Welcome to the 2022 Stampin Friends Blog Hop! We have a fun theme planned by starting off the year celebrating all Life's Occasions. I chose Birthdays to focus on for my projects. I like starting the year by getting ready for all the upcoming birthdays.
Before we get started, you can find a list of our blog hop participants below. Be sure to continue on to Jean Beaulieu's blog to see her awesome projects! Leave a comment, I'd love to hear what you think!!!
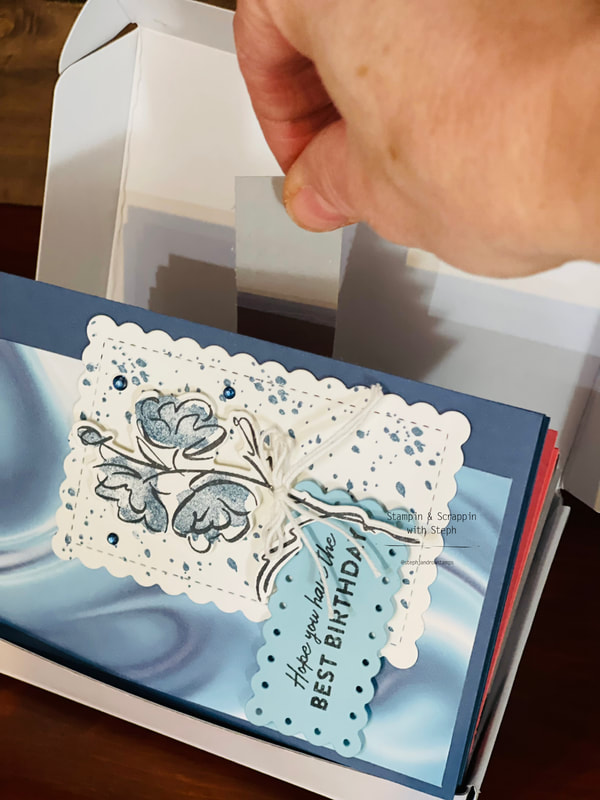
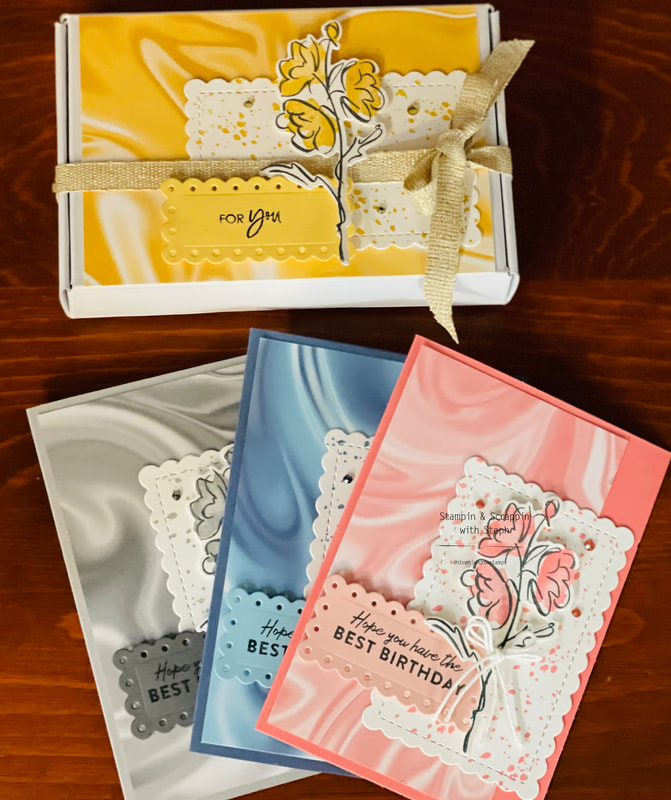
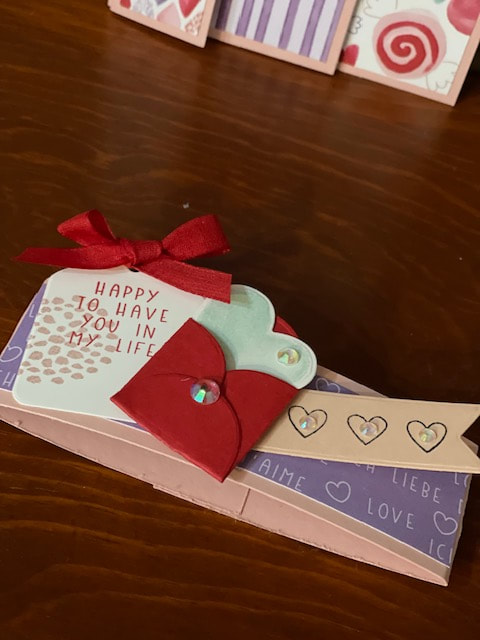
For my cards, I chose a monochromatic look. I made 6 cards, 2 in each color & design.
I used the new Stampin Up Sale-a-Bration DSP called Simply Marbelous. The colors are Misty Moonlight & Balmy Blue, Flirty Flamingo & Blush Bride and Smoky Slate & Gray Granite. The stamps and dies are from the Color & Contour Bundle. Each card measures 3 3/4x5 1/2 over all. Directions: Cardstock 7 1/2x5 1/2 score on the 7 1/2 side at 3 3/4 DSP Layer 3x5 1/4 Basic White Die Cut - I used the middle size die in the Scalloped Contour Dies. Basic White for flowers - Stamp in black and add layer in the matchin ink color cut out with the coordinating die Cardstock diecut - I used the smallest size die in the Scalloped Contour Dies. 
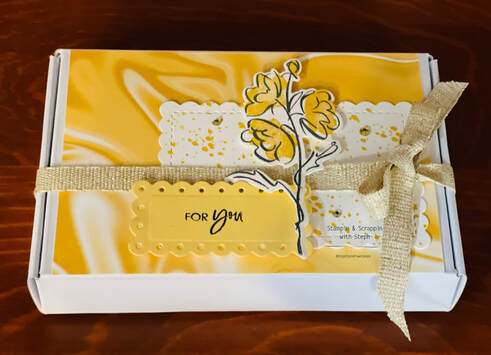
took the Mini Paper Pumpkin boxes and decorated it to match the cards. For the box I used the colors Bumblebee and So Safron. I made the horizontal to fit the lid of the box.
DSP 3 3/4x5 1/2 Basic White Die Cut - I used the middle size die in the Scalloped Contour Dies. Basic White for flowers - Stamp in black and add layer in the Bumblee ink and cut out with the coordinating die Cardstock diecut - I used the smallest size die and So Saffron in the Scalloped Contour Dies. For the greeting, I only colored the For You in black in before stampin. The cards will fit snug in the box, so to make it easier to take them out, I added a little tab. I had a strip of cardtock left over from the cards 1x11 I folded about an inch and glue it down to the inside of the box, added the cards and then folded the strip over a bit, and trimmed it down.
8 Comments
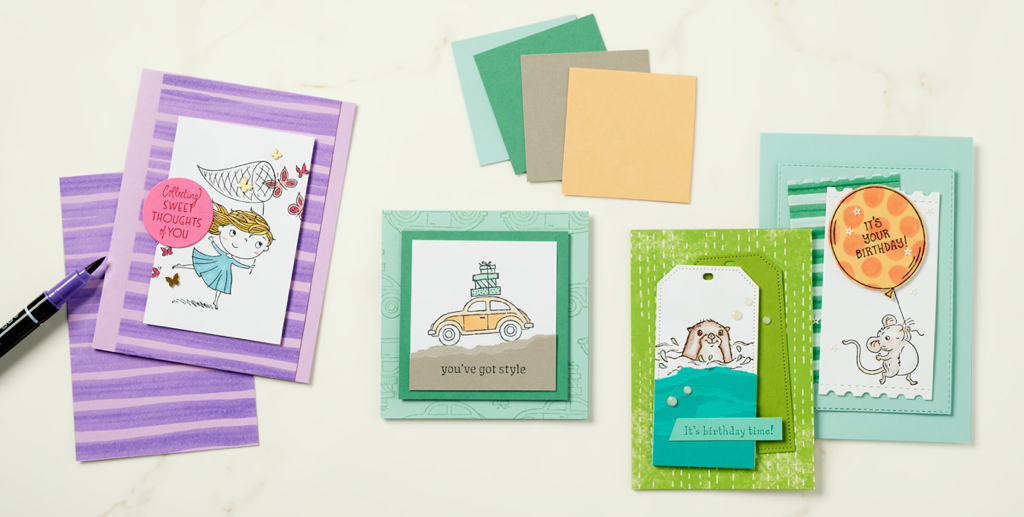 Admire a fellow stamper’s work? Show how much you love it by CASEing it! Whether you’re a seasoned stamper or just starting out, get creative by copying and sharing everything! Our concept artist did just that by CASEing the It’s Your Birthday card three different ways. She created the Catching Butterflies card by using the Highland Heather Stampin’ Write Marker to make a stripped background. Pro Tip: try making your lines thicker or thinner by doing more or fewer marker strokes. Just CASE the color scheme from the It’s Your Birthday card to create our Driving By card (Gray Granite, Just Jade, Pale Papaya, and Pool Party—it’s a great color combination for any occasion)! This card is a great reminder that you don’t have to copy every detail exactly to make a great card. Need help with the layout of your next card? Look no further than the Awesome Otters card. Our concept artist CASEd the layout from the It’s Your Birthday card by die cutting a few Tailor Made Tags and stacking them on one another. So cool! Happy Stampin
Steph
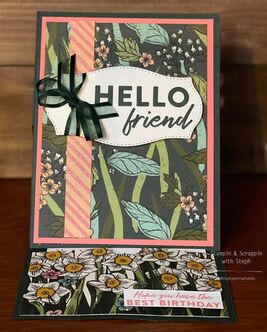
This video shows the cards from the Mini Catalog Swap and the Sweet Talk Accordion Card I made. To make the easel card you will need 2 pieces of Evening Evergreen cut to 4 1/4x11 score on 11” side at 5 ½ and 2 ¾ and Evening Evergreen 4 ¼ x 5 ½ attach to top section of this piece to the 2 ¾ section of the 5 1/2x1 piece make sure to lay flat Flirty Flamingo 4x5 ¼ for the layer and then a few pieces of DSP 3 3/4x5, ½ x5 and 2 ½ x 4 1/8 Layer the 3 3/4x5 piece of DSP onto the flirty flamingo ad the 1/2 inch strip ontop and then layer onto the Evening Evergreen. Cut a half circle out of the 2 1/2x4 1/8 piece of DSP. Adhere 3 sides down-and keep the adhesive close to the edges, to the bottom portion of the card. I cut the label out from the Tasteful Labels dies and stamped the Hello Friend in Evening Evergreen, I wrapped the ribbon around and tied it in a bow. I created a YouTube Video below to show how to assemble the card. This video shows the cards from the Mini Catalog Swap and the Sweet Talk Accordion Card I made. Happy Stampin
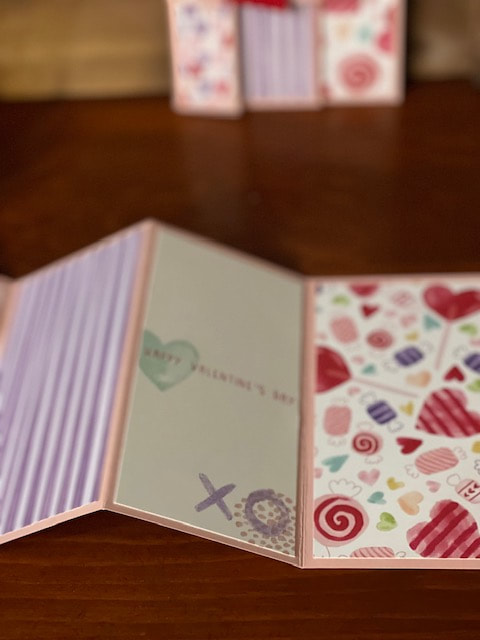
Steph 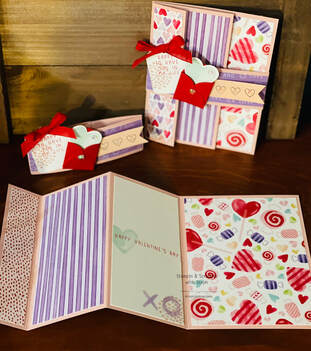 I am sharing with you my fun fold Accordion card. I made this card for a recent card swap I participated in from Tami White. I used the new Sweet Talk Suite from the Mini Catalog. It's /super easy to make and really is a great card to showcase any DSP. You will need a piece of Blushing Bride cardstock 11’x5 ½’ score on 11’ side 4 ¼, 7 & 9 ¾ Fold in a zig-zag For the bellyband a piece of Blushing Bride 9 ½ x1 ½ use the left over piece DSP: 4x5 ¼, 2 ½ x5 1/4 , 2 @1x5 ¼ and 4 ¼ x 1 ¼ Basic White 2 ½ x 5 ¼ and pieces for stamping/die cuts Real Red for die cuts Stamp the greetings and other images on the Basic White - I used Pool Party, Real Red, Highland Heather and Blushing Bride ink colors. Add the DSP to each section. Take the 9 1/2 strip and wrap it around the card loosely so it can slide on and off easily. I created a YouTube video to show how to assemble the card and to show the cards I received from the swap.
Happy Stampin '
Steph 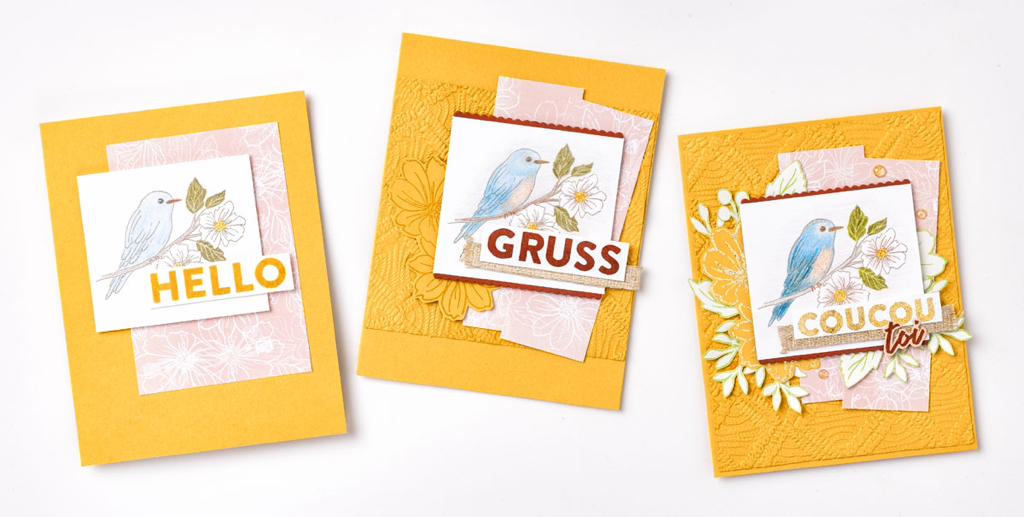 This month’s step-by-step cards feature products from our fabulous Sale-A-Bration offering that you and your customers won’t want to miss: the Friendly Hello Stamp Set plus our Friendly Hello 12" x 12" (30.5 cm x 30.5 cm) Designer Series Paper—FREE with a qualifying purchase. Available until 28 February 2022, these products are the perfect focus for a ring-in-the New-Year card-making.
CASUAL The Hello card is simple and fast. Start by stamping the charming little bird image in Gray Granite ink, then add subtle color using Watercolor Pencils. Brush over the image with a Water Painter to create a light wash. Layer Friendly Hello Designer Series Paper under this focal image for extra prettiness. Tip: To just stamp the “Hello” sentiment, cover the word below it with a sticky note. AVID Step up the color on the Gruss card using both watercolor pencil assortments for richness and depth. We also adhered a Cajun Craze Cardstock frame on two edges and backed the sentiment with a little frayed Gold 3/8" (1 cm) Fine Art Ribbon.To add a tactile layer, we ran a piece of Bumblebee Cardstock through the Stampin’ Cut & Emboss Machine using the Macrame 3D Embossing Folder. The fussy-cut cosmos flowers popped up with Stampin’ Dimensionals are a great finishing touch. ARTFULLY AVID For our Coucou card, we stamped the sentiment in VersaMark ink, then applied Heat and Stick Powder and Gilded Leafing. We also added a few more fussy-cut layers and a sprinkling of Genial Gems to finish. Whatever level your at we have the perfect products for you!! Happy Stampin Steph  Did you see that? It’s a mischievous monkey swinging from tree to tree! What about that elephant marching through the mud? Can you catch an antelope galloping in the grass? Grab your binoculars, buckle up, and hop into our off-road truck—there’s so much to see on this safari! Answer the call of the wild—and your creativity—with the Safari Celebration Paper Pumpkin Kit. This playful, party-themed kit includes all the goodies and gear you need to create nine cards and coordinating envelopes in safari-inspired shapes and patterns you’ll go wild for! Make every occasion a celebration with this month’s amusing animals, beautiful botanicals, and celebratory sentiments. Don’t monkey around and miss this amazing adventure! Unleash your creativity with February’s wildly fun kit. To explore what’s inside, keep reading! 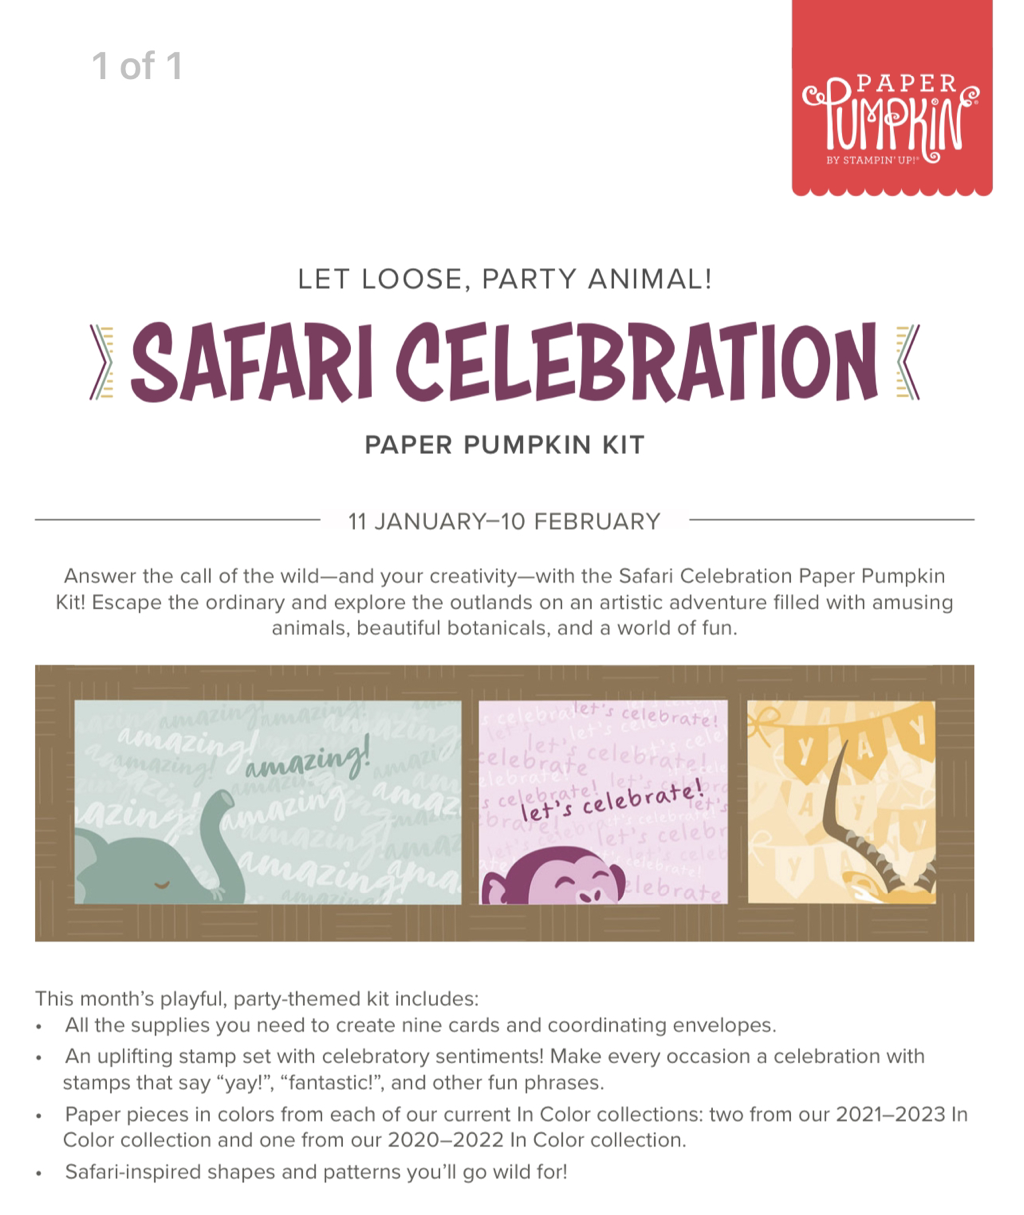 Details:
Be sure to subscribe by February 10 to receive this fun Paper Pumpkin! Click here for PaperPumpkin site!
Happy Stampin Steph  Kits Collection by Stampin’ Up! is the perfect program for new customers and beginner crafters with its variety and all-inclusive projects. We will continue to strengthen that variety by regularly adding new kits to the offering. With that, we are excited to announce the latest Kits Collection addition. 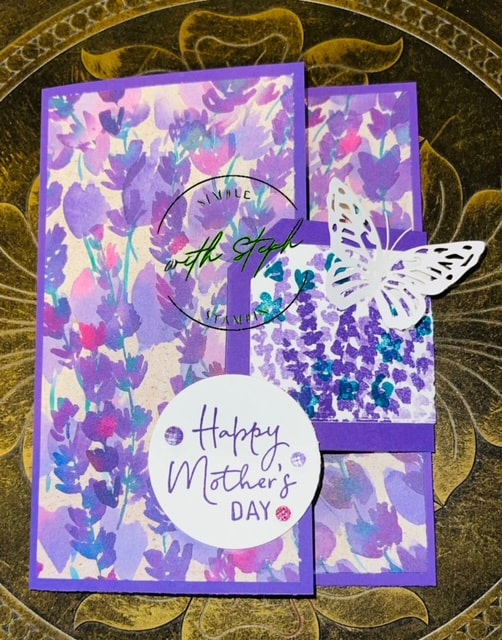 Keep It Simple
A quick Google search will yield hundreds of thousands of results on how to make adorable Christmas, birthday, or greeting cards. With all this information, it’s easy to get overwhelmed. But there’s no need to be stressed—sometimes simple is best! Our Best Day Ever card is simple but sweet. We used Basic White and Costal Cabana cardstock for the base, then stamped with the In Symmetry Stamp Set to create a mirrored effect with Flirty Flamingo and Pear Pizzazz ink. We finished off this lovely card with a simple sentiment in Coastal Cabana ink. Our Merci mille fois card took no time at all but still left a great impression. We used Basic White and Fresh Freesia cardstock for the base and stamped out some multi-level flowers with Daffodil Delight, Highland Heather, and Pear Pizzazz ink. For our Du bist alles, außer gewöhnlich card, we used Subtles cardstock, cutting out 1-1/4" x 3-1/2" (3.2 x 8.9 cm) in Petal Pink and So Saffron and 2-1/4" x 3-1/2" (5.7 x 8.9 cm) in Calypso Coral. We adhered the strips to a 3-1/2" x 4-3/4" (8.9 x 12.1 cm) piece of Basic White cardstock with Stampin’ SEAL, then stamped out some cute images using VersaMark ink. We finished the card with an adorable sentiment stamped in Memento ink. Happy Stampin Steph 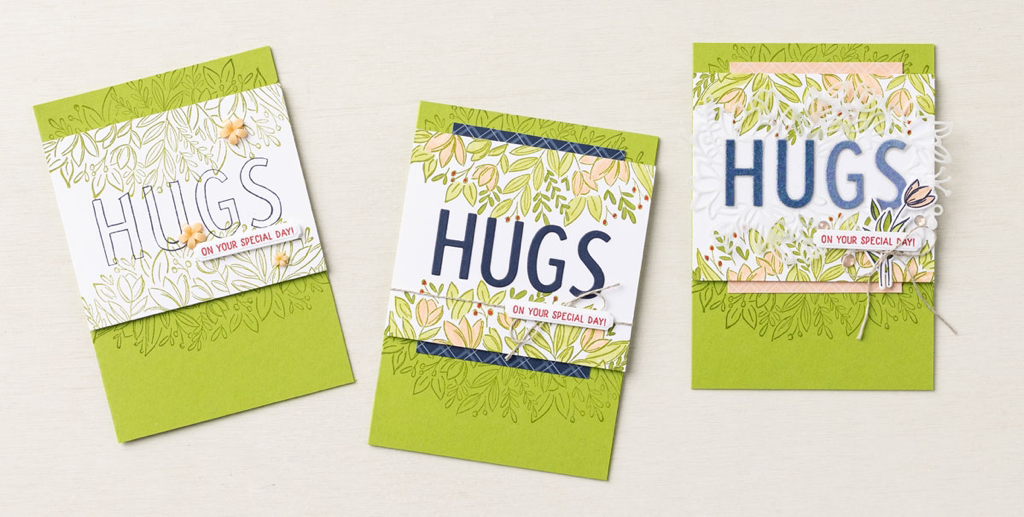 Small Cards, Big Hugs
Sometimes it might be difficult to give your loved ones a big hug—maybe they’re too far away or maybe an illness is keeping you apart. Whatever the reason, if you can’t see your friends or family in person, sending them a handmade card in the mail is the next best thing! CASUAL For our casual Hugs card, we used the Night of Navy Stampin’ Write Marker to ink the word “Hugs” on the Sending Hugs stamp. We stamped the base of the card and the top and bottom of the cardstock with Granny Apple Green ink. The card was finished off with another small sentiment in Poppy Parade ink and some Loose Flower Flourishes. AVID To make the Avid card, we used Granny Apple Green, Petal Pink, and Poppy Parade Stampin’ Write Markerss to color in the flowers, berries, and leaves. We also added some more color to the card with Neutrals 6" x 6" (15.2 x 15.2 cm) Designer Series Paper and some Linen Thread. ARTFULLY AVID Making our Artfully Avid card was so much fun, especially when we used the Layering Hugs Dies. First, we die cut our main image using vellum, then we cut out the individual letters with Night of Navy Ombre Specialty Paper. Then we added some Subtles 6" x 6" (15.2 x 15.2 cm) Designer Series Paper, a few die cut and colored flowers, and some Elegant Faceted Gems to make it pop. How do you step up your cards? Show me on social media! Use #stampinup2022steppedup Happy Stampin Steph  Sale-A-Bration is one of our biggest promotions of the year. And now it is offered twice a year! How exciting!
It’s jammed with free goodies for demonstrators, filled with opportunities for customers, and packed with fun products and ideas for everyone! During the Sale-A-Bration pre-earn period, you can earn free, exclusive products. |

New 2023-2024 Stampin Up Annual Catalog


Kits Collection


Join today

Categories
All
Archives
January 2024
|

 RSS Feed