Stampin & Scrappin with Steph
  • Home
  • About Me
  • Contact Me
  • Products
  • Paper Pumpkin
  • Catalogs
  • Join the Fun
  • Paper Crafting
    • Card Ideas
    • Calendar Projects
    • Paper Projects
    • Scrapbook Layouts
  • Retired Products for Sale

STAMPIN FRIENDS FEBRUARY 2023 fancy folds blog hop

2/24/2023

2 Comments

 
Picture
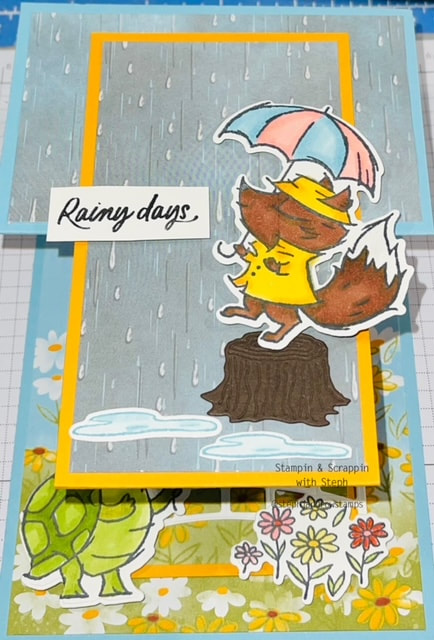
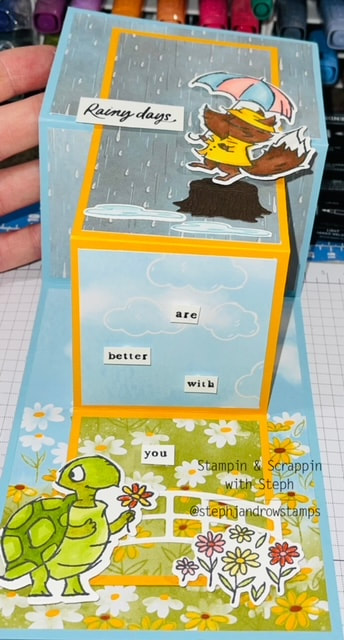
Welcome to our Stampin Friends February blog hop. Today we are sharing fancy fold cards! A fancy fold doesn't have to be difficult or intimidating. Simply scoring and folding different, can have a fancy and fun affect!!! SO if you have seen all those fancy folds and thought, that seems too hard, give one of ours a try and you will see how easy they can really be.  And there's more, we have included a bonus 3-d project!!!
I hope you are joining me from Maureen Rauchfuss blog. Her projects were amazing!!!!! Take a look at what I've made, leave a comment and hop on over to Tiziana Milano's! A full list of blogs is located at the end of this post.
Picture
How cute is the Stampin Up Suite, Rain or Shine?? Adorable!!!! I had to use it for my projects.  I've made z-fold cards before as a horizontal layout, so I decided to make it vertical. Same concept. I liked when I finished the card and put it all together, because it is vertical, it kind of pops up. 
For the card and box I used Balmy Blue and Mango Melody cardstock and layered the Rain or Shine Specialty Designer Series Paper.
​From the Playing in the Rain stamps and dies, I stamped the Fox, Turtle, Flowers and Puddles. Then I colored them using Stampin Blends in Mango Melody, Granny Apple Green, Flirty Flamingo, Balmy Blue and the Medium and Dark Tone.  I used the dies to cut them all out and I also cut out the fence in Basic White. I used my Basic Black Stampin Write Marker and just colored over the words Rainy Day and stamped down. I fussy cut around the words. 
DO the same with the other half of the words "are better with you" I trimmed them smaller and then cut each word out separately.
So for the cardbase, start with the Balmy Blue  4 1/2x11 score on the 11 side at 2 3/4 and 5 1/2
For the z-fold layer in Mango Melody 2 3/4x10 score on the 10 side at 4 3/4 and 7 1/2
Fold both in half and then fold opposite on the smaller score line. Before attaching to each other, we are going to add the layers. On the cardbase, you need 2 pieces of DSP both cut at 2 1/2x4 and 1 at 5 1/4x 4.  For the z-fold layers, you need 1 of each 4 1/2x 2 1/2 and  2 12x2 1/2 and 2 1/2x 2 1/4  
Picture
Picture
Now it's time to assemble. As you can see, I chose DSP with the rain and blue skies and flowers. I made the top be the rainy part and the bottom be the sunny part. Start with the base and add the DSP, the your will need to fold the z-fold layer and adhere ontop, making sure when the card is closed, nothing over hangs. You can see in the picture to the left how, it sits about 1/4-1/2 from the top and around an inch from the bottom.  
Add the DSP and all the images we colored and diecutted out
How stinkin' cut!!! I am so happy with how this card came out! It was so fun designing as I went along!

Now for the box, I love simple boxes that can be adapted for so many different uses and designs. You can make and decorate several and fold-it flat until you are ready to fill! Or just make a bunch in different colors and then decorate to match a theme when you need a box.  For today's I kept the colors the same! I chose the 3rd animal, the bunny. 
The overall size of the box is 3 3/4 lx 2 3/4 w x 1 1/4 d
You will need cardstock that measures.8 1/2 x7 
On the 8 1/2 side score at 1 1/4, 4, 5 1/4, and 7
On the 7 side score at 1 1/4, 5  and 6 1/4
Fold on the scores and burnish with a bone folder to have a nice crisp fold. 
You will need to trim a little bit off. The top of the box is the section on the  8 1/2 side that has the 2 score sections. Refer to the pictures below. Cut up on the score lines to second line. Now, notch the first section (just trim a little angle on each side of the tab this will let the box close easy. Then moving to the right, cut out that whole section, notch out the next and leave the whole section together, and just round the top corners. The get rid of the skinny little section, an add a little angle.
Picture
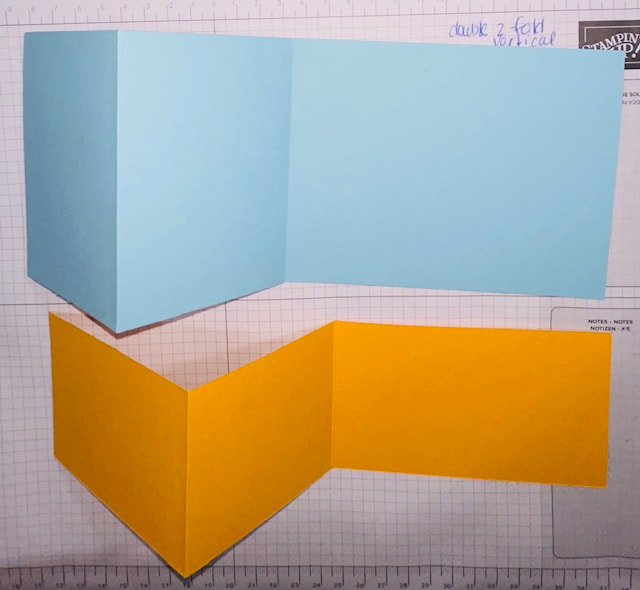
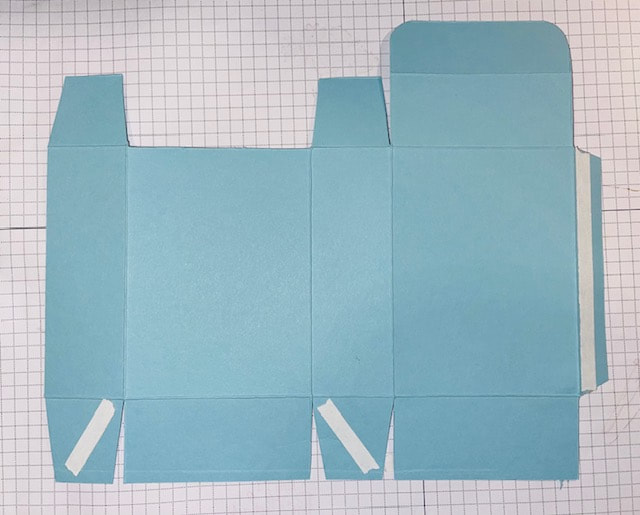
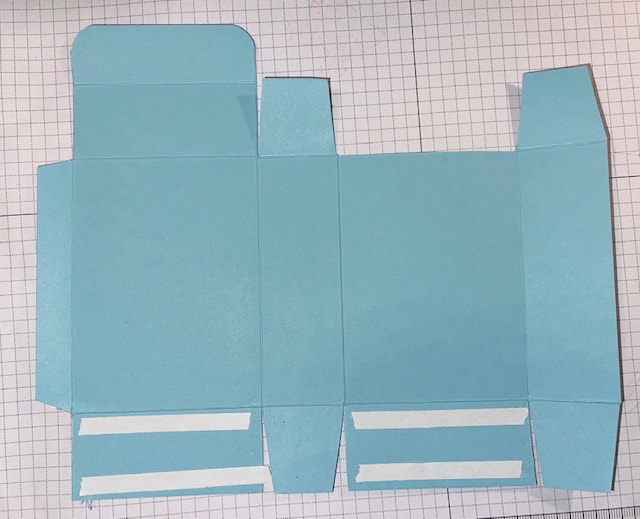
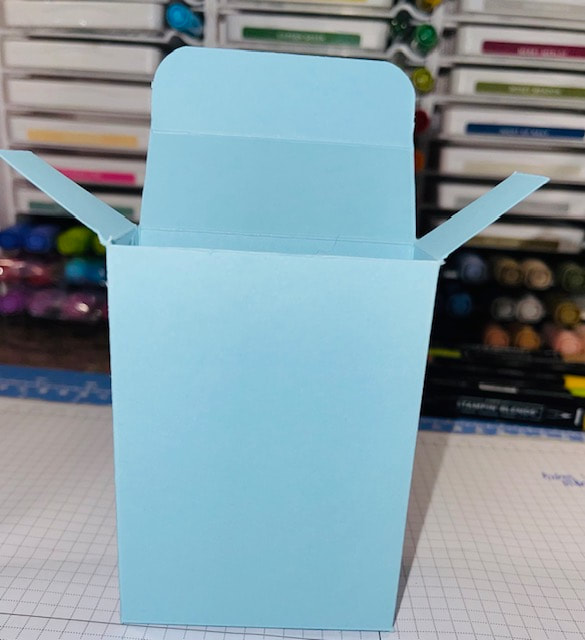
On the bottom, you need to cut up to the score line, and notch out the 2 smaller tabs. And remove the skinny section and add and angle. I added sticky strip to all the sections that will need adhesive to assemble. The front of the box is the large section that has the section on the top with the rounded corners, so you could decorate the side before you assemble. But if you prefer, it's just as eas​y to decorate when it's made.
Picture
Picture
Picture
The DSP image I chose, had the animals holding umbrellas. I like the design, but did not really need the animal that was visible, so I cut a piece of Mango Melody about 1 1/4 x 2 1/4 and covered the section.  I stamped the bunny and colored him in with the Stampin Blends in Mango Melody, the water in Night of Navy and Balmy Blue. and the clouds and diecutted them out. Next I colored the word Rainy and stamped into the cloud, I will admit this took a couple of tries for it to be in the right position. The I repeated with the word Day. I didn't realize when the bunny is diecutting, the puddle is cut off, so I fussy cut the puddle out and lined it up to the foot.
I added the bunny and clouds to the box using dimesionals.  This box can be filled with travel tissues, hand sanitizer, mini lotions and lip balms, jewelry or candy or anything else you can think of!!!!!

I hope you enjoyed the projects that I have shared with you today! Be sure to leave me a comment! 
And hop on over to Tiziana Milano's hop and check out her Fancy Fold card and project!!!!

Thank you for hoppin along today!!!
Happy Stampin
​Steph
Picture
2 Comments
    Picture
    Watch me on YouTube
    Picture
    New 2022-2023 Stampin Up Annual Catalog
    Picture
    Picture
    Kits Collection
    Picture
    Exploring In Colors by Paper Pumpkin
    Picture
    Join today
    Picture
    Retired Products for Sale

    Categories

    All
    3 D Projects
    Become A Demonstrator
    Berry Basket
    Birthdays
    Blog
    Boxes
    Calendar
    Candle Holder
    Card Club
    Challenge
    Christmas Cards
    Fall
    Gift Bags
    Gift Sets
    Gift Tags
    Halloween
    Holiday
    Homemade
    #imbringingbirthdaysback
    Kits
    Love
    Mini Treat Bag
    New
    Occasions
    Paper Pumpkin
    Punches
    Sale
    Samplers
    Stamp A Stack
    Stamp Of The Month
    Summer
    Thanksgiving
    Thank You
    Valentine
    Workshop

    Archives

    April 2023
    March 2023
    February 2023
    January 2023
    November 2022
    October 2022
    September 2022
    August 2022
    July 2022
    June 2022
    May 2022
    April 2022
    March 2022
    February 2022
    January 2022
    December 2021
    November 2021
    October 2021
    September 2021
    August 2021
    July 2021
    June 2021
    May 2021
    April 2021
    March 2021
    February 2021
    January 2021
    December 2020
    November 2020
    October 2020
    September 2020
    August 2020
    July 2020
    June 2020
    May 2020
    April 2020
    March 2020
    February 2020
    January 2020
    November 2019
    October 2019
    September 2019
    July 2019
    June 2019
    May 2019
    April 2019
    March 2019
    January 2019
    November 2018
    October 2018
    September 2018
    August 2018
    June 2018
    May 2018
    April 2018
    March 2018
    February 2018
    January 2018
    December 2017
    November 2017
    October 2017
    September 2017
    August 2017
    July 2017
    June 2017
    May 2017
    April 2017
    March 2017
    February 2017
    January 2017
    December 2016
    November 2016
    October 2016
    September 2016
    August 2016
    July 2016
    June 2016
    May 2016
    April 2016
    March 2016
    February 2016
    January 2016
    December 2015
    November 2015
    October 2015
    September 2015
    August 2015
    July 2015
    June 2015
    May 2015
    April 2015
    March 2015
    February 2015
    January 2015

    RSS Feed

    Enter your email address:

    Delivered by FeedBurner


    Question? Contact Me

Submit
  • Home
  • About Me
  • Contact Me
  • Products
  • Paper Pumpkin
  • Catalogs
  • Join the Fun
  • Paper Crafting
    • Card Ideas
    • Calendar Projects
    • Paper Projects
    • Scrapbook Layouts
  • Retired Products for Sale