How crazy that it is June already! I feel like this month has just flown by!!! I guess that can just mean it is time or our monthly bl og hop sooner than later! Right?
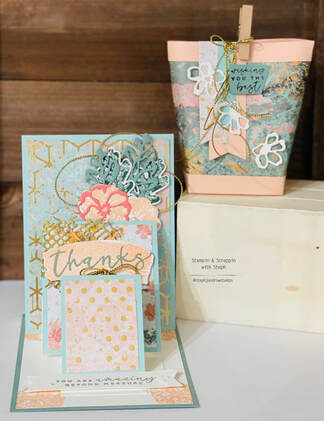
Our theme this month is Lots of Layers. Who doesn't love cards with alot of layers and embellishments? I know I do! But in the craziness of life, I tend to make more simple cards, with a few layers and embellishments! I need to get them done!!! I enjoy this theme, because I get to pause and think about designing a card much different than I would. I don't want a card that will be over the top and too difficult to mail. And, a card like this would not be just for anyone, so I will definitely think about who I'd love to give a stepped up layered card to! To make my projecys today I choice to use the new Stamin Up Suite called Texture Chic. Its a beautiful set with color combo of Petal Pink, Mango Melody, Pool Party, Evening Evergreen, Soft Succulent and Gold accents in the DSP . The stamp set has stunning images of different seasons and coordinates with a 19 piece die set. Alright before we dive into the projects, I hope you visited from Barb Pfeffer's blog and saw her amazing projects. Make sure to visit all participants blogs and if your not sure whose blog you have been too, you can view a list at the end! Be sure to leave a comment! I love hearing what you think! 
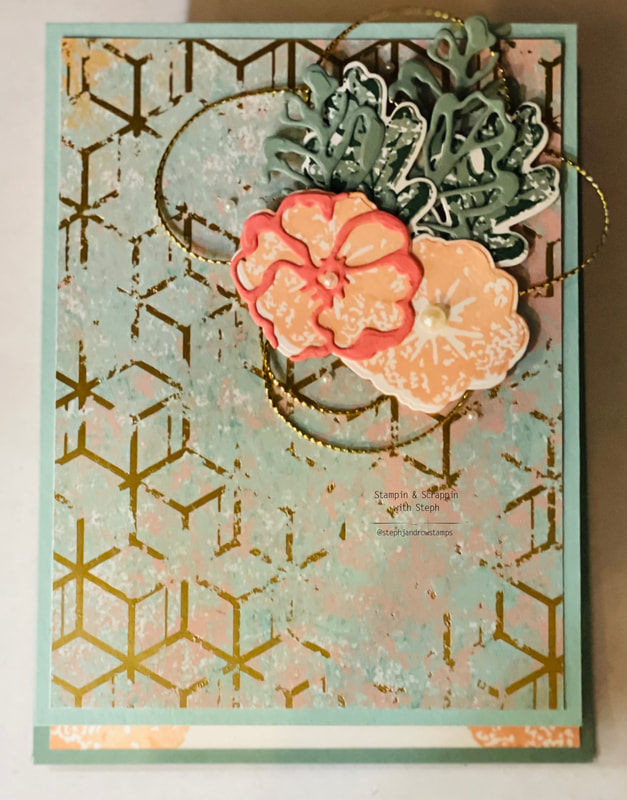
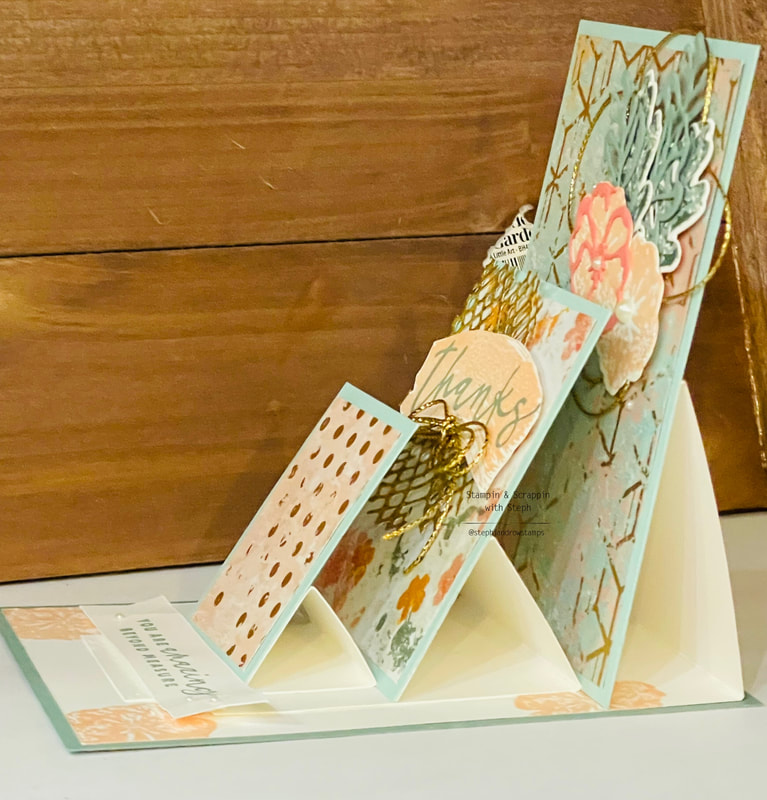
The card I chose was a Triple Easel card! I just love easel cards, I have never made a double easel card, let alone a triple! So, I gave it a go!!! I thought this type of fun card would definitely showcase layers, the beautiful DSP, Stamp set and dies.
The card came together easier than I thought. Your basically making 3 separate easels and then putting them all together! Measurements: Cardbase
Adhere the DSP to the Pool Party layer. Stamp, diecut and embellish your card front!! Do the same to create the other easel frames lay each easel folding in half. Add adhesive only to the bottom half (section without the fold) and lay the cardstock on top. make sure to lay the card stock flat ontop (it should cover the all the basic white) but only the bottom half will be adhered. Adhere each easel ontop of one another like in the picture. Stand each easel up in the angle you prefer then adhere the next one down. To see how this card comes together, I made a video showing how to assemble from start to finish.
Full disclosure, it's been a while since I recorded, so I'm a little off my game. Its a bit longer than i wanted due to a few interruptions along the way!
I hope you enjoy the projects I shared with you today.
Happy Stampin Steph
7 Comments
 Looking for a fun seasonal set with sentiments versatile enough to be used all year long? Your search is over—take a look at the Paradise Palms Bundle. It features detailed palm trees and other beachside images that can be used to create a complete scene!
Happy Stampin Steph  Memories & More
This week we did some traditional scrapbooking with the Today is the Day Memories & More Card Pack, and we loved the way it turned out! We used two sheets of Mint Macaron Cardstock as our base, then we cut one of the 4" x 6" (10.2 x 15.2 cm) Memories & More cards into four 1" x 6" (2.5 x 15.2 cm) pieces for the strip that runs along the bottom of the pages. Next, we broke out some stamps and ink pads, and used the Flowers of Friendship Stamp Set to stamp out some flowers in Mint Macaron ink and the Alphabest Stamp Set to stamp out “Friends” in Calypso Coral. We adhered a few photos to Basic White Cardstock using Multipurpose Liquid Glue and added them to the pages. Then we trimmed down one of the 3" x 4" (7.6 x 10.2 cm) cards for journaling and adhered it to Pale Papaya Cardstock. To finish our lovely scrapbook pages, we clustered some of the stickers from the card pack along with die cuts from the Layering Hollyhock Dies to create a focal point. Lastly, we used the Garden Green Stampin’ Write Marker to color our white Baker’s Twine. We want to see how you preserve your memories. Take some time to craft this week and show us what you come up with! Happy Stampin Steph  Need a creative break? Sometimes a simple stamping session is just what you need to recharge and refresh!
One of our favorite crafting experiences involves stamping our own Designer Series Paper—just as our concept artist did here. Do you love how the Parakeet Party lime images pop on Basic White Cardstock? To add interest to the hand-stamped layer, she cut a banner shape at the end. So cute! To create a sweet, bubbly look for our Veel sterkte card, we sprinkled on a few Tahitian Tide and Starry Sky 2022–2024 In Color Matte Decorative Dots. Our artist also die-cut paper hearts and flipped a few of them to show off the opposite side of the In Color 6" x 6" (15.2 x 15.2 cm) Designer Series Paper Assortment. Add a contrasting Baker’s Twine bow to finish the card. For the Ruhe bewahren und Tee trinken card, we used Parakeet Party Matte Decorative Dots to mimic the look of adorable flower buds. Tip: Cut the edge off the Stampin’ Dimensional sheet to adhere behind the sentiment. Have fun simple stamping! And don’t forget to share your work on social media using the hashtag #SimpleStamping. We love to see your work! Happy Stampin Steph 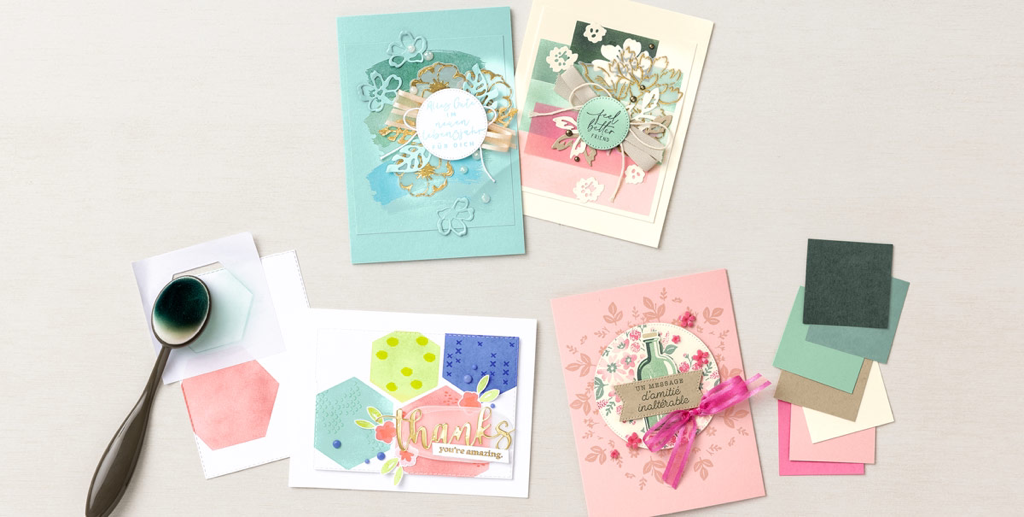 CASE—Copy And Share Everything!
Let’s get crafty! Take some time this week to CASE—Copy And Share Everything. Not sure how? We can show you! For our Alles Gute im neuen Lebensjahr für dich card we CASEd the layout by stamping out a multicolored card base. We then used Gold Stampin’ Emboss Powder to heat emboss the flower image on Vellum and die cut those flowers. Using Pool Party Cardstock and Distressed Gold Specialty Paper, we die cut more flowers and leaves to add some pop. After adding some twine and ribbon, and we finished it off with a sentiment and some Opal Rounds. We loved the color combination for our Feel Better card so much that we decided to copy it in our Un message d’amitié inalterable card. First, we inked the flower image in Blushing Bride, and used a sponge dauber to add Polished Pink directly to the stamp. Next, we stamped out the flower centers and some leaves in Soft Succulent. We used Mint Macaron to stamp out the solid bottle image and Evening Evergreen to stamp out the shadow image. We added one more dash of color using Crumb Cake Cardstock for the sentiment. For our Thanks card we CASEd the technique by using Masking Paper to color different shapes on the card background. We did this by die cutting different sizes of hexagons from Masking Paper. Starting with the largest hexagon, we placed the die-cut Masking Paper on the Basic White Cardstock, then applied ink with a Blending Brush. We repeated this with the other sizes of hexagons. Happy Stampin Steph 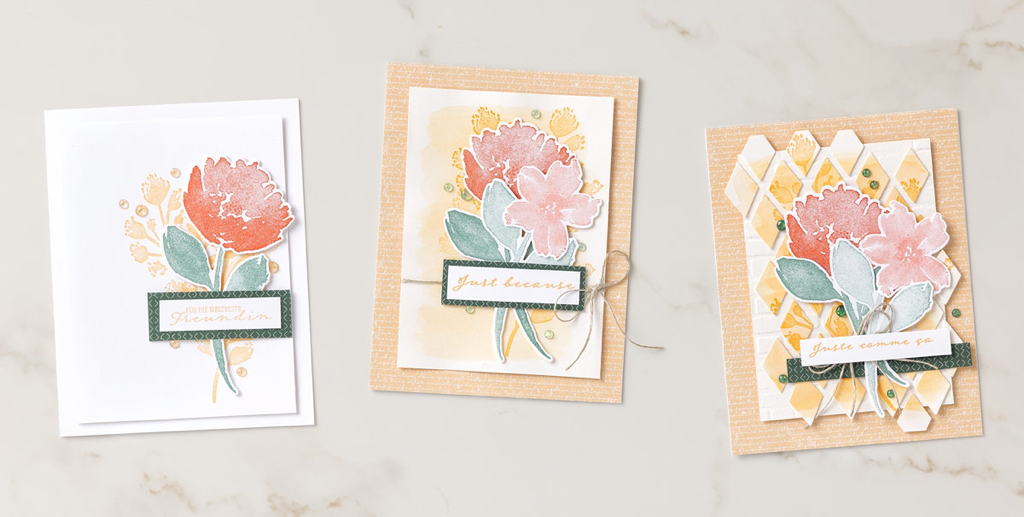 Just Because Card (4-1/4" x 5") (10.8 x 12.7 cm)
Celebrating friendship with a handmade card has never been easier than with the True Beauty Bundle to inspire you. Lovely sentiments like “You are a true friend” and “Here for you always,” plus gorgeous floral images straight out of an English country garden, will have you crafting for hours—perhaps with a cup of tea. CASUAL To create the casual version of our Just Because card, start by folding Basic White Cardstock in half; stamp the floral image in Pale Papaya ink on another layer of Basic White Cardstock, then adhere it to the card front. Add die-cut flowers and a sentiment, plus a few In Color Opal Rounds to finish off this simply stunning card. AVID Step up our second card by creating a wash background using Shimmery White Cardstock, Pale Papaya ink, and Water Painters. Let the background dry before stamping the beautiful floral image. ARTFULLY AVID Our most detailed card features the stamped wash background die cut using the lattice shape from the Organic Beauty Dies. Instead of the lattice, however, we used the die’s negative pieces to create this unique background with fancy diamond shapes. We also used a layer of Basic White Cardstock embossed using the Brick & Mortar 3D Embossing Folder for extra dimension. Happy Stampin Steph  I wanted to take a moment to do a Thank You shout out! Let me explain why! The past few years has been a crazy one. I am sure many of you can relate. Even without the pandemic, I am pretty confident I'd be feeling this way at one point or another. Life has gotten pretty busy. I have been a stay-at-home mom since my oldest was born 18 years ago. And over the last few years I slowly got back into working. Whether through volunteering, substituting or part-time. I took my time. Ove the last year I began working full-time and my schedule was pretty much days nights and weekends. I liked my job. At first it wasn't so bad, but as soon as things began to resume. I found balancing my home life to be very difficult. Lots of things had to wait for a day off or free time. Crafting had to take a serious backseat!!! But you hung on!
With all that said, I want to thank you! Thank you for visiting my blog or other social media outlets. Thank you for messaging me product questions or ideas. Thank you for reaching out to me to purchase pre-made cards. Thank you for shopping my retired stamps. AND Thank you for your orders!!!! I cannot say Thank You enough! More than ever your support means the world to me! As I look forward to the rest of 2022, I know it's going to be busy. But a few weeks ago, I made a career change that should be a great fit for my busy home life. And I am hoping that I can have a good balance once again! I look forward to getting back into my craft room and creating for you again. I miss it!!! So send me your ideas, products or techniques you'd like me to use or demonstrate! Thank you again!!!! Happy stampin Steph |

New 2023-2024 Stampin Up Annual Catalog


Kits Collection


Join today

Categories
All
Archives
January 2024
|
 RSS Feed