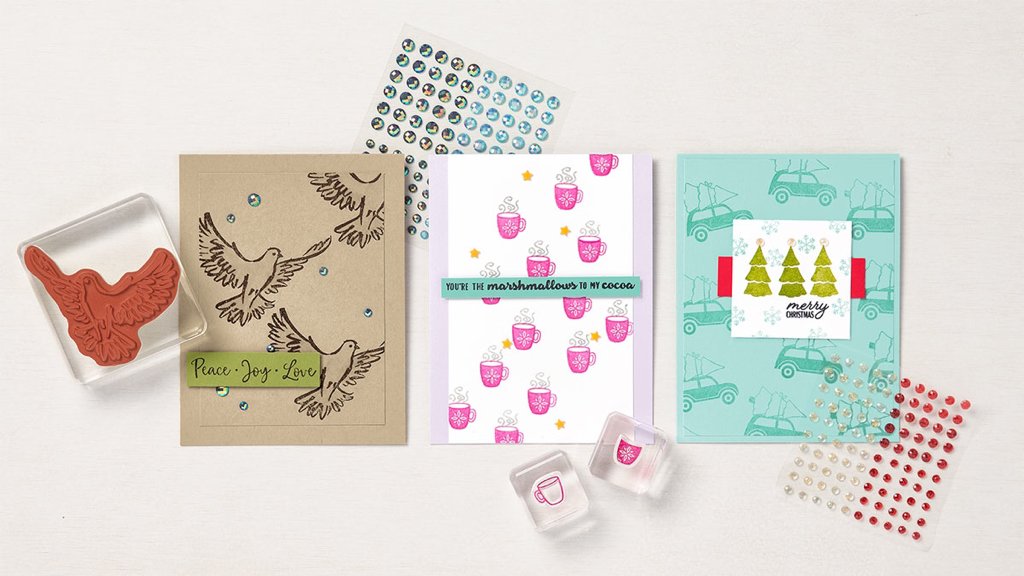
 Wishing you had lots of cards on hand for every occasion, but not sure where to start? Designing clean, simple projects is the quickest way to reach your goal.If you want an even faster method for getting the job done—one that doesn’t involve coming up with your own card design—simply use one of the samples you see here as a basic template, substituting stamps, ink, and paper to suit your taste. When you follow the overall layout of the card, including image and sentiment placement, half of the work is done for you. At the end of your stamping session, you’ll have a stack of ready-to-send cards—finished in no time at all.Easy techniques you can duplicate from our samples include, filling in the stamped images with Wink of Stella, creating fun backgrounds by stamping multiple images on a layer, and tone-on-tone stamping. To illustrate this final technique, we stamped the car image in Pool Party ink on Pool Party Cardstock to create a subtle background. (Tip: On the top layer, stamp the center tree first for even spacing.)Whatever you do to create your simple cards, have a great time! And invite a friend over to stamp with you. The more stampers, the more fun! Happy Stampin
Steph
0 Comments
 FUN WITH PARTS & PIECES
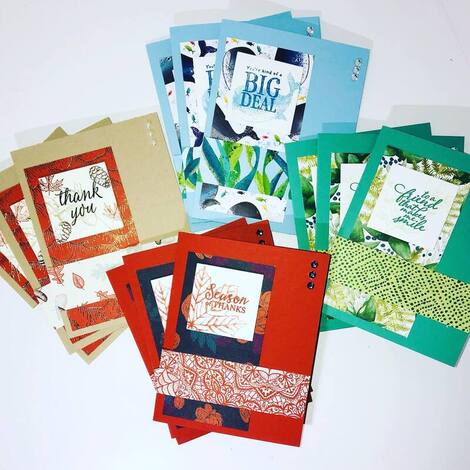
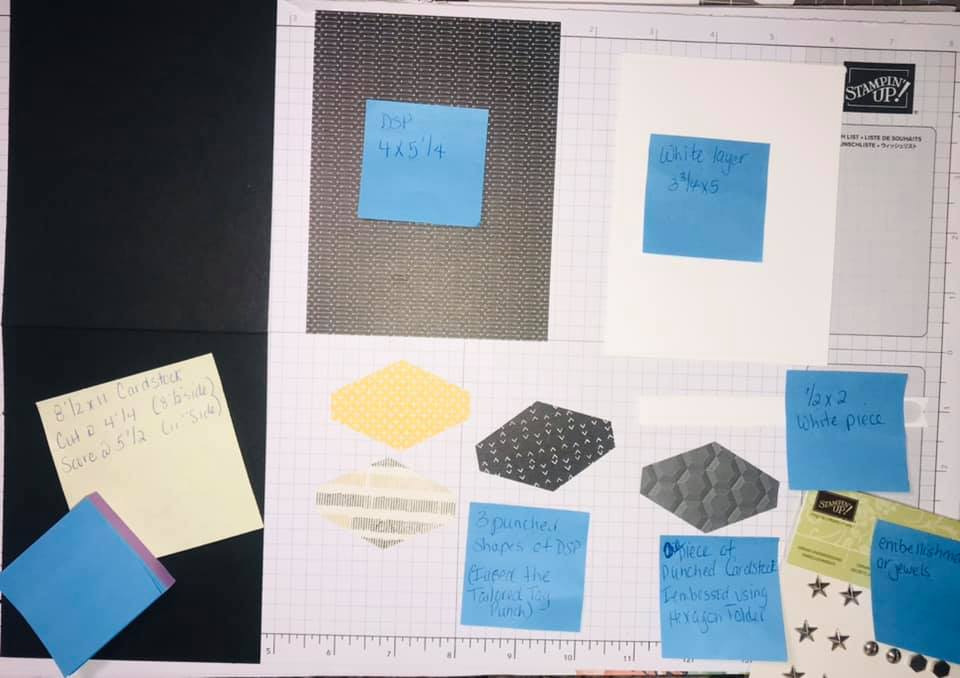
Challenge: Make three lovely cards using the following supplies, but give them each a unique look. A Crushed Curry card base A 3-3/4" x 5" (9.5 x 12.7 cm) piece of white cardstock A 4" x 3/4" (10.2 x 1.9 cm) piece of Cajun Craze Cardstock A 5-1/2" x 2" (14 x 5.1 cm) piece of Plaid Tidings Designer Series Paper Life Is Beautiful Stamp Set Stampin Up's concept artist accepted this challenge, and now look at all of the lovely cards: one for summer, one for autumn, and one all-occasion card! We particularly wanted to draw your attention to the card with three 1-5/8" x 3-3/4" (4.1 x 9.5 cm) panels. The first depicts late summer/early autumn, the second shows a tree in full autumn glory, and the third panel illustrates a tree preparing to cozy up and hibernate for the winter. By changing the number and color of the leaves in each panel, our artist was able to suggest the seasonal progression—and create a fun build-up of leaves on the bottom of the card, which gets bigger with each panel. #stampinup #stampinandscrappinwithsteph #lifeisbeautiful Happy Stampin Steph 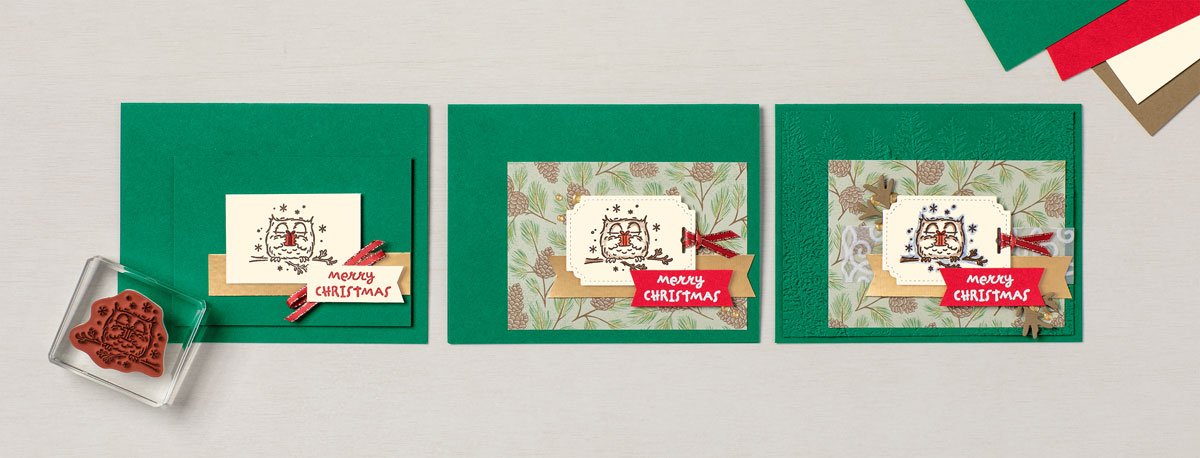 HAVE A HOOT STEP-BY-STEP
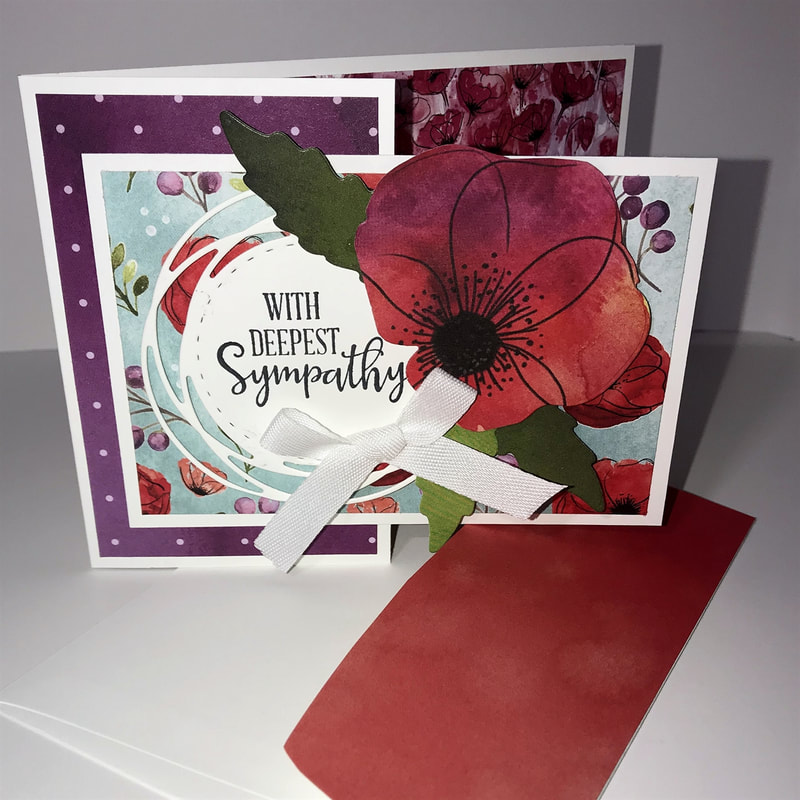
CASUAL Kept things simple on the first version of this cute card. A few simple layers, a splash of color, ribbon, and a sentiment popped up using Stampin’ Dimensionals. This cheerful, little project takes just minutes to make and would be the perfect solution for a casual crafter. AVID Step up the charming second card by running the tag through the Stampin’ Cut & Emboss Machine using the Peek-A-Hoot Dies for a stitched-edge look. Fold the gold-trimmed satin ribbon in half, insert the ends through the hole in the tag, then pull them snugly through the loop at the end of the ribbon. Add a little extra pop to this card with a layer of Poinsettia Place Designer Series Paper, some Gold Glitter Enamel Dots, and heat embossing. STEPPED-UP AVID Our fanciest card is a real hoot. Emboss the card front using the Stampin’ Cut & Emboss Machine and the Evergreen Forest 3D Embossing Folder, adhered die-cut branches, and added a strip of Plush Poinsettia Specialty Paper. Perfect! Whoo wouldn’t love to have a Christmas cardmaking party featuring these cute, outdoorsy cards? I certainly wood . . . er . . . would! You can find the Have a Hoot Bundle here! #stampinup #giveahoot #stampinandscrappinwithsteph Happy Stampin Steph 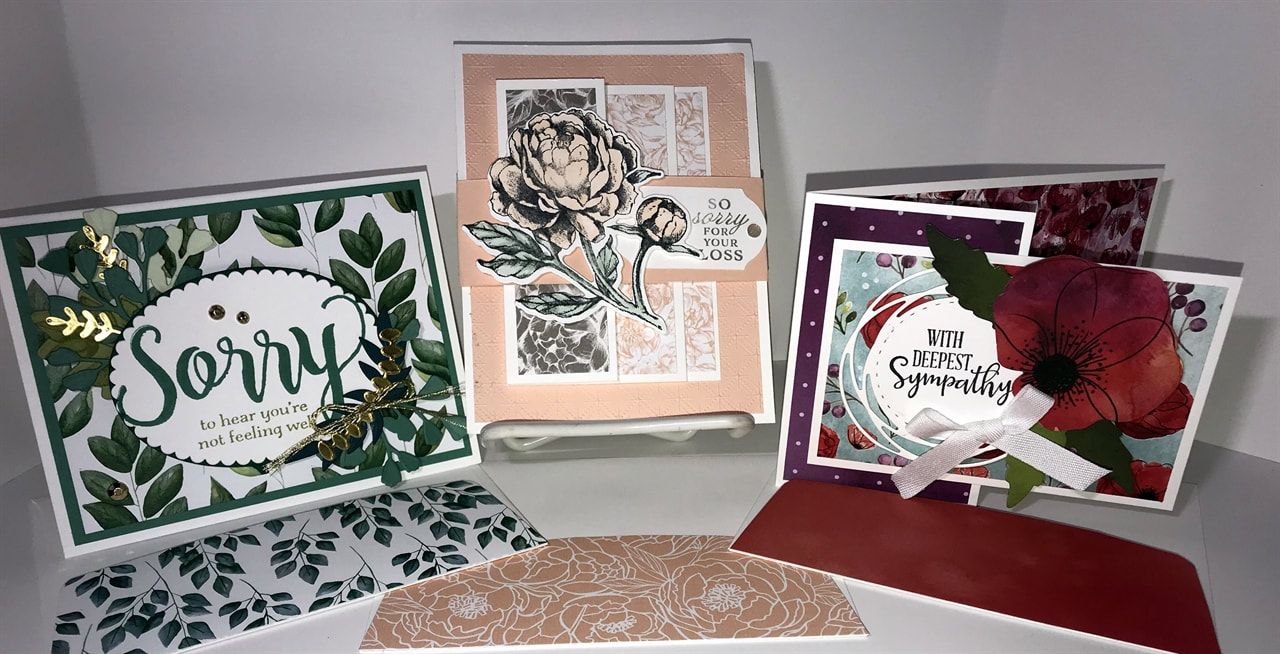 I have been enjoying keeping busy with my Stampin UP business and my Cards "to-go" have really inspired me to keep creating for you! SO thank you to everyone that has been making my kits a success!!! I am super happy with this next "to-go"! Although the theme I chose, Sympathy & Get Well, may not be joyous. I love how the cards came out! And I know when having to send these cards, regardless of the situation, you want to make that person smile! I decided to feature a few Fancy Fold tecniques for each card! , I will also demonstrate how to make these cards on Monday, November 2 @ 7pm, using Facebook Live on my page Stampin & Scrappin with Steph. Upon order and payment, you receive 1 Card "to-go" kit which will include all the precut materials to complete 6 cards (2 of each design) For $15. If you prefer, you can order 6 is on design or 1 of 1 and 5 of another, etc. Whatever combination you prefer. You can also add additional cards at $2 each. Please be sure to contact me to order, if you are planning to change or add to the original "to-go" so I can make sure I prep properly!! A FEW NOTES: Designer Series Paper used may vary due to availability! Also, keep in mind the stamped images are not included due to Stampin UPs Policy! Please Order and pay using https://www.paypal.me/StephanieJandrow or Venmo @Steph-Jandrow  Now that I got the "to-go" details done, let's talk about each card!! For this beautiful pink card, we are showcasing a beautiful collection called Peony Garden and Petal Pink Cardstock. This fancy fold was a first for me! But I just think it is so fitting when your trying to share with someone who is grieving! I wrapped the card with a belly band, but this is totally optional if you prefer, you can decorate the folds of the card directly! Card Recipe:
4. DSP 3"x4 1/2" 5. DSP 2 1/2"x4" 6. Cut the Swirly Circle from the Painted Labels Dies, stamp your greeting in the center. I used the greeting from the Peaceful Moments stamp set. 7. To make the poppy, I used the Poppy outline die from the Poppy Moments Dies included in the bundle, using the watercolored Poppy colored dsp. I also used the leaf dies and DSP. 8. Assemble and finished with a bow from Whisper White Cotton Ribbon.  I saved the best card for last!!! I know this little tissue box card is not new, you can find different versions all over, especially on Pinterest. But I've been wanted to make this card for a while now! I wondering why I waited so long, it's so easy to make! I used the suite Forevery Greenery. It's a gorgeous collection with all 5 different shades of green. Each paper is a beautiful arrangement of vibrant leaves. Honestly, since the day I ordered this collection, I have been saving the paper! Almost to afraid to part with it!!!! But, it's too pretty to be wasted by sitting in my cabinet! 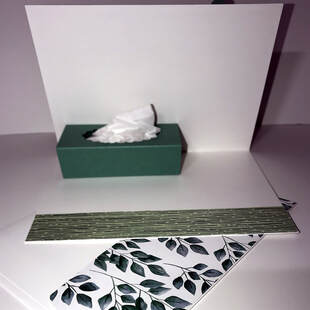 CARD RECIPE:
There you have it! I hope you enjoyed these cards. Be sure to contact me for your order!
Thanks for visiting my Blog and Happy Stampin Steph 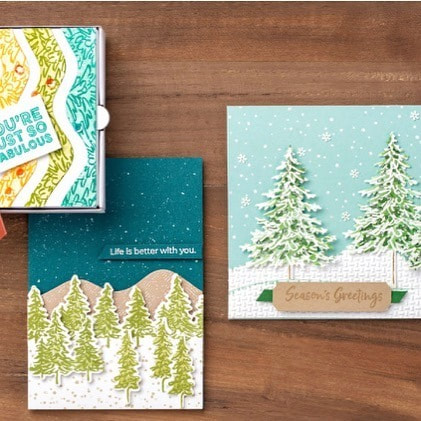 With forest-inspired imagery, the In the Pines Bundle helps you create easy projects with a woodsy, nature theme. While lending itself to Christmas projects, the In the Pines Stamp Set also includes a multi-occasion “Thinking of you” greeting. Use its timeless natural elements all year for masculine projects and more. The Two-Step Stampin’ images combined with the Pine Woods Dies make this bundle a must-have for creating quick cards any day of the year. #stampinup #inthepines #stampinandscrappinwithsteph
Happy Stampin Steph  CAPTURE MEMORIES WITH WONDER OF THE SEASON
Do you have shoeboxes filled with old Christmas photos that somehow never make it into a scrapbook? Let’s face it—when the celebration is all over, sometimes you just want to put your feet up and get comfy with a good book. You’ll put those Christmas photos in a scrapbook someday . . . right? Or maybe you’d like to start planning now how you and your customers will preserve those merry 2020 Christmas memories. Either way, we’ve got you covered with the perfect memory preservation solution: the Wonder of the Season Memories & More Card Pack. This gorgeous collection has 48 cards in two sizes, 12 specialty cards with gold foil, and eight sticker sheets. The double-sided cards are perfect for card fronts—or for scrapbooks. Simply tuck them into our Variety Pack 6" x 8" (15.2 x 20.3 cm) Photo Pocket Pages with your photographs—maybe add a little journaling—and your page is done. Scrapbooking does not get easier than that! Step up your projects and add Designer Series Paper, stamps or embellisments! You can view the entire Wonder of the Season Collection here. #stampinup #wonderoftheseason #stampinandscrappinwithsteph Happy Stampin Steph  I am excited to share with you October's Stampin Friends Blog Hop! The leaves are turning colors and the air is getting cooler! I just love the fall! Today is a beautiful sunny day with ble skies! It helped inspire me to be creative! This month's theme is Thanks, Thankful, Thank You! So basically anything Thanks. I hope you are following along with our blog hop and you came from Jean Beaulieu's blog! I just love her projects, didn't you?? Be sure to continue to Anne Marie Hile's blog and make sure to leave comments so we know you visited!! 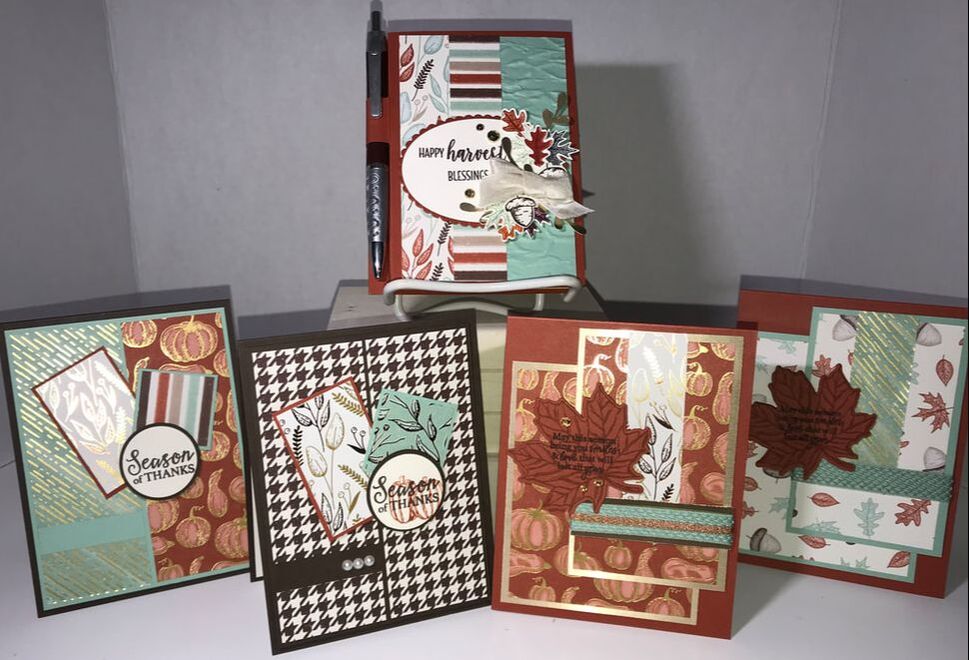 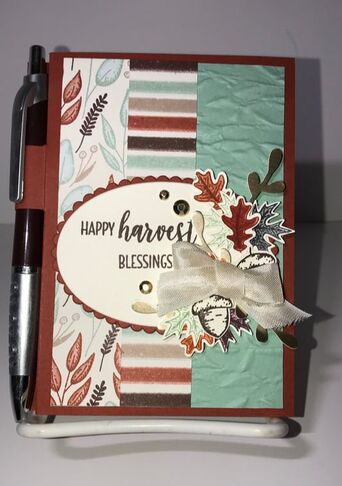 Many of you may have heard about World Card Making Day! This is a huge day for paper crafters all over the world. We strive to make as many cards as possible. But most importantly MAIL many cards! I had planned a quick online event to demonstrate the cards I would be working on. And.......technology had a different agenda for me. I started off with many technical issues and had to restart my Facebook Live - so needless to say an hour turned into 2. I wanted to thank the participants that rejoined with words of encouragement for me. So I made this cute little notepad holder using the Gilded Autumn Suite! I found a the little pack of notepads at the Dollar Tree. They come in a variety of different colors. Originaly, I just measured the cardstock to wrap over the notepad. But I felt like it was missing that finished looked. The clock was ticking to finish before the weekend. So I searched and searched and came across this YouTube video from Kitchen Table Stamper and it was perfect! She even used the same notepads from the Dollar Tree. It's the perfect size and her directions include the pen/pencil holder. I used the coordinating colors from the designer series paper. Cajun Craze as my cover. Next I layered Mint Macaron embossed with Old World Paper 3D Embossing Folder and added 2 strips DSP from the Gilded Autumn Speciality Designer Series Paper. I stamped the leaves and acorns with Cajun Craze, Early Espresso and Mint Macaron ink from the Beautiful Autumn Bundle. The greeting I used is from the Country Home stamp set and I stamped it on Very Vanilla cut out using the Layering Ovals dies. I'm so happy how the notepad cover came out! I have already hand delivered to my viewers that were local and they loved them!!! 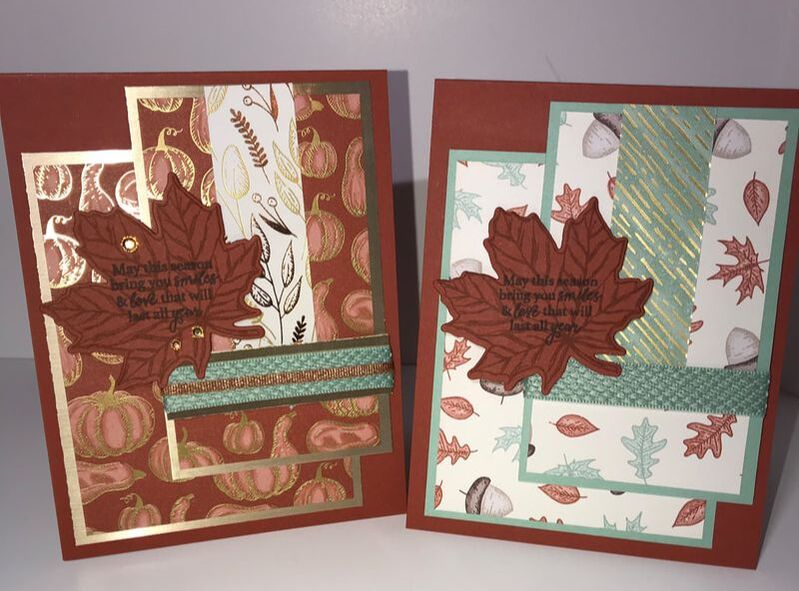 Whenever I make cards, whether it's for a hop, challenge, order or event if I am in a need of a specific card, I always make 2. It's been a habit ever since the first Stampin Up event I eever attended. I normally only show 1 card since there's no need for both, especially if I make them the same. And we only need to share a card and a project for the Blog Hop. But today I am not just showing you 1 or 2. I am showing you 4 cards! I was on a role and I just kept going! I said "Why Not!" For the cards above, they were so easy to make. And I used up some smaller pieces of DSP from the pack....which I sometimes, never know what to do with! For both cards, I used the same layout and Cajun Craze as the base. I scored the cardstock on the 11" side to 5 1/2" then on the 8 1/2" side, I cut at 4 1/4". My layers are as follows: Cardstock 4 1/2" x 3 1/2" Layer 4 1/4" x 3 1/4" Cardstock 4 1/2" x 2 3/4" Layer 4 1/4" x 2 1/2" Layer 3"' x1" Layer 3/4" x 2 3/4" (on the left card wrap with the Basket Weave and Metallic Ribbon Combo Pack) on the right, just the basket weave ribbon. I stamped the leave on Cajun Crazy, using Cajun Craze ink and then stamped the greeting with Early Espresso. The images are from the Gather Together Bundle. These cards were fun to make and I liked that I tried a slight stepped up version on the left. #stampinup #gildedautumnsuite #stampinandscrappinwithsteph #msscardchallenge22 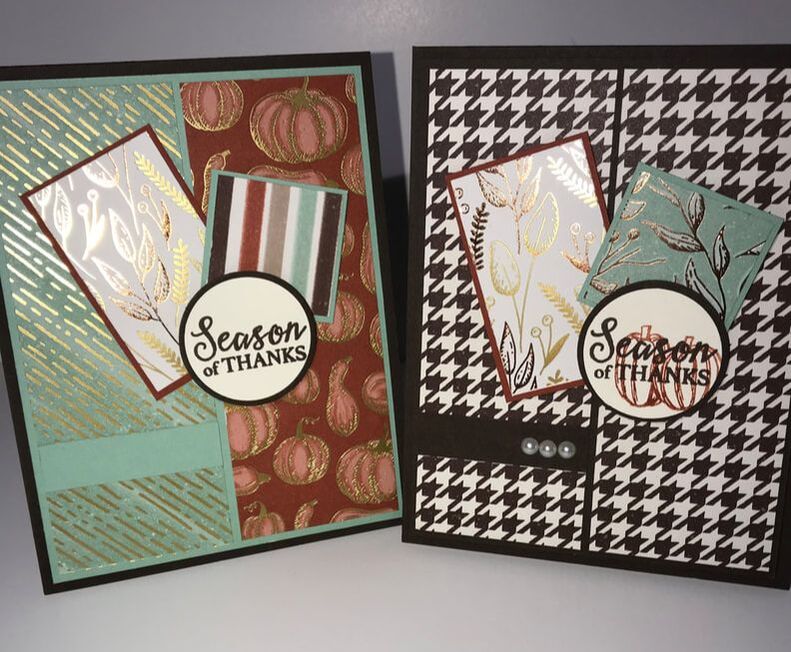 These 2 cards are also made using the Gilded Autumn Designer Series Paper! I am going to be sad with this paper is gone! It's just so pretty! The cardbase is cut the same as the previous cards and I used Early Espresso! The card on the left has Mint Macaron and Cajun Craze and the card on the right, is Early Espresso with Cajun Craze and Mint Macaron. To make the card: Cardstock 4" x 5 1/4" Layer 1 7/8" x 5 1/16" (you need 2) Cardstock 2 1/2"x 1 1/2" Layer 2 3/8 1 3/8" Cardstock 1 1/2" x 1 1/2" Layer 1 3/8" x 1 3/8: Circles 1 1/2" and I 3/8" Cardstock strip 1/2" x 1 7/8" So easy to assemble!! Simple layers! #stampinup #gildedautumnsuite #stampinandscrappinwithsteph #msscardchallenge23 I hope you enjoyed the projects I have shared with you for this month's Blog Hop! Be sure to leave a comment and 1 lucky person will receive the notepad cover! Continie to Anne Marie Hile's hop and see what amazing projects she is sharing this month! Thanks for joining me Happy Stampin! Steph Below is a list of participants in this month's blog hop
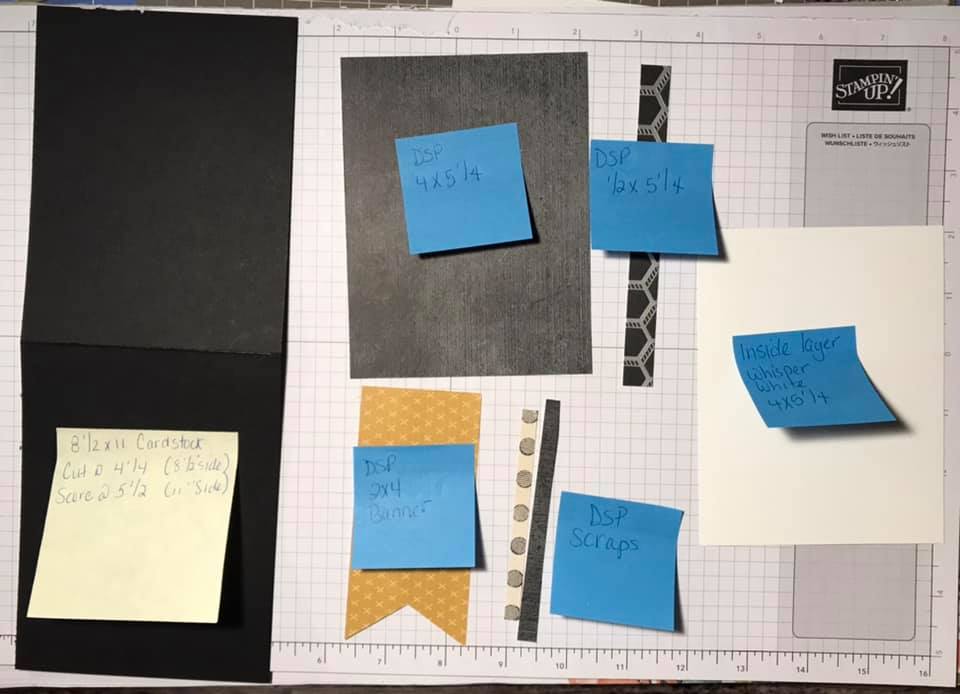
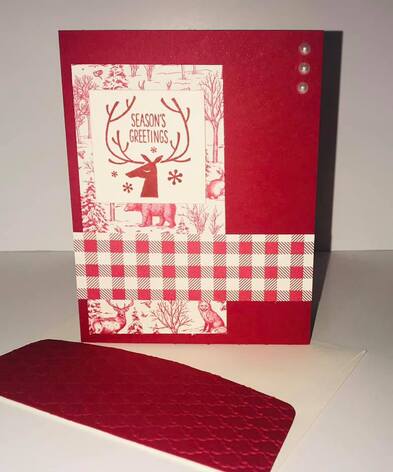
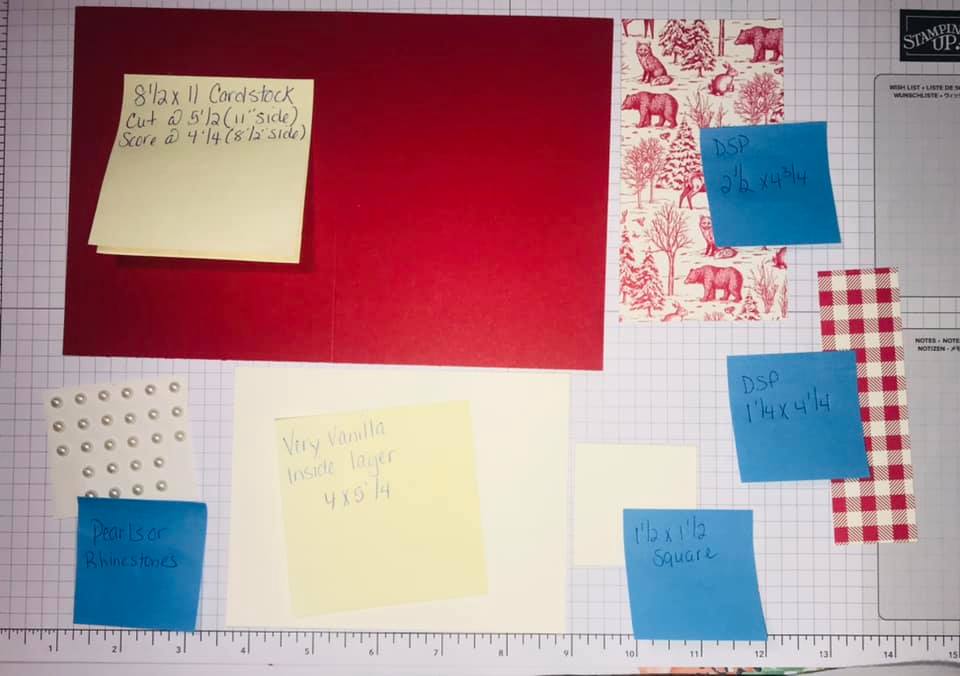
 I shared with you several cards during the World Card Making Day event, and I wanted share with you the directions I used! If you have a chance be sure to check out the Facebook Live where I demonstrated the cards picture above. Here is an alternate version in a feminine style of the cards I made! What do you think?  Seasons Greetings and Toile Tidings! My monochromatic holiday card was created as part of a card challenge sketch! It is also a card I will be demonstrating at my World Card Making Day! For details on how to make the card view the following link https://s.tamp.in/QN7inQ #stampinup #worldcardmakingday #stampinandscrappinwithsteph
 For these cards I used the same design and measurements as the Toile Trimmings quick and easy. I used coordinating colors from each paper pack: Magic in this Night DSP with the Come to Gather Stamp set; Forever Greenery DSP and Forever Fern stamp set; Whale of a Time DSP and Whale Done stamp set, and lastly Golden Autumn Specialty DSP and the Beautiful Autumn stamp set! #worldcardmakingday #stampinup #stampinandscrappinwithsteph  The last card I prepped many cards for a World Card Making Day was these holiday cards I used the Christmas Gleaming Suite Mossy Meadow, Night of Navy and Pretty Peacock #worldcardmakingday #stampinup #stampinandscrappinwithsteph I hope you completed lots of cards and more importantly mailed them out!!! I completed 66 cards on World Card Making Day and have mailed 13 so far...I am working on mailing my next batch this week!
Thanks for stoppin by Happy Stampin Steph 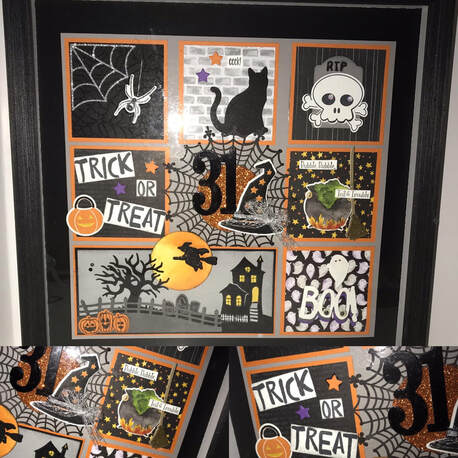 I used a mix of retired sets. 12x12 Basic Black as my base and then a layer of Smoky Slate 9 1/2x10. The Pumpkin Pie squares are 3x3 and the card stock or DSP is 2 3/4x2 3/4! The larger Pumpkin Pie rectangle is 6 1/4x 3 and a layer of Smoky slate is 6x2 3/4. I used Howl-o-ween Treat stamp set and Boo to You dies, Halloween scares stamp set and Halloween Scenes edglits, Halloween Magic stamps, Cauldron Bubble and the Toil and Trouble DSP, Cat Punch!
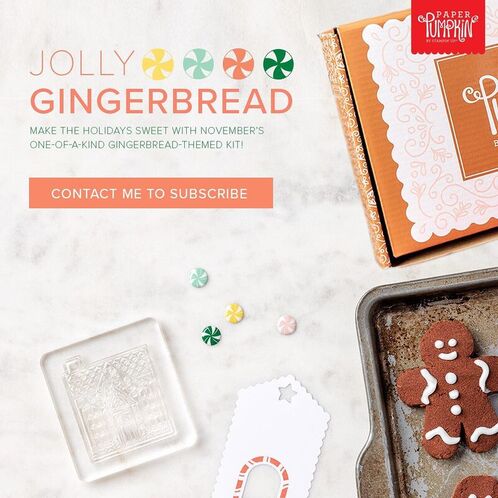 Paper Pumpkin is our monthly subscription service that offers unique papercrafting projects for crafters of any skill level! In these all-inclusive kits, subscribers receive pre-cut paper pieces, embellishments, ink, and an exclusive stamp set designed to encourage them to explore their creativity. As your subscription continues, subscribers will have a collection of cards—and other creations—for a variety of occasions, in addition to a stockpile of supplies! Subscribe by November10th to@receive this fun festive kit!!! https://www.paperpumpkin.com/en-us/sign-up/?demoid=2127355
#paperpumpkin #stampinup #stampinandscrappinwithsteph #jollygingerbread Happy Stampin Steph |

New 2023-2024 Stampin Up Annual Catalog


Kits Collection


Join today

Categories
All
Archives
January 2024
|
 RSS Feed