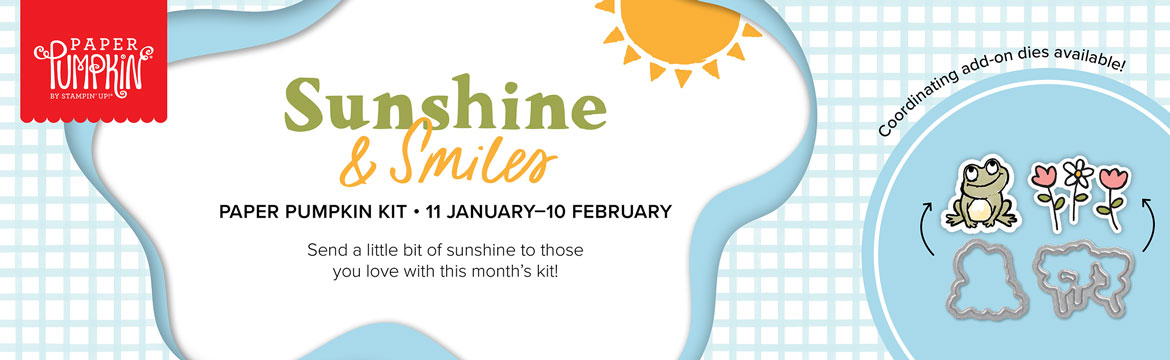
 Make cloudy days a little brighter with the Sunshine & Smiles Paper Pumpkin Kit! This kit includes nine sweet and sunny cards—three each of three designs. If someone you know is weathering a storm, this kit is just what you’ll need to create cards that are sure to brighten their day! AND for the first time ever, we’ve got a coordinating die add-on! (Stampin’ Cut & Emboss Machine sold separately). Keep reading to learn more!!
0 Comments
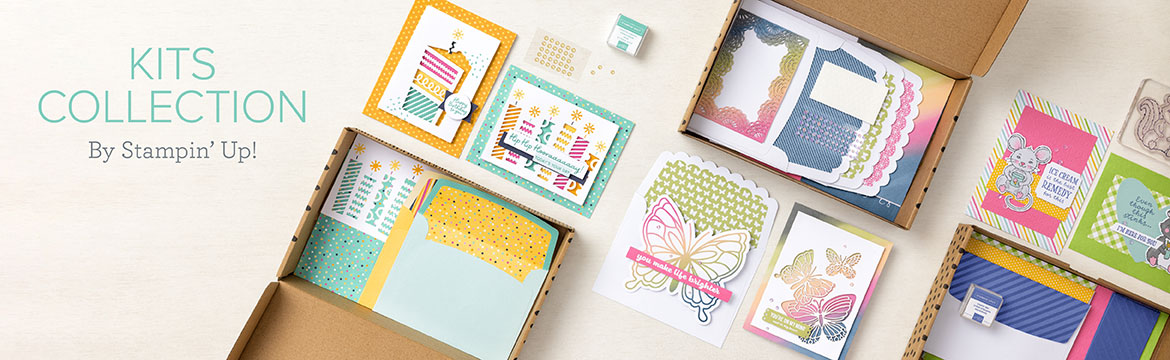 Kits Collection by Stampin’ Up! is the perfect program for new customers and beginner crafters with its variety and all-inclusive projects.
We invite you to say thank you to the people who make your day, every day with Saying Thanks all-inclusive card kit! This month’s kit has everything you need to show appreciation to family and friends who light up your life! Make nine bright, colorful cards in no time to say thank you, recognize friends, and share your gratitude with a bright watercolor wash that won’t go unnoticed! You’ll never miss an opportunity to express gratitude with this colorful kit! View this kit and others at https://www.stampinup.com/categories/shop-products/other-products/kits-collection #kitscollection #stampinandscrappinwithsteph #stampinup 
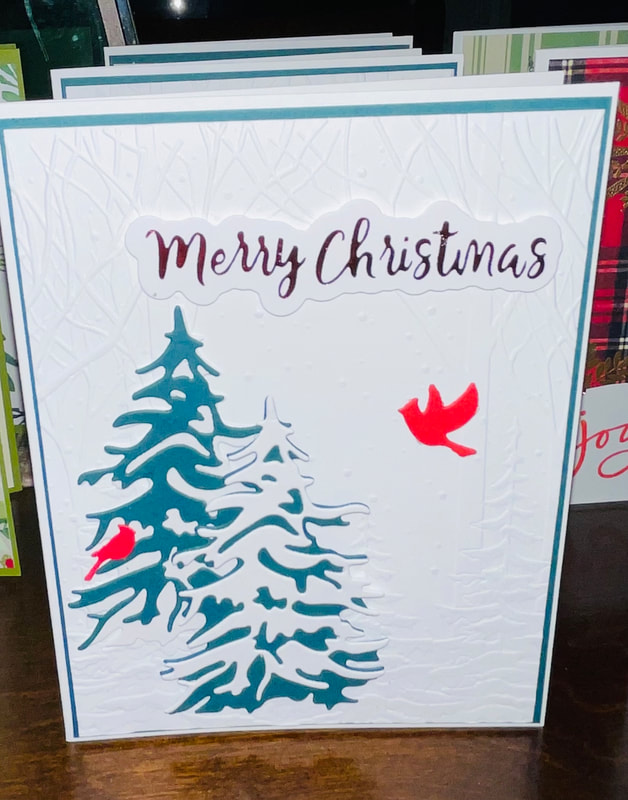
It's almost the end of January 2023, how quickly this month has gone by. But it's not over yet, and that means it's time for the first Stampin Friends Blog Hop of the year! And we have some fun cards to share with you! At the beginning of the year, I love to go through special occasions dates and see if I have cards on hand to match, if I don't I make a list and begin making the cards so I have them when the date arrives.
So sit back and relax and enjoy the hop and I hope you get some inspiration from us. I hope you joined me fromMaureen Rauchfuss's blog wasn't her card beautiful? Be sure to leave a comment and continue to Tiziana Milano's blog after visiting mine.
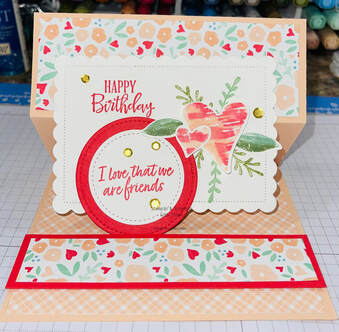
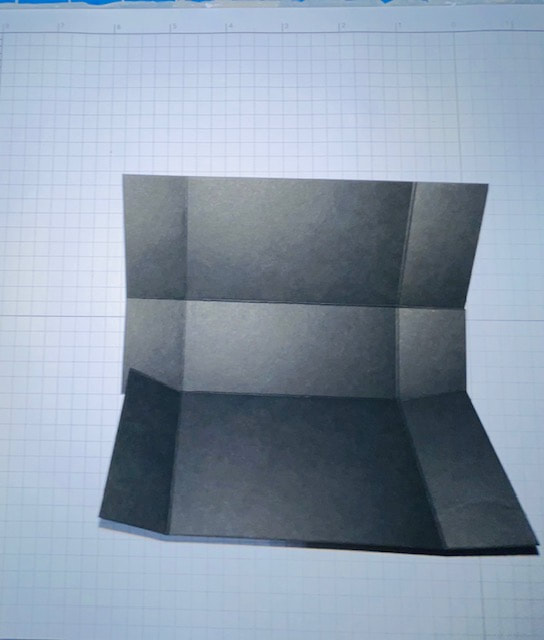
Here are the directions to make the reverse easel card:
Cardbase 8 1/2x5 1/2 score on 8 1/2 side at 2 1/8 and 4 1/4 Sweet Sorbet 5 1/2 x 1 1/4 and piece to cut out stitched circle Basic White: 1/2 piece of cardstock to cut out Scalloped Contour, stitched circle and stamping the hearts and leaves DSP: 4x5 1/4, 5 1/4 x 1 7/8 and 5 1/4x1 To stamp my images, I used the Stampin Write markers in Petal Pink, Sweet Sorbet, Mint Macaron and Mossy Meadow. I colored on the stamps with the lightest marker first, then I added the darker marker to add some dimension. Huff on the stamp and then stamp the images, I used the coordinating punch to cut them out. I stamped a few sprigs directly on the scalloped contoured shape and stamp the greeting. Attached the punched-out pieces over the sprigs. Stamp a greeting on the Basic White stitched circle. and attach to the Sweet Sorbet circle. Fold the cardbase in half on the 4 1/4 score line the fold the 2 1/8 score line in the opposite direction. Add the DSP layers. Attach the Scalloped Contour shape about halfway down the top section. Stand the card up like an easel and then attach the Sweet Sorbet 5 1/4x1 piece with dimensionls. The scalloped Contour piece will rest against this and hold the easel up. I attached the cirles to the bottom of the scalloped contour piece and used that as my easel base.
I hope you enjoyed my cards. Be sure to leave a comment and continue to the next blog!
Thanks for visiting. Happy Stampin Steph 
Here's to the last Stampin Friends blog hop of 2021. This month we are sharing all projects just in time for the holidays. We all need tags, boxes and bags! So hop along with us and see all the wonderful projects in out Stampin Friends November Tags, Boxes and Bags Blog Hop. I hope you are visiting me from Teri Pocock's blog. Teri's projects are always so beautifully done! Be sure to leave a comment and tell us what you think, and visit Jo Blackman's blog. For a list of hoppers, just scroll down to then end.

I have a fun project set to share with you this month. I used Stampin Up's Santa Express DSP and Santa Express Memories & More Cards (M&M) along with Bermuda Bay, Shaded Spruce Cardstocks, Mint Macaron, Real Red, Petal Pink and Sahara Sand.
Let's talk cards! These cards are the fastest and easiest I ever made, the Memories & More packs include 2 different sizes of predesigned images and greetings, along with a few stickers and embellishments. They are designed for pocket-style scrapbooking but they are perfect to make quick cards. I CASE'd designs from Pinterest, as I stated in my quick video below, this week is a busy week especially with Thanksgiving, that I had a time crunch to be creative. For the cards, I used the Shaded Spruce Cardstock as a base. I made a sample of 4 cards to share, but will include 2 of each design, for a total of 8 cards to put inside the box. The Santa card includes a layer of DSP that measures 4x5 1/4. Santa was fussy-cut out placed over a stitched circle, I added a layer of Mint Macaron, just 1/8" wider than the striped M&M card. I also cut a strip of Mint Macaron 1x4 and added on top, added the greeting which is a sticker included in the pack. Most Wonderful Time of the Year includes a layer of DSP that measures 4x5 1/4, wrap ribbon around the DSP, as if you were wrapping a package, and tie off with a bow. If you want to save on the ribbon, you can just cut strips to just wrap the edges of the paper. Either way works! Add the M&M card on top with dimensionals. Add a few rhinestones to embellish. C is for Christmas, trim the Pink Snowflake Memories & More card to 4x5 1/4, wrap some ribbon around a 3 1/4x4 1/4 Real Red, and tie in a bow, Adhere the M&M card ontop and pop up with dimensionals onto the cardbase. And for the last card, Merry Christmas, trim trees M&M card to 4x5 1/4, wrap ribbon around, tie with a bow and adhere to the cardbase. Cut a piece Petal Pink, adhere the M&M card ontop and pop up with dimensionals onto the cardbase. Add a few rhinestones to embellish. How adorable! How easy!!! 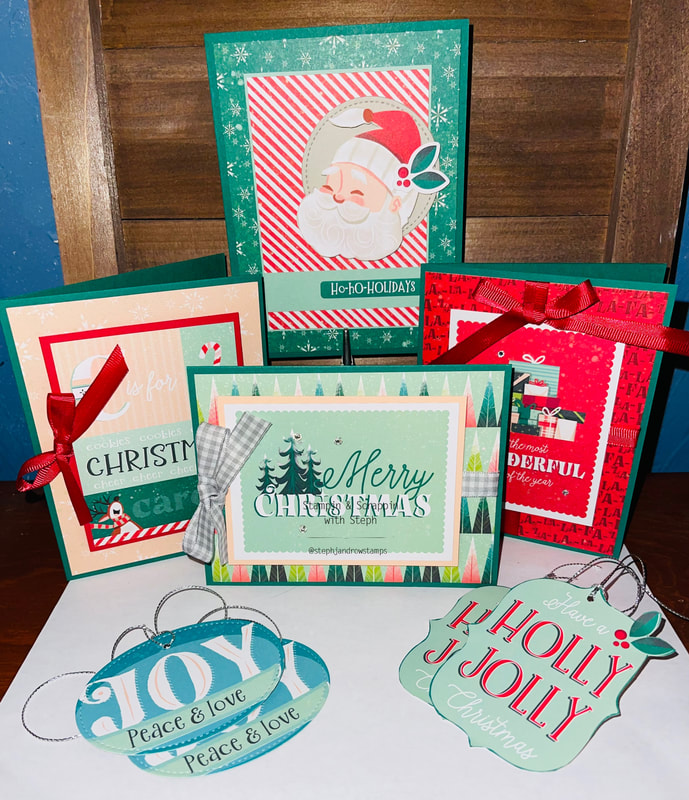
I made a Explosion Stationary Box to hold the cards and some tags. I had so much fun making this box. I LOVE how it came out. I will admit, I have been intimidated on this for a while, and it is not nearly as difficult as I thought it would be.
First, the tags. The tags are quick and simple. Holly Jolly is simply fussy cut from the Memories & More card pack. Joy, is cut out with a Stitched Oval die. I added the holes and some silver cording! Add a small piece of Basic White to the backside for addresses the tags. And there you have 4 easy tags that took a matter of minutes to make. 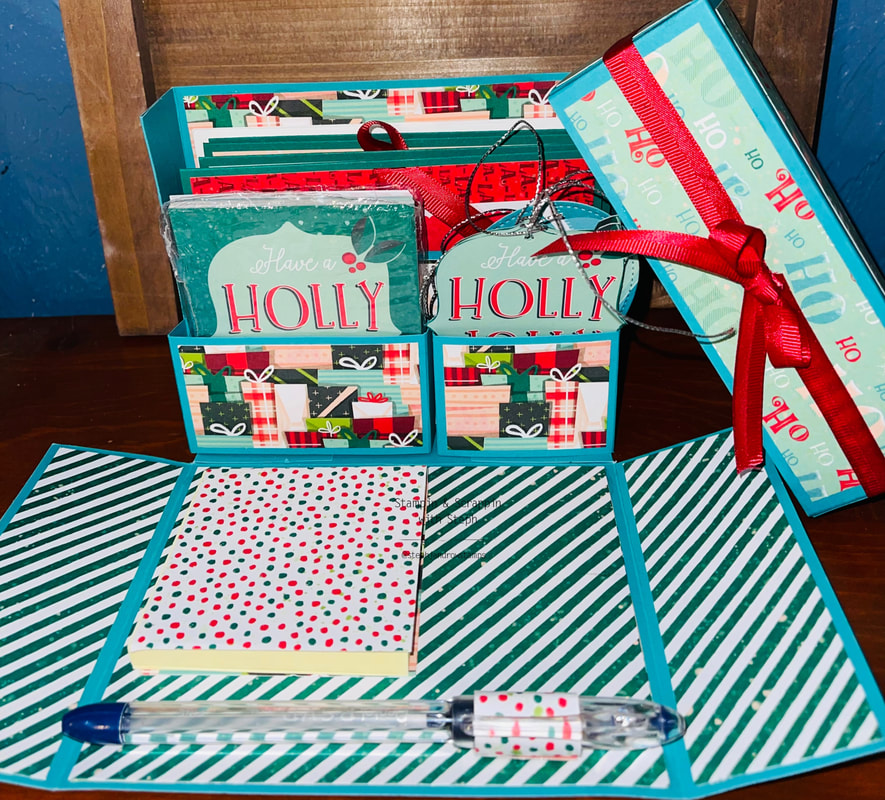
There are a few steps to designing the box. I had hope to get my video done, but I will have it by the weekend. I will say it is easier to assemble watching it made then just following the directions. SO I promise a tutorial is coming.
You will need A few pieces of cardstock, I used Bermuda Bay - 10x12, 6 1/8 x 10 1/8, 8 1/2x4 1/4, 2x5 1/2 and 2x4 1/2 Box 10x12 Score the 10" side at 2 & 8 turn and score the 12" side at 5 & 7 Turn back to the 10" side and score 3/4 just down to the horizontal score line, Do the same at 9 1/4 Lid 6 1/8x10 1/8 Score the 6 1/8 x 10 1/8 with the 6 1/8' side at the top score at 2 & 4 1/8 turn to the 10 1/8' side and score at 2 & 8 1/8 Card Divider 8 1/2x4 1/4 Score the 8 1/2x4 1/4 with the 4' side at the top score at 3", turn score at 1/4 and 7 1/4 Pocket 2x5 1/2 Score the 5 1/2' side at 1/2, 1, 4 1/2 & 5 Pocket 2x4 1/2 Scote the 4 1/2 side at 1/2, 1, 3 1/2 & 4 Holding the box paper horizontally, with the 12" side at the top, you need to trim out the little box that is formed between the lines. Repeat on the other side. Now fold on all the score lines. The side that has score lines at 3/4 is the box side and the part the has no 3/4 score lines is that part that pops down when the lid is removed. Before gluing the box, you will want to add you DSP - it's easier to adhere to the box before it's assembled. Just match up the layers to each side and make the paper is going in the right direction. Stand up the side that has the 3/4 and glue down the 3/4 strip gets to create support for the sides. Take the card divider add line it up to the score line (section where we cut the tabs off) and adhere to the sides of the box, do the same with each pocket - Assemble the lid, as if you were creating a box. DSP Layers Inside Outside Mat Lid 2 at 5 3/4 x 4 3/4 2 at 5 3/4x4 3/4 3 at 1 3/4x5 3/4 1 at 5 3/4x2 3/4 2 at 1 3/4x4 3/4 2 at 1 3/4x 1 3/4 1 at 1 3/4x2 1/4 2 at 1 3/4x4 3/4 1 at 1 3/4x3 1/4 Be sure to view the tutorial, it will make these directions make more sense. I have included a quick video explaining the cards and box below, and a full tutorial video!
Below is a full tutorial on how to put together the Stationary Box!
Thank you so much for joining me today and following along in our blog hop! I hope you enjoyed the projects we have created for you!
Join us 2023 for a brand new year of hops! If you're a paper crafter and have a blog, and are interested in joining our monthly hops, please contact me, we are always looking for creative people to share with us! Be sure to visit everyone's below and leave a comment! Happy Thanksgiving and Happy Stampin Steph   Today was a fun day!! Thank you Tiziana https://stampinwtiziana.blogspot.com/ for inviting me to join your Shoebox Card Swap. The Candy Cane card is the one I prepped for everyone to make and the other 6 are the cards I made from the other ladies today!! Beautiful card yummy lunch and laughs made for a great day!!! #shoeboxswap #stampinup #stampinandscrappinwithsteph Happy Stampin Steph
How crazy is it that October is almost over! This year feels like it's flying by! So, it's time to take a moment and show our appreciation! This month we will sharing Thankful projects. Be sure to stop by everyone's blogs and check out their amazing projects. Leave a comment and share what you loved! I hope you hopped over from Tiziana Milano's blog; she's always creating something awesome! And after you view my hop, check the list below and stop by anyone's hops that you may have missed.
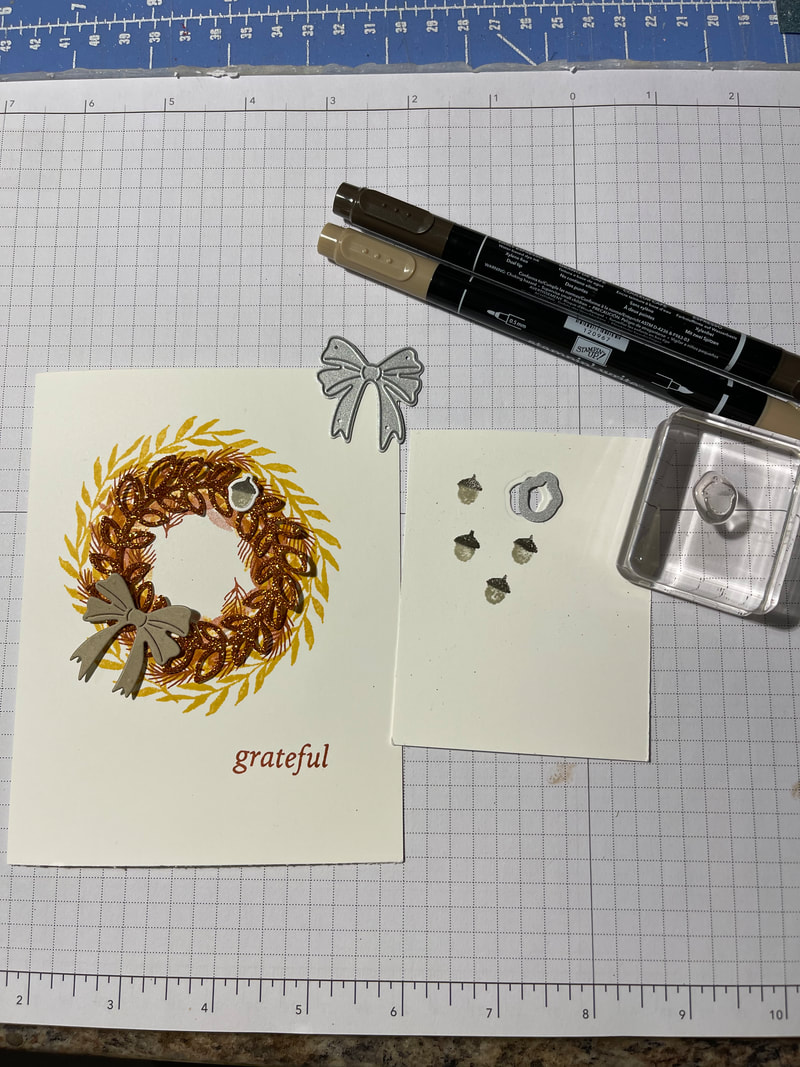
When planning out my projects I usually decide what I want to make fun fold card, box or bag. This time, I stepped out of my comfort zone and decide to try 2 different things this time. I typically do not create a 1 layer card. I always have different paper layers and designer paper. This was a bit of a challeng and with different attempts, my card changed many times along the way.
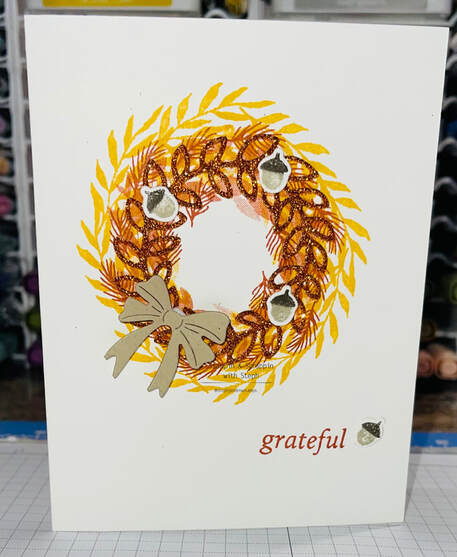
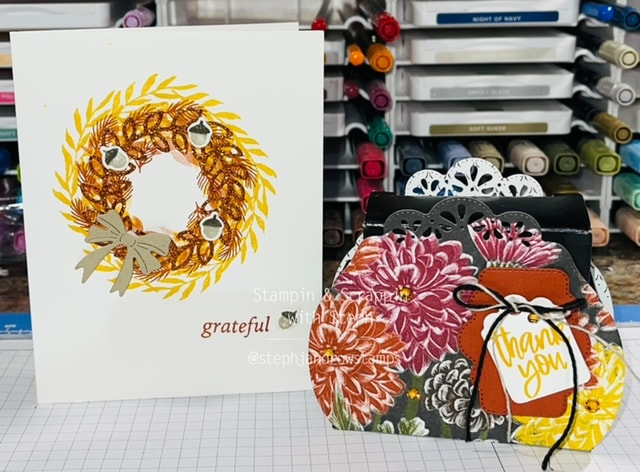
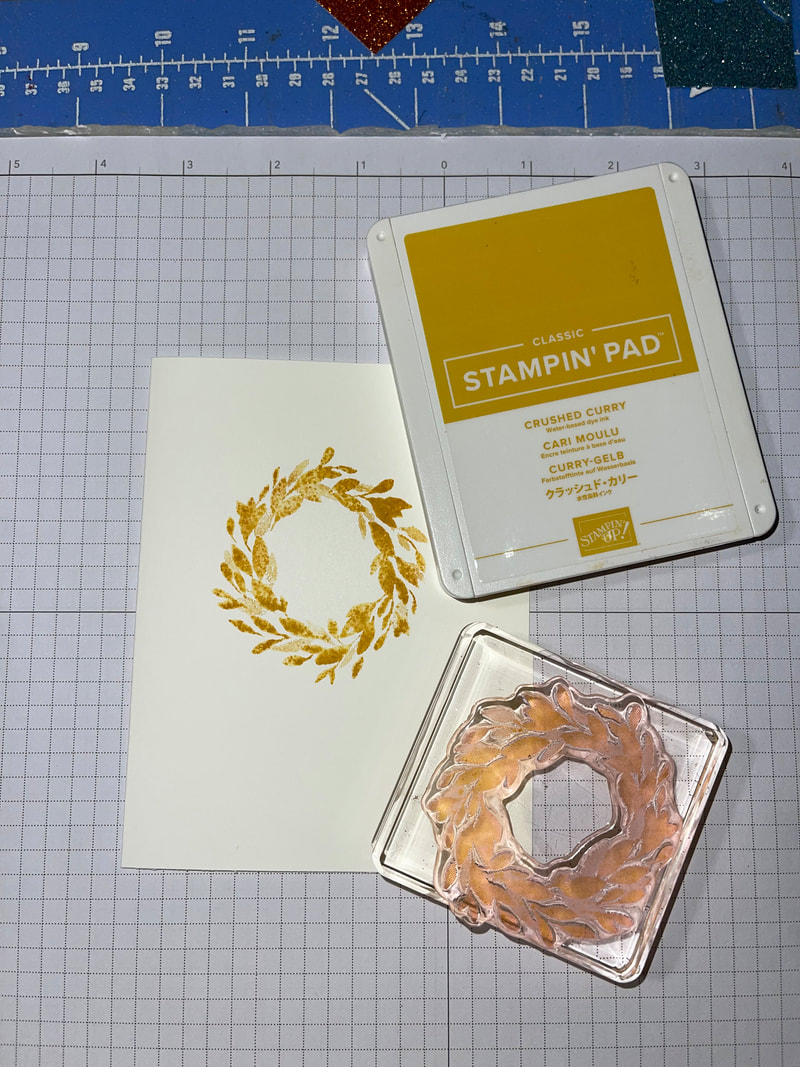
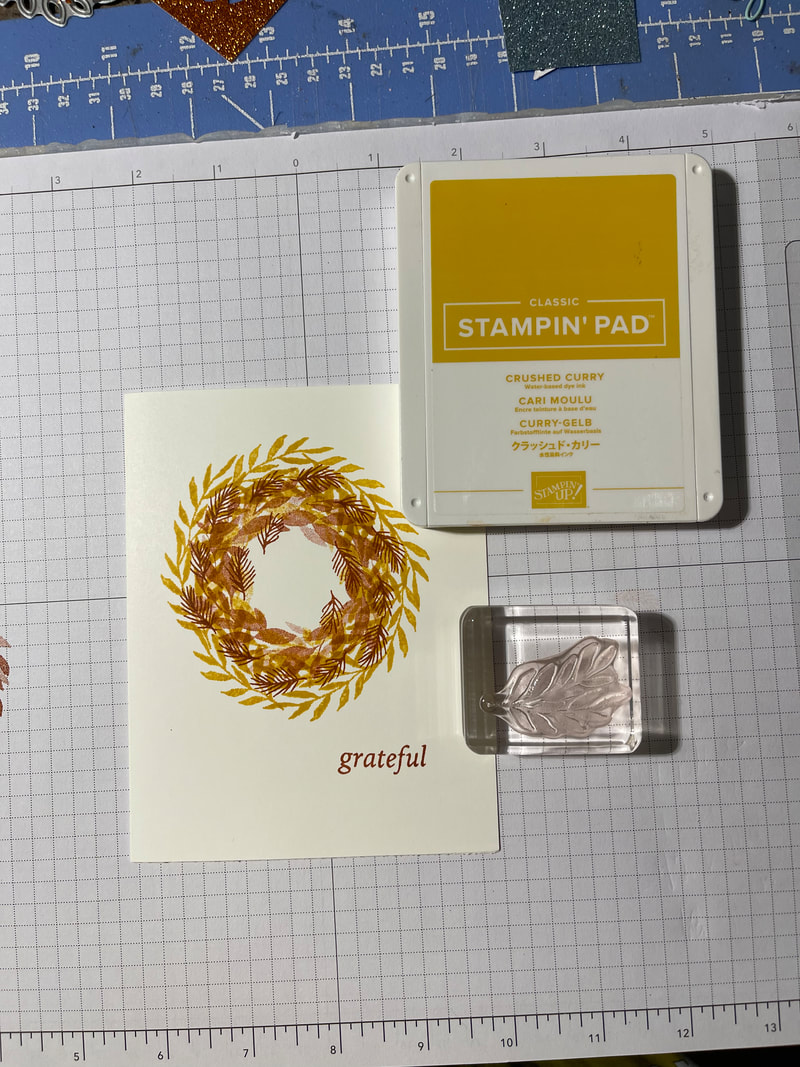
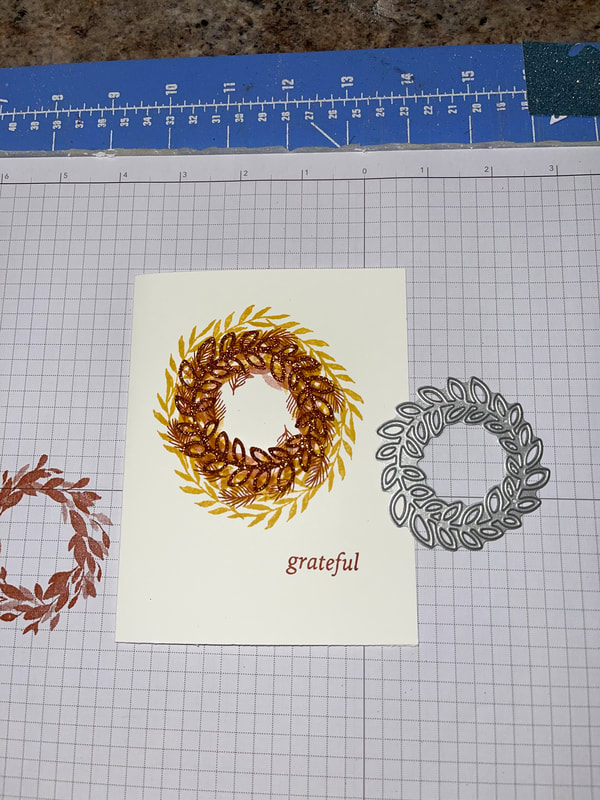
So first I grabbed the Cottage Wreath Bundle from the Stampin Up Mini Catalog. Grabbed some Basic White for the cardbase a chose a color scheme. I wanted a fall feel so I chose Crushed Curry and Cajun Craze. I started stamping with my lightest color first and then layered darker next. You can see from the pictures below the process I used to create the wreath! I cut out a piece of glimmer paper using the coordinate dies to add a textured layer to the wreath. I colored the acorns and cut them out and used the bow die in Crumb Cake. And finally, the word Grateful stamped! It was a super easy card to make.
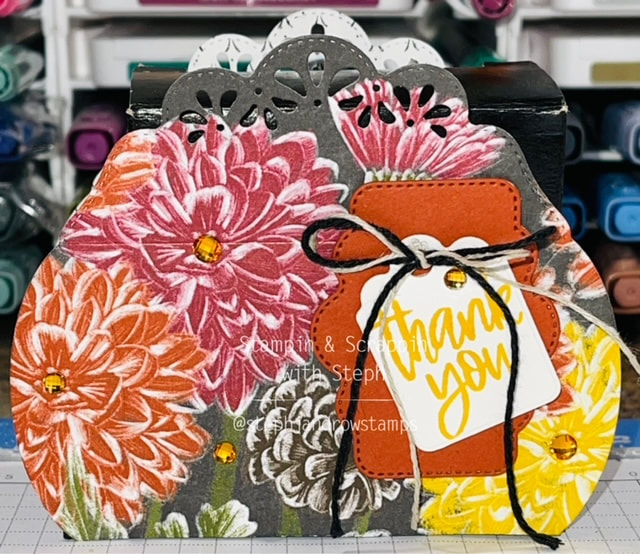
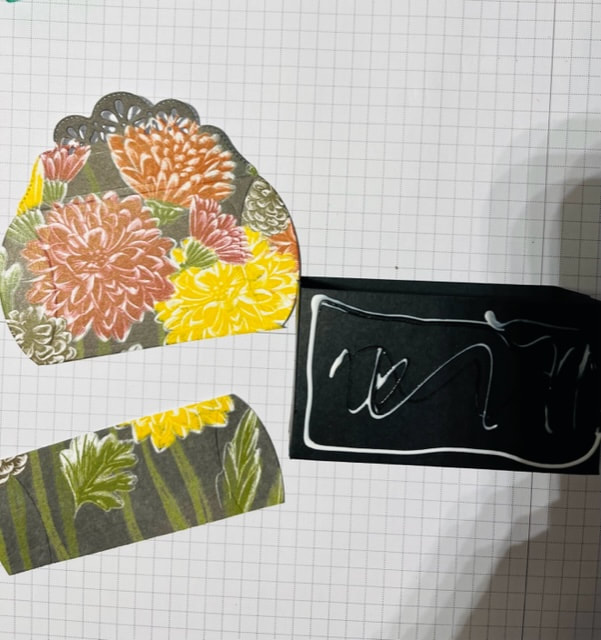
Moving onto the project. I normally create my card and 3D item to match or coordinate. I would use the same stamp sets, colors paper etc and usually make them to be given together. This time I made them independent of each other.
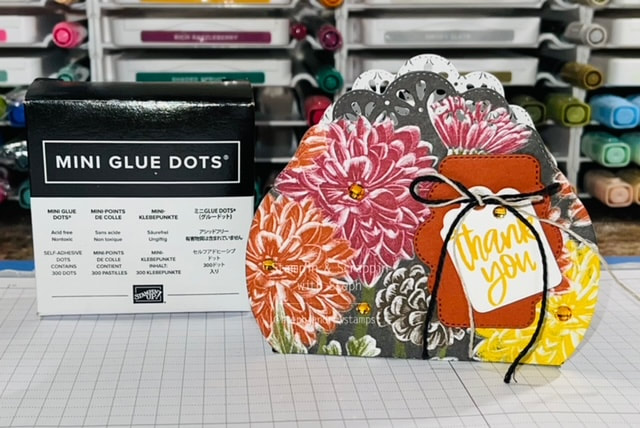
And if a little bit is there, your just going to cut that section off. Add glue to each side of the box, and attach the pillow box piece. I cut the label and tag out from the Pretty Pillowbox dies and I stamped the Thank you from the Cup of Tea in Crushed Curry. Added some black twine and linen thread to create double bow. I added a box of mini glue dots to give as a gift. SO cute SO easy!!
Thank you for stopping by. I hope you enjoyed the projects I have created for you today.
Please leave a comment and let me know what you think and stop by everyone's blogs to see their projects. Thanks again, Happy Stampin Steph  A sweet Christmas can be yours with our July–December 2022 Mini Catalog Sweet Gingerbread Bundle, which includes the charming Sweet Gingerbread Stamp Set and Gingerbread House Dies. Use this bundle to create a festive Christmas cottage with gumdrops, lollipops, pine trees, and a cozy curl of smoke that doubles as an adorable speech bubble—where you can stamp loving sentiments for family and friends.
To duplicate this month’s “technique focus,” fold Thick Basic White Cardstock in half to create a 4-1/4" x 5-1/2" (10.8 x 14 cm) card, then add texture to the card front using the detailed border die pieces. Ink the stamps in a lighter color, stamp off once, then use Sponge Daubers to add shading in a darker color before stamping and die cutting. Heat emboss the sentiment on Basic Black Cardstock using white Basics Embossing Powder, cut a tag shape, then adhere the sentiment to the card front using Stampin’ Dimensionals. What can you make with this super-fun bundle? Post your projects on social media and use the #SweetGingerbread hashtag so we can see your work! Happy Stampin Steph 
Welcome to Septembers Stampin Friends blog hop! This month were saying it with sentiments. Sometimes the words say it all so this month we are letting them shine. I hope you’re joining me from Maureen. Rauchfuss’s blog! Her projects were great weren’t they? Be sure to continue onto Joe Blackman‘s blog and leave us a comment. We love to hear your thoughts on our projects.
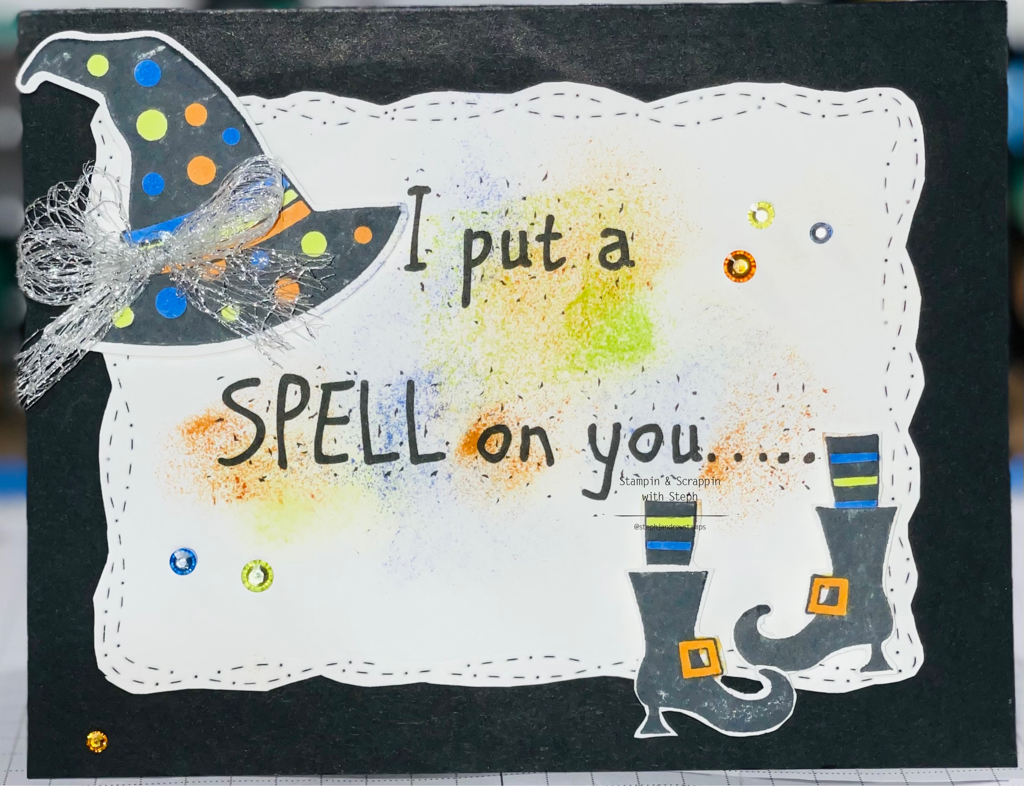
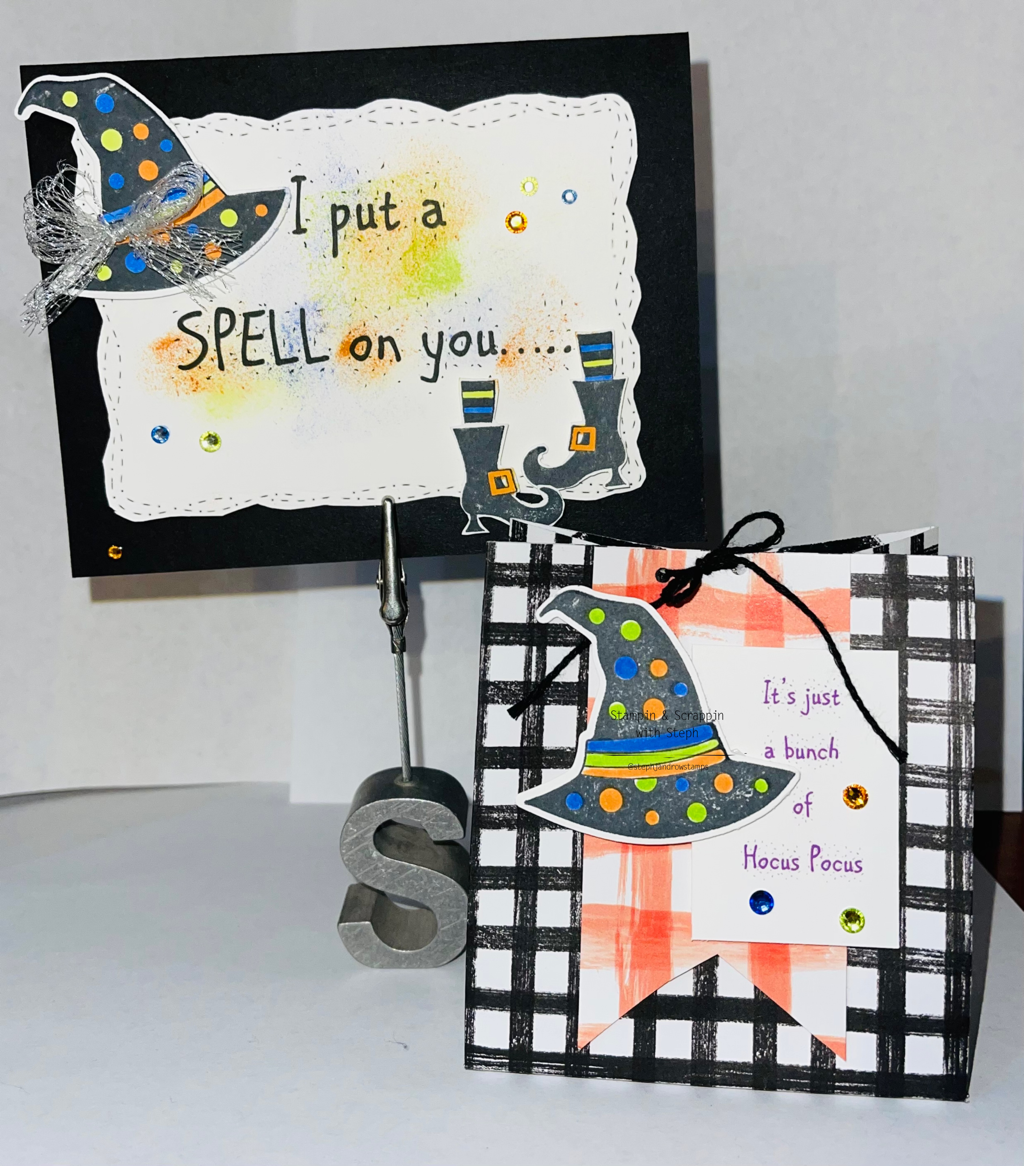
For my projects! I did something I normally don’t do and that was because I didn’t have a sentiment for exactly what I wanted. I just grabbed my computer typed up the greeting and printed it out on my printer. Then I took the Stitched with the Whimsy dyes framed it around the greeting and cut it out! I sponge coordinating colors around the words to just give it a little bit of a pop. I used the Bewitching Bundle, stamped and punched out 2 hats with the coordinating punch! I used the second one on the bag below, I colored it in using an Orchid Oasis, Pumpkin Pie, and Parakeet Party, markers stamped the boots and fussy cut them out, I finished the hat off with a bow using the Metallic Mesh ribbon.and finished off with a few rhinestones colored with the same ink!
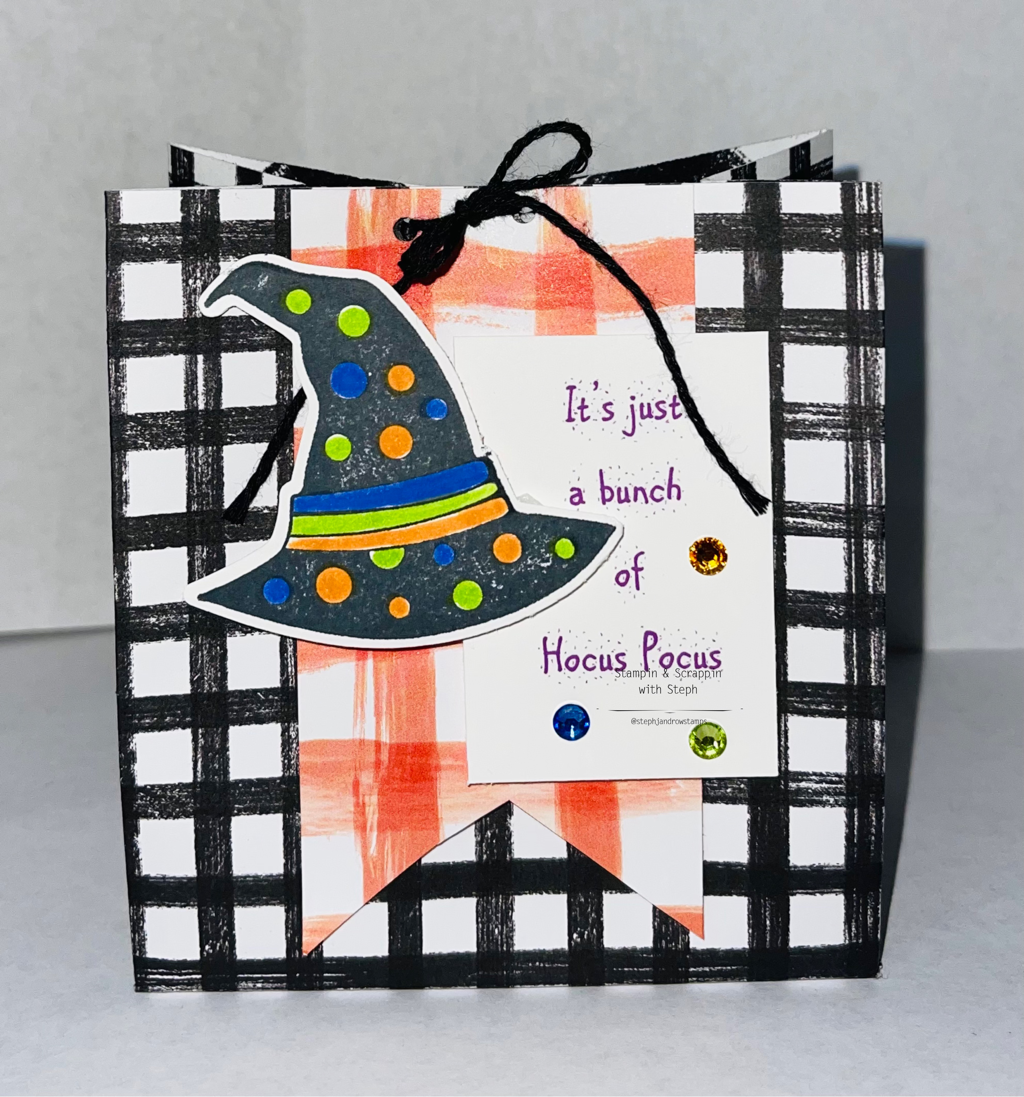
Next I made this little treat bag out 6x12 sheet of gingham cottage DSP paper. On the 12” side on the top, score at 2 5 3/4 7 3/4 and 11 1/2 and turn on 6” side and score at 2. Cut up on your score lines io to the 2” making sure your 12 inch side of the paper on top. I cut a 2 x 3 3/4 strip again using the gingham cottage DSP and this time I chose the pumpkin pie plaid. I flagged the ends and stapled it to the side of the bag. I took my hole punch and punched out to little holes and added some bakers twine in black to hold the bag shut. I also printed out the greeting and trimmed it to 1 1/2x 2 added some rhinestones.
I hope you enjoy my projects, be sure to leave a comment and visit Jo Blackman’s Blog next. Happy Stampin Steph  Find yourself staring at multiple stamp sets and can’t decide which one to get? On 15 September 2022, you can get those sets you’ve been wanting at a 15% discount. This is a deal you do not want to miss out on! The 24-Hour Stamp Sale will only last for one day, so make sure you are ready to shop ‘til you drop! It’s time to expand your collection! Sales Period: 15 September 2022 12:00am to 11:59 p.m. (MT) DETAILS:
Happy Stampin Steph
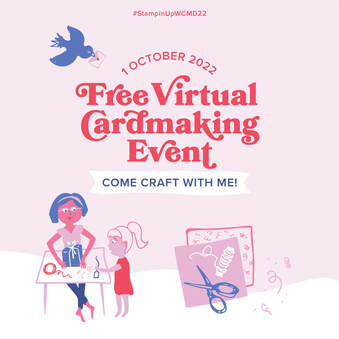
What is World Card Making Day? World Card Making Day is all about making beautiful, heartfelt cards. We celebrate Papercrafting! During the event, we’ll walk you through several projects, and you’ll create the cards right along with us. You’ll end up with new project ideas and some stunning new cards! HOW DO I ATTEND? - 3 OPTIONS AVAILABLE! OPTION 1: Attend on your own and watch the event from the comfort of your own home! How do I attend on my own? Stampin Up will be hosting the Virtual Event on October 1st! Where anyone can host from their own homes - or gather with your friends and follow together - all you need to do is Register here Once you register you will get further information from Stampin UP for the event! (Do not register here if you choose to attend in person) Is the event free do I need to have anything? Yes, Stampin Up is offering a free Virtual Event that anyone can join and follow along! But since we will be making cards, you will need to have some product to follow along with! You can use your own products or to make the most of this experience, you can order the Cottage Rose Bundle from the 2022–2023 Annual Catalog, the Cottage Wreaths Bundle from the July–December 2022 Mini Catalog, or the Warm Welcome Bundle, which you can get from the January–June 2023 Mini Catalog! If you want, you could even order all three bundles! The Warm Welcome Bundle which are all available for purchase now! See flyer below Following the event, we will post an Instructions PDF so that you can recreate the projects we made on World Card Making Day. What do I get for attending through Stampin UP? If and when you order one of these three bundles: Cottage Rose Bundle, Cottage Wreaths Bundle or Warm Welcome Bundle you'll get a FREE gift of Iridescent Pearl Basic Jewels! (Note that even if you order all three bundles, you’ll only receive one Iridescent Pearls gift.) OPTION 2: Attend with me in my crafting space! (Space is limited) RSVP - to me and attending at my craft space. As a group - we will watch the Virtual Event and make the projects together! I will be limiting to 5 guests. RSVP BELOW Is the event free do I need to have anything? Yes, Stampin Up is offering a free virtual event to follow along with and I am offering my craft space to you to attend together! But since we will be making cards, you will need to have some product to follow along with! I will have the stamp bundles, ink pads to use and other tools to use! Please bring your own adhesives and scissors to use! I will be putting together card kits so you can complete the projects as we follow the Virtual Event. Each kit will be $20 and you will receive enough product to complete 6 cards (2 of each design). If you prefer you can purchase your own bundles and put together your own kits to complete! That is entirely up to you! What do I get for attending through you? You will get use of the stampset bundles, Stampin Cut Emboss Machine, ink pads, and other tools required to assemble the cards (You will need your own adhesive and scissors). If you choose to purchase a card kit, I will have all the paper prepared and ready for stamin and assembly! I will offer the space, the media to follow long and some light snacks and refreshments, feel free to bring your own as well. A free gift from me! And the pleasure of each other's company! OPTION 3: Attend on my own - but purchase the card kit from you You choose to watch the Virtual Event on your own, either purchase the bundle(s) offered or use your own supplies. But purchase the card kit, with the precut paper, from me to use! Register here for the Stampin Up event and also RSVP below for the card kit!!! Ok alot of information and alot of choices! So be sure to read carefully and be sure to RSVP If you have any question, you can feel free to contact me I can't wait to create with you again! Steph |

New 2023-2024 Stampin Up Annual Catalog


Kits Collection


Join today

Categories
All
Archives
January 2024
|
||||||||


 RSS Feed