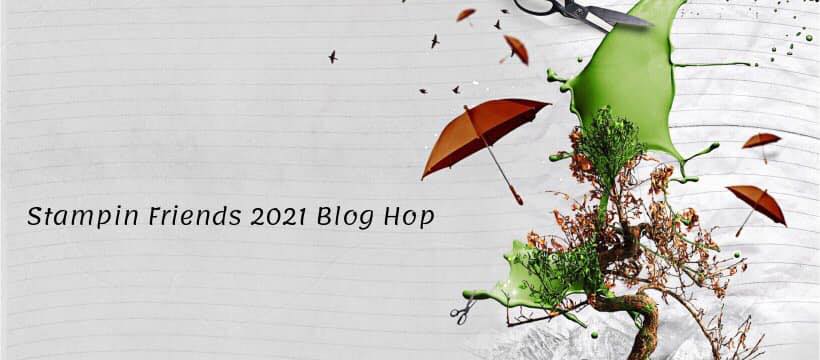
 Welcome to my favorite hop of the year! I look forward to January, when we kick off the new year with a fresh blog hop! I am energized and organized after a much needed December hop break! Each year I look at my perpetual calendar and review all birthdays for the year and begin to go through current cards to send! I then plan to make more birthday cards if I don't have enough....and then some! So it's so fitting that we start our 2021 Stampin Friends Blog Hop with Birthday Celebrations! So here’s to a new year, new beginnings, new possibitlities and a new 2021 Stampin Friends Blog Hop!! Be sure to hop along and visit everyone's blogs, if you miss anyone along the way, you can find a list of participants to the bottom of each blog. I hope you came from Teri Pocock’s blog, wow weren't her projects amazing?? After you view my blog, continue onto Maureen Rauchfuss’s blog, you're going to be blown away. You are guarantee to find projects that you will want to make! 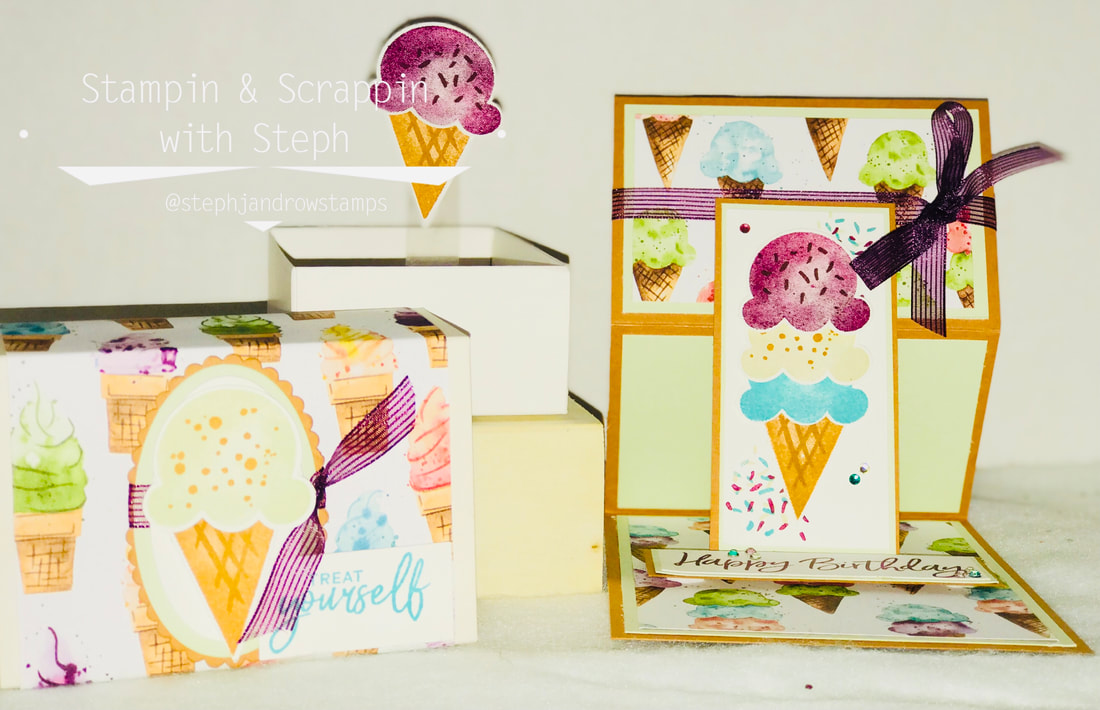
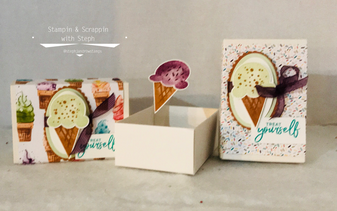
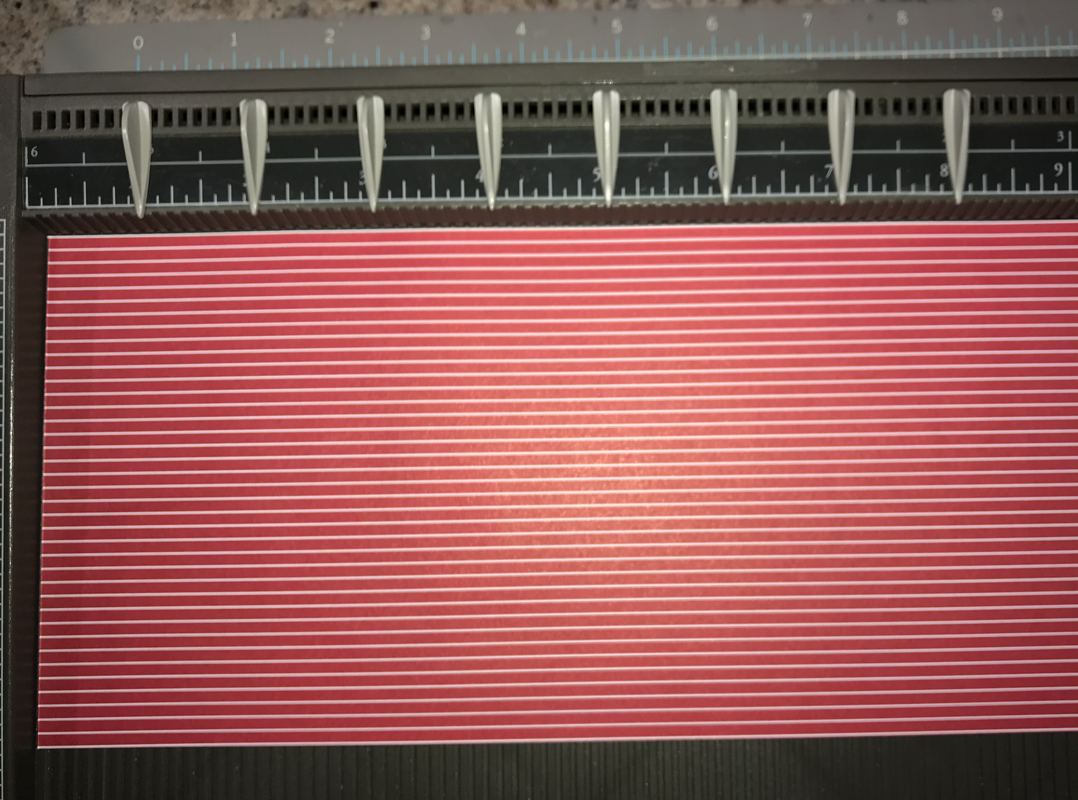
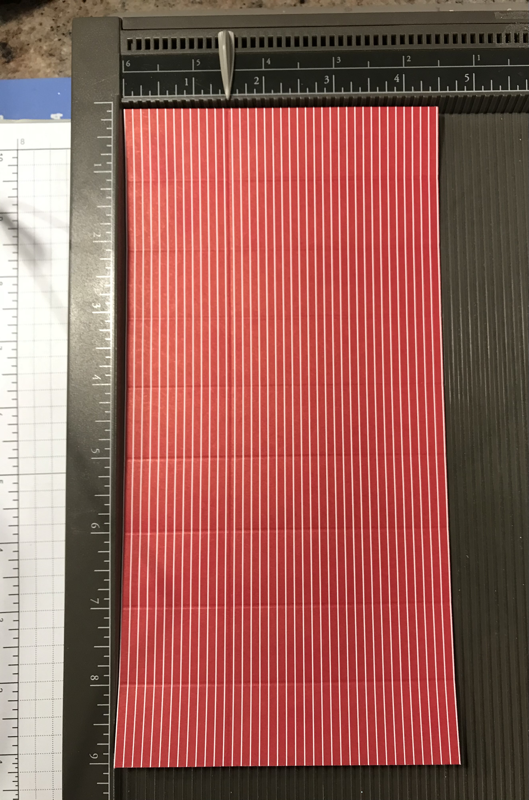
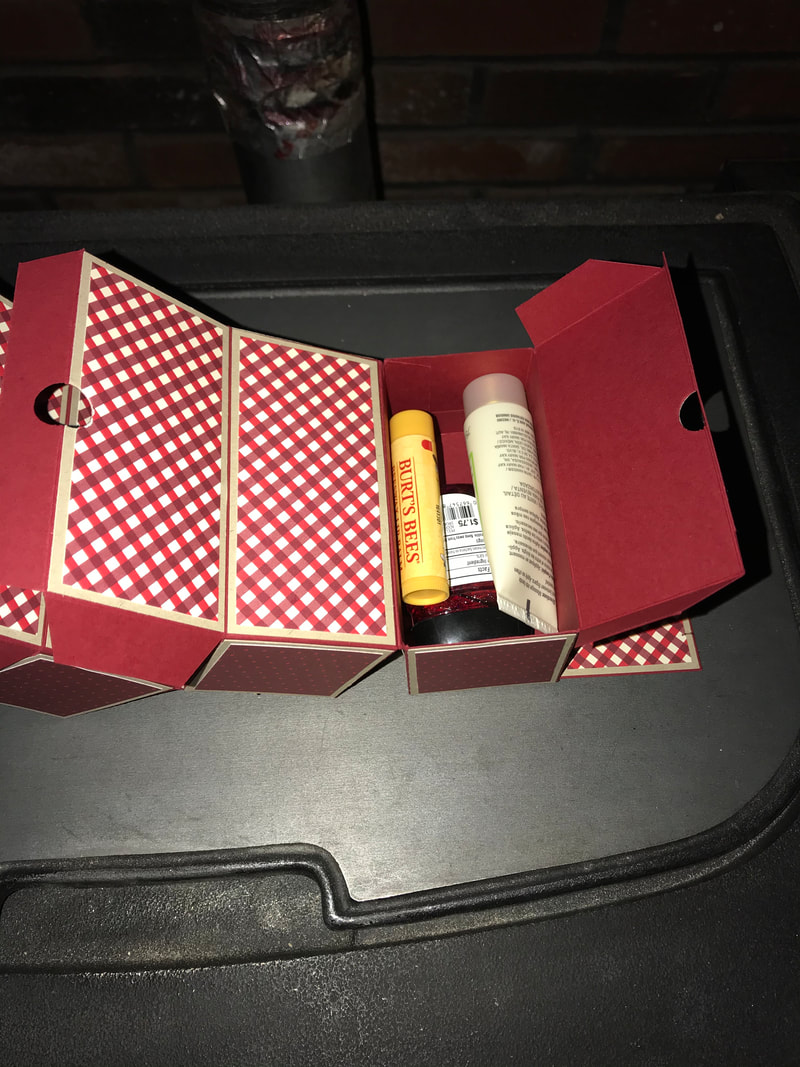
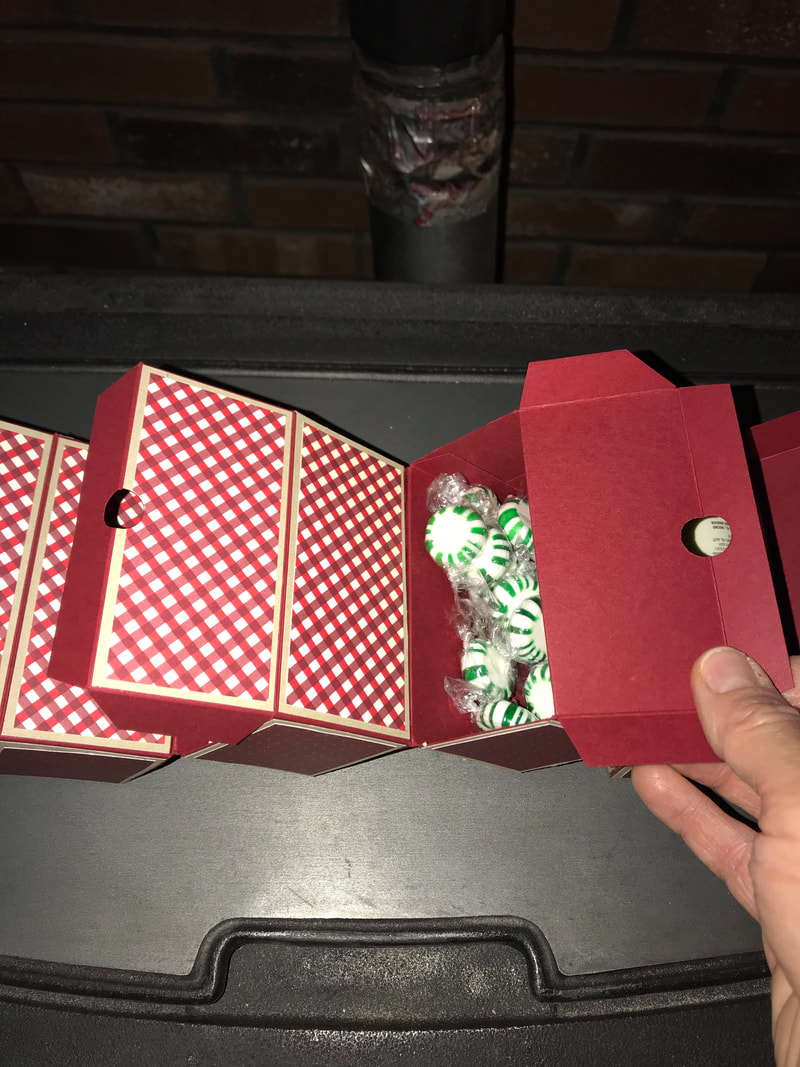
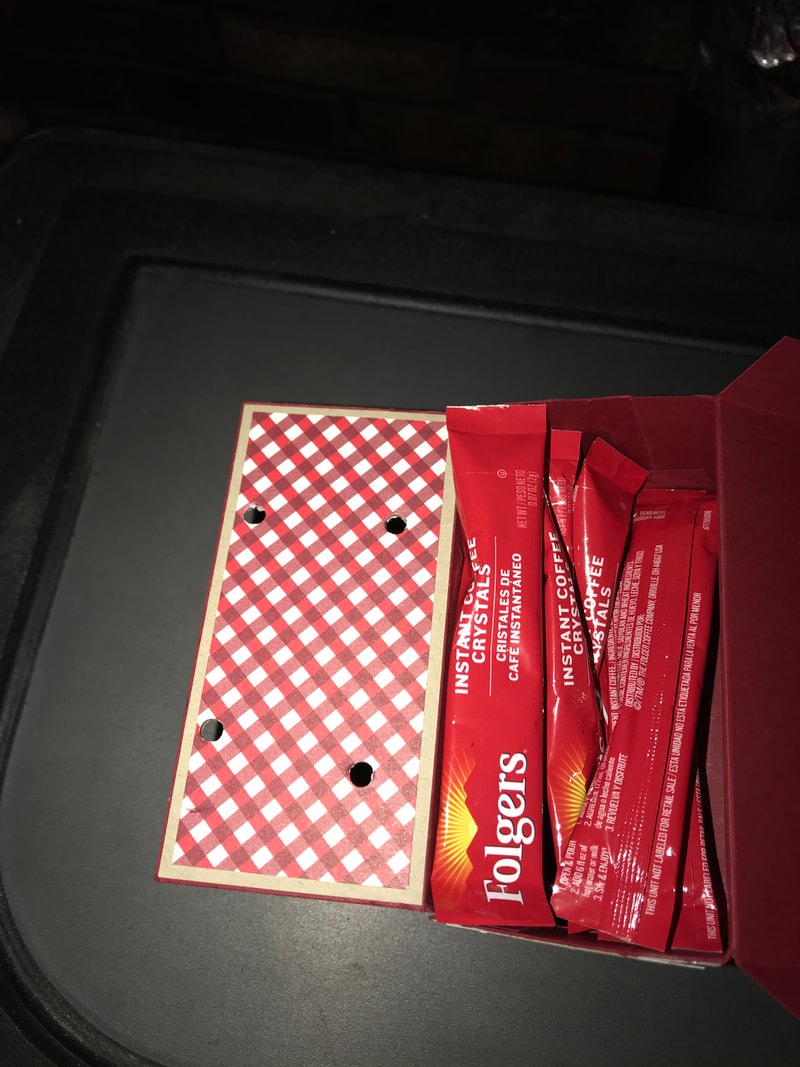
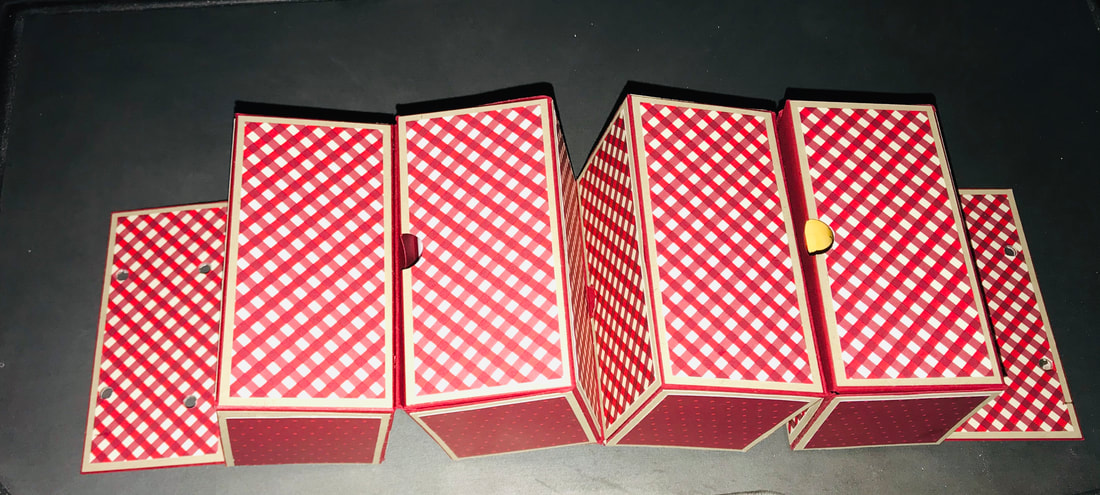
I chose a fun fold card that I have never made before! This Easel Card is so easy to make! I choice Cinnamon Cider as my base with a layer of Soft Sea Foam! Can you say Mint Chip? Ok, maybe just me!! Then, I added the layer of DSP. Rich Razzleberry, Soft Sea Foam and Bermuda Bay are the perfecct scoops! I see Black Raspberry, Mint Chip and Cotton Candy!! Well around here, those would be colors of so fun flavored ice cream. What about were you are??? Stamp the images and use the Ice Cream Cone Builder Punch to punch them out! Add the fun sprinkles or jimmies and chips on the scoops and then don't forget the criss-crosses to define the cone! The Happy Birthday Greeting can be found in the Sweet Ice Cream stamp set and I stamped that in Rich Razzleberry. Below is the measurements of the paper used! For more details on how I put this card & box together, I created a video for you to follow! To make the card: Cardstock: Cinnamon Cider 11x4 1/4; on the 11" side score at 2 3/4 and 5 1/2. Fold on the 5 1/2 score line and then fold back on the 2 3/4 score line. Layer 1: Soft Sea Foam 5 1/2x4, DSP 5x3 3/4 adhere to the bottom section of the card Layer 2: Soft Sea Foam 2 at 4x2 1/2, DSP 1 at 3 3/4x2 1/4. Adhere 1 of the Soft Sea Foam pieces to the center section (measures 4 1/4x2 3/4). Adhere the other piece of Soft Sea Foam and then DSP to the top section. Layer 3: Cinnamon Cider 2x4, Soft Sea Foam 1 7/8x3 7/8, and Whisper White 1 3/4x3 3/4. Stamp the sprinkles in different colors on opposite corners of the Whisper White. Adhere layers togther and then add about 1/2 way down on the top section. Use dimensionals. Make sure to only add the adhesive to the part that sticks to the card base. Layer 4: Cinnamon Cider 1 1/4x3 1/2, Soft Sea Foam 1 1/8x3 3/8 and Whisper White 1x3 1/4 Stamp the greeting in Rich Razzleberry. Ink Colors used to stamp ice cream scoops, jimmies/sprinkles, chips and cone on Whisper White. Bermuda Bay, Cinnamon Cider, Early Espresso, Rich Razzleberry and Soft Sea Foam. Punch out using the Ice Cream Cone Builder Punch. Add to the Whisper White Sprinkle layered piece. Wrap and tie in a bow, on top section, with the Rich Razzleberry Ribbon. Lift the card up, so the ice cream cone section stands almost up right, then add the greeting to the base of the card, so it holds up the top section.
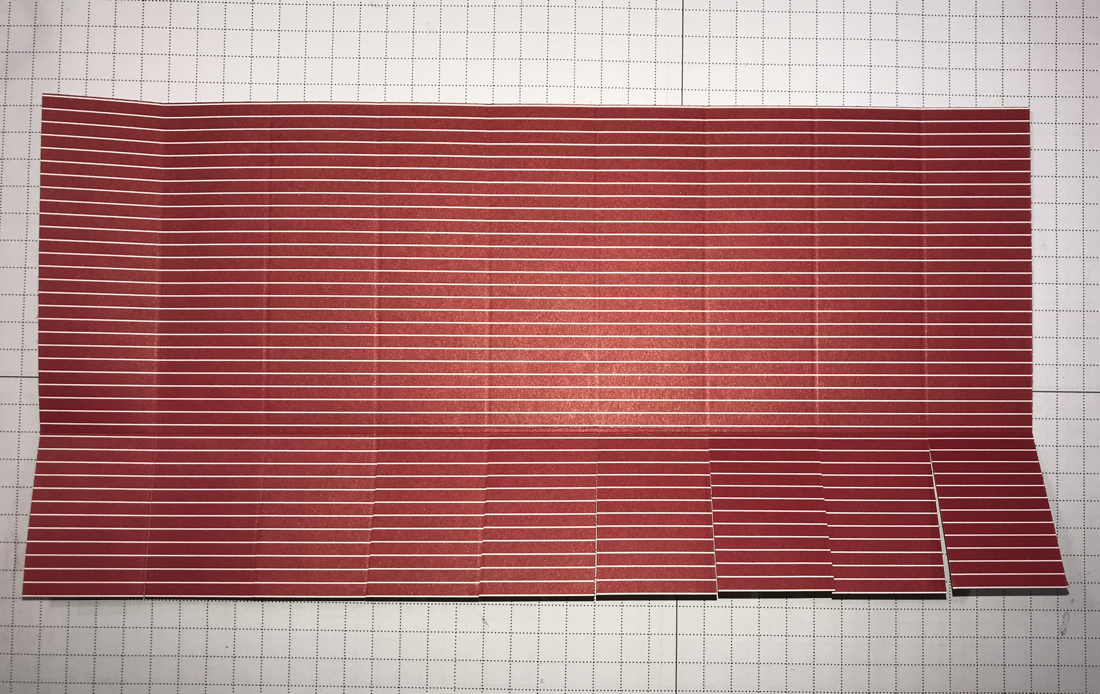
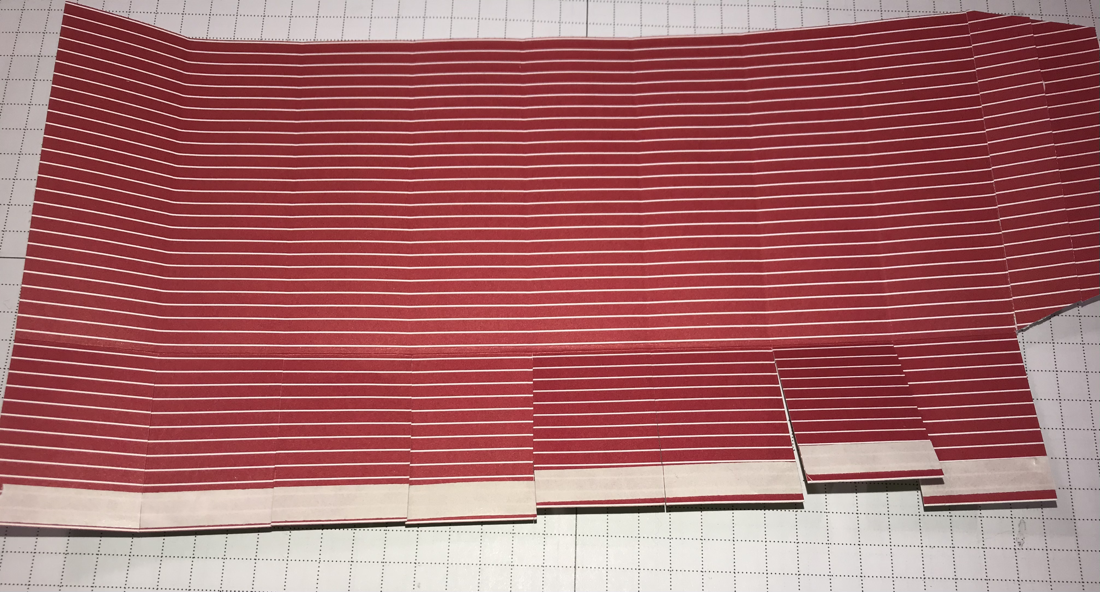
To decorate the box;
What do you think? SO FUN right? I just love how adorably fun this suite is!! Thank you for joining me today, be sure to leave a comment and visit blog! Happy Stampin! Steph  Below is the list of hoppers for this month's Blog Hop.
7 Comments
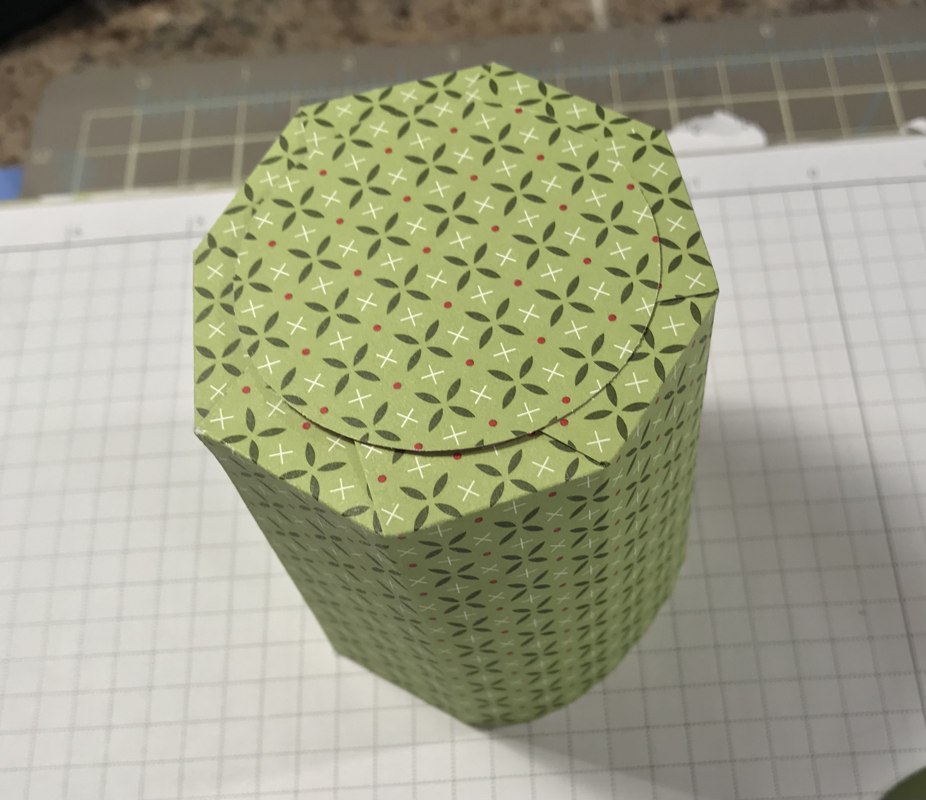
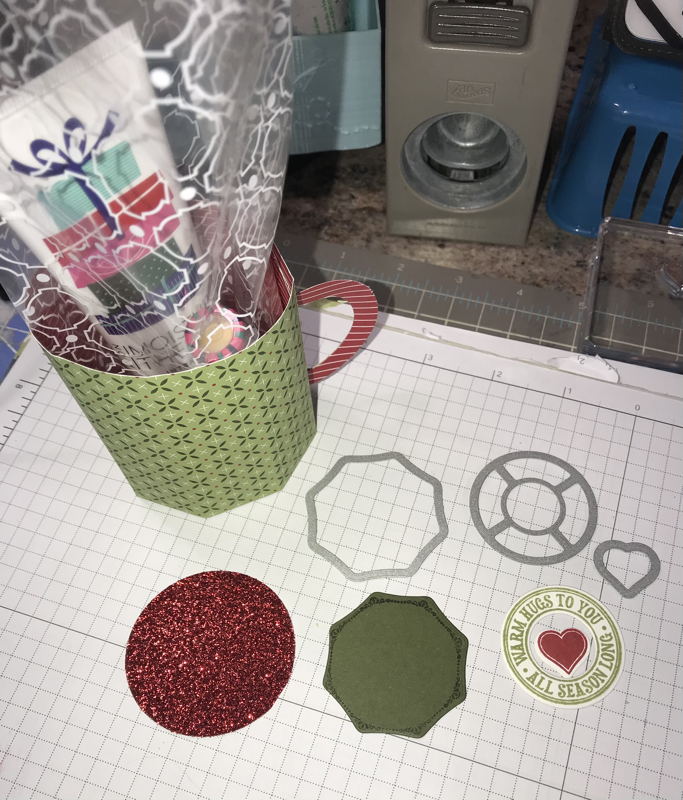
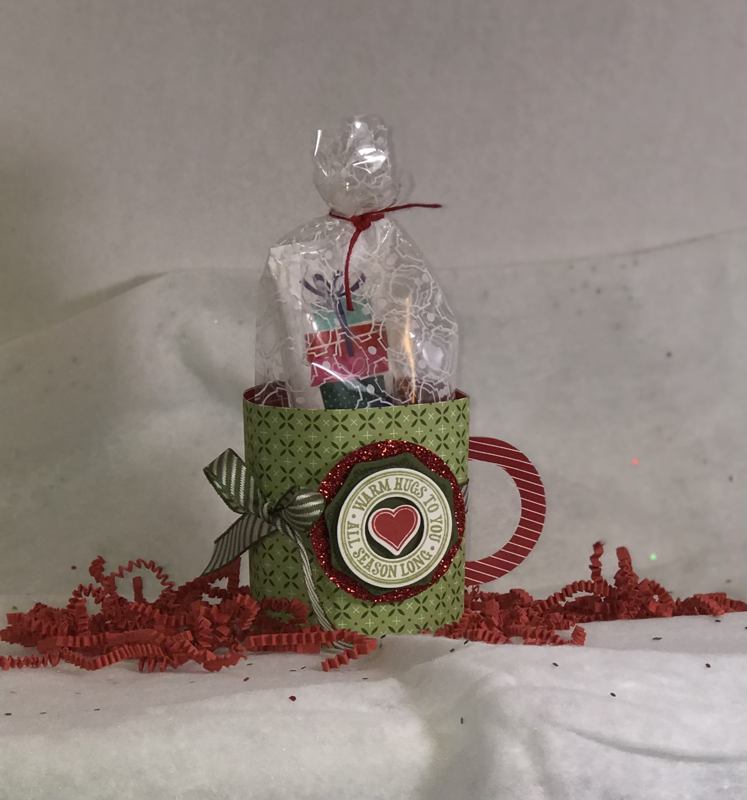
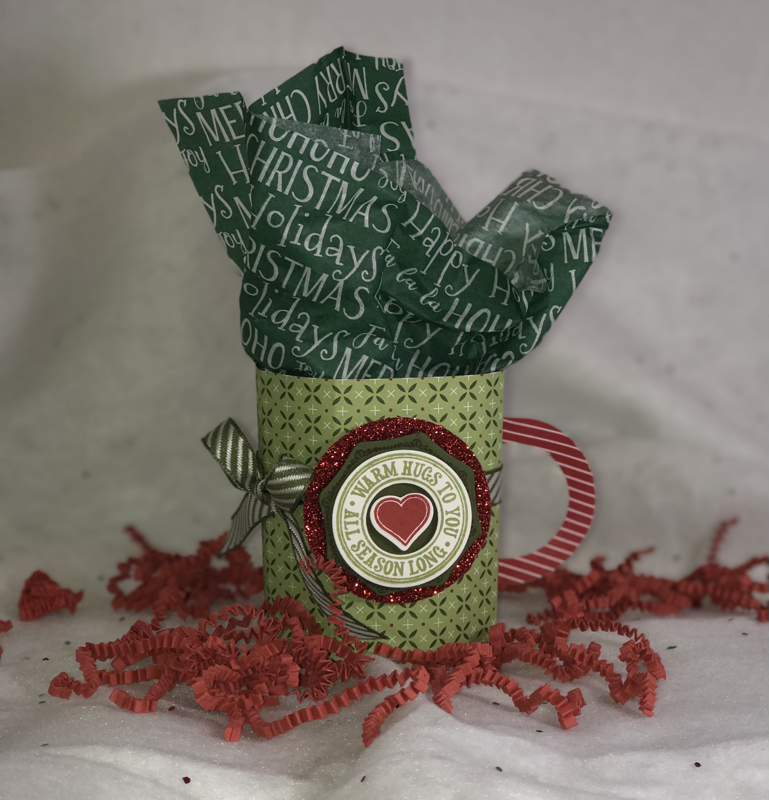
 Welcome to the Stampin Friends November Blog Hop! You will notice as you hop along our theme is Happy Holidays! Make sure to view all of this months hoppers! You’re guaranteed to be in the holiday spirit with some crafting inspiration!!!! This is our last hop of 2020, don’t worry we will be back in January 2021. With all the craziness this year has brought us, I am so happy to be a part of this blog hop! As I look back over the last several years, I love how my crafting has evolved and improved!! I truly feel honored to be a part of this group! It’s so fun each month to stay creating, to be inspired and to continue to be challenged! And for me the best of it all, is seeing all the beautiful projects that are shared!! I look forward to each month! It’s just so exciting to hop along aside these amazing and talented ladies from all over the US, UK, Australia and Germany! If you’re a paper-crafter, with a blog, and you’re interested in joining us, please contact me! I hope you are following along with our blog hop and you came from I just love her projects, or if you're just getting started with me, you can find the full list of hoppers at the end of this post. Once you finish with my blog, be sure to continue to Tiziana Milano's Blog and make sure to leave comments so we know you visited!! We love to hear from you!! 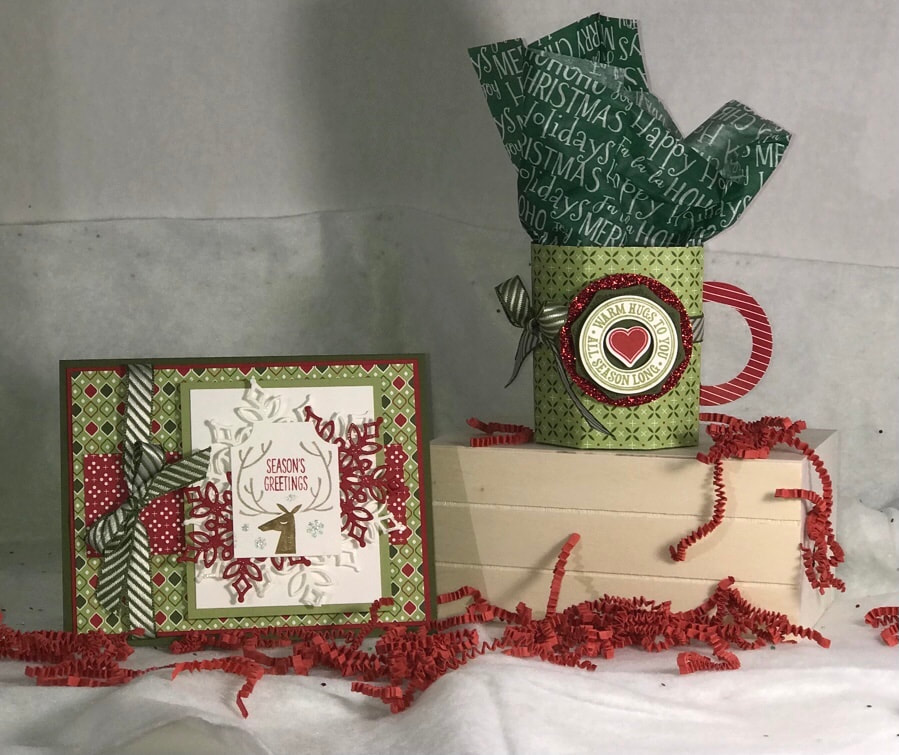 My project this month features a paper mug. I’ve been noticing these paper mugs all over Pinterest as I was searching for some packaging inspiration! I immediately shared this project with a friend who has been working endlessly on making Hot Chocolate Bombs!!! So fun and such a cute way to package a yummy treat! I used products from the Heartwarming Hugs Suite. I have also included a video showing you how to make the mug! To make the paper mug; you will need a piece of card stock or designer paper that measures 4 1/2” x 9” I used the Heartwarming Hug DSP. Now if you are using a piece of designer paper you want to have the side that is the inside of your mug face up on your Simply Scored Scoring Board. Start with the 9” side along the top and score every inch at 1”, 2”, 3”, 4”, 5”, 6”, 7”, & 8” Then turn the paper to the 4 1/4” side and score at 1 1/2” NOTE: before you score, make sure if your paper has a directional pattern that the pattern is facing the right way on the score board, the 1 1/2” line is the bottom of the mug! So when it's assembled that larger section should be facing correctly. Hope this makes sense!! Continue to have paper for the inside of the mug face up Cut the 1” score lines up to the 1 1/2” line. Then remove the bottom right corner section from the 8” score line up to the 1 1/2” line and then cut the top section at an angle....see the 3rd picture below! Add adhesive to the bottom tabs, flip over to the outside of the mug and then adhesive along that tab! Now lightly fold on the score lines as you roll the paper to adhere the sides! Attach the bottom piece overlapping each other to form the bottom! I punched out 2 - 2” circles one for the bottom and one for the inside, you don’t have to do this but it makes it look finished to me and adds a-little more support to the mug! For the handle I just layered 2 different sizes circle dies I cut out 2 glued them together and cut the almost in half! Bend the ends alittle and glue them to the mug! You could also use ovals, as well! Fill with some candy or whatever treats you like! I added some lotion and lip balm in a pretty bag! I used the Warm Hugs Stamp and coordinating Warm Wraps dies to make the greeting on the front and I also cut the Real Red Glimmer paper using a 2” punch! You can refer to the pictures below for more details! What do you think?? So fun!!! And so EASY. In order to accomodate the size of the Hot Chocolate Bombs, I had to adjust my measurements, but I will show that as another post when I make the final version! I can’t wait to make a bunch for my friend to package her goodies in! And now my card!!! Super easy layers! I used the same paper pack Heartwarming Hugs DSP and chose a couple different patterns. Start with a Mossy Meadow card base 4x5 1/4 piece of Cherry Cobbler DSP that measures 3 7/8”x 5 1/8” DSP that measures 1 1/2”x 4 3/4” 3”x3 1/2” piece of Pear Pizzazz 2 3/4”x3 1/4” of Whisper White Adhere the DSP onto the Cherry Cobbler add then add the DSP strip, wrap some Mossy Meadow Diaganol Striped Ribbon around the left side and tie in a bow, before adhering to the card base. I stamped using on a scrap piece of white using the Everything Essential stamp set. To get the different colors I used my Stamp n Write markers. I colored the stamp, the huffed on it to moisten and then stamp! So cool right? Then punched it out with the Tag Punch. I die cutted a few snowflakes from a retired set called Snowfall, I’m sorry I don’t have any news ones! And layered behind the tag before adhering to the card. 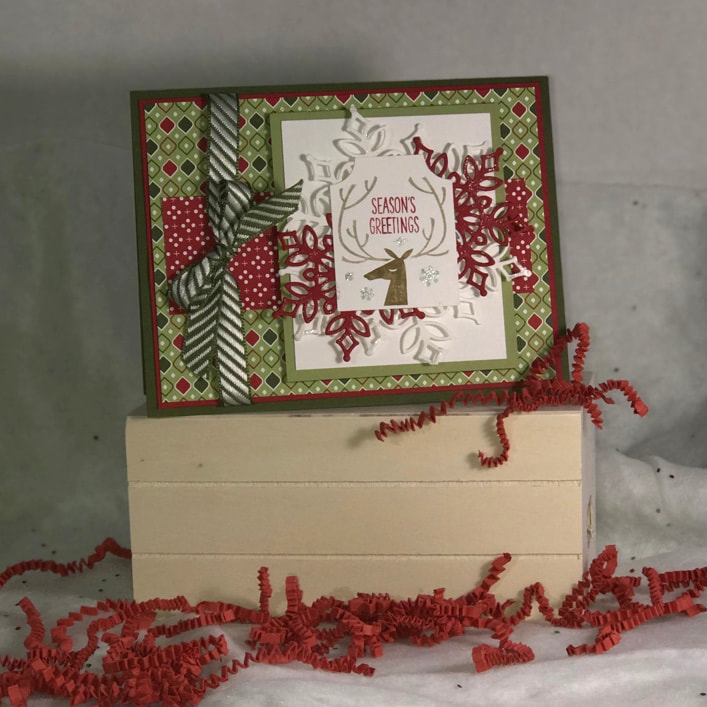 You can see below I have to cards, one with Real Red Braided Linen Thread and one with ribbon! Which one do you like better??? I can’t decide!!! 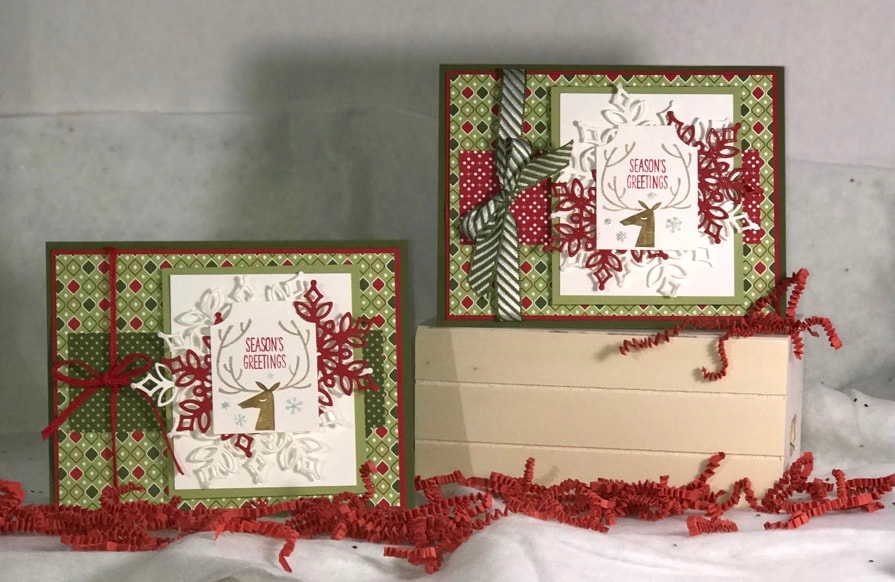 Thank you so much for joining me today!! I had so much fun creating my projects I hope you enjoyed them!!! Be sure to continue to Tiziana Milano’s blog for her awesome projects!!! Thank you again Happy Holidays & Happy Stampin Steph Below is a list of participants in this month’s Blog Hop. Be sure to visit everyone’s and leave a comment we love hearing from you!
I am excited to share with you October's Stampin Friends Blog Hop! The leaves are turning colors and the air is getting cooler! I just love the fall! Today is a beautiful sunny day with ble skies! It helped inspire me to be creative! This month's theme is Thanks, Thankful, Thank You! So basically anything Thanks. I hope you are following along with our blog hop and you came from Jean Beaulieu's blog! I just love her projects, didn't you?? Be sure to continue to Anne Marie Hile's blog and make sure to leave comments so we know you visited!! 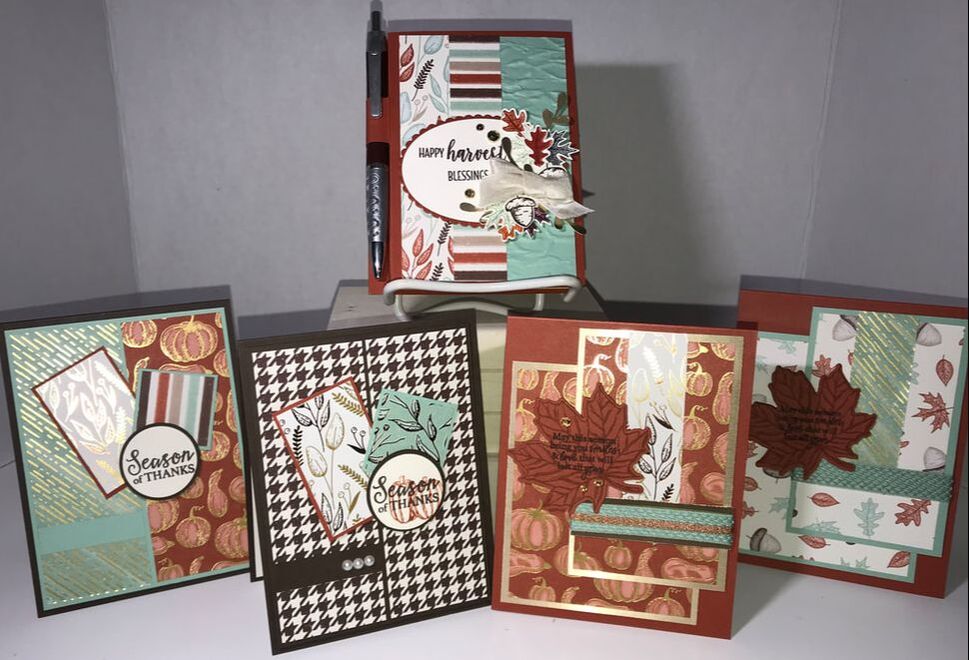 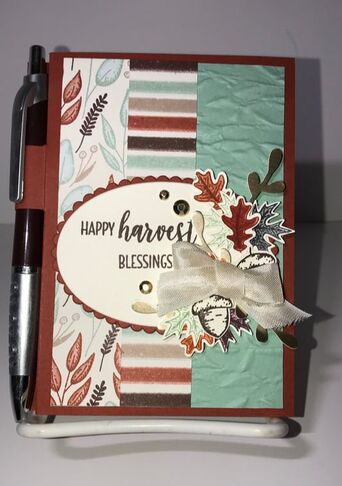 Many of you may have heard about World Card Making Day! This is a huge day for paper crafters all over the world. We strive to make as many cards as possible. But most importantly MAIL many cards! I had planned a quick online event to demonstrate the cards I would be working on. And.......technology had a different agenda for me. I started off with many technical issues and had to restart my Facebook Live - so needless to say an hour turned into 2. I wanted to thank the participants that rejoined with words of encouragement for me. So I made this cute little notepad holder using the Gilded Autumn Suite! I found a the little pack of notepads at the Dollar Tree. They come in a variety of different colors. Originaly, I just measured the cardstock to wrap over the notepad. But I felt like it was missing that finished looked. The clock was ticking to finish before the weekend. So I searched and searched and came across this YouTube video from Kitchen Table Stamper and it was perfect! She even used the same notepads from the Dollar Tree. It's the perfect size and her directions include the pen/pencil holder. I used the coordinating colors from the designer series paper. Cajun Craze as my cover. Next I layered Mint Macaron embossed with Old World Paper 3D Embossing Folder and added 2 strips DSP from the Gilded Autumn Speciality Designer Series Paper. I stamped the leaves and acorns with Cajun Craze, Early Espresso and Mint Macaron ink from the Beautiful Autumn Bundle. The greeting I used is from the Country Home stamp set and I stamped it on Very Vanilla cut out using the Layering Ovals dies. I'm so happy how the notepad cover came out! I have already hand delivered to my viewers that were local and they loved them!!! 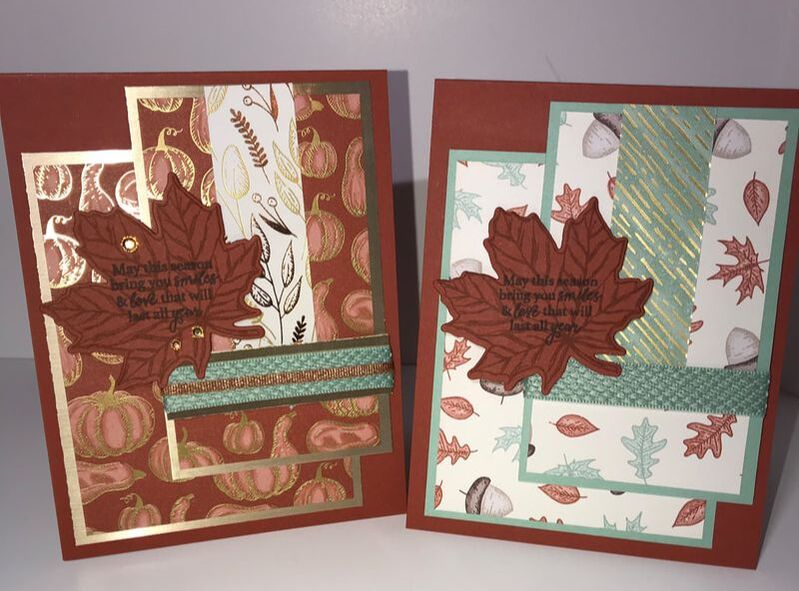 Whenever I make cards, whether it's for a hop, challenge, order or event if I am in a need of a specific card, I always make 2. It's been a habit ever since the first Stampin Up event I eever attended. I normally only show 1 card since there's no need for both, especially if I make them the same. And we only need to share a card and a project for the Blog Hop. But today I am not just showing you 1 or 2. I am showing you 4 cards! I was on a role and I just kept going! I said "Why Not!" For the cards above, they were so easy to make. And I used up some smaller pieces of DSP from the pack....which I sometimes, never know what to do with! For both cards, I used the same layout and Cajun Craze as the base. I scored the cardstock on the 11" side to 5 1/2" then on the 8 1/2" side, I cut at 4 1/4". My layers are as follows: Cardstock 4 1/2" x 3 1/2" Layer 4 1/4" x 3 1/4" Cardstock 4 1/2" x 2 3/4" Layer 4 1/4" x 2 1/2" Layer 3"' x1" Layer 3/4" x 2 3/4" (on the left card wrap with the Basket Weave and Metallic Ribbon Combo Pack) on the right, just the basket weave ribbon. I stamped the leave on Cajun Crazy, using Cajun Craze ink and then stamped the greeting with Early Espresso. The images are from the Gather Together Bundle. These cards were fun to make and I liked that I tried a slight stepped up version on the left. #stampinup #gildedautumnsuite #stampinandscrappinwithsteph #msscardchallenge22 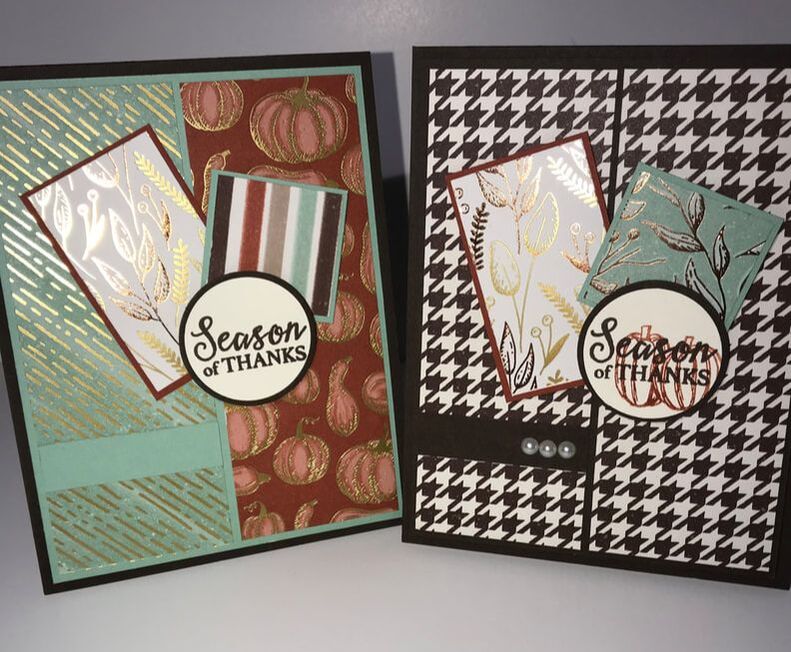 These 2 cards are also made using the Gilded Autumn Designer Series Paper! I am going to be sad with this paper is gone! It's just so pretty! The cardbase is cut the same as the previous cards and I used Early Espresso! The card on the left has Mint Macaron and Cajun Craze and the card on the right, is Early Espresso with Cajun Craze and Mint Macaron. To make the card: Cardstock 4" x 5 1/4" Layer 1 7/8" x 5 1/16" (you need 2) Cardstock 2 1/2"x 1 1/2" Layer 2 3/8 1 3/8" Cardstock 1 1/2" x 1 1/2" Layer 1 3/8" x 1 3/8: Circles 1 1/2" and I 3/8" Cardstock strip 1/2" x 1 7/8" So easy to assemble!! Simple layers! #stampinup #gildedautumnsuite #stampinandscrappinwithsteph #msscardchallenge23 I hope you enjoyed the projects I have shared with you for this month's Blog Hop! Be sure to leave a comment and 1 lucky person will receive the notepad cover! Continie to Anne Marie Hile's hop and see what amazing projects she is sharing this month! Thanks for joining me Happy Stampin! Steph Below is a list of participants in this month's blog hop
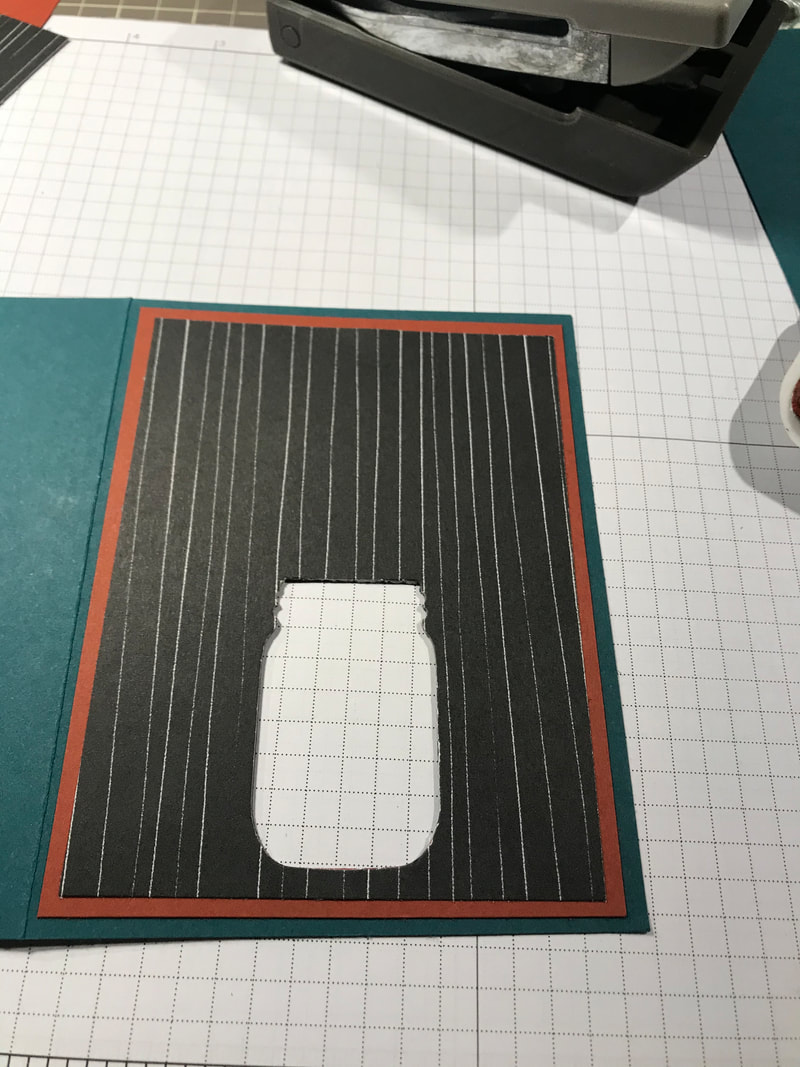
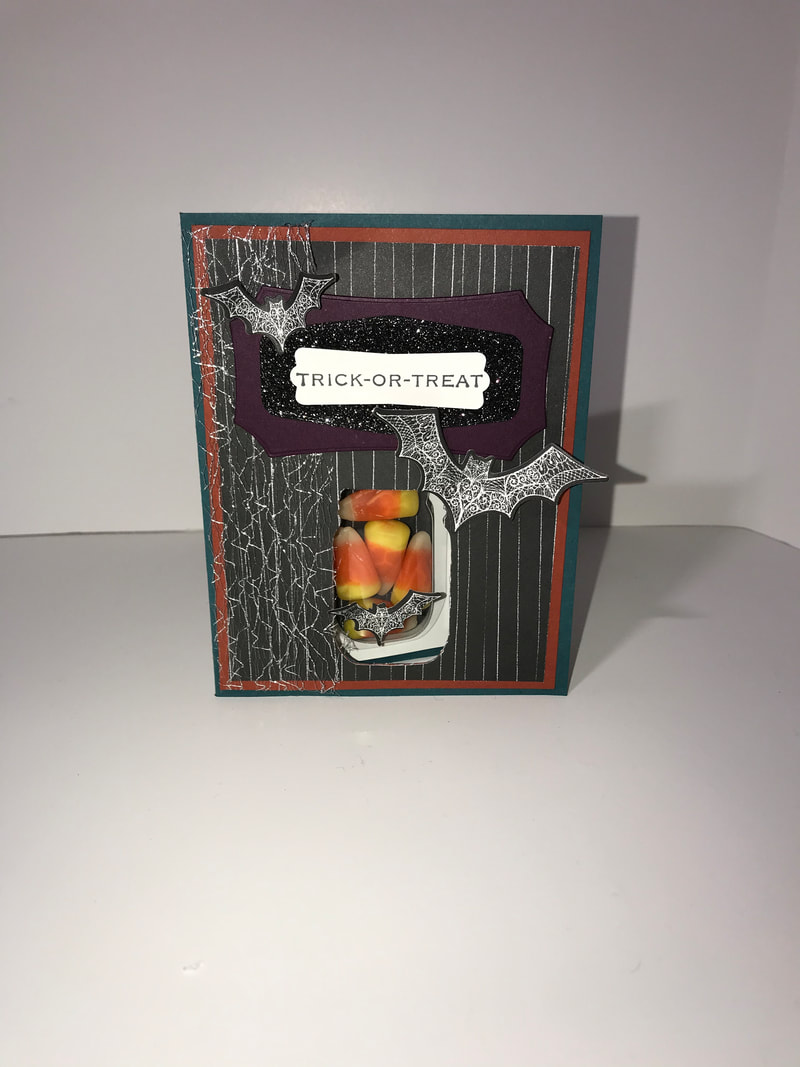
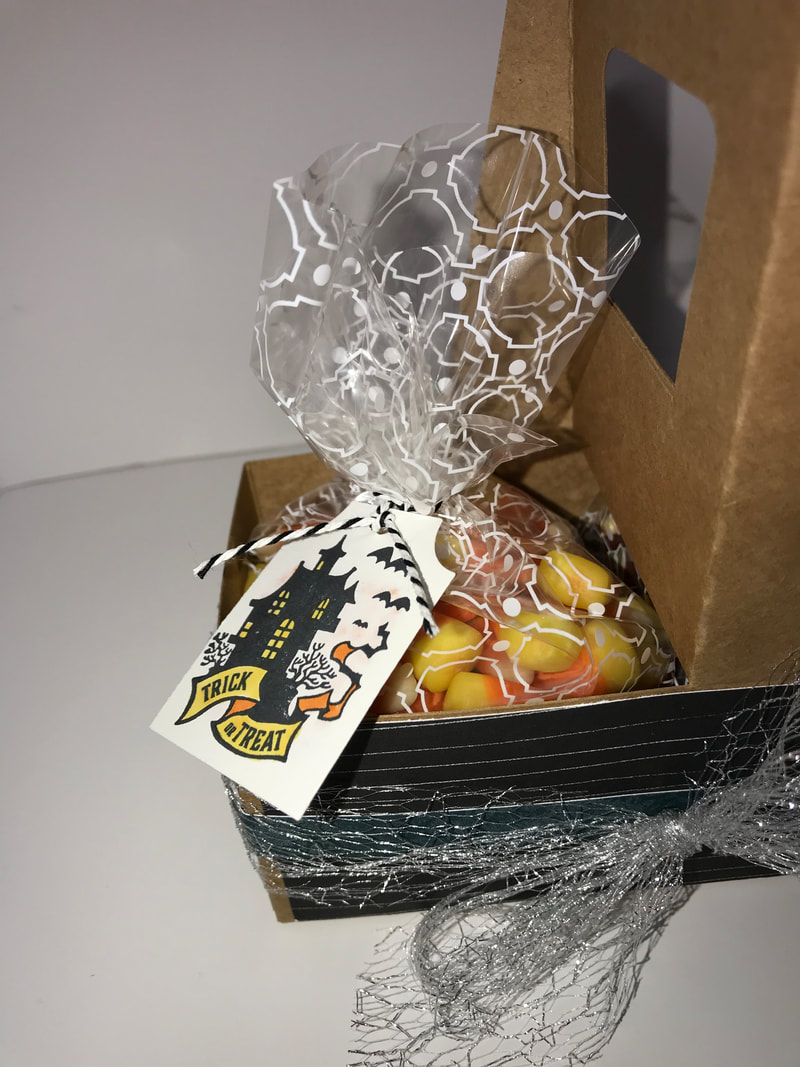
I am excited to share with you September's Friends Blog Hop! Each month I work hard to come up with a card a projects that are new and different than what I've done in the past. This month's theme is Fall, Outdoors or Halloween depening on where we are located! Normally, I would be working on Hallween Treats to pass out when we are camping to all the Trick or Treaters. But, as you know, Trick or Treating may not be happening. So I wanted to come up with a few treats that I can give my kiddos. And... while I know they appreciate the time and effort I put into handmade treats for them, I know they don't keep the packaging.... I hope you came from Melissa Thomas's Blog and be sure to continue to Katja Ettig, their projects were really amazing! If you missed someone along the way, you can find a list of all hop participants at the end of my projects. 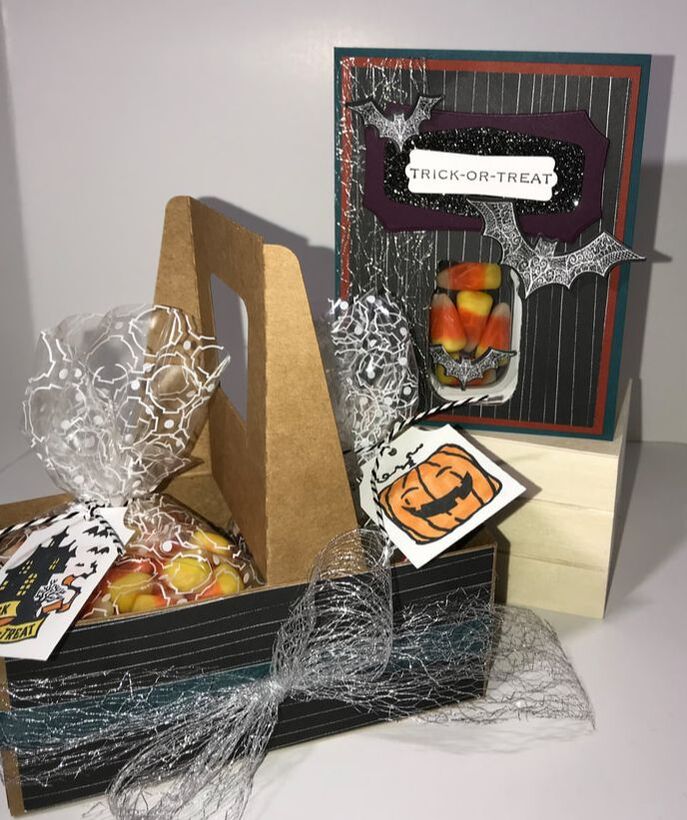 My projects were fun to make and feature new products from the Stampin UP Mini Catalog. Both projects use the Magic in This Night Suite. This suite, to me, doesn't use the traditional Hallween colors like black white and orange, but uses colors like Blackberry Bliss, Cajun Crazy and Pretty Peacock. Which together are just perfect for the season! 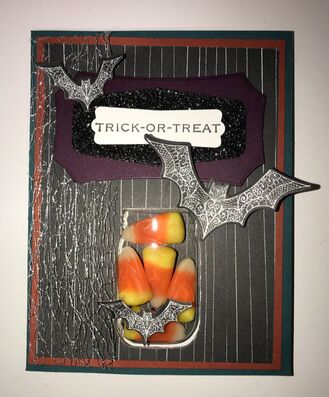 I kept my card layout pretty simple. I started with a Basic Black cardbase, the added a 4 x 5 1/4 layer of Cajun Craze then 3 3/4 x 5 layer of DSP. Before adhering the layers together, I used the jar punch and from the bottom, I put the paper into the punch as far as it would go and made sure it was centered. Then punched. Then I used this layer as a template for the next and for the cardbase. I wrapped the Metallic Mesh Ribbon around the layers and then added to the cardbase. Next, I added the new Mason Jar Shaker Domes, making sure the clear part is popped out of the top of the card. Add your contents. Then I took the black jar that gets punched out of the cardbase...... ...and add adhesive to one side. Add this to the backside of the dome. Make sure the adhesive side is out. Remove the tape off the dome and fold the back side of the card up. The dome will now be stuck to the inside of the card. But the dome will pop out of the opening you punched out!!! Hope this all makes sense. It really is easy too do! I will be sharing a Facebook Live on my Stampin & Scrappin Page, Friday to demonstrate the card. Next add the Blackberry Bliss cut of of the largest label Hallween Magic dies in the suite. I also cut out the Black Glimmer Paper using a die from the Tasteful Labels Dies. I cut the bats out of the DSP using the Hallween Magic Dies, they line up perfectly! It seems like theres alot but I promise it really is easy to make! To make the treat holder, I used the Mini Coffee Carrier and decorated it with DSP. I used the same pattern I used on the card. I got 2 of each sizes then I took a strip of 1/2x12 DSP and 1/2x6 to wrap around the base. Next I wrapped the Metalllic Mesh Ribbon and tied it in a bow. I used 2 Mosaic Gussetted Cellophane bags and filled one with candy corn and one with mini chocolates. Tied them closed using the Black/White Baker's Twine from the Playful Pets trim combo pack. For the tags, I used the Everything Essential Bundle. I stamped 2 tags, bothsides. One side was the Haunted House - Trick or Treat and the otherside the Jack-o-Lantern. I colored the windows and label on the house with Daffodil Delight and a little Pumpkin Pie. And I colored the Jack-o-Lantern with Pumpkin Pie. This way no matter which way the tag is laying there is an image showing. I used a whole punch and added the tags to the twine and finished with a knot. So Fun. You could also decorate and fill the Mini Coffe Cups with treats. But since I'd give these to my kids, I decided the bags will do!!!! I hope you enjoyed my projects. Be sure to visit Katja Ettig blog and see her amazing projects! Thanks for stopping by Happy Stampin Steph Below is a list of all the Stampin Friends Blog Hoppers.
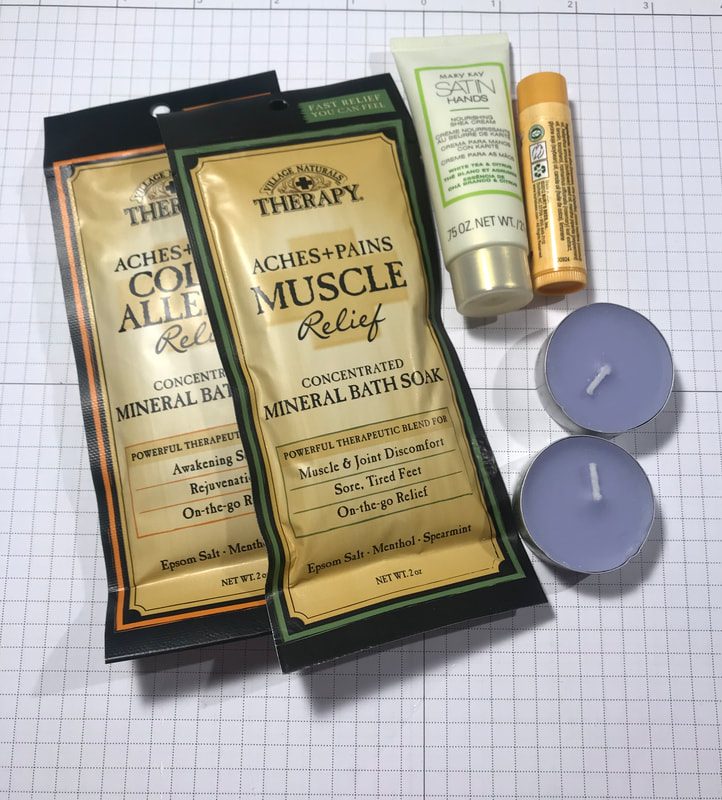
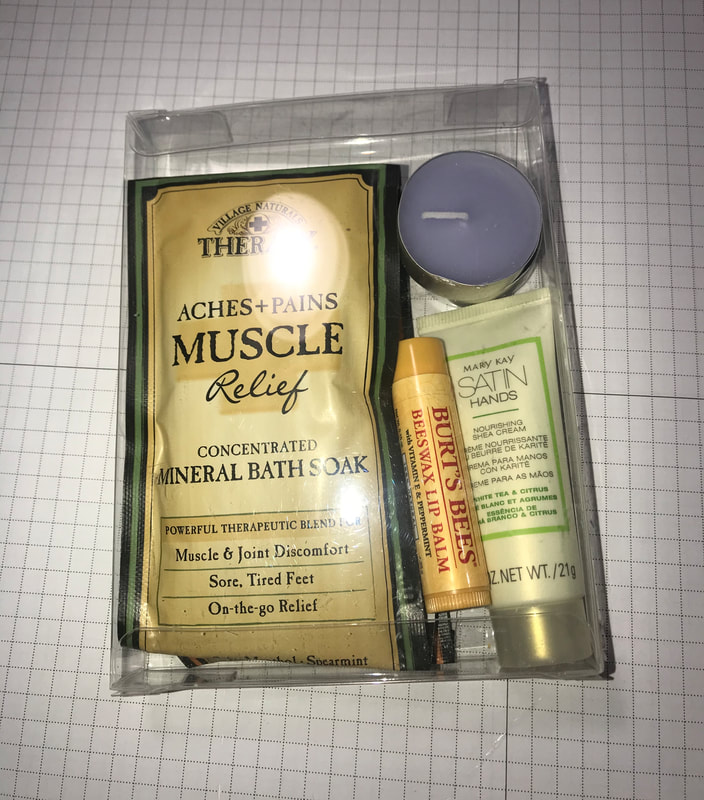
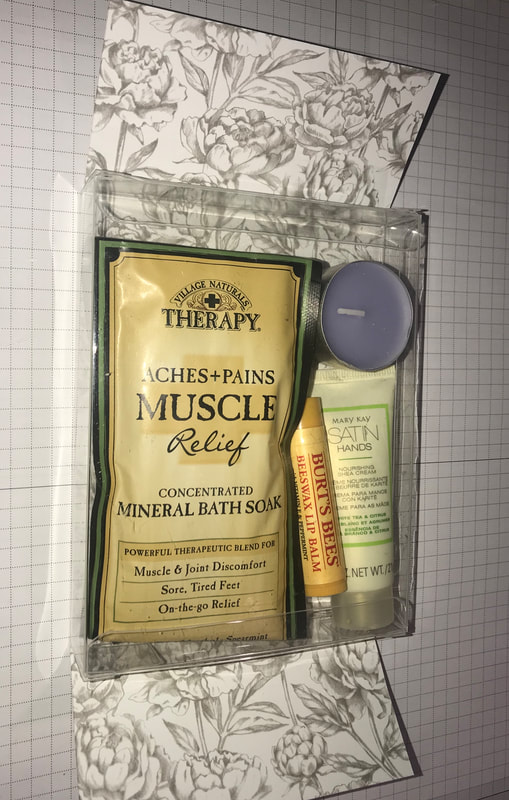
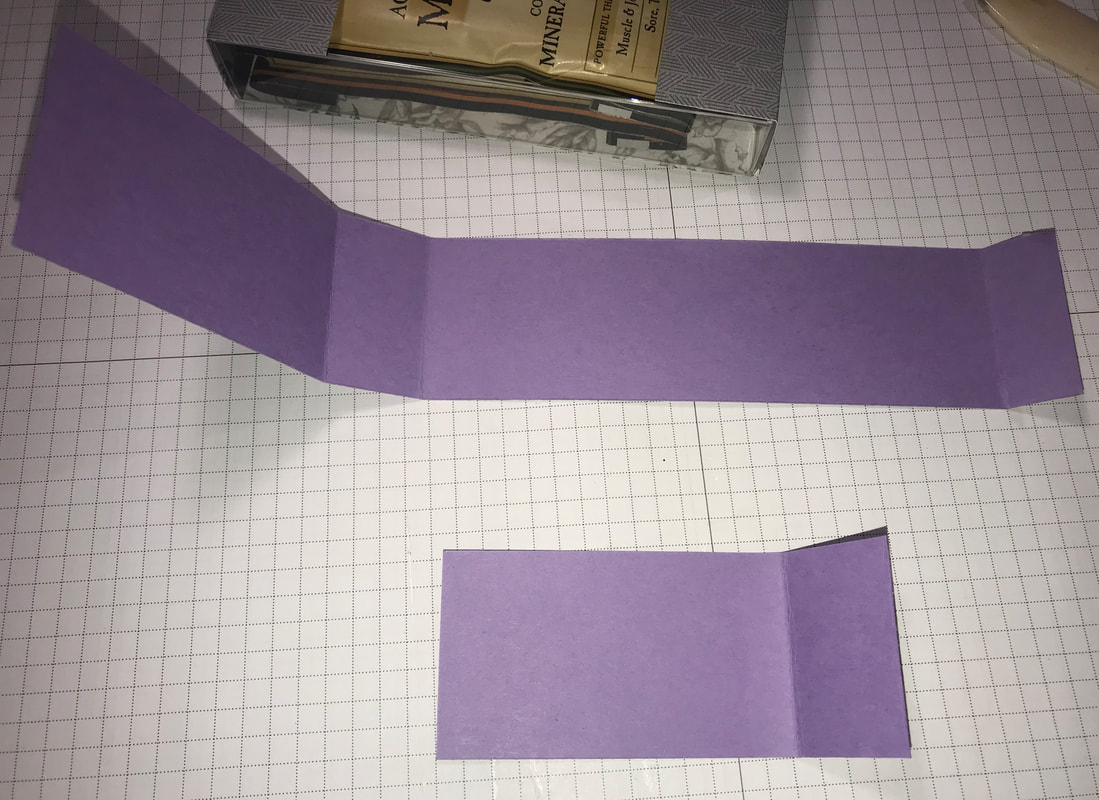
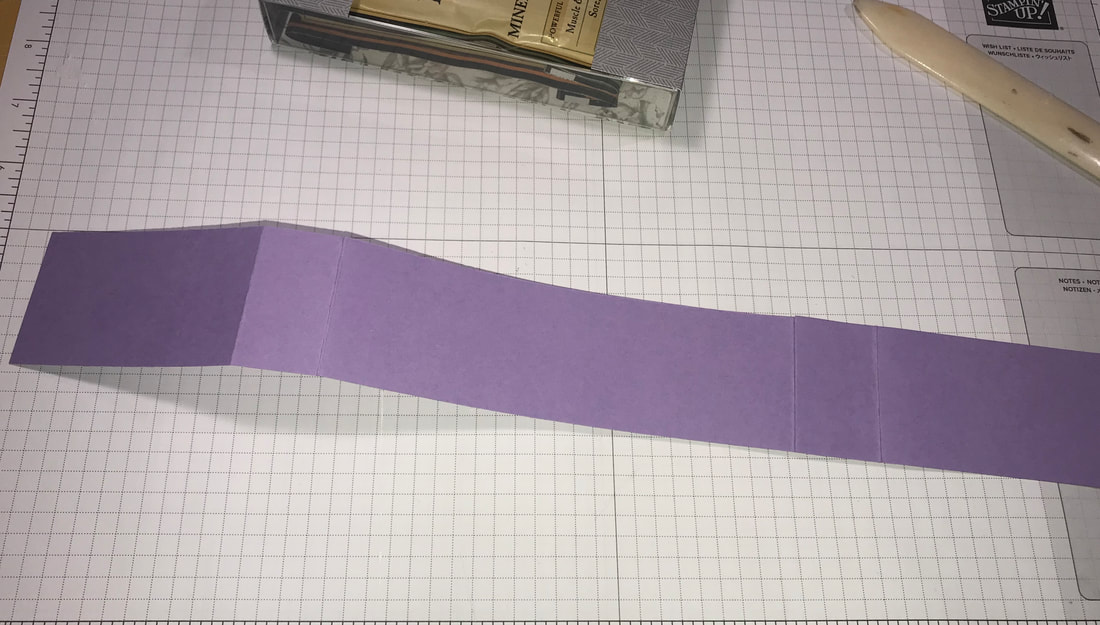
Thank you for joining me for another month of Stampin Friends Blog Hop! We have a jam pack hop this month with so many talented papercrafters!!! August theme is Well WIshes. I think this theme is great for saying "Hi" to friends & family and sharing some well wishes. Letting them know we are thinking about them even during this crazy times! I hope you came from Kim Lamos Blog and be sure to continue to Jo Blackman's Blog, their projects were really amazing! If you missed someone along the way, you can find a list of all hop participants at the end of my projects. 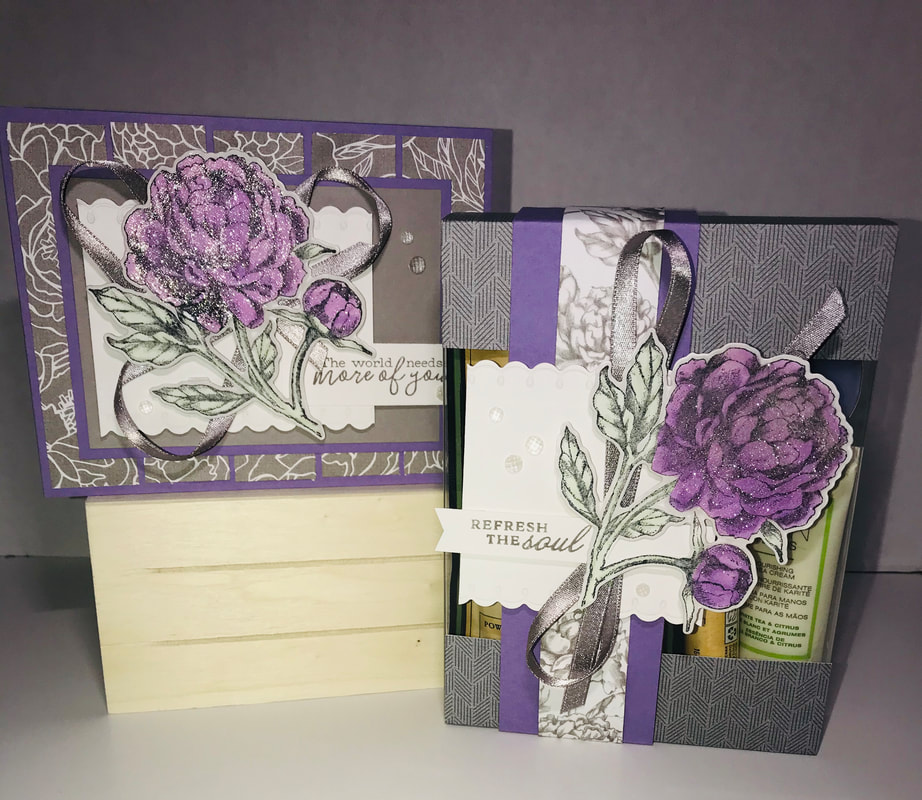 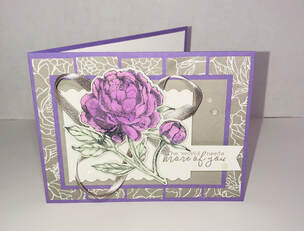 First, I will share my card with you! I was inspired by a card challenge to use a cardsketch. I will share that sketch so you can see the measurements! I used the Prized Peony Stamp Suite, stamp set, matching dies, elegant faceted gems, ribbon and DSP. The cardbase is Highland Heather and Gray Granite layers. I stamp the flower in black ink, nut stamped off once, as I didn't want the black to be so dark. Then I colored the flower using the light and dark Highland Heather and Soft Seafoam Stampin Blends. Before adhering the flower with dimensionals, I added a swirl of the Gray Granite Shimmer Ribbon and finished off with the Elegant Faceted Gems. And last but not least I went over the flower with Wink of Stella. Below is a picture of the cardsketch I used, it includes the measurements for this card! #msscardchallenge15 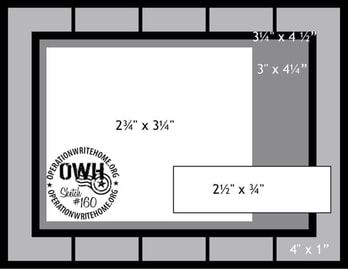 For my project, I decided to revist I project I put together for a vendor event. I really love this and have used a version of it many times for quick gift giving! My girls like to give treats and gift cards for gives and this comes together quickly to give a fun gift to friends. So for this, I choice some bath soaks, lavender candles, hand cream and a lip balm. You can use anything really to build this pampering package! After I made it my daughters said I should have added some facemasks.....maybe for the next set! I used acetate card boxes to hold everything. Now, Stampin Up does sell them, but they aren't wide enough! I found the perfect size on Amazon. I have fun decorating the box and it depends on what I put inside that drives my mood. I used the same colors and started with the Peony Garden DSP. I love that one side was a more solid pattern and then the opposite was a Gray Granit Floral. Although most of the paper is covered by the products inside, I like that there was a "background" to the box. Now I could have just cut the DSP to fit inside the box, but I like the wrapped look. 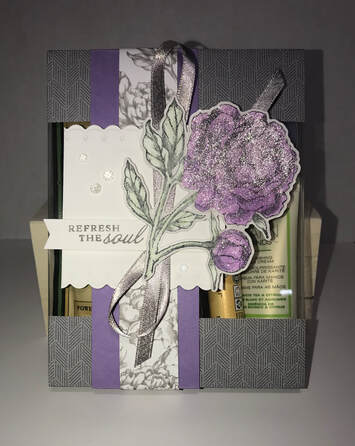 To make the wrap, I used a piece of DSP that measures 4 1/2"x10 1/2" you can see in the third picture below, how I wrap the paper on cover just the ends. I use glue dots on the corners to secure in place. You can just use the belly band to hold the wrap in place, but the glue dots prevents the edges of the paper from curling up. Then I cut 2 pieces of cardstock1 7/8"x11" and 1 7/8"x 4 7/8". I gently wrap the longest piece around the box, crease were the paper would fold and then determine where it will end, then adhere the shorther piece on. I use my bone folder to make a crisp line where the paper folds. And then wrap it around the box and adhere the 2 ends together. For the DSP, I just cut a 1" strip and adhered it to the cardstock as I wrapped it around. Now you can cut 2 pieces of DSP so it wraps completely, but I knew that part would be covered. So I just used 1. I cut a piece of Whisper White cardstock to 3x3 and then used the edgelit in the Peony dies and trimmed the edges off 2 sides of the square, just enough to cut the edge off. I used dimesionals to adhere the white CS to the band. The flower was made the same way I made for the card and I added the ribbon and gems to match. I love it! So simple yet so elegant! What do you think??? I hope you enjoyed these projects, be sure to leave me a comment and continue to Jo Blackman's blog. Thanks for hopping with me Happy Stampin Steph Below is a list of all Blog Hop Participant;
Thank you for joining me for another month of Stampin Friends Blog Hop! We have a jam pack hop this month with so many talented papercrafters!!! July's theme is Anything Goes. So we get to pick and choose what and how we want to share! I hope you came from Melissa Thomas's blog, wasn't her projects wonderful!!! After viewing my blog, be sure to check out Barbara Welch's blog for her projects. And if you missed someone along the way, you can find a list of all hop participants at the end of my projects. 
Using your Simply Scored Scoring Tool, Score with the 11" side at the top at 2 3/4" Then turn a complete 180 and score again at 2 3/4". I added a layer of card stock to each section that measure 2 1/2"x4" Next cut 2 piece of cardstock to 1 7/8"x5 1/4" I added the DSP layer on top of each which measure 1 5/8"x5". I then wrapped 1 with a ribbon and tied a bow and the other I just added the ribbon around. Take these pieces and added one towards the top on the left fold and then one towards the bottom of the right fold to create flaps. I stamped the images and cut them out. Added a layer of Whisper White to the inside and stamped the greeting and images again.
Thanks so much for stopping by and visiting my site during this blog hop! Be sure to visit everyone who participated and leave them a little comment so they know you were there. Happy Stampin Steph Below is a list of this month Blog Hop Participants, be sure to visit everyone's blogs to see their projects!
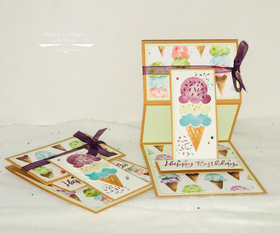
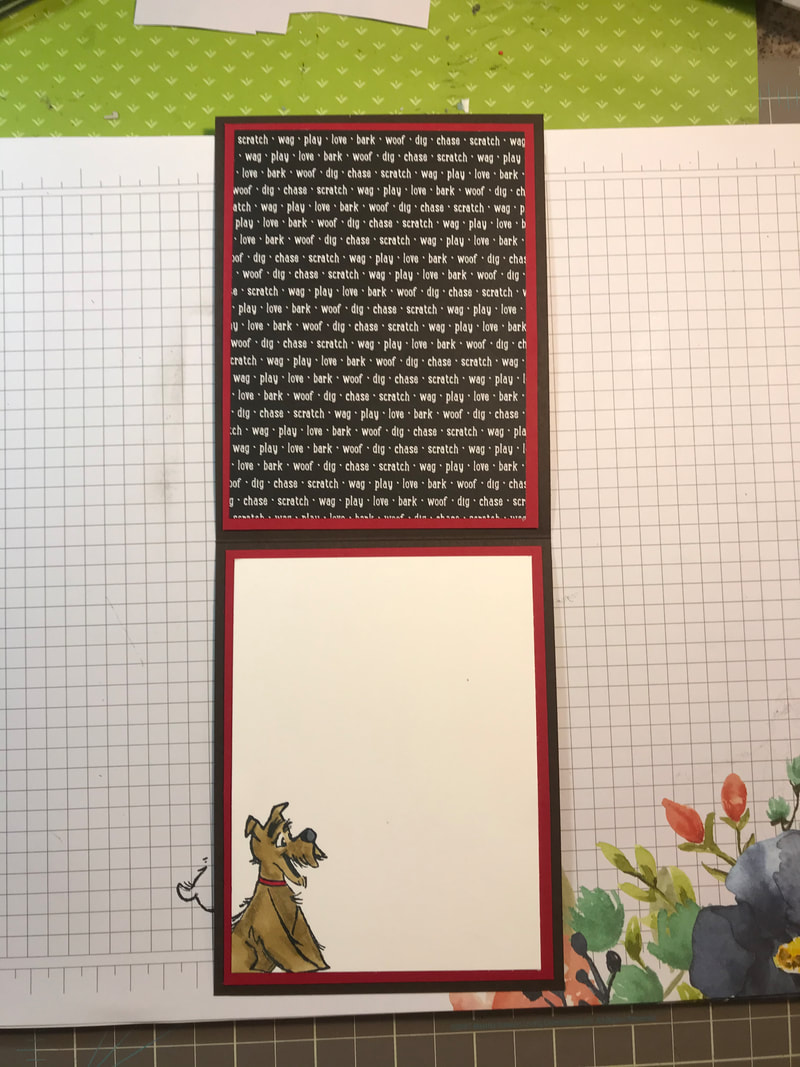
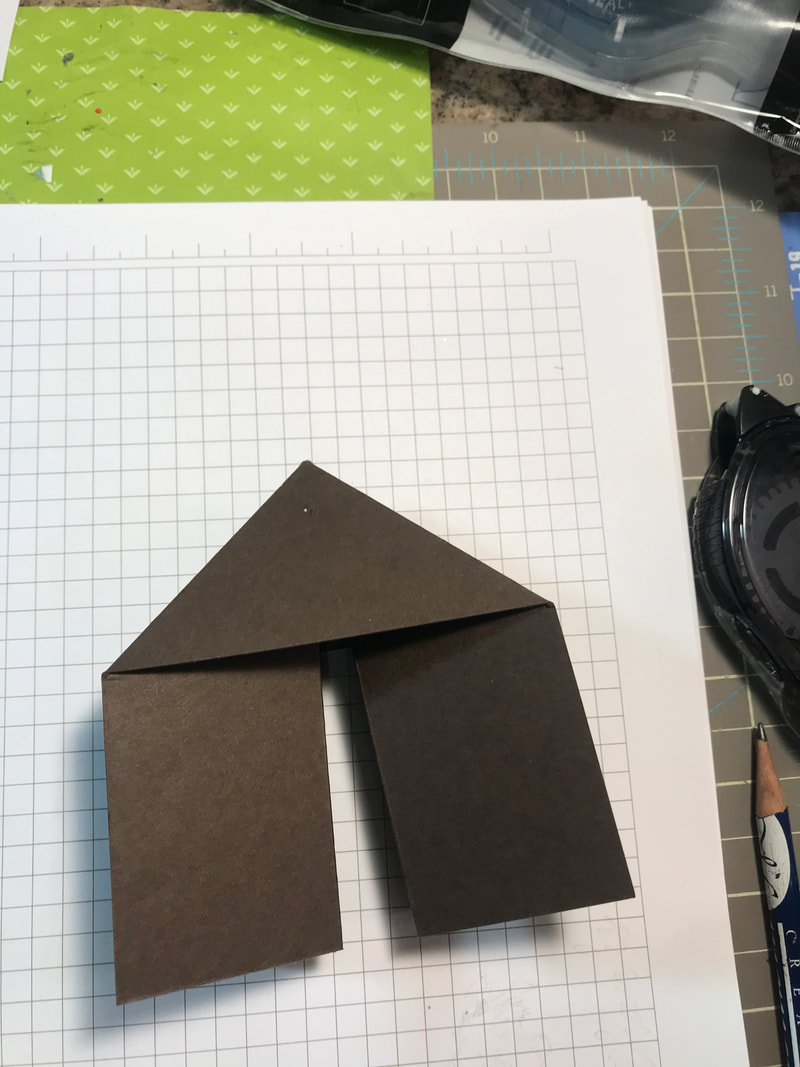
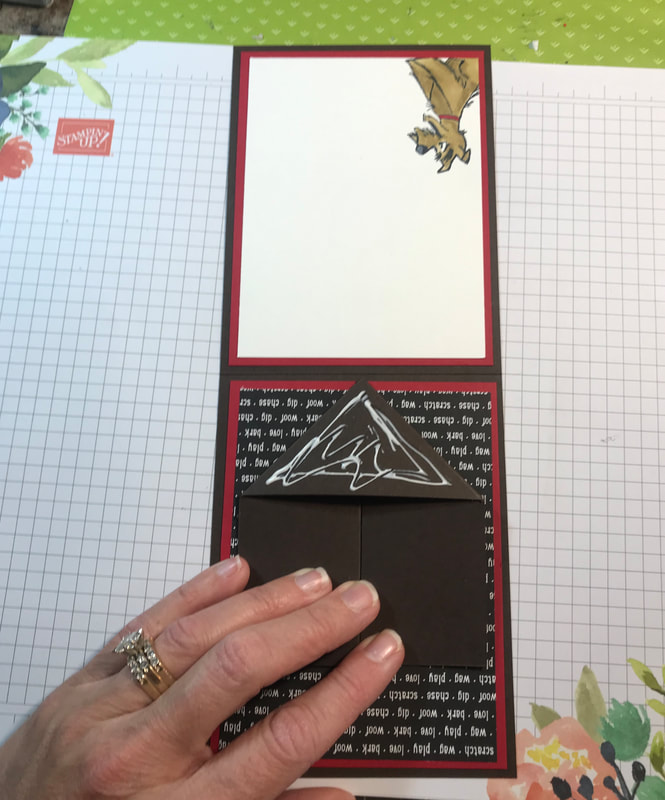
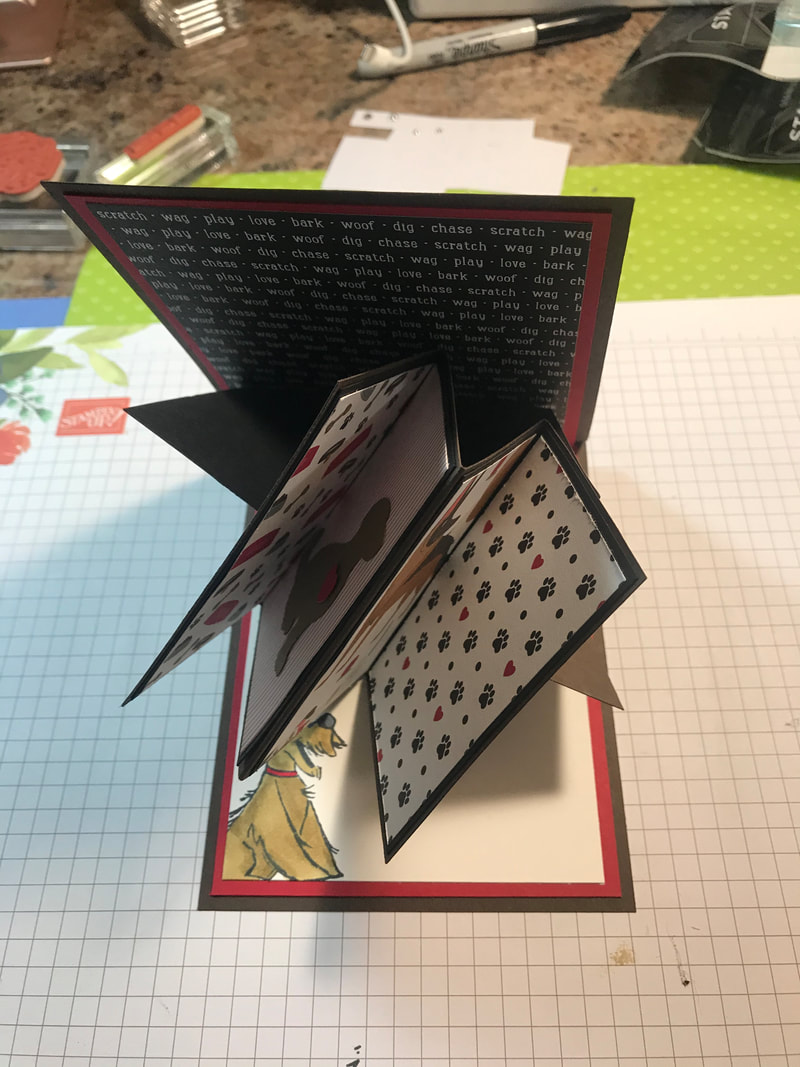
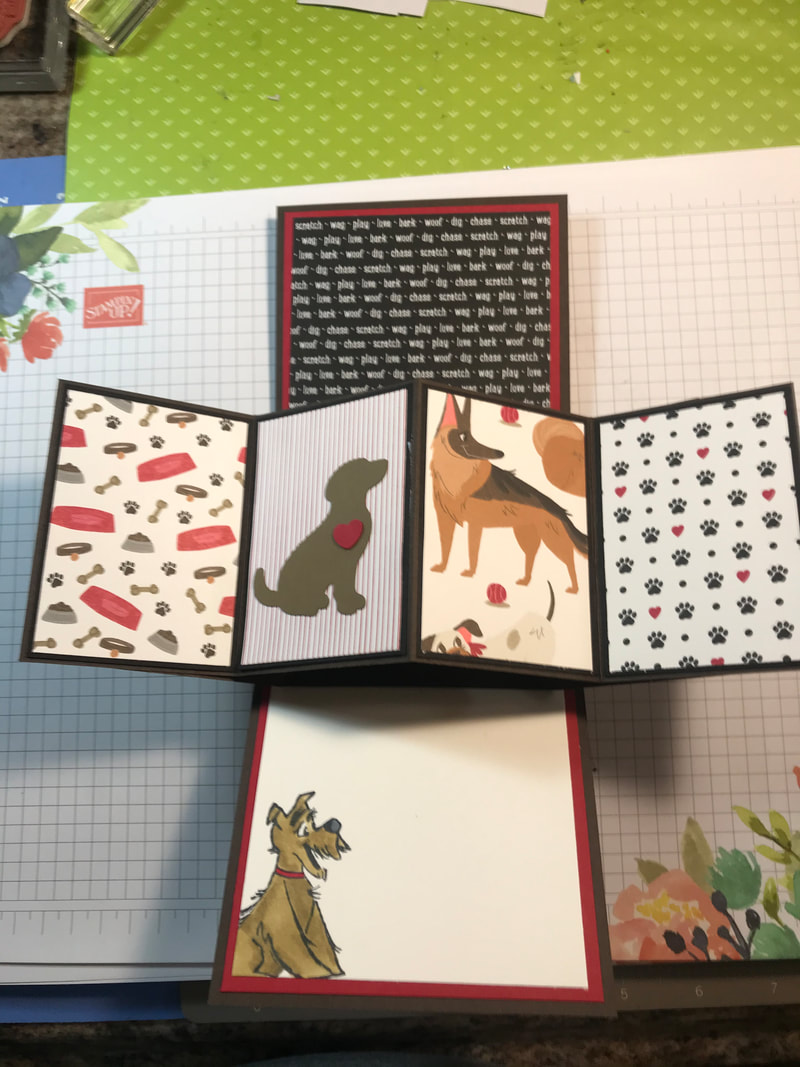
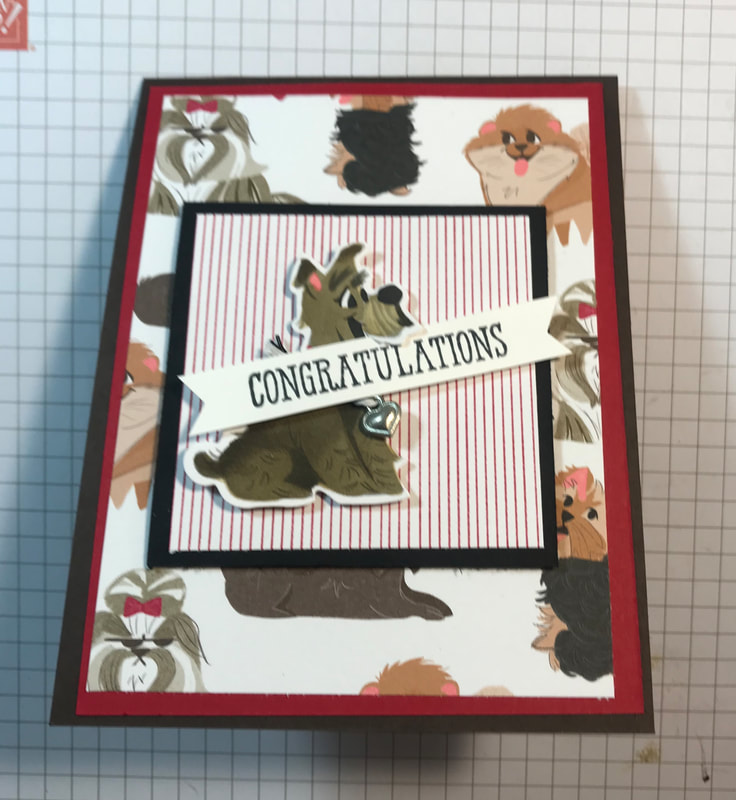
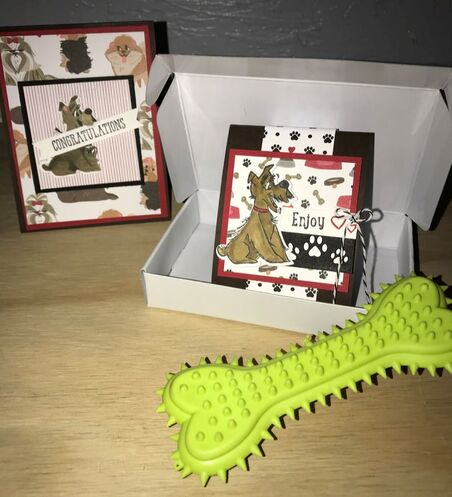 Oh My Goodness!! I'm super excited to share with you my projects for this month's blog hop. June's Hop is a more general theme of What's Going On! For many of us, school is ending, graduations or weddings are being celebrated and families head on vacation! Here in the US we are rolling into our summer. For Stampin Up Demonstrators, it's like a holiday! Our new Annual Catalog is Live in June and there are so many fun new products to play with! I hope you are going to join our hop and follow along, if you came from Barbara Welch’s blog, thanks for continuing on! Weren't her projects amazing!!! Be sure to follow to the end and continue on to the very talented Teri Pocock's blog So many of our friends have gotten puppies during this stay at home time! That I thought it would be fun to make them little treats! I chose the Playful Pets Suite, and oh my it's is too stickin' cute!!! The Designer Series Paper features images for both dog and cat lovers and uses a fun combination of Early Espresso, Basic Black, Real Red, Cinnamon Cider, Soft Suede, Flirty Flamingo and Whisper White. WOW so many fun neutrals with a pop of color! While my card fold is not a new fold at all, it is new to me. I gave a whirl at the Twist and Pop Fold Card or Twist and Fold Card. There are many many tutorials on Pinterest that you can search and follow! It was really fun to make and not at all as intimidating as I thought it would be! Not sure why I waited!!! I used Early Espresso as my card base which measures 4 1/4x11 score 5 1/2 and fold in half. I used layers of Basic Black and Real Red. I am so happy the way this card came out! For the front, I cut out the dog using the dies. The dog is an image on the DSP! I love that the dies cut out the images! I tied a little heart around the dogs neck. The greeting is from the Well Said stamp set. I trimmed the mouth a little bit so it looks like the dog is holding the greeting.
I hope you like my projects. Be sure to leave a comment and follow along and visit everyone's blogs! Leave comments we love to hear from you!!!
Thanks for hopping along Happy Stampin Steph Some fun cards going in the mail today using the Stampin Up Share Sunshine PDF download and the It Starts with Art retired suite. The Share Sunshine PDF Download has ended and we are happy to announce that the proceeds for this digital stamp set totaled $218,196. 100% of these proceeds will be donated to COVID-19 response funds benefitting frontline workers and vulnerable communities! Thank you to everyone who purchased this download!!!
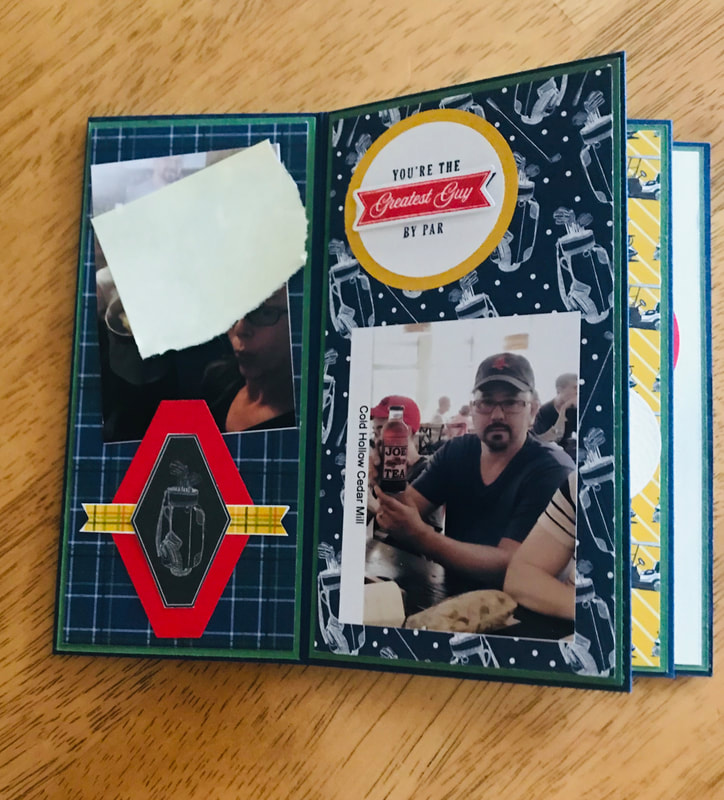
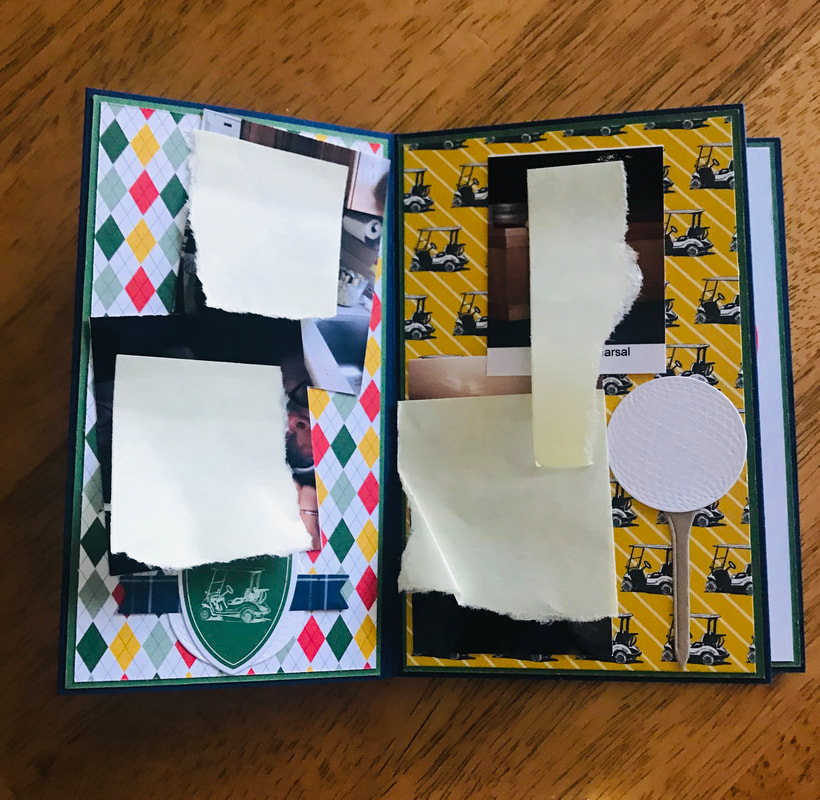
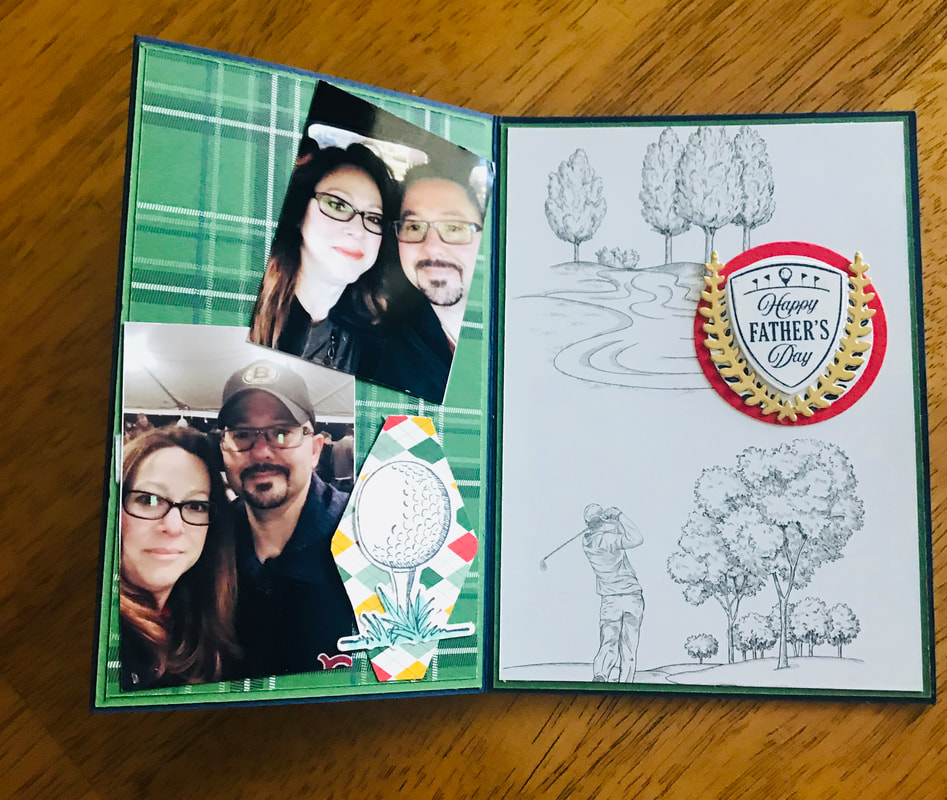
These cards were super easy to use. I used a combination of colors for my cardbases, Blushing Bride, Coastal Cabana, Crushed Curry and Island Indigo which measure 5 1/2x8 1/2 scored at 4 1/4 then fold in half. The DSP is now retired but was from the It Starts with Art Suite. The DSP measures 4x5 1/4 I printed out the pages of the PDF on whisper white and cut of the greetings using the Stitched Rectangles and Layering Ovals. I then stamped and cut of the images and colored them with coordinating Stampin Blends!!!! #stampinup #sharesunshine #stampinandscrappinwithsteph @stephjandrowstamps Thanks for stopping by Happy Stampin Steph Welcome to the May Stampin Friends Blog Hop!! We are featuring Masculine Style projects in this month's hop. Be sure to hop along and visit everyone's blogs, if you get lost, scroll down to the end of each blog to find a list of hoppers. I hope you came from Jean Bolen Beaulieu's blog, didn't you just love her projects?? So great! After you view my blog, be sure to leave a comment!!! And then continue to Tiziana Milano's blog. If you are not sure whose blogs you have visited, you can find a list of hoppers at the bottom of each blog! 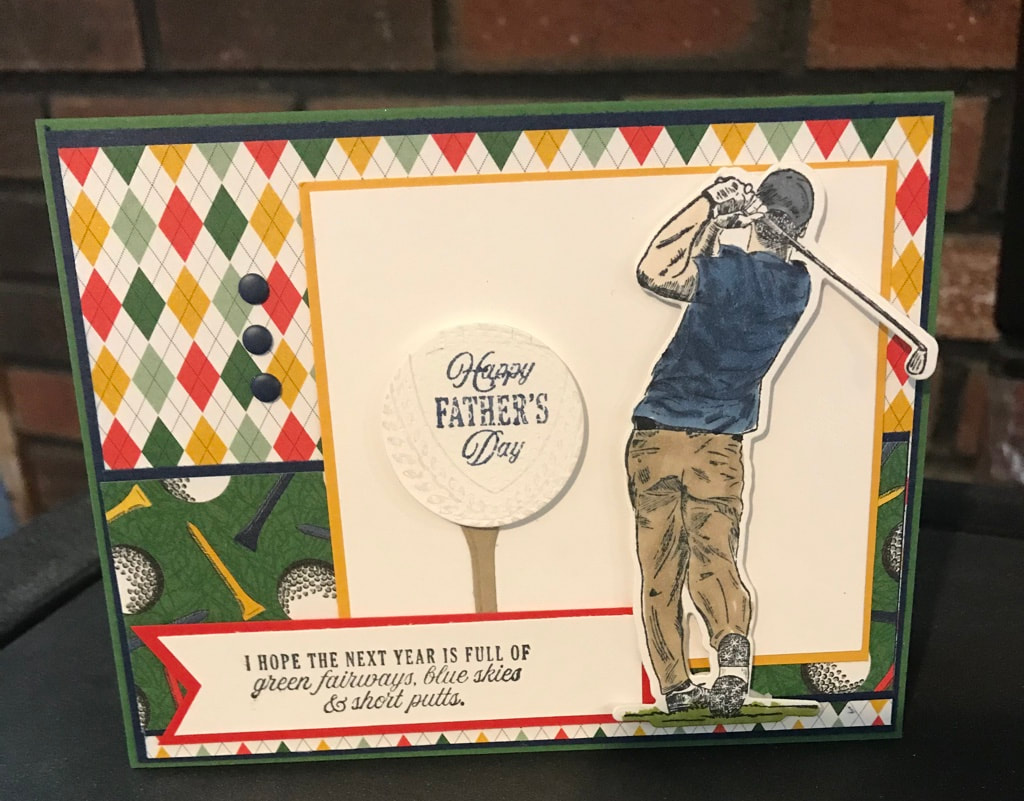 My projects were designed with my husband in-mind. He loves to golf and with Father's Day in June here in the USA, the Stampin Up Country Club suite was perfect!! I am sad this suite will be retiring once the new Annual Catalog comes out. For the card, I used Garden Green for the card base and layers of Night of Navy, Crushed Curry and Poppy Parade. I added the DSP for the top layers card. I stamped, colored and diecut out the golfer! I also made this card to go along with 2 challenges, one was for a card sketch challegne we do weekly with my group you can join the challenge by checking it out here. The other is to Stampin Up Demonstrators by Donna Jean Griffith, to keep stampin, if your a demonstrator you can find it on our Demonstrator Planning Facebook Page. #msscardchallenge7 #keepstamping For my project I made a mini accordion album! I found my inspiration from Jan B she offered a tutorial and it was so easy to follow. Click here to see her tuturiol. I used 1 sheet of 12x12 Night Of Navy to make the accordion base. Cut 1 piece to 5 1/2"x11" and the other 5 1/2"x12". Score the 5 1/2"x11" across the 11" side at 3", 6" & 8 1/2" Score the 5 1/2"x12" across the 12" side at 4", 7 1/2" & 11" I do recommen referign to Jan's video to see how to attach the 2 pieced together. I used Garden Green for the cardstock layers and cut them, 2 each of the following sizes: 2 3/8" x 5 3/8" 2 7/8" x 5 3/8" 3 3/8" x 5 3/8" 3 7/8" x 5 3/8" and then the DSP cut 2 each of the following sizes: 2 1/4" x 5 1/4" 2 3/4" x 5 1/4" 3 1/4" x 5 1/4" 3 3/4" x 5 1/4" I decided to only decorate 1 side of the accordion album with pictures. My kids might be adding to the blankside.....maybe!?! Rather than tying a ribbon to keep it closed, I created a belly band, I used the strip of cardstock that was leftover from the 12x12. I made sure to keep it loose so it slides off easily with all the layers! 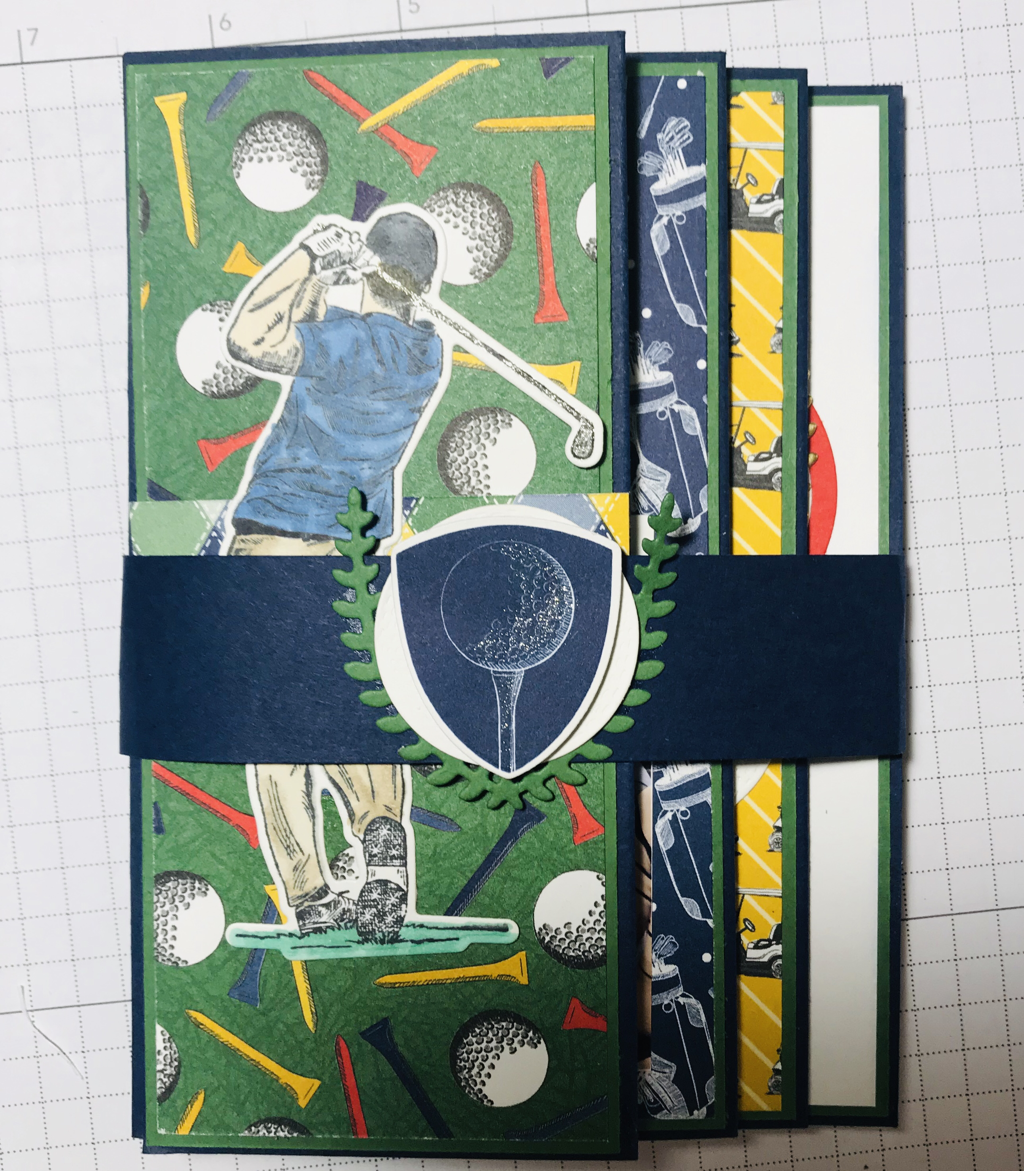 Below you can see the album opened. I have blocked the faces on a few pictures but you can get a sense on how my embellishments look!!! 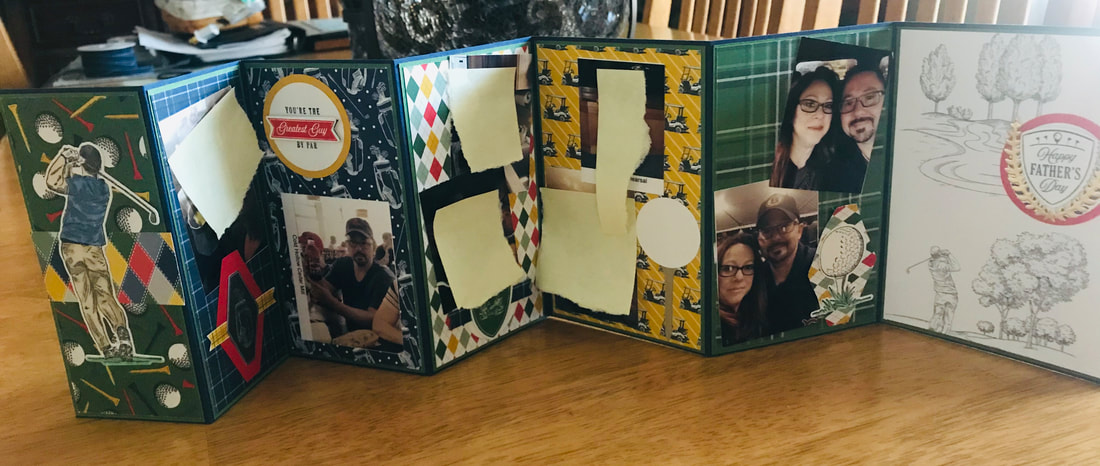 I hope you liked my projects. Leave a comment and then on over to Tiziana Milano blog!
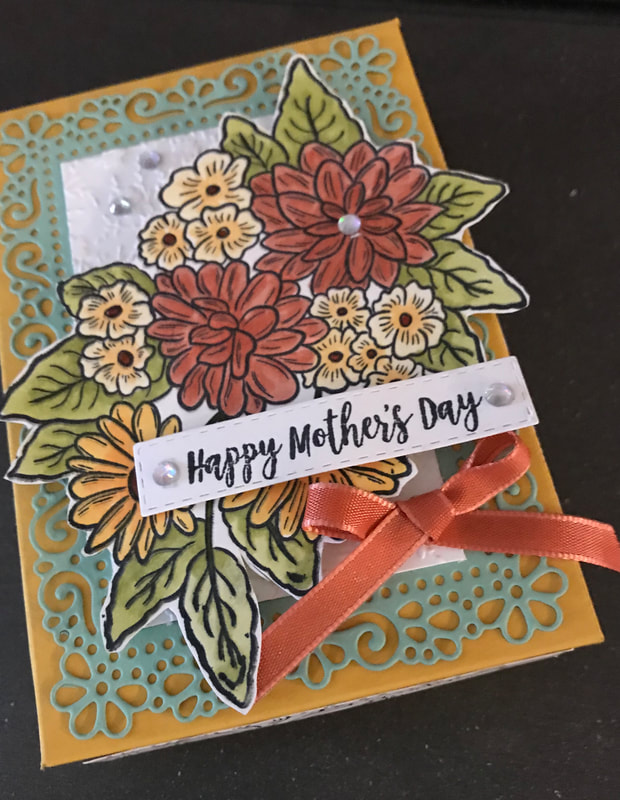
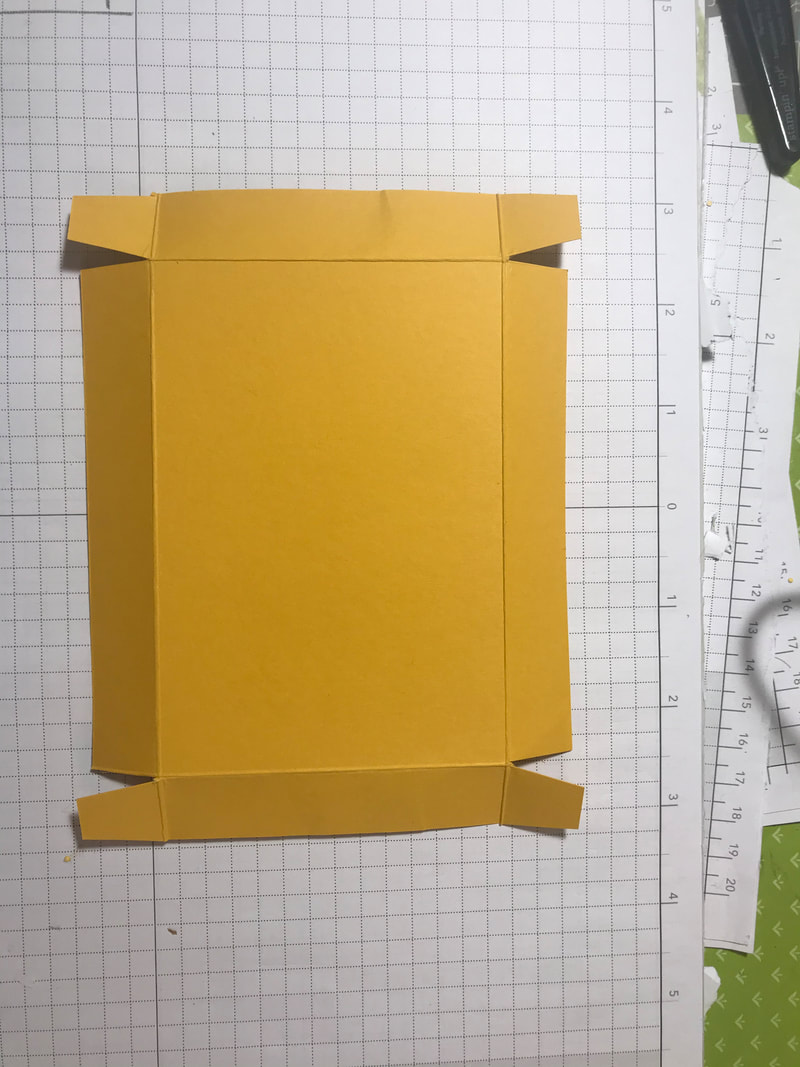
Thanks for stopping by Happy Stampin Steph 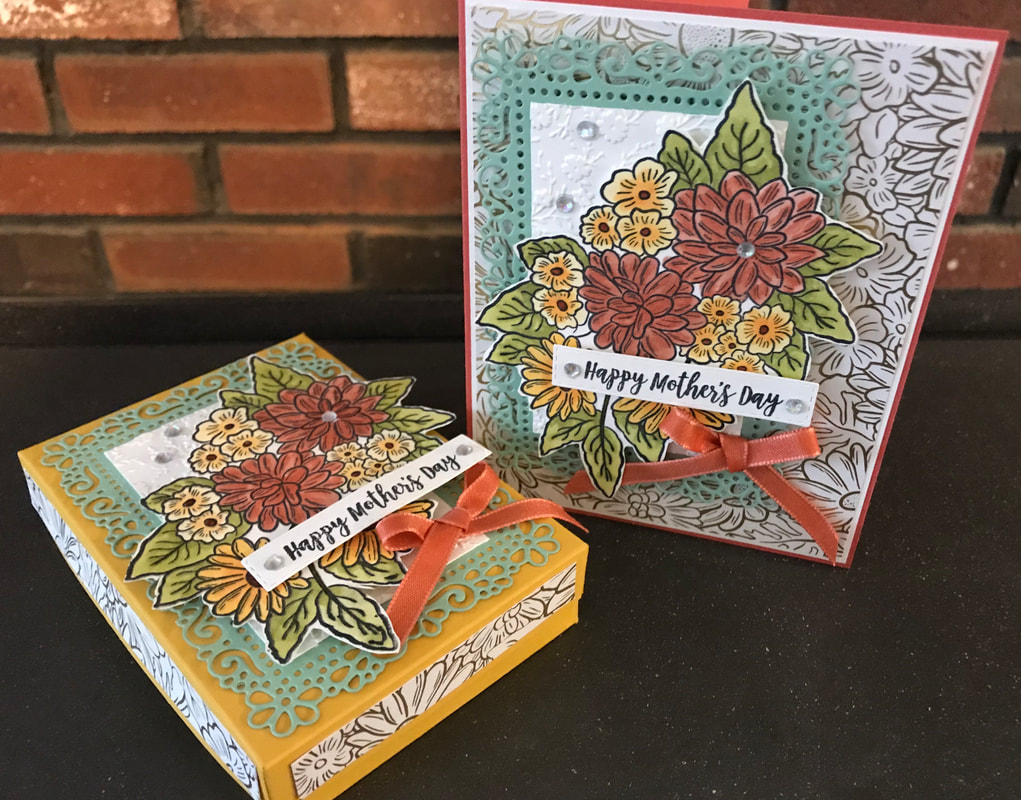 Welcome to the April Stampin Friends Blog Hop!! We are featuring Flowers and Mom's in this month's hop. Be sure to hop along and visit everyone's blogs, if you get lost, be sure to scroll down to the end of each blog to find a list of hoppers. I hope you came from Melissa Thomas, didn't you just love her projects?? So great! After you view my blog, be sure to leave a comment!!! And then continue to Jo Blackman If you are not sure whose blogs you have visited, you can find a list of hoppers at the bottom of each blog! Mother's Day is May 10, 2020 here in the USA. So I decided to not only feature flowers, but to also make my projects for Mother's Day! At this point, not sure if my projects will be hand delivered or mailed. We will just have to wait and see! I've been loving the new Stampin Up Ornate Garden Suite. I chose this suite this month because it has so many flowers in this suite. And the big flower arrangement stamp was perfect! I made this easy adorable lidded box and matching card for you! SO let's dive right in!
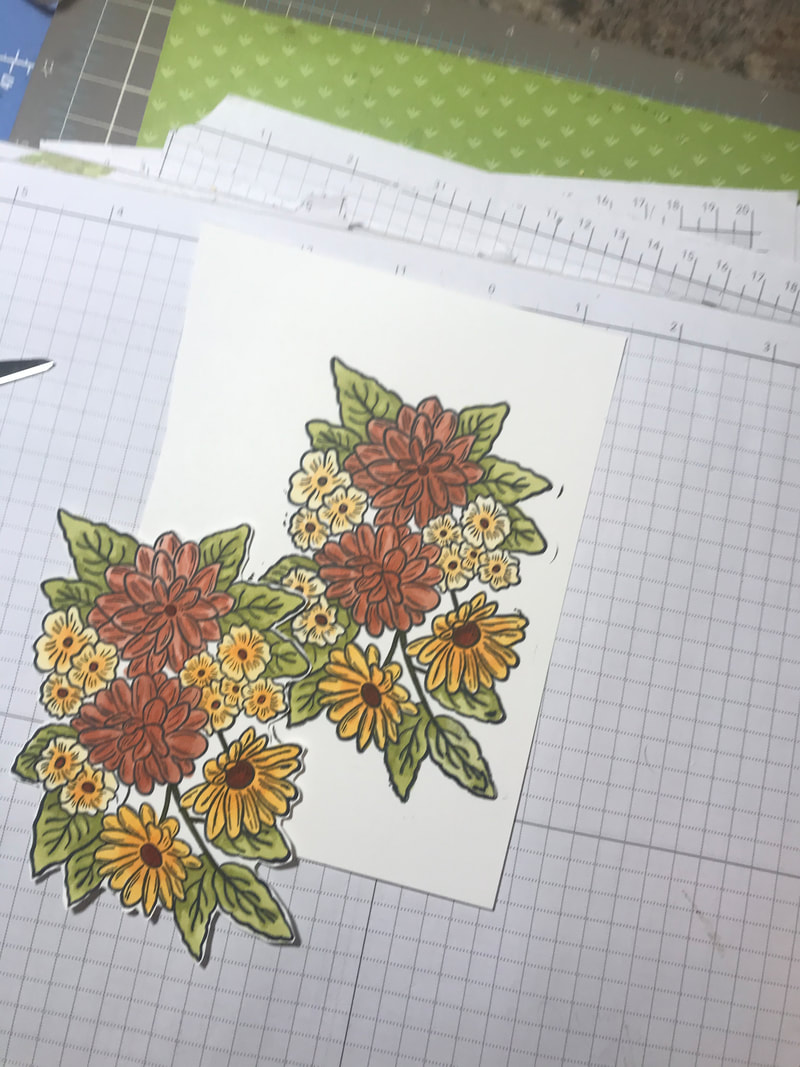
I cut the frame using the die from the Ornate Layers Dies. It is the second largest. Then I cut a piece of Whisper White to layer on top and embossed it using the Ornate Floral 3D Embossing Folder. I stamped the Flower image from the Ornate Style Stamp set in Black and colored with coordinating Stampin' Blends Markers; Calypso Coral, So Saffron, Daffodil Delight and Old Olive. Finished with some pearls and the Calypso Coral ribbon from the Ornate Garden Ribbon Combo Pack. Now I did all of this twice since I used the same design on the card. 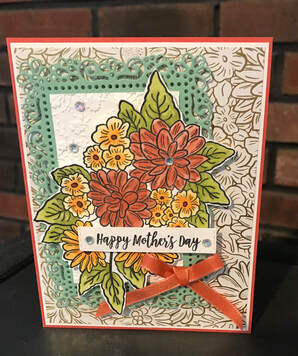 The box is a good size as you can see from the picture above, I included a travel tissue pack the and the lid goes on perfectly fine! You can tealights to this box too, so you can see just how much you can fit.
I made my card to match the box, so as I mentioned above, I stamped and cut the images twice so when I got the card, it was basically assembly. The card base is Calypso Coral. I added a layer of DSP first that measures 4 1/8'x 5 3/8". The DSP is from the Ornate Garden Specialty Designer Series Paper. I hope you enjoyed my projects today and I have inspired you to make one on your own! Please feel free to contact me with any questions!!! Be sure to check out the next blog during this month's blog hop, Jo Blackman! I'd love to hear what you think, so feel free to leave a comment!!! Take care Happy Stampin Steph |

New 2023-2024 Stampin Up Annual Catalog


Kits Collection


Join today

Categories
All
Archives
January 2024
|


 RSS Feed