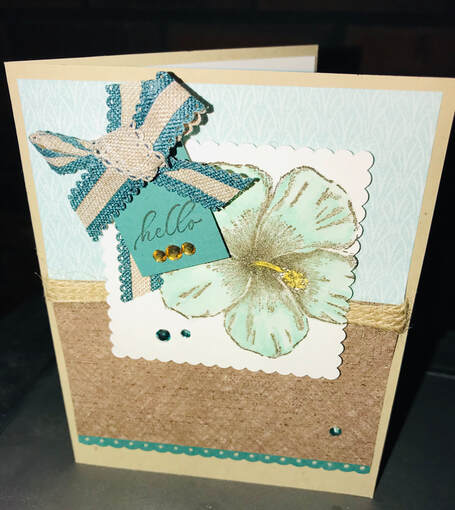
Before adhering to the card I added strip of twine to cover the seam.
I used the Layering Squares dies for a white element. Stamped the flower in Early Espresso and lightly colored with Pool Party Stampin Blends. I also colored a few Rhinestones using the blends. The small tag is cut in Pretty Peacock CS and it's 1" wide. I just eyeballed the length. Finished with some Pretty Peacock Ribbon. What do you think? I hope you share your designs too. Please remember even though I am exclusive to Stampin Up products, you can feel free to use whatever your favorite products are and whatever you have on hand. Happy Stampin Steph
0 Comments
 Card Challenge #3 Is this really fun card layout that I that uses squares. Please post your card on this blog post or my facebook page. Remember when posting you use #msscardchallenge3 as part of your description. Also be sure to post on your, your personal page or blogs and mine if you’d like! My facebook page is: https://www.facebook.com/stephjandrowstamps/
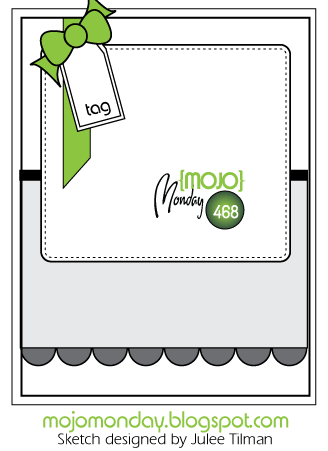
As mentioned above, the most important thing is to please use the following hashtag when and wherever you share your card so that it will be easily identified as part of this challenge. #msscardchallenge3 And, mail the card to someone...anyone...and spread the joy You can view the previous card challenges by using #msscardchallenge1 #msscardchallenge2 or visiting my previous post to view what the challenge is all about. Why do this challenge, you may ask? Well, to keep crafting, to feel inspired an keep our minds busy. I think it's fun and helps make the time pass a little more positively. I can't wait to see what you make! Happy Stampin Steph 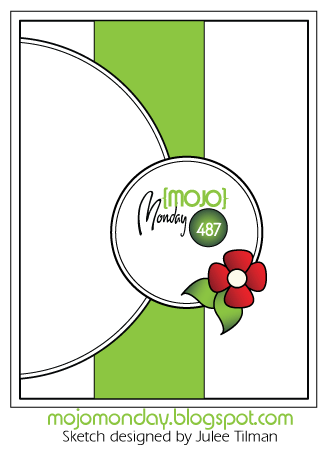 Card Challenge #2 Is this really fun card that uses circles. Post your designs by Friday, April 10, 2020. Please post your card on this blog post or my facebook page. Remember when posting you use #msscardchallenge2 as part of your description. Also be sure to post on your, your personal page or blogs and mine if you’d like! My facebook page is: https://www.facebook.com/stephjandrowstamps/
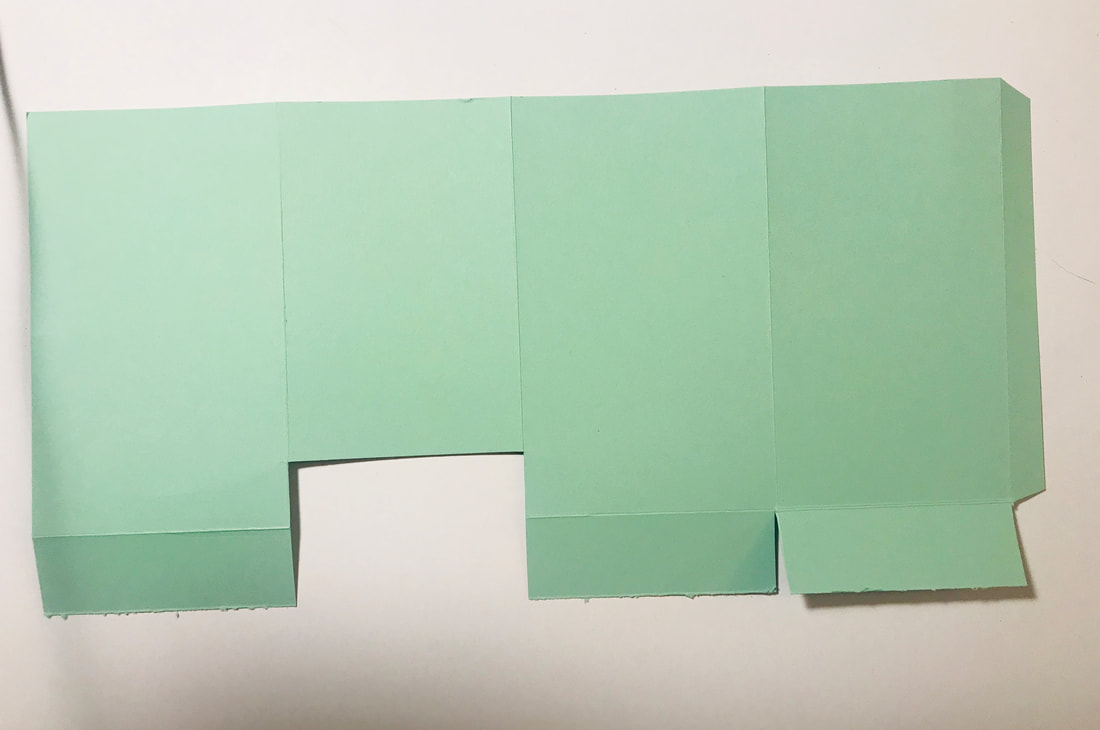
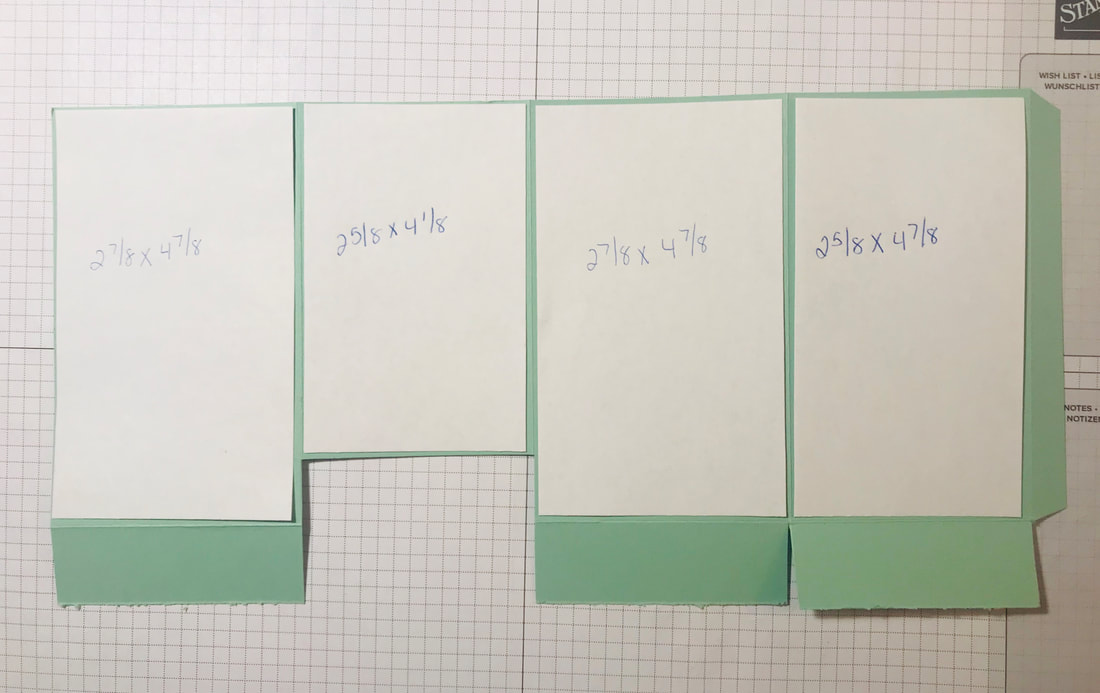
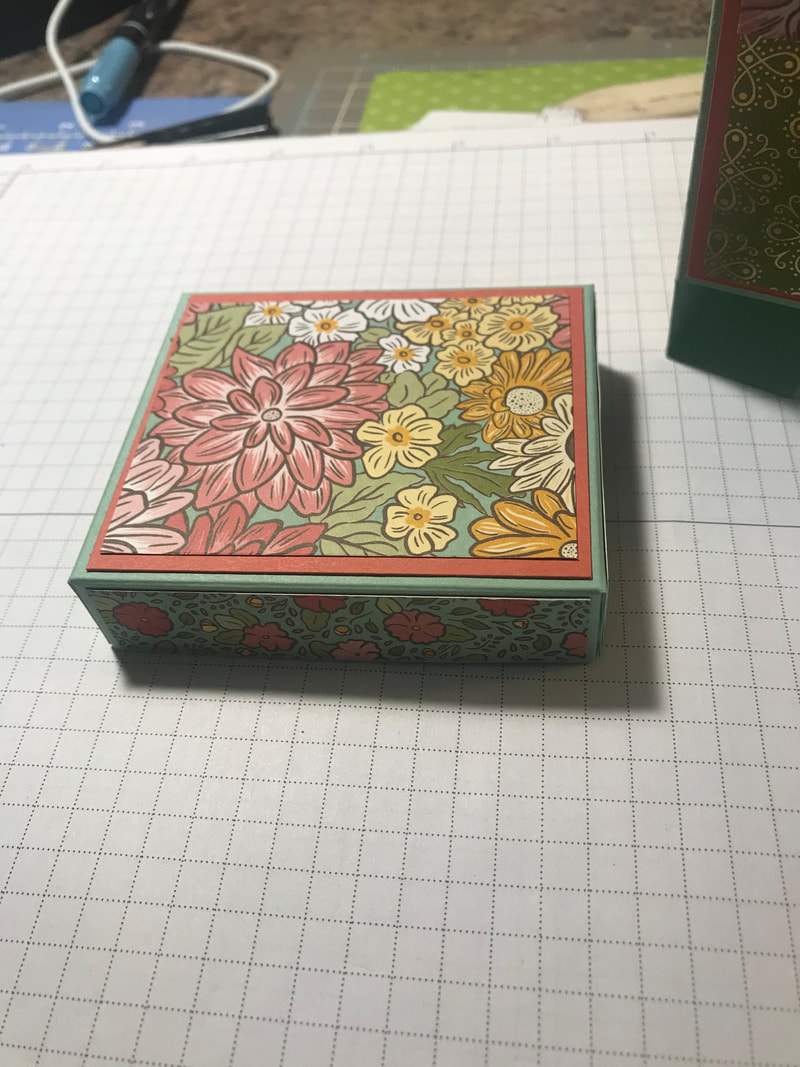
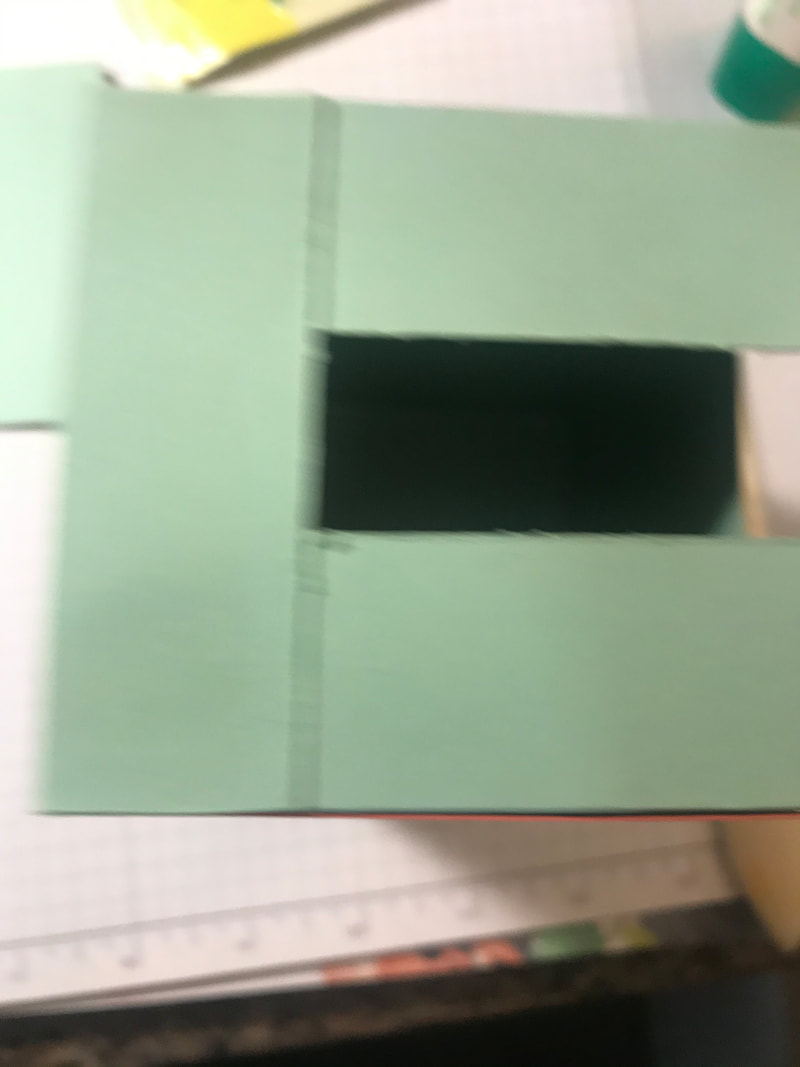
As mentioned above, the most important thing is to please use the following hashtag when and wherever you share your card so that it will be easily identified as part of this challenge. #msscardchallenge2 And, mail the card to someone...anyone...and spread the joy You can view the previous card challenges by using #msscardchallenge1 or visiting my previous post to view what the challenge is all about. 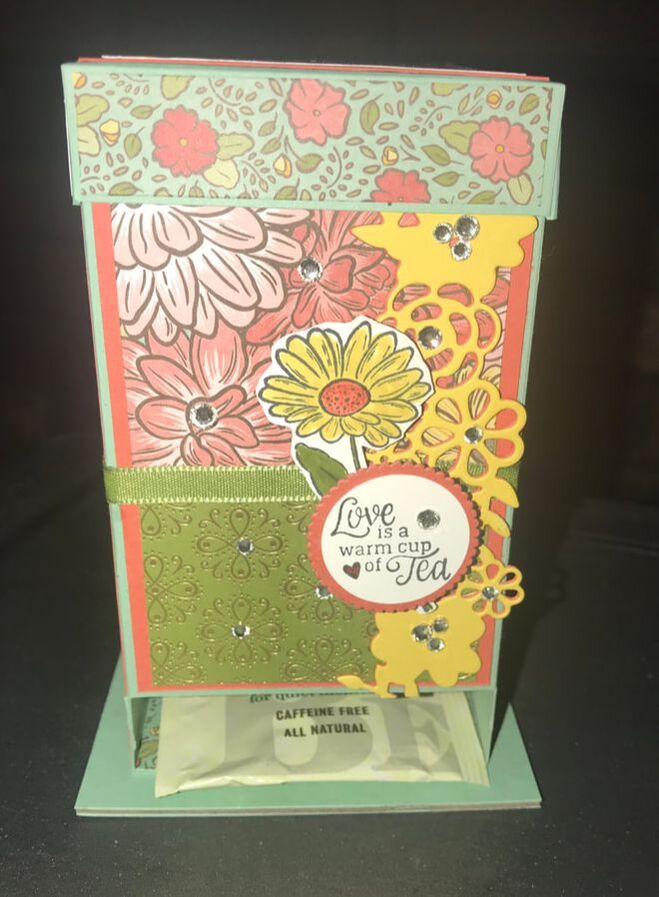 Today's project is this beautiful tea bag holder that doubles as a dispenser. It's a project that is perfect for all those tea drinkers in your life! You can fit a whole box of tea and totally customizable to match anyones decor! To make this tea holder, I used the new Stampin Up suite called Ornate Garden. You get a sneak peak of what is to come in the new Annual Catalog in June. I have made this project in the past and I would like to say it always went without a hitch, but sadly i seemed to get hung up on some the measurements that were out there. This time I worked on modifying to simplify the process. So here goes. You will need 6"x12" cardstock Designer paper for layers Cardstock for layer and lid Ribbon Embellishments To make the dispenser:
To make the lid:
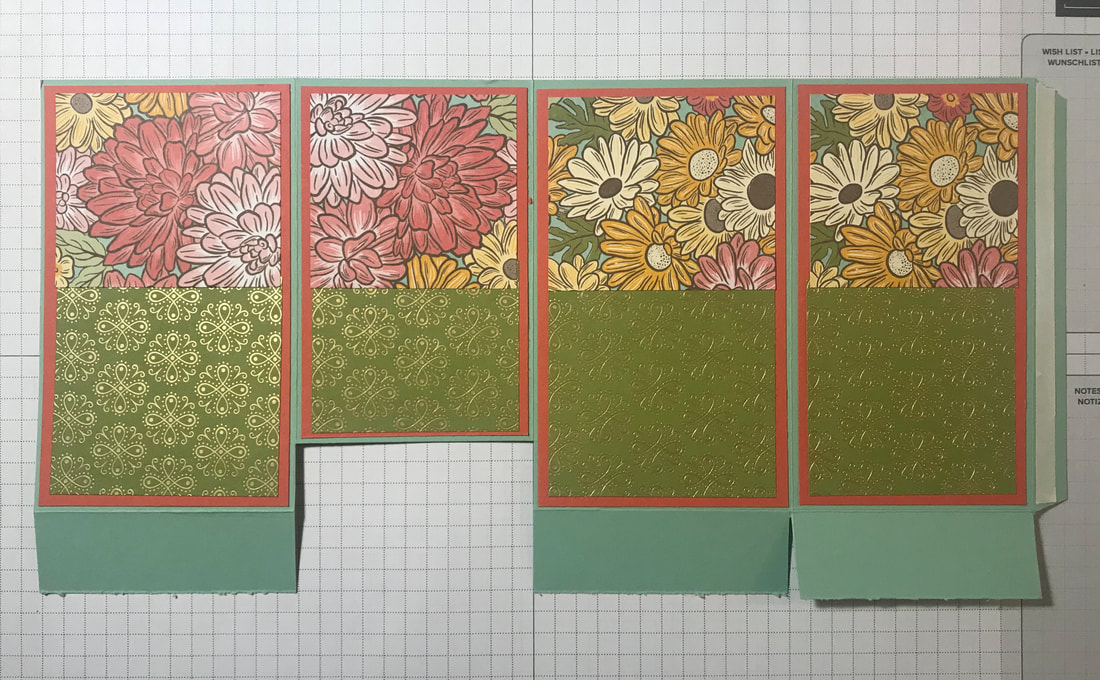
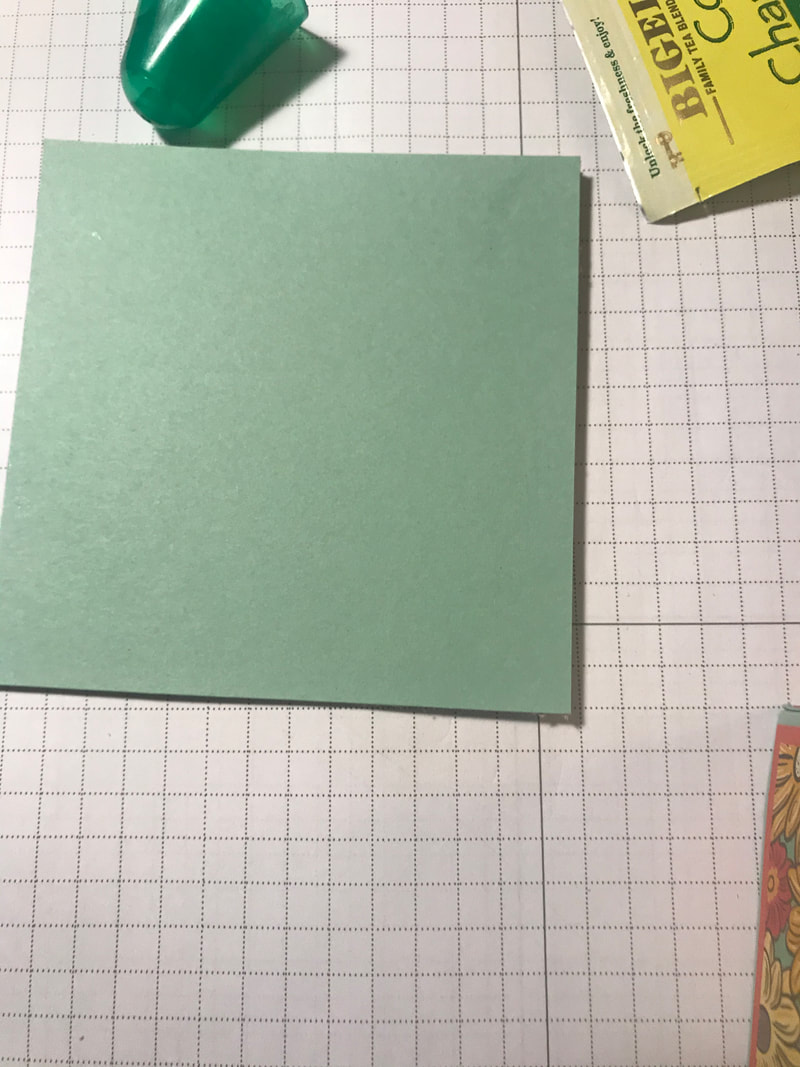
To decorate the outside of the box, I decided to use a layer of cardstock first, then 2 different patterned designer paper from the Ornate Garden DSP. The colors I used are Mint Macaron and Terracotta Tile. To add the cardstock layer you need:
To add the DSP layers for the top portion of the box:
To add the DSP layers for the bottom portion of the box:
To add the cardstock and DSP for the lid:
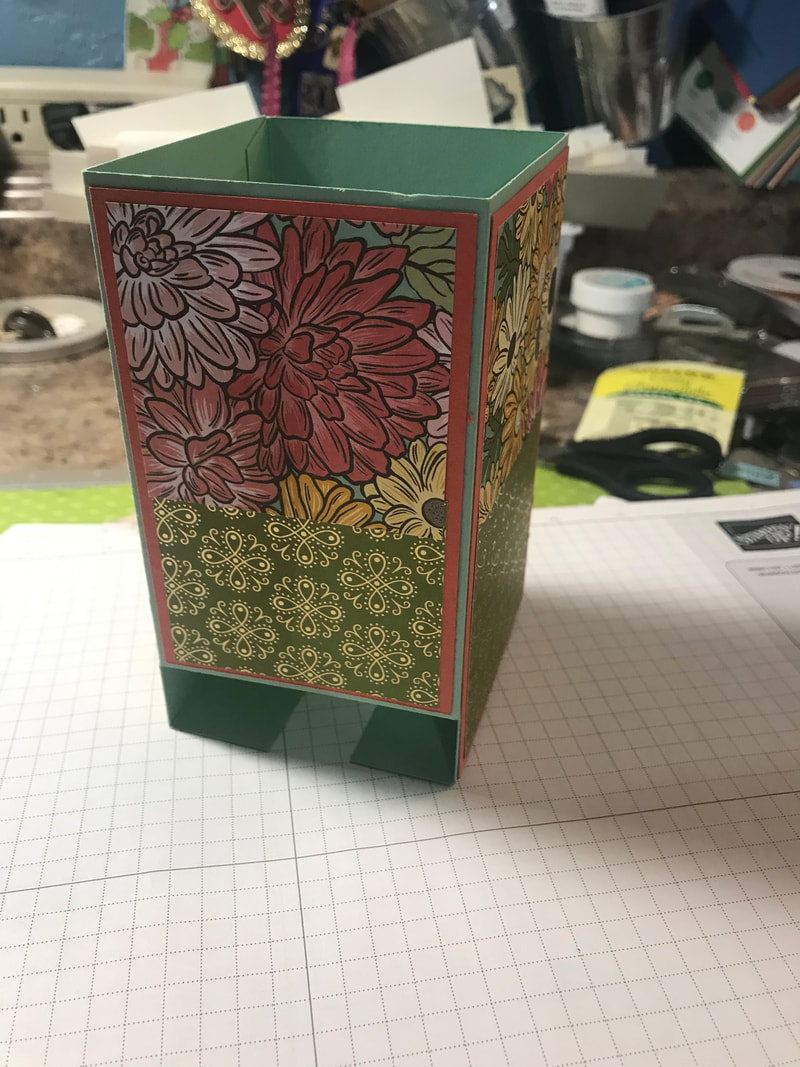
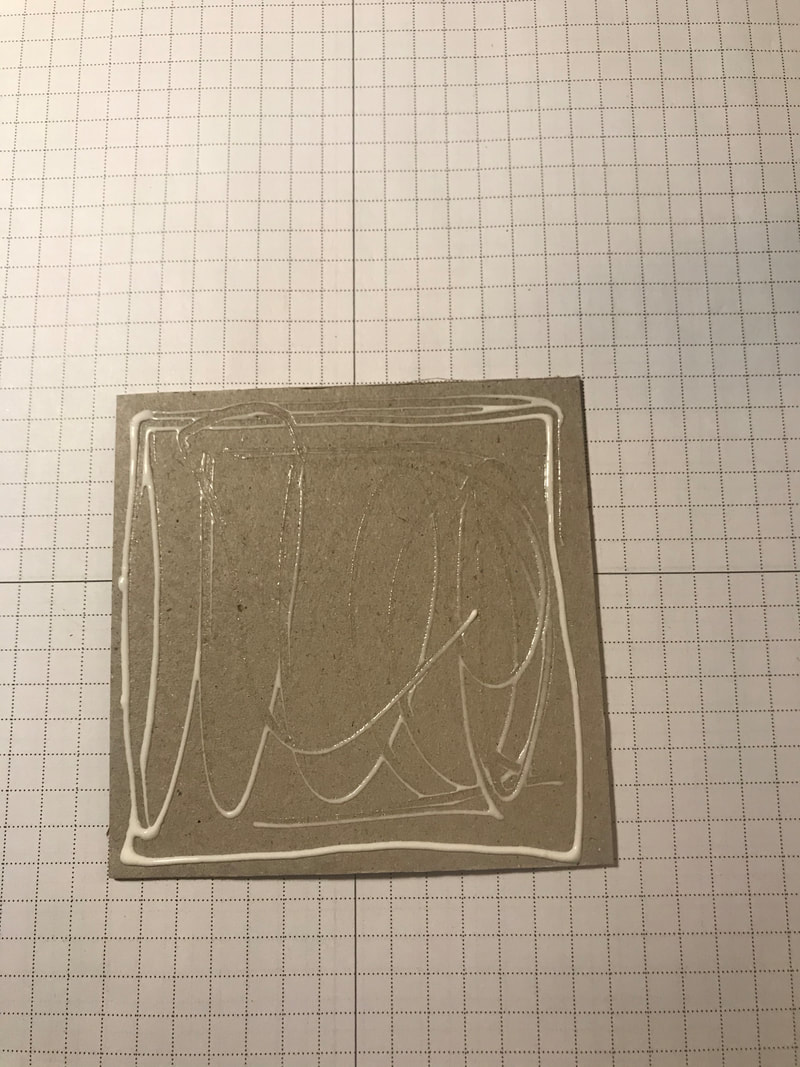
To create the base of the box, you will need a piece of chipboard that measures 3 1/2"x3 1/2" you will also need 2 pieces of cardstock that measure 3 1/2"x3 1/2". Glue them onto the top and bottom of the chipboard, you can also sponge the sides of the chipboard, I just left it as it. To adhere the box to the base, you will need to carefully glue the tabs onto the chipboard. Make sure to center as best as you can. The take a piece of DSP that measure 3 1/8"x2 3/4" and glue it on the inside to cover the tabs. To decorate the box, I took a piece of ribbon and wrapped it around, covering the seams from the 2 DSPs I used. I added some diecut flowers from the Ornate Garden Suite and the greeting is from the Tea Together stamp set. I finished it off with some rhinestones and it's ready to fill with some favorite teas.
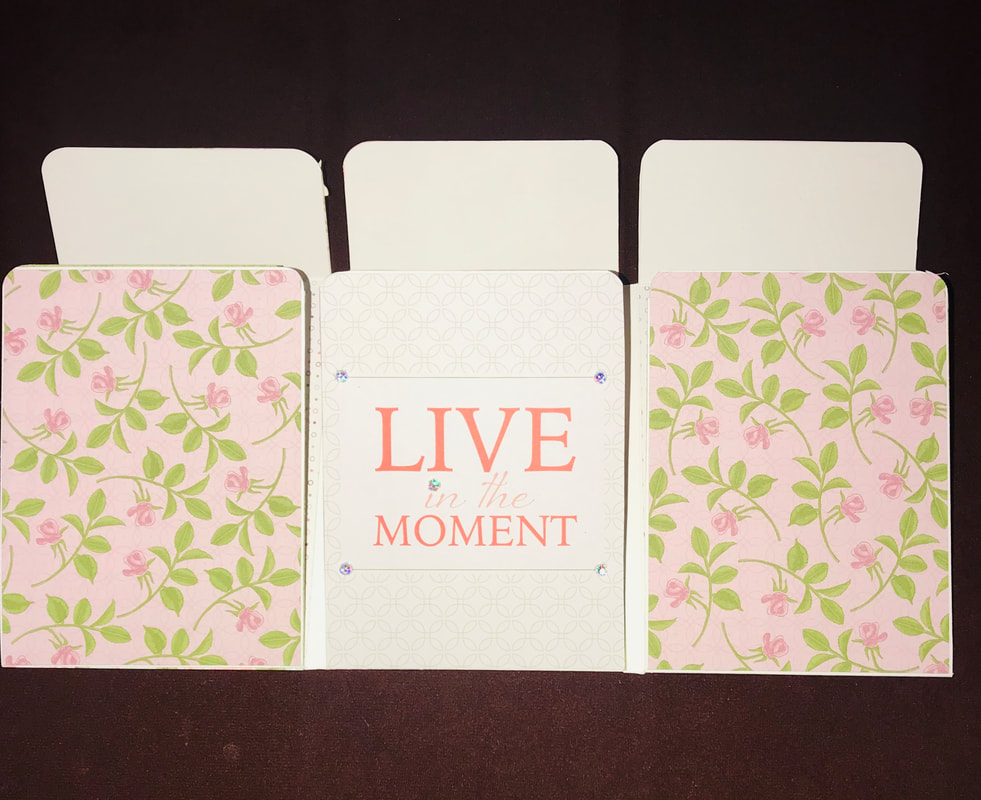
What do you think? I love it too! I can't wait to make more and have these ready for gifts to give to some special people. Thanks for stoppin by Happy Stampin Steph  I've been working on keeping busy here. Homeschooling has had it's challenges and keeping our family doing some form of normal has been crazy....There's never a dull moment but we are doing our best. I find when I can being creative helps to keep my mind from wondering into all those "what if" thoughts! I am sure many of you can relate! Working on 3-D types of projects has always been a little bit of a challenge, finding the time and patience and sometimes supplies can hinder the projects. But now I seem to have nothing but time! And using what I have on hand has been great! Today I am going to share with you a really pretty, super easy photo brag book. I design this with my teenage daughter in-mind. She has several friends turning 16 this year, and having to be away from each other has been tough, but I thought she could put together a little memory book for them! So let's get started. This project used very little paper supplies. You could make this with one-sheet of designer paper, but I chose to use Whisper White as the background to add a little stability. I also used a retired Stampin Up paper set called Petal Garden DSP and the Petal Garden Memories and More Cards, coordinating ribbon in Fresh Fig. And I have to say, I did not stamp anything when I made the project!! And here's what you need:
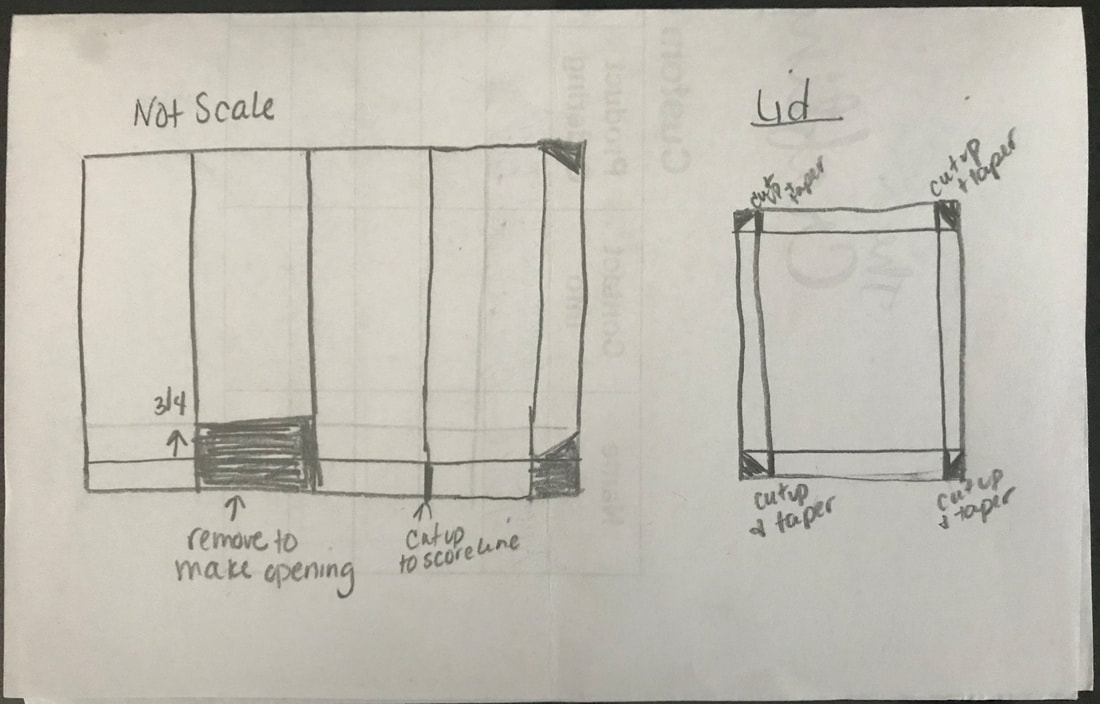
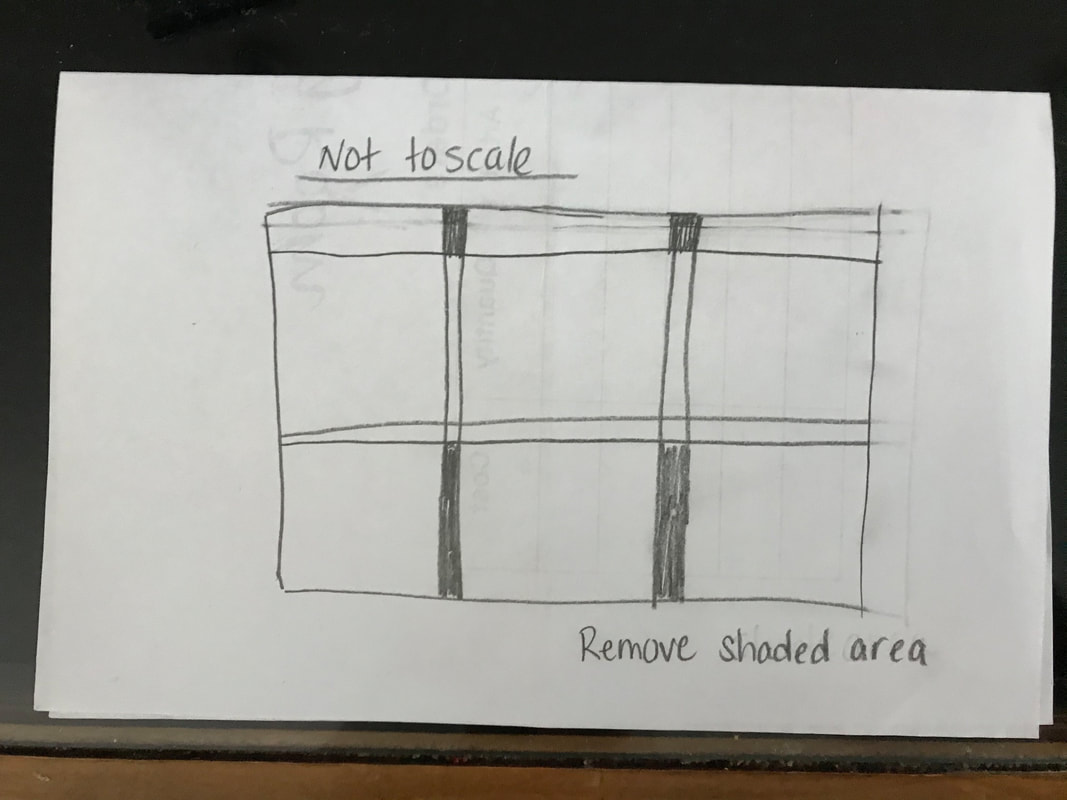
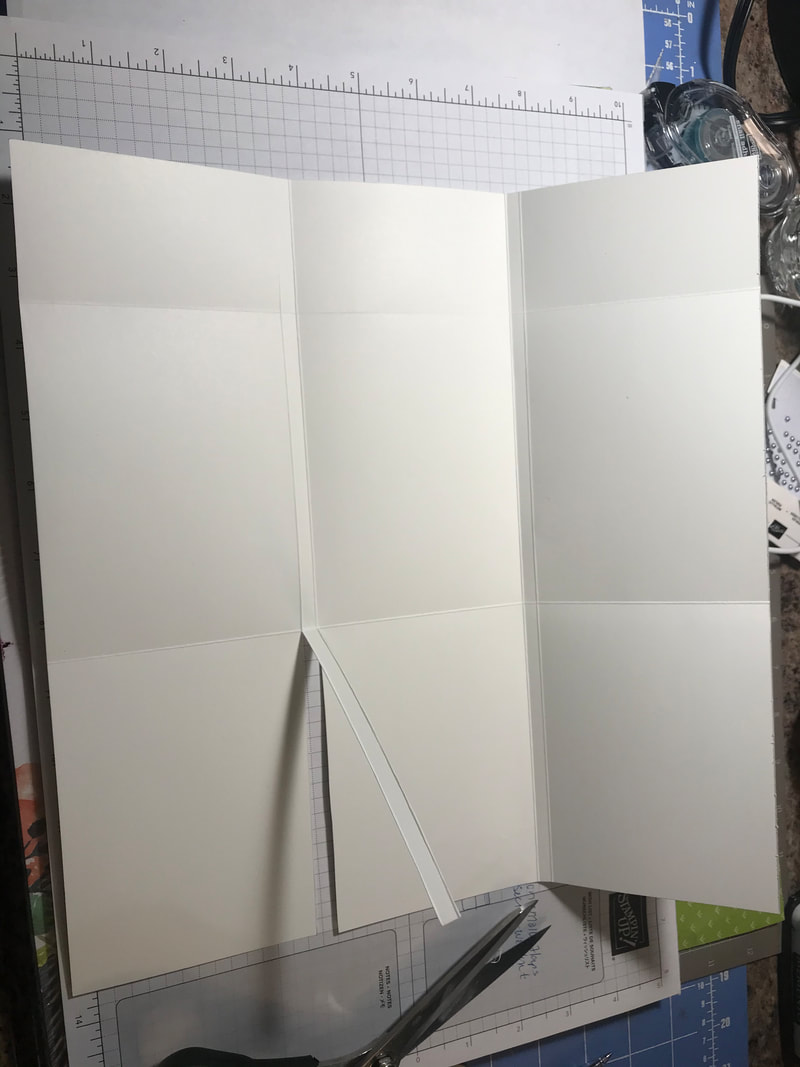
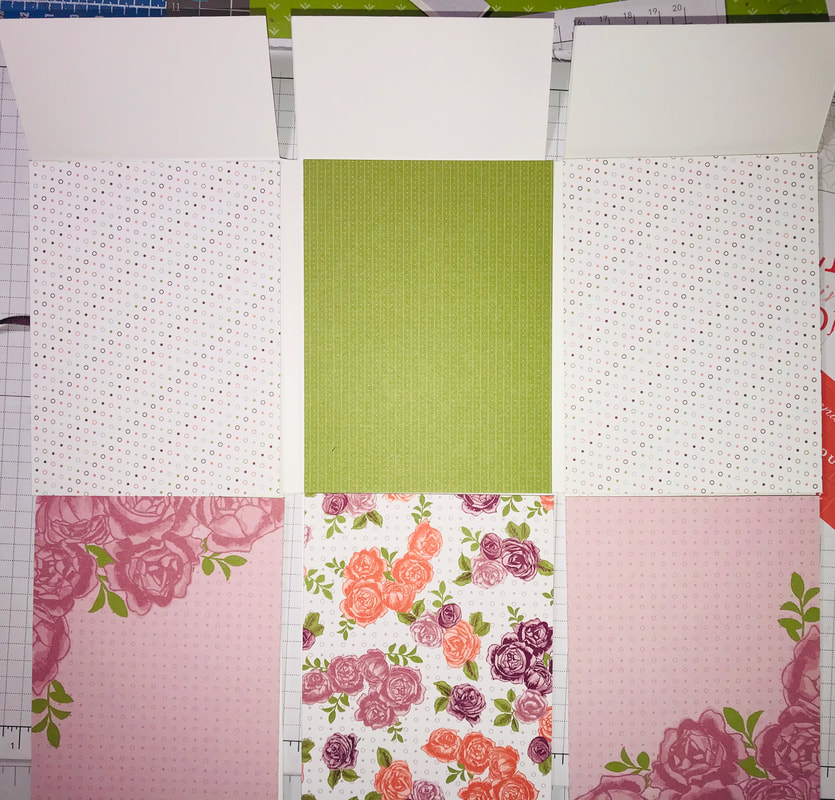
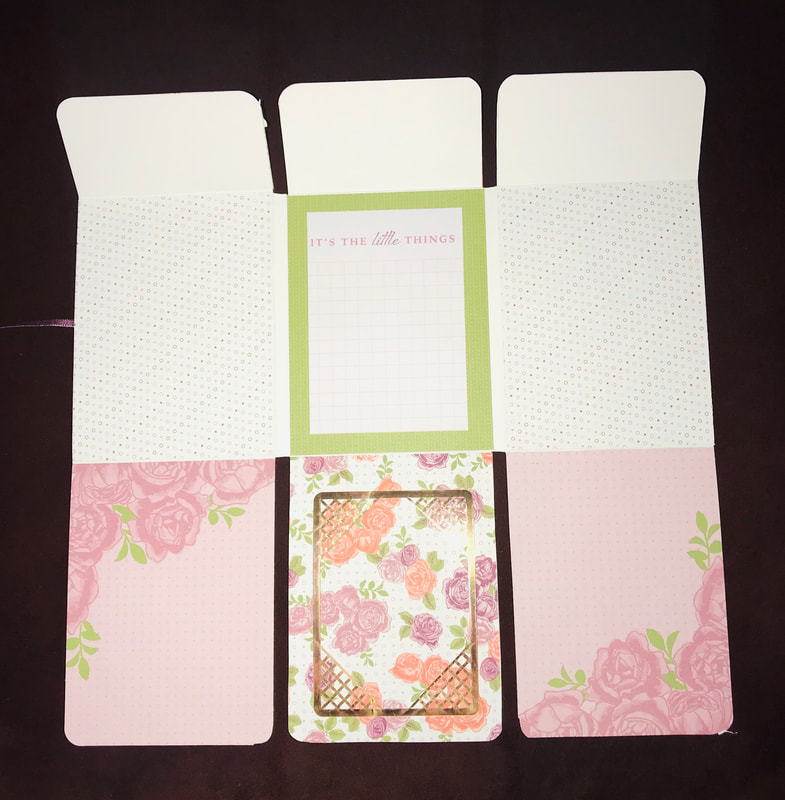
With your scoring tool and the 11 3/4" edge of the paper at the top Score at 3 3/4", 4", 7 3/4" and 8" Turn once to the 12" side and score at 5" and 10" Fold on all the score lines. The top of the brag book, is the small section, then there's the middle and the bottom The score lines are close together and create little rectangles, Remove the rectangles from the top section to the score line that begins the middle Do the same from the bottom, cut out the rectangles from the bottom up to the bottom score line of the middle section. I hope this makes sense, I have included a template so you see what I mean. Please note, my hand drawing is not to scale at all, it's just meant to give a visual of what needs to be cut. Now, we come to the fun part, the decorating! The big sections of the brag book measure approx. 3 3/4"x5". There are 12 sections; 6 on the inside and 6 on the outside (3 that fold in). I started with the front cover, first attach approx 10" piece of ribbon. Then lay the DSP on top, this is the front tie for the book. I used DSP cut at 3 3/4"x5 and trimmed a memories more card to about 3 5/8'x 4 7/8" and I also trimmed a smaller memories more card down so that just the wording was framed out. So for the front, you need:
for the sections that appear on the backside, just like the front, cover the white cardstock edge to edge so you will need;
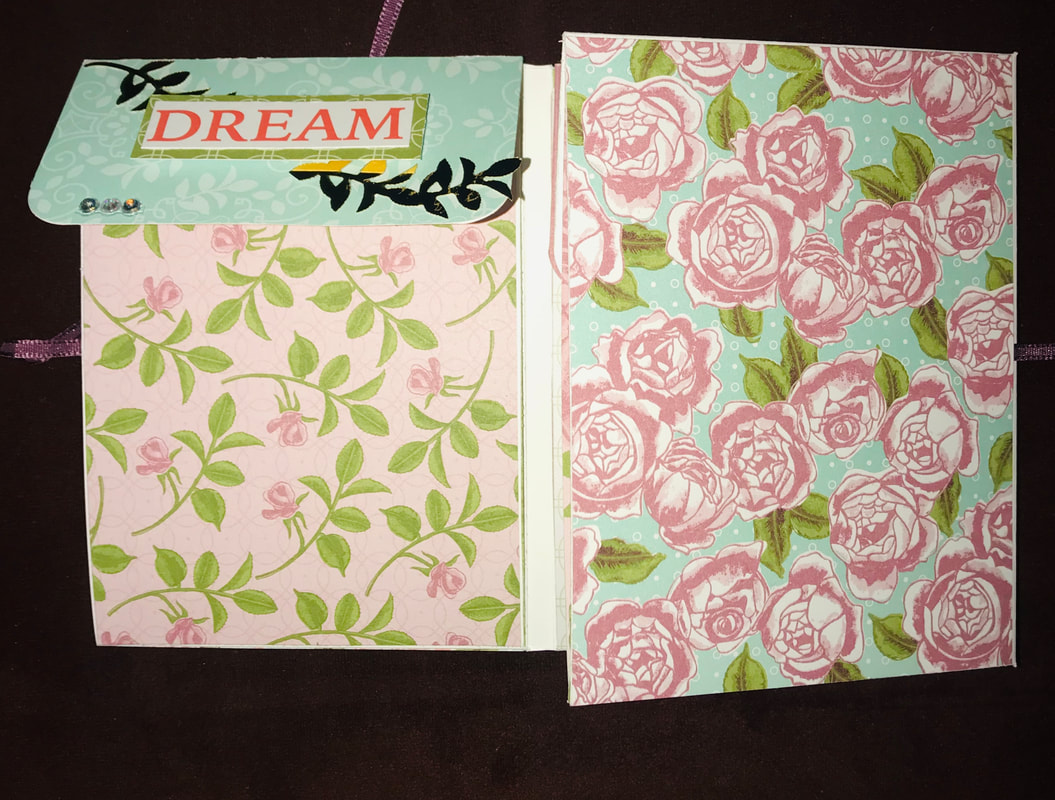 The backside again, I left simple. Added the DSP and a small card to add a space to write or add a photo, etc 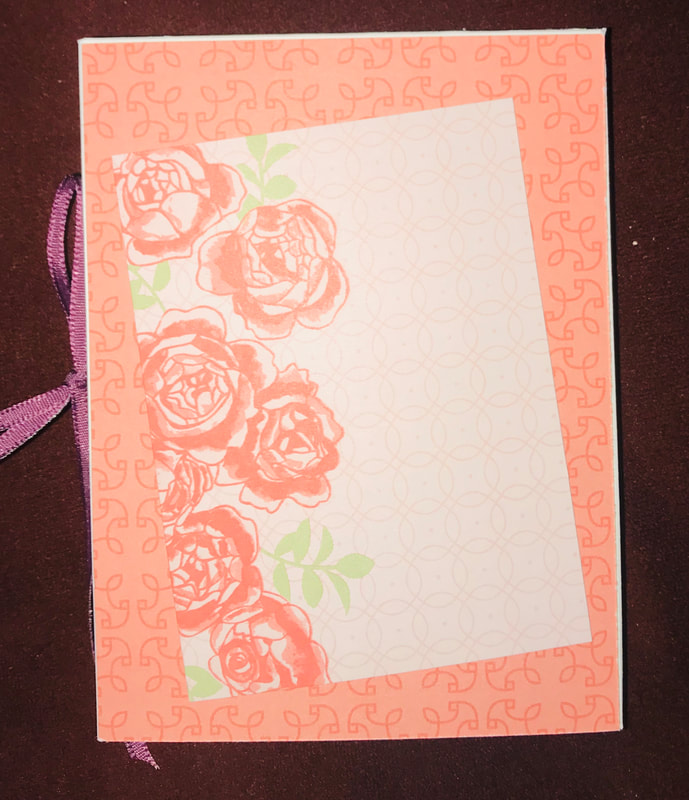 And just like that the brag book is finished. I'd say overall this took just a bit over an hour. That was probably spent decided what supplies I was going to use. But in the end this is one of those projects I am sure I will be making over and over because it's just so easy and makes a WOW projects when we are done!
I hope you enjoyed what I shared with you today! Thanks for stopping by Happy Stampin Steph 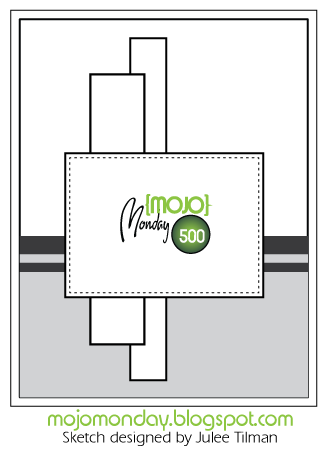 If you have been following, me, you know I've been trying to keep busy at home while helping my kiddos with their school work. Some days have been much more challenging than others and I'm sure my battles with working though a home school routine etc. is minimal to what others may be facing! But nonetheless...like I said just trying to keep busy...so last week I posted that I worked on past Paper Pumpkin kits and today, I've tried to be a little more creative. With that said, I posted a challenge to all my peers in my up-lines' group to stay crafting. I am extending this challenge to you! I will post a card sketch to follow on Mondays and then by Friday we can share what we made?? My only request is that you use all Stampin Up, but it can be whatever you have on hand!! On Friday you can post your card on this blog post or my facebook page. Please post on your, your personal page or blogs and mine if you’d like! My facebook page is: https://www.facebook.com/stephjandrowstamps/ Please use the following hashtag when and wherever you share your card so that it will be easily identified as part of this challenge. #msscardchallenge1 And, mail the card to someone...anyone...and spread the joy! I am not going to create a prize drawing, I want this to be fun and to keep us busy and our minds off of these crazy times...I know this doesn't change anything but it doesn't hurt. Use up what you have on hand, no need to shop. The first card challenge sketch is in the picture above!!! I can't wait to see what you make Stay healthy Stay safe Happy Stampin Steph 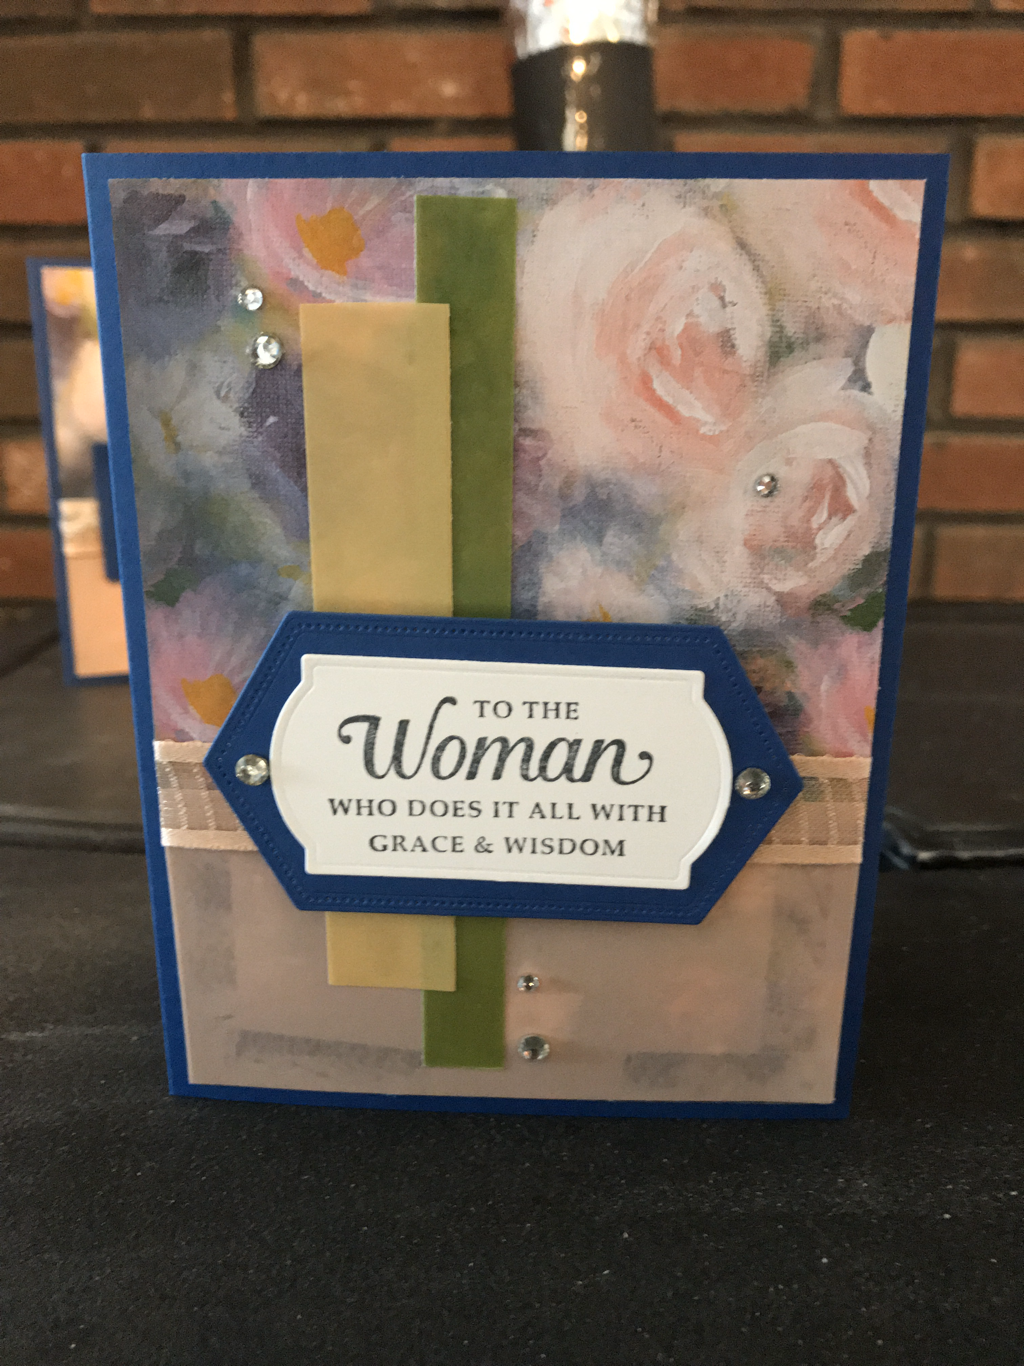 On Monday I had set a challenge to make a card from a template and post on Friday. Here is the card I made. I used the stamp set Strong & Beautiful, Perennial Essence DSP and Perennial Essence Vellum. Be on the lookout on Monday -April 6 for the next challenge
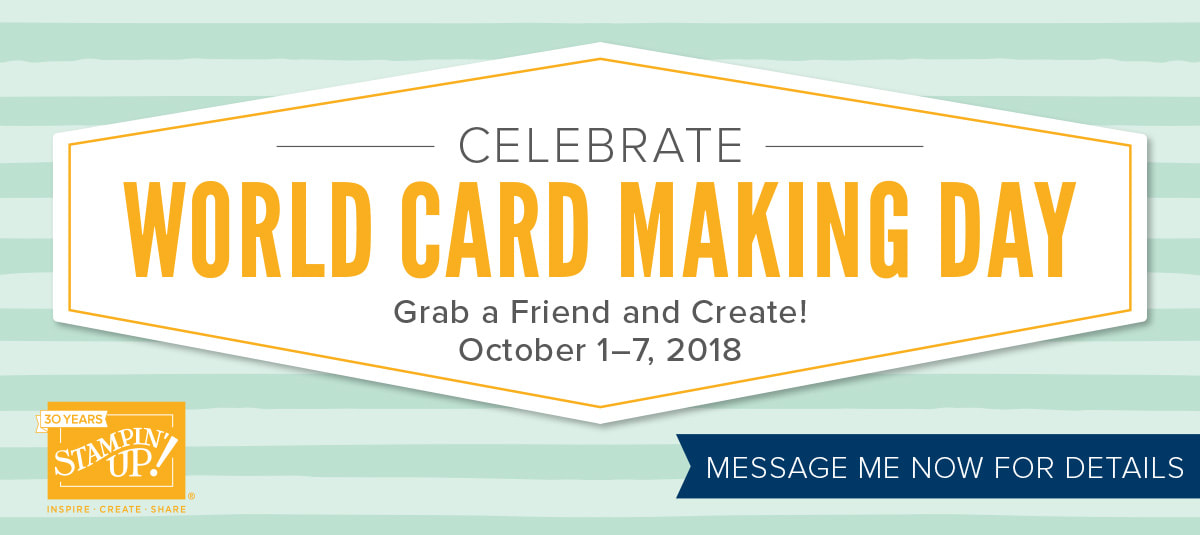 World Card Making Day is October 7, 2018! But why celebrate just one day! Stampin Up is offering a discount on select items October 1-7, 2018 to celebrate WCMD (World Card Making Day) What is a WCMD??? It is a day to celebrate us crafty types! But...it is not limited to those who craft! It's new cardmakers too. They can experience a sample of what we have do and what Stampin Up has to offer. WCMD is the perfect reason to connect with your passion for crafting and help strengthen those reason you enjoy what you do and...it's the perfect way to rebuild your crafting relationships past, present and future crafting friends. Thought about Stampin Up as a business? WCMD is a great way to kickstart a new business! Contact me for more details! Join me on October 7th at 7:00pm-8:00pm. Nothing fancy, but stop by, this will just take a few minutes of your time to celebrate! I will have 2 free make n takes available for you and each attendee will be entered in raffle for a prize! No obligation to buy or join ...just a quick event! RSVP so I know what to prep! 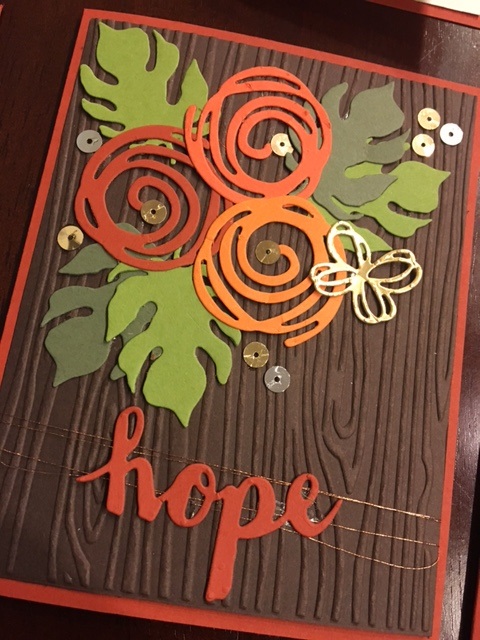 I can finally share the card I made for a swap since everyone who participated should have received their cards by now. I joined a small group swap and chose the Dies category. I needed to make 6 cards using dies. Here is what I came up wtih. I used colors that remind me of the fall. The swirls were cut in Cajun Craze, Pumpkin Pie and Tangerine Tango from the Swirly Scribbles Thinlits. I used Early Espresso embossed with the Woodgrain Embossing Folder as my 1st layer. The leaves were cut from the Botanical Builders framelits in Old Olive & Early Artichoke. Hope was cut in Cajun Craze from the Sunshine Thinlits. I used the Copper Floss, Silver & Gold Sequins trim and a Gold Paper for the Butterfly from the Sunshine thinlits. To add some texture to the card. No stamping at all on this card. I am so happy with the card. That I made 2 for me along with the 6 I made for the swap. Ever make a card that just makes you happy Well that's this card for me Love Love Love Hope you like it as much as I do! Enjoy Happy Stampin Steph  These were the "Die-lovers" cards I received back from the swap. Too bad not everyone that signed up sent or cards were received on time.  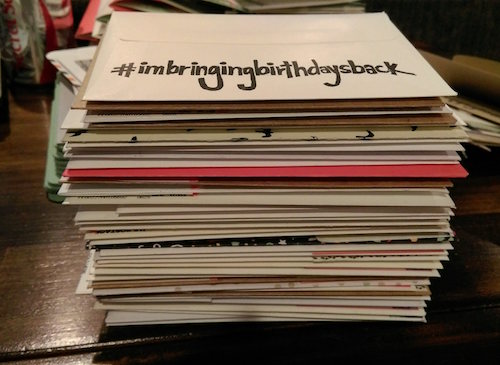 Back in March, I blogged about bringing birthdays back. I offered a challenge to anyone who commented or emailed me that I would send you a birthday card that you could use. You can read the original #imbringingbirthdaysback post here. The original #imbringingbirthdaysback was started by Shannon West and a stamp was designed. Love it!!! You can read about Shannon West's challenge here. So my challenge was: I challenge you to mail birthday cards out to those that you know the dates on. AND...comment on my blog with the #imbringingbirthdaysback and I will mail you a birthday card, handmade from me. After commenting, I will need to ask that you email me your full name and address so I can mail you the card. My email is [email protected] I received a wonderful response via email, which is great!!!! I know most won't want any personal information on a website. Soo with that said, I am going to offer this challenge again and I am going to offer this challenge from now until December 31st. With the exception, I am going to send you 2 birthday cards, (a traditional style birthday card and a non-traditional (may be seasonal or holiday themed)). For more information on the #imbringingbirthdaysback stamp, you can click on the image below. There's no purchase necessary and no soliciting! You will receive the cards from me in approx 7-10 business days, depending on the response and whether I need to create more cards. I really you will except this challenge, I look forward to hearing from you all again!!! Happy Stampin Steph  |

New 2023-2024 Stampin Up Annual Catalog


Kits Collection


Join today

Categories
All
Archives
January 2024
|


 RSS Feed