Stampin & Scrappin with Steph
  • Home
  • About Me
  • Contact Me
  • Products
  • Paper Pumpkin
  • Catalogs
  • Join the Fun
  • Paper Crafting
    • Card Ideas
    • Calendar Projects
    • Paper Projects
    • Scrapbook Layouts
  • Retired Products for Sale

Lots of Love Stampin Friends Blog Hop

1/21/2016

68 Comments

 
Picture
Welcome to the Lots of Love Stampin Friends Blog Hop! I'm really excited to be back again as a guest Hopper for Stampin Friends. There are 14 amazing crafters involved in hop, along with 3 Guest Hoppers.  And like I said I've very proud an excited to be back as a guest.

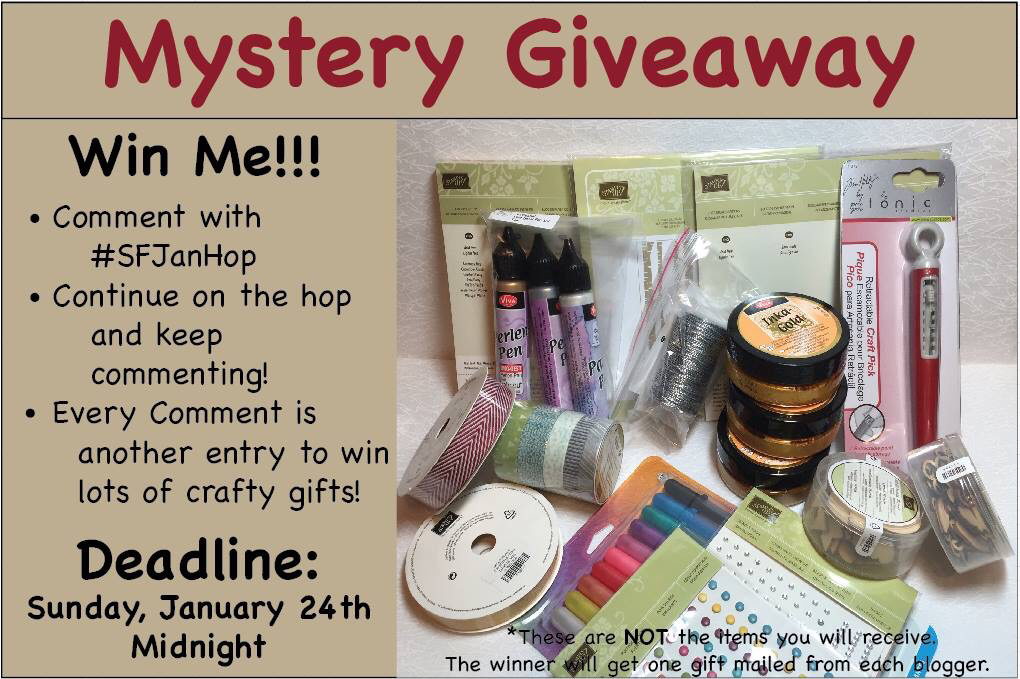
Please, make sure you check everyone's blogs out. After reading the blog, scroll to the end, and make sure to leave a comment with #SFJanHop at each blog!!! I would love to hear some feedback and you will earn a chance to win some Blog Candy!

If you have visited my blog from Elizabeth's site, thanks so much for continuing with the Blog Hop.  Make sure to check out my blog and at the end click the NEXT button to continue with the Blog Hop and visit Leanne Johnson's Blog.  Didn't come from Elizabeth's blog?? Make sure to click the PREVIOUS button or scroll to the end of the post to and click on Elizabeth's name to visit her blog.

This month's guest hoppers are:
ME, ME, ME Steph Jandrow
Siara Acdal
Mandy Reedyk

Picture
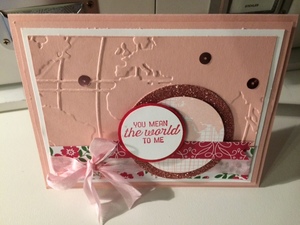
This month's Blog Hop theme is Lots of Love. I knew exactly what products I wanted to use for the blog. NEW! Of Course! NEW items from Stampin Up's Occasions catalog!! I will be showing you 2 projects and 1 card for the blog hop. It may seem like alot of products were used. But it really isn't. I used the same colors, DSP and stamp set throughout the projects and cards. So if you do not have alot on hand, this is great, because we are just using same products,in different way.  What I decided to make is SUPER easy projects that I can make multiples, in a breeze. As a busy mom of 3, I need to accomplish the most, in what appears to be a very short amount of time. I'm all about coordination!!!!
So here we go....I hope you enjoy what I've prepared for you! I look forward to hearing your feedback!!!
Picture
Picture
Project 1:
This is a little treat pack I made using the Envelope Punch Board. If you have never used one, you can watch this video to see how easy it is to create custom envelopes.
  • Choose a piece of cardstock measuring 6x6. I used Blushing Bride Cardstock.
  • Follow the instructions on the punch-board for the smallest envelope design, starting with the cardstock.
  • Choose a piece of DSP, also 6x6. I chose a pattern out of the new Love Blossoms Stack Pack. Perfect the paper is already 6x6 so no cutting needed. And I followed the steps to make the smallest envelope again.
  • Take the DSP and place it on you Stampin' Trimmer on the diagonal and cut it in half. You will have 2 long triangles. Cut the sides off so your left with half of the middle and one corner piece. See pictures below. You will be able to add a liner to 2 envelopes from one sheet of DSP.
  • Layer the DSP onto the Cardstock and assemble the envelope leaving one side unsealed. I used Fast fuse to make the envelope. As I was gluing the envelope, I realized maybe the bottom piece should have been on the outside since it's a little package, but I don't really think it makes a difference.
  • Cut a piece of Pink Pirouette Seam Binding Ribbon, long enough to wrap around the envelope. Match the seam up on the front, it will be covered up by the stamped image.
  • Stamp, using the Going Global stamp set, the same image twice. Once in Real Red and once in Blushing Bride. Punch out the Real Red image with a 2" circle punch. Cut the LOVE part out of the Blushing Bride image and adhere on top of the Real Red with a Dimensional.
  • Punch out a 2 3/8" scallop circle in Real Red. And a 2 1/2" circle in the new Blushing Bride Glimmer Paper.
  • Add the stamped image to the Real Red scallop circle with Snail. Then attach onto the glimmer circle with Dimensionals.
  • Adhere onto the envelope with Dimensionals.

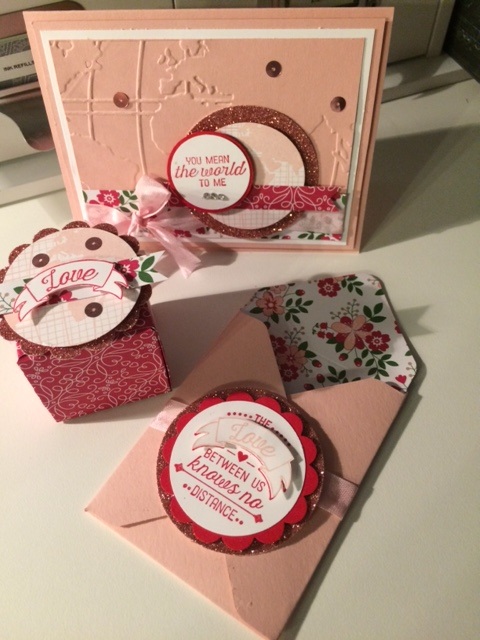
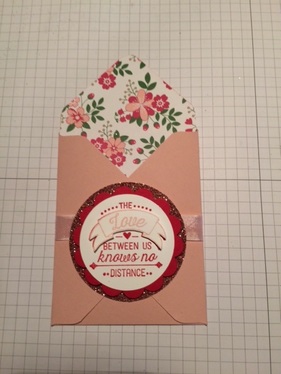
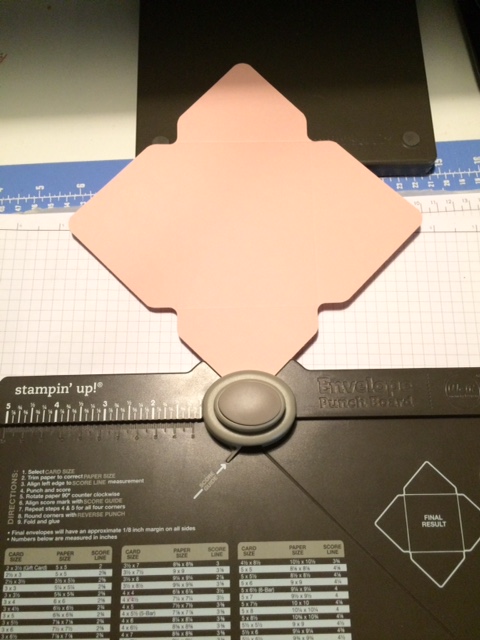
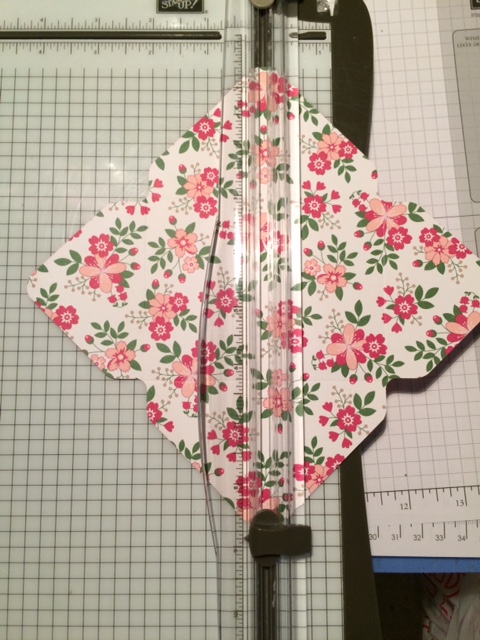
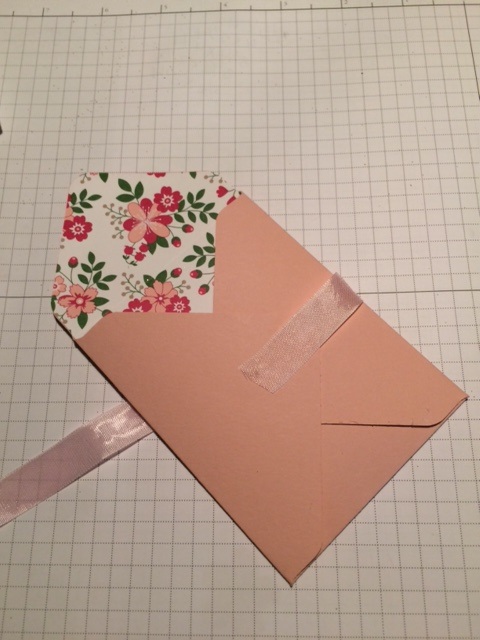
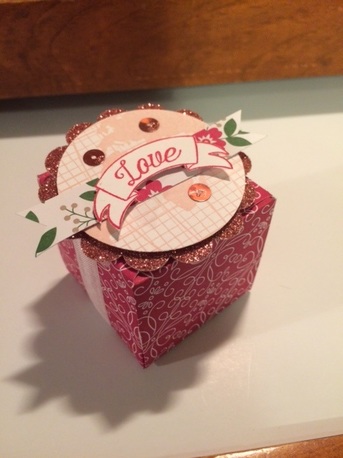
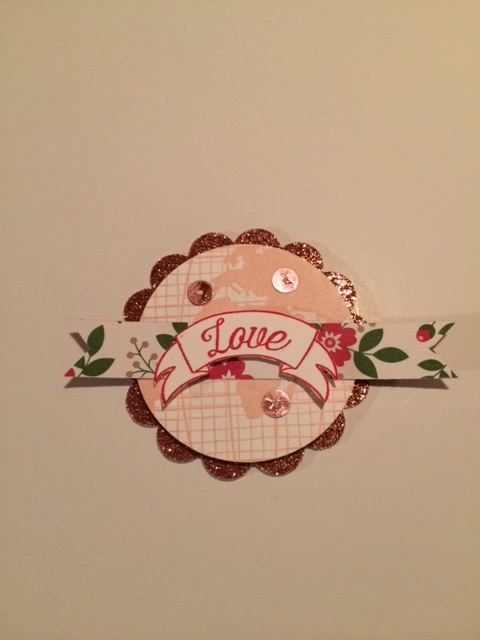
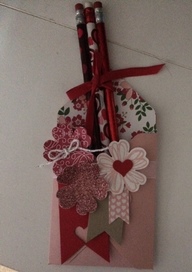
This project was really easy and uses a small amount of paper. The stamping/punches and glimmer could be scraps on hand! But whats better, is the project can be easily duplicated, if you needed to make a lot, it will take no time!!! The envelopes are not very deep, so this treat package would be perfect for a regular Hershey bar or another thin candy bar, a gift card, perhaps a note, as well. You could also add a couple pencils or pens for a school gift. I am debating whether or not to make for my elementary school kids Valentine Swaps...hmmm there's plenty of time to decide...Right??
Project 2:
Cute little gift box. I love it.
Again I chose a design that used very little cutting paper...This box was made with the Gift Box Punch Board. You can watch this video to see how to use the Gift Box Punch Board! 
  • Choose a 6x6 piece of DSP. I used the Love Blossoms again. Because of course it's new and it's perfect because the stack packs are 6x6 (I used the reverse side of the pattern I used in the envelope)
  • Follow the directions on the punch board to make the smallest box.
  • Turn the paper on the diagonal and line up with the S on the bottom left, punch, score down, score across and score one more time on the S at the top left to make the diagonal score line. Rotate paper and repeat on all 3 sides.
  • Turn paper over and line up paper to punch and score on the diagonal. It may sound a little complicated but it's really easy.
  • Use the reverse punch to make the notches on each corner. The box can be assembled without adhesive, but I chose to glue the sides together to create more structure.
Picture
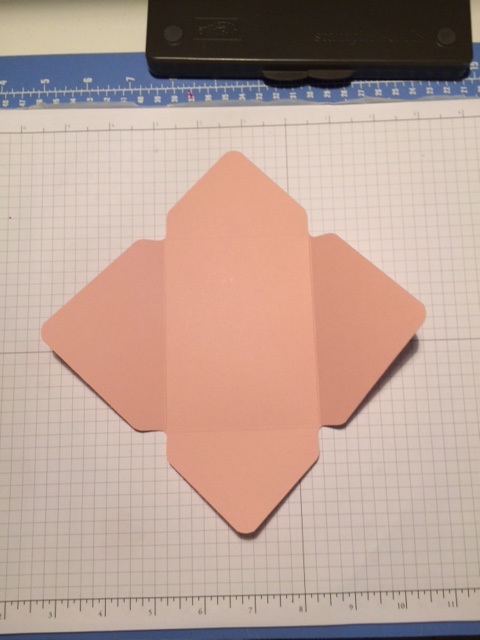
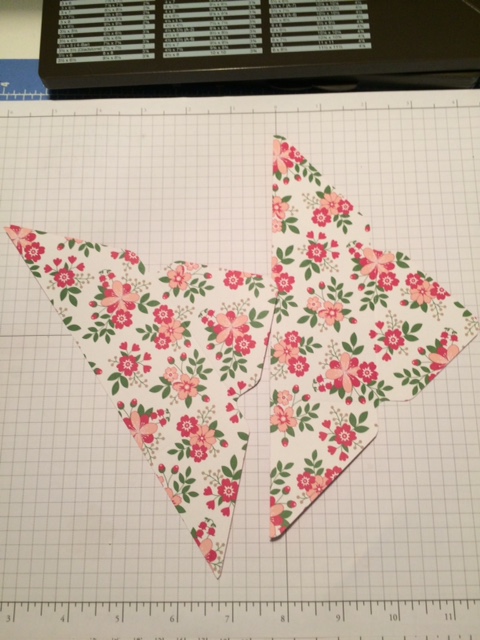
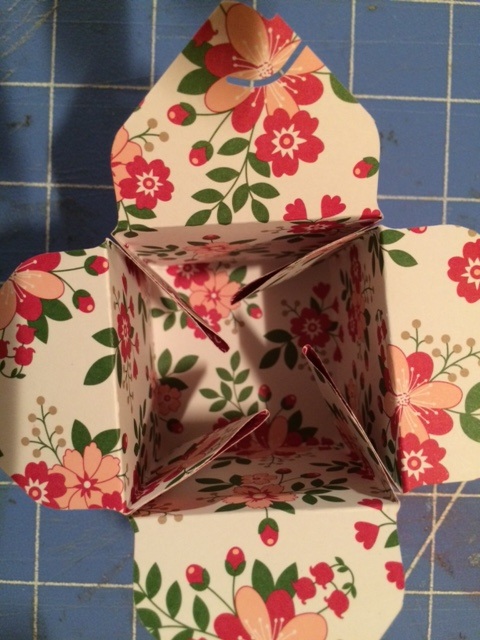
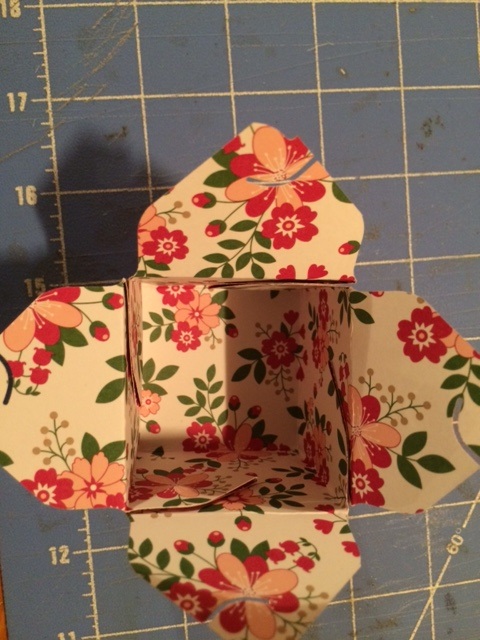
You can see in the second picture below, that once you fold the sides in, there are these little corners that stick out into the middle of the box. That is because the box will open flat. No worries. Just take a few glue dots and stick them to the sides. Wala, they are out of the way. You can fill the box with little treats...maybe a special piece of jewelry!!
  • Stamp the globe twice, from Going Global, in Blushing Bride. Punch out with a 2" circle punch. (Put one aside for the card)
  • Stamp the Love image, from Going Global, in Read Red. Cut the Love banner out.
  • Cut a strip of the DSP about a 1/2" to about 3" and flag the ends. Adhere to the globe with Snail. Adhere the Love banner onto the DSP with Dimensionals
  • Cut a 2 3/8" Scallop Circle using the Blushing Bride Glimmer Paper. Attache the globe with Dimensionals.
  • Add 3 Blushing Bride sequins using the Fine Tip glue pen.
  • Lastly, wrap a piece of Pink Piourette Seam Binding Ribbon around the box and use glue dots to hold it down. Attach the embellishment onto the box with Dimensionals. Make sure to fill the box before attaching everything.
Here is the card I made to go along with the Treat Envelopes and Gift Box.
  • I stayed with the Going Blobal stamp set and Love theme.
  • Cardbase is Blushing Bride Cardstock. Measure 5 1/2x 8/12, fold in half
  • Next layer, Blushing Bride, 5 1/4x4, attach to cardbase with Snail.
  • Measure Whisper White to 5x 3 3/4 and set aside.
  • Top Layer, is Blushing Bride. 4 3/4 x 3 1/2. Emboss the piece with the World Traveler Embossing Folder.
Picture
  • Cut a strip of DSP 4 3/4 x 1 and attach to the top of the embossed cardstock with Snail. I used the same pattern I've been using throughout the projects.
  • Tie a piece of Pink Piourette Seam Binding Ribbon around the layer. Attach to the cardbase with Dimensionals.
  • Cut a 2 1/2" circle in the Blushing Bridge Glimmer Paper.
  • Take the stamped global and attach to the glimmer circle with Dimensionals. (If you followed along, you stamped this when making the box, if not, stamp the globe in Blushing Bride and punch out with a 2" Circle Punch).
  • Cut out a circle in Real Red with the 1 1/2" circle punch.
  • Stamp "You mean the world to me" in Real Red. Use a piece of Whisper White scraps. Punch out using a 1 3/8" Circle Punch. Attach to the Real Red circle with Snail.
  • Cut a 1/2 x 3 1/2" strip of DSP, again I used the reverse side of the patterns I've used in the projects. Flag the ends. Adhere to the bottom of the globe using Snail.
  • Attach the "You mean the world to me" with Dimensionals onto the globe. Then adhere it all to the cardbase with Dimensionals.
  • Add 3 Blushing Bride sequins to the card and 3 rhinestones onto the stamped "you mean the world to me".
Well I wanted to send a big thanks for following along with the blog hop and visiting my blog. I hope you enjoyed the projects I have shared with you. Feel free to contact me with any questions and if you are interested in any of the projects used. You can also shop my website 24/7. You can see a photo of each product used in my projects below.

The photo on the right, is a quick alternative to the envelope. Cute teacher gift, right???

Remember to click next to visit Leanne Johnson's blog.

Happy Stampin
Steph
Picture
Picture
Picture

  1. Elizabeth Jeanne - http://craftsbyhappystamper.com/2016/01/21/lots-of-love-stampin-friends-blog-hop-with-blog-candy
  2. Steph Jandrow - http://stampinandscrappinwithsteph.weebly.com/home/lots-of-love-stampin-friends-blog-hop
  3. Leanne Johnson - http://literallymyjoy.blogspot.com/2016/01/lots-of-love-stampin-friends-blog-hop.html
  4. Mandy Reedyk - http://mandyreedyk.blogspot.com/2016/01/stampin-friends-january-2016-blog-hop_21.html
  5. Carolina Evans - http://studioevans.blogspot.com/2016/01/stampin-friends-january-blog-hop-lots.html 
  6.  Deana Benson- http://www.designcreativelybling.com/2016/01/stampin-friends-lots-of-love-blog-hop.html
  7. Melissa Thomas- http://stampinbythesea.weebly.com/blog/stampin-friends-blog-hop-lots-of-love
  8. Kirsteen Gill - http://www.creatinwithkirsteen.com/home/stampin-friends-january-hop-lots-of-love
  9. Kathie Rotti -https://kathielovesstamping.wordpress.com/2016/01/21/stampin-friends-lots-of-love-hop/
  10. Lynn Streifert - http://wp.me/p3eRQX-1s3
  11. Siara Acdal - http://www.siarasweetsensations.com/2016/01/stampin-friends-lots-of-love-blog-hop.html
  12. Andrea Tracy-Tucker - http://onestampinmothertucker.blogspot.com/2016/01/stampin-friends-lots-of-love-blog-hop.html
  13. Sarah Devendorf - http://lovelettersillustrated.blogspot.com/2016/01/stampin-friends-lots-of-love-january-hop.html
  14. Andrea Pancrazio - http://www.andreascardshop.com/new-blog-avenue/2016/1/stampin-friends-lots-of-love-blog-hop
  15. Kim Smith - http://craftingbuddy.blogspot.com/2016/01/stampin-friends-january-lots-of-love.html
Built for Free Using: My Stampin Blog
68 Comments
Beverly Farmer
1/21/2016 08:18:26 am

#SFJanHop - love this blog hop

Reply
Steph
2/14/2016 04:41:30 pm

Me too!!!

Reply
Carolina Evans link
1/21/2016 08:21:24 am

WoW Steph! Excellent tutorial. I'm so excited to be on this hop with you.

Reply
Steph
2/14/2016 04:47:09 pm

Thank you very much. Your projects were great!!!

Reply
Sue Silver
1/21/2016 08:25:55 am

#SFJanHop - very creative!

Reply
Steph
2/14/2016 04:47:39 pm

Thank you

Reply
Steph
2/14/2016 04:54:23 pm

Thanks!

Reply
Vicki Keyzer
1/21/2016 09:08:12 am

Love this. I can't wait to make these!!

Reply
Steph
2/14/2016 04:51:01 pm

Thank you! So much fun to make!

Reply
Kate S
1/21/2016 09:09:44 am

Thanks for the great directions on all your projects. Love the HOP

Reply
Steph
2/14/2016 04:51:42 pm

You're welcome!

Reply
christi
1/21/2016 09:42:55 am

#SFJanHop love the card and box idea. cute for munchie gifts for card party attenders.

Reply
Steph
2/14/2016 04:52:37 pm

thanks for stopping by!

Reply
Diane Seidler
1/21/2016 10:03:42 am

#SFJANHOP Love your card and project. And thanks for all the nice directions to follow. Diane Seidler

Reply
Steph
2/14/2016 04:53:40 pm

You're welcome. Thanks for stopping by

Reply
Cathie
1/21/2016 10:47:00 am

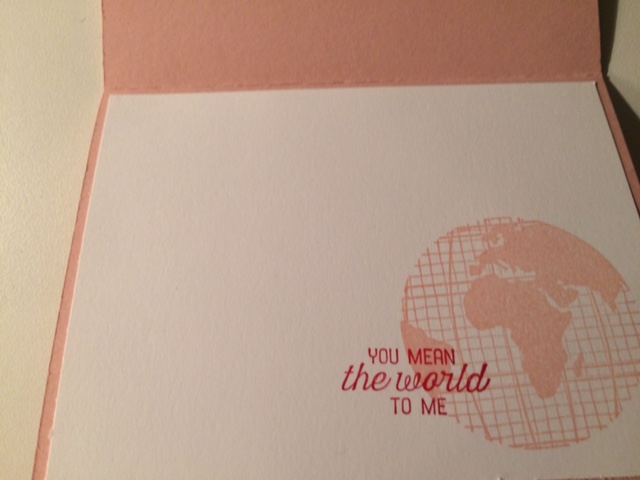
Good color choice (pink!) for the world ef

Reply
Steph
2/14/2016 04:55:03 pm

Thank you!!!

Reply
Cindy link
1/21/2016 10:54:02 am

#SFJANHOP Stephanie! Great job. Love all of these. So glad you were a guest today.

Reply
Steph
2/14/2016 04:55:47 pm

Thank you! Glad I was too :-)

Reply
Yvonne
1/21/2016 11:09:06 am

#SFJANHOP you did an amazing job! I love all your projects. Thank you for sharing.

Reply
Sue Bartnes
1/21/2016 11:24:26 am

Love this card . I have to sto looking I need everything

Reply
Sandy Berghuis
1/21/2016 11:54:46 am

Wonderful projects - thanks for sharing!

Reply
Kim Smith link
1/21/2016 01:42:54 pm

Wow! I am sure that I can speak for all the CASEr's out there when I say "Thanks for the directions" it will save a lot of time! Nice job.

Reply
Barbara Welch link
1/21/2016 02:12:24 pm

Love your card and projects. You are awesome for sharing the details to recreate your projects. #SFJanHop

Reply
SALLY
1/21/2016 02:23:20 pm

Love the inside liner on your envelope and the circle. Really pretty.

Reply
Siara Acdal
1/21/2016 02:28:03 pm

These are so cute!!!.....I just may to case these projects :) TFS!!!

Reply
Kate
1/21/2016 03:31:14 pm

#SFJanHop-- Love all your projects. Thanks for the great directions.

Reply
Audrey McQuown
1/21/2016 04:55:19 pm

#SFJanHop Lovely projects. :)

Reply
Sarah
1/21/2016 04:56:45 pm

Very stylish work! I'm enjoying your whole blog. ;)

Reply
Betsy
1/21/2016 05:19:44 pm

Love them all!

Reply
Aline
1/21/2016 06:52:11 pm

Love all the ideas, #SFJaHop

Reply
Heather
1/21/2016 07:10:48 pm

#SFJanHop - Lovely items, thanks for the tutorial!

Reply
Lisa Tedder link
1/21/2016 07:21:20 pm

Great job!
#SFJanHop

Reply
Sandy
1/21/2016 07:39:23 pm

#SFJanHop Love that you used the new global set

Reply
Lynn Streifert link
1/21/2016 07:44:09 pm

Oh Steph, what a sweet trio of amazing projects- you've given us some great Valentine's projects for sure! So pleased to be in the hop with you!

Reply
Debbie McBrayer
1/21/2016 08:07:36 pm

Thanks for showing how to do the envelop and the box! Cute ideas--I must try them!

Reply
Elizabeth Jeanne link
1/21/2016 08:19:17 pm

You made two gorgeous projects an a lovely card! Beautiful work! I'm so happy you joined us on the hop!

Reply
JoAnne
1/21/2016 08:22:03 pm

I love all your cards! Very pretty.....

Reply
Dianne Maggard
1/21/2016 08:48:06 pm

SFJan Hop
I just came across my envelope punch board. Guess I am going to have to get brave and use it! Haha. Love your treat bag.

Reply
Tina Riddle link
1/21/2016 08:49:12 pm

Stunning card and project! #SFJanHop

Reply
Deana Benson
1/21/2016 09:53:24 pm

Love it all! You make me want to break out my punch boards.

Reply
Leanne Johnson link
1/21/2016 10:54:30 pm

Steph - Your pocket, gift box and card are so lovely. I too love coordination and that's why I just LOVE Stampin' Up! products. :)

Reply
Wahnita Hammond
1/21/2016 11:28:12 pm

#SFJanHop - Simply gorgeous!!!

Reply
Kathie Rotti
1/21/2016 11:38:02 pm

Thanks for the directions! Beautiful project and card.

Reply
andrea pancrazio
1/22/2016 12:12:33 am

Very nice! That little box is so adorable.

Reply
Stacy Hobdy
1/22/2016 12:33:39 am

Great tutorial. Thanks for sharing.

Reply
Linda Atkins link
1/22/2016 07:32:45 am

Don't you just love the versatility of the glitter paper at Stampin Up? The quality is awesome.

Reply
Tara
1/22/2016 07:39:50 am

#SFJANHOP love the tutorial!

Reply
Myrna Therrien
1/22/2016 08:27:19 am

#SFJANHOP. Perfect for Valentines Day!!! Thank You for the tutorial

Reply
Kirsteen Gill
1/22/2016 09:06:06 am

I love the pink glimmer paper - gives a subtle girly bling ;) Thanks for sharing your projects Kx

Reply
Nanci Wilson
1/22/2016 10:38:39 am

I love your gift boxes! We are expecting our first great-granddaughter & I am in charge of making the 'favors' for the shower....this little box has given me some inspiration! Thank you! Love the card too! #SFJanHop

Reply
Diana Baker
1/22/2016 01:31:15 pm

#Stanhope, love the boxes! Thank you for sharing!

Reply
KATRINA
1/22/2016 04:01:30 pm

Your projects are beautiful. The instructions are very detailed which I need, so thank you. Now I can make a set for me!!

Reply
kim killeen link
1/22/2016 06:40:05 pm

Love the world background and pink to give a little bling! beautiful work

Reply
kim killeen link
1/22/2016 07:29:44 pm

#SFJANHOP - sorry steph! love the pink glitter and projects are beautiful!

Reply
shirley fann
1/22/2016 07:56:50 pm

love your textures & layering!!! these hops have so many great ideas that I miss my TV shows...great reason, I think so!!

Reply
Denise Hanson
1/22/2016 08:53:34 pm

#SFJanHop beautiful projects :)

Reply
Roberta Eldridge
1/22/2016 10:27:40 pm

#SFJanHop Love your valentine cards and creations!

Reply
Sharon W link
1/22/2016 10:58:32 pm

Very cute

Reply
Tina
1/23/2016 02:37:23 am

Very Nice!

Reply
Sue Vine link
1/23/2016 06:32:20 am

I just adore the colour theme - beautiful #SFJanHop

Reply
Angela Mero
1/23/2016 01:52:04 pm

Always love your projects!!! #sfjanhop

Reply
Mandy link
1/24/2016 10:13:21 am

Great card and project Steph! :)

Reply
Tammy Dickerson
1/24/2016 11:45:22 am

Love it!! The box is really cute!

Reply
Debbie Neuman
2/10/2016 01:56:32 pm

Love it all !!

Reply
Steph link
2/14/2016 04:48:10 pm

Reply
Steph
2/14/2016 04:40:27 pm

Thank you!

Reply
Steph
2/14/2016 04:57:33 pm

While I was trying to respond to everyone's comments my computer is not coorperating! But I want to thank all of you for stopping by!!! Thank you so much! I appreciate all your kind words!!! I look forward to next months Blog hop!!!

Reply


Leave a Reply.

    Picture
    Watch me on YouTube
    Picture
    New 2022-2023 Stampin Up Annual Catalog
    Picture
    Picture
    Kits Collection
    Picture
    All the Little Things by Paper Pumpkin
    Picture
    Join today
    Picture
    Retired Products for Sale

    Categories

    All
    3 D Projects
    Become A Demonstrator
    Berry Basket
    Birthdays
    Blog
    Boxes
    Calendar
    Candle Holder
    Card Club
    Challenge
    Christmas Cards
    Fall
    Gift Bags
    Gift Sets
    Gift Tags
    Halloween
    Holiday
    Homemade
    #imbringingbirthdaysback
    Kits
    Love
    Mini Treat Bag
    New
    Occasions
    Paper Pumpkin
    Punches
    Sale
    Samplers
    Stamp A Stack
    Stamp Of The Month
    Summer
    Thanksgiving
    Thank You
    Valentine
    Workshop

    Archives

    March 2023
    February 2023
    January 2023
    November 2022
    October 2022
    September 2022
    August 2022
    July 2022
    June 2022
    May 2022
    April 2022
    March 2022
    February 2022
    January 2022
    December 2021
    November 2021
    October 2021
    September 2021
    August 2021
    July 2021
    June 2021
    May 2021
    April 2021
    March 2021
    February 2021
    January 2021
    December 2020
    November 2020
    October 2020
    September 2020
    August 2020
    July 2020
    June 2020
    May 2020
    April 2020
    March 2020
    February 2020
    January 2020
    November 2019
    October 2019
    September 2019
    July 2019
    June 2019
    May 2019
    April 2019
    March 2019
    January 2019
    November 2018
    October 2018
    September 2018
    August 2018
    June 2018
    May 2018
    April 2018
    March 2018
    February 2018
    January 2018
    December 2017
    November 2017
    October 2017
    September 2017
    August 2017
    July 2017
    June 2017
    May 2017
    April 2017
    March 2017
    February 2017
    January 2017
    December 2016
    November 2016
    October 2016
    September 2016
    August 2016
    July 2016
    June 2016
    May 2016
    April 2016
    March 2016
    February 2016
    January 2016
    December 2015
    November 2015
    October 2015
    September 2015
    August 2015
    July 2015
    June 2015
    May 2015
    April 2015
    March 2015
    February 2015
    January 2015

    RSS Feed

    Enter your email address:

    Delivered by FeedBurner


    Question? Contact Me

Submit
  • Home
  • About Me
  • Contact Me
  • Products
  • Paper Pumpkin
  • Catalogs
  • Join the Fun
  • Paper Crafting
    • Card Ideas
    • Calendar Projects
    • Paper Projects
    • Scrapbook Layouts
  • Retired Products for Sale