 The 2021–2022 Annual Catalog will be retiring soon! It’s always bittersweet to see a classic Stampin’ Up! catalog take a trip to retirement. But, we’re looking forward to all the new products on their way—and we hope you are, too!
Stock up on your favorite products before they’re gone for good! Save up to 50% on essential craft supplies. What are you waiting for? Start shopping! After all, this selection of Last Chance Products is only available while supplies last. you can view the current last chance supplies here Contact me with any questions Happy Stampin Steph
0 Comments
Welcome to the 2022 Stampin Friends March Blog Hop! We have a fun theme planned by starting off the year celebrating all Life's Occasions. This month we are sharing monochromatic projects. I love making monochromatic cards, focusing on 1 color and making it shine! There are so many possibilities! At first, I was going to create something using a green, green is my favorite color. But I decided to use Stampin Up's retiring In Color BumbleBee and paired it with the Pansy Petals Suite. I love all the In Colors, but I will probably miss BumbleBee the most! I used it all the time and will most likely keep using it!
Be sure to hop along to each participant's blog, you can find a list of our blog hop participants below. After viewing my projects, continue on to Teri Pocock's blog to see her awesome projects! As you go through the hop, if you feel like you could do this, send me a message! We are always looking for crafters who love to create and share!!! Be sure to leave comments along the way, we love to hear what you think!!! 
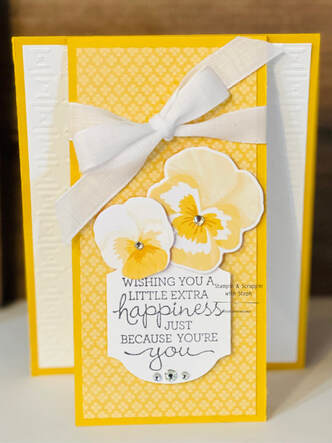
I love how my card came out! It is super easy!! It's a fun fold card. I'm calling it a front-panel card. I don't know if that is the actual name, but it works for me!
You will need: BumbleBee cardstock 4 1/4 x 5 1/2 and 2 3/4x11 (score on the 11' side at 5 1/2 and then fold in half) Basic White cardstock 4 x 5 1/4 and emboss with the Gingham Embossing Folder. Basic White 2 1/2x 5 1/4 and piece for stamping greeting Pansy Petals DSP 2 1/2 x 5 1/4 Pansy Dies - cut out 2 pansies from the DSP Stamp greeting and punch out with Elegant Punch Whisper White Ribbon from the Flowers for Every Season Ribbon Combo Pack Tuxedo Black Memento Ink Pad and Rhinestone Basic Jewels. Directions: Adhere the Basic White layer to the Bumble Bee piece. Adhere the DSP to the top of the folded Bumble Bee strip, adhere the Basic White piece to the inside. Tie a bow to the top of the strip. Adhere the strip to the Basic White, centering onto the layer. Arrange the pansies and greeting onto the front and a few Basic Rhinestones to embellish. And that is it! It is that easy!! 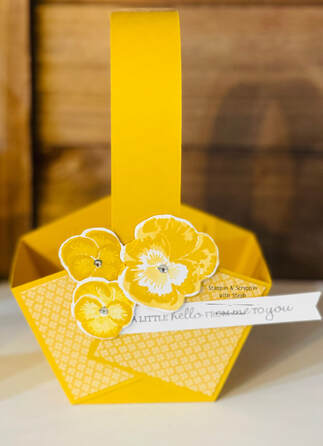
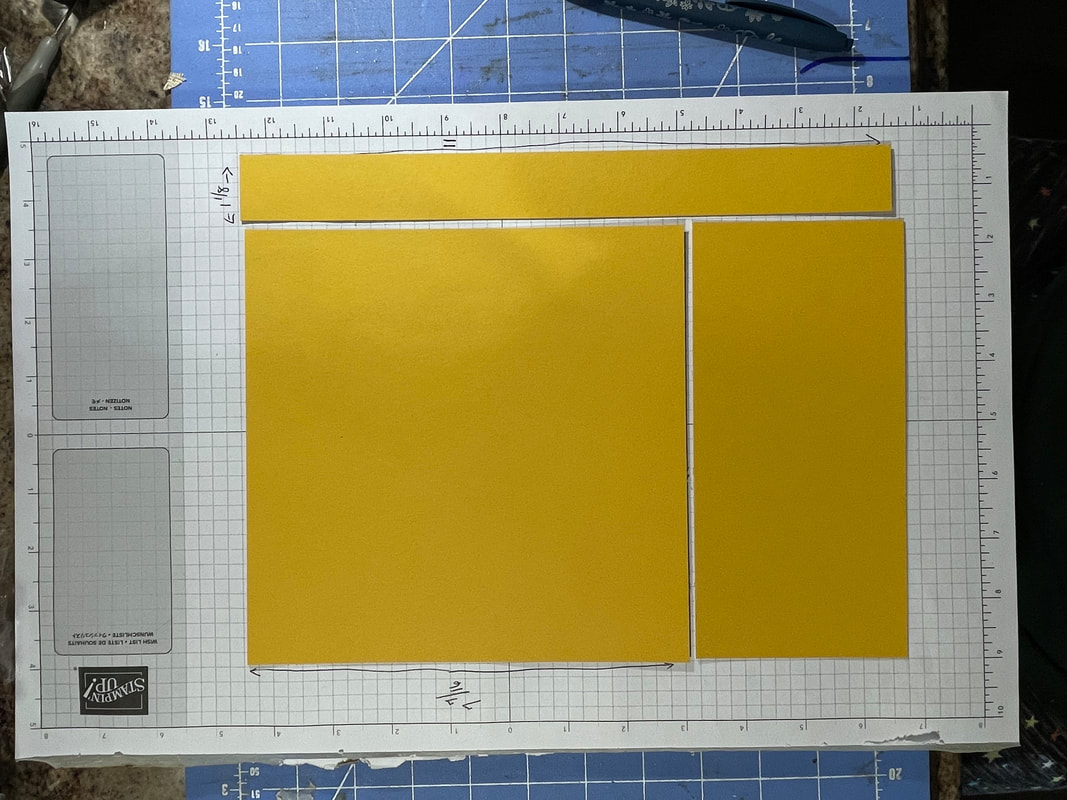
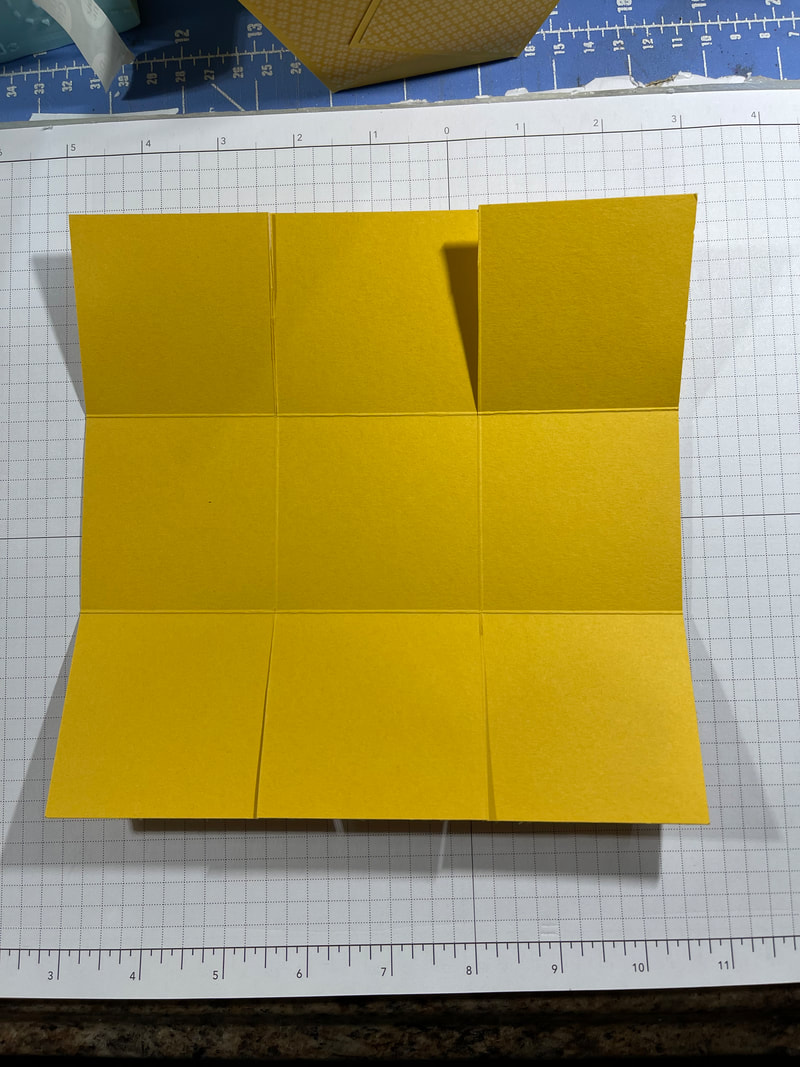
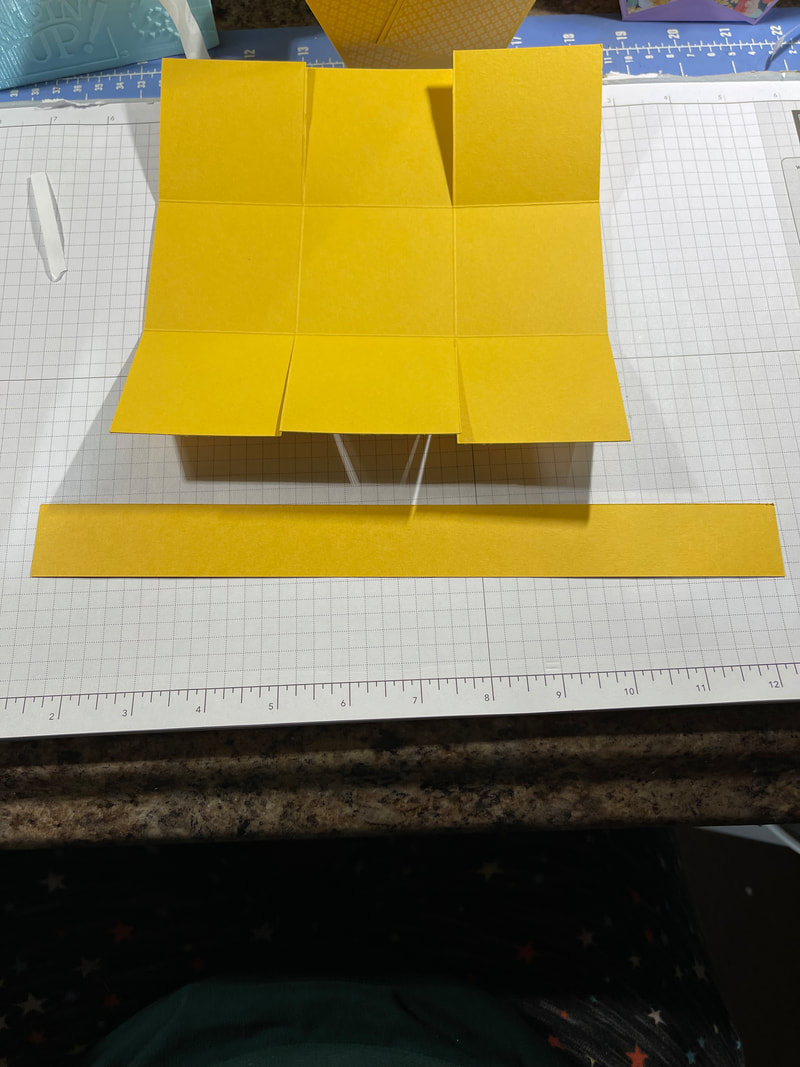
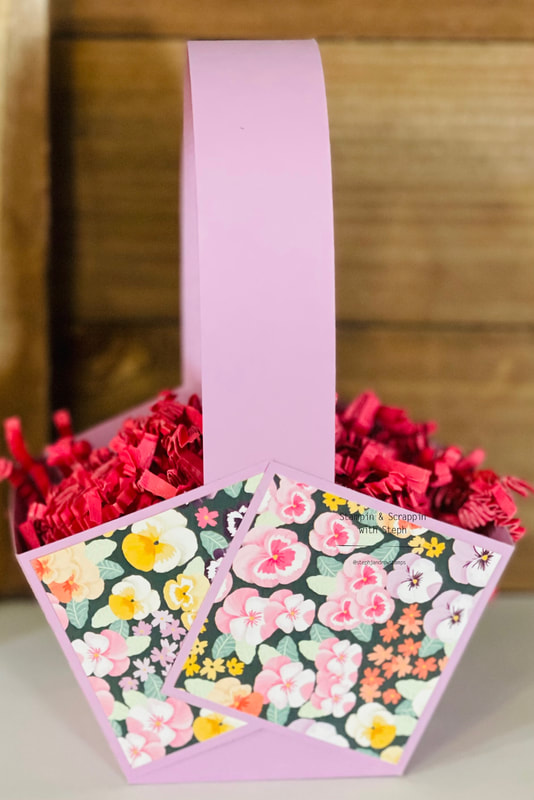
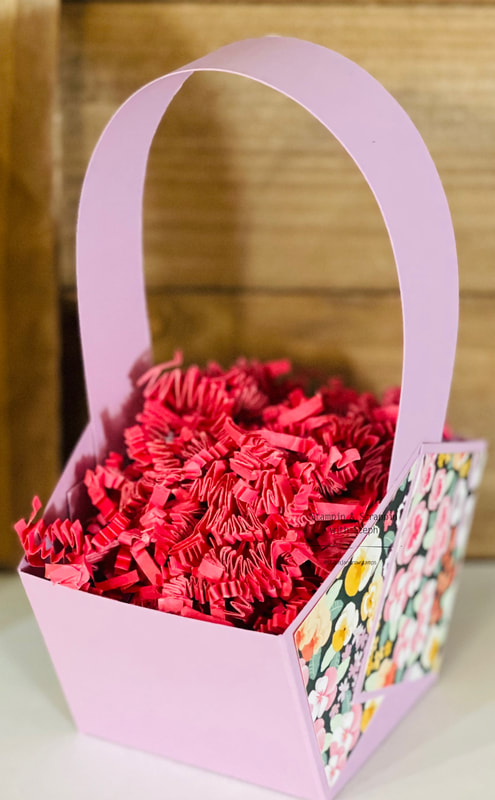
For my project, I decided to make a little paper basket. I call it a Springtime Basket. It can be used for Easter also or any occasion really. It is super easy and super quick to make!!! And all you need is 1 sheet of cardstock.
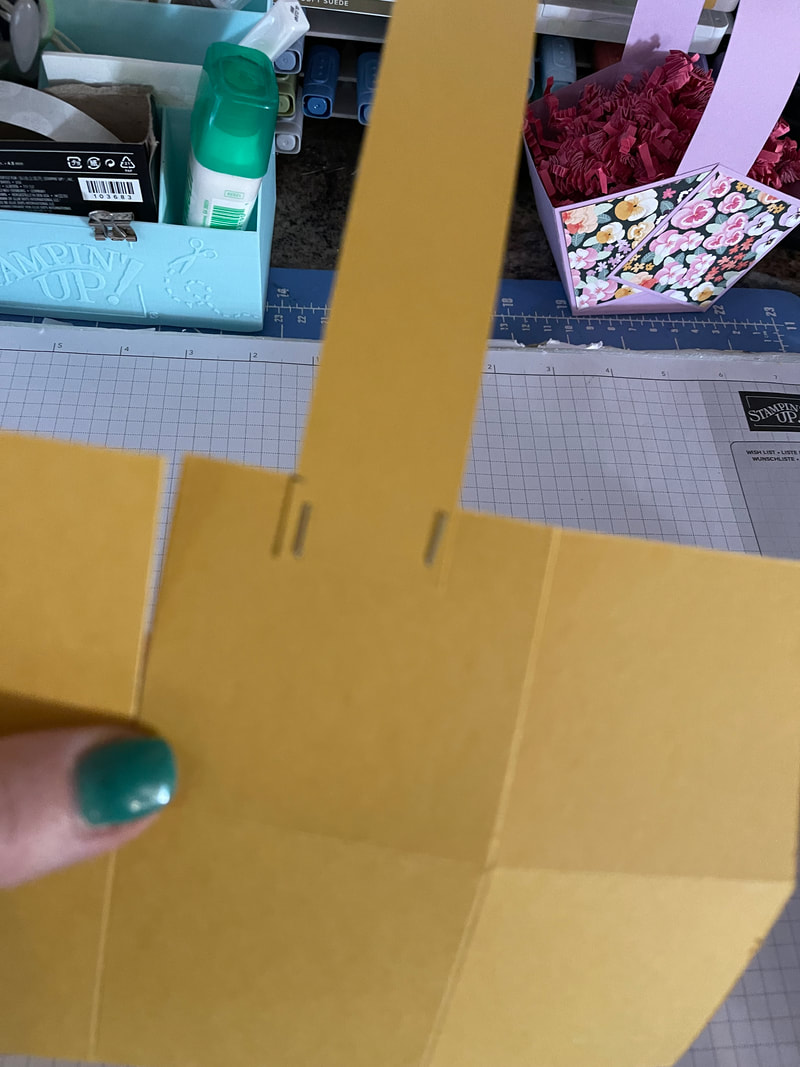
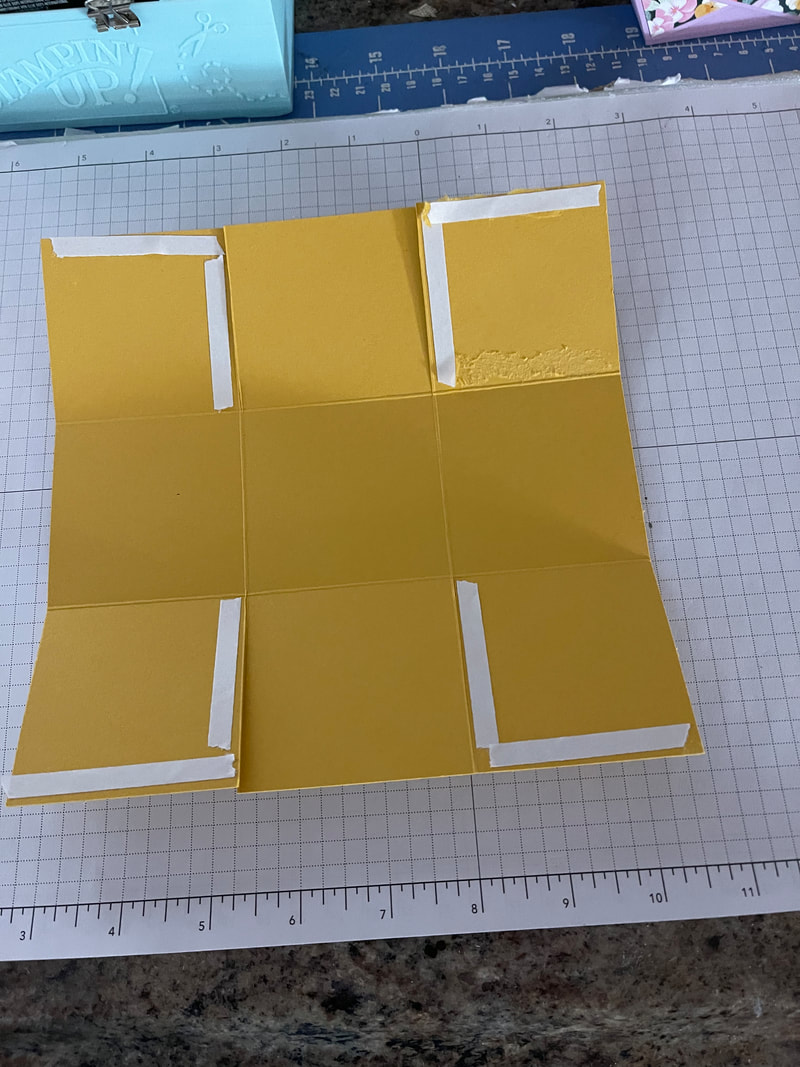
Refer to the pictures below, Cut the cardstock into 3 pieces, first, with the 8 1/2" side at the top, cut a strip at 1 1/8" Turn the remaining piece so that the 11" side is at the top and cut at 7 7/16." Set the smaller piece aside for decroating or another project. Take the larger piece and score at 2 7/16" on both sides, then turn and score again at 2 7/16" on both sides, you will have 9 squares. Cut 2 score lines from the bottom edge to the intersecting score line. Then repeat on the opposite side, See pictures below. I also created a quick video demonstrating how I made, the basket. Cut 4 pieces of DSP at 2 1/4" x 2 1/4" adhere to the 4 corners of the cardstock. Take the long strip and mark 1/2 inch on each end. Line that mark to the edge of the middle square, either adhere or staple, repeat the same on the opposite side. Add tear tape to the edges of the 4 corners. Bring them together lining up the 2 points and adhere. Repeat on other side. Use the Pansy Patch Bundle, and stamp and cut the Pansies, I used So Saffron, BumbleBee and Daffodil Delight I haven't filled my basket; my plan was to make a bunch for all my co-workers for Easter. But I am still deciding what I am going to use it for! I might fill it with candy for Easter, office supplies like post-its paper clips or a tissues, lotion and tea for a care basket. Whatever I end up with, I will make sure to post an updated picture! What do you think? So cute right??? I included the verison I created in the video at the end of the post! Which color is your favorite!
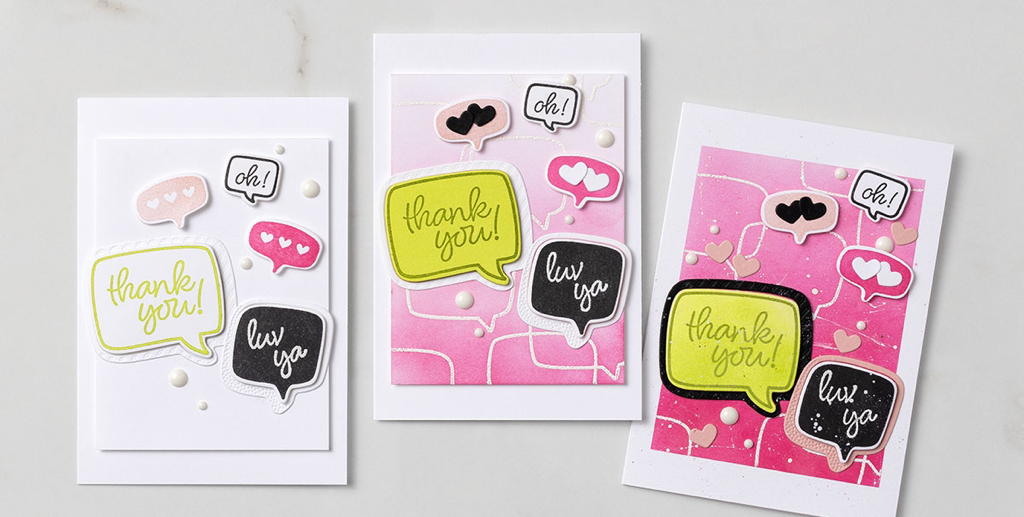
 Pansy Patch Step-by-Step - Thank You Card (4-1/4" x 5-1/2") (10.8 x 14 cm)
CASUAL As one of the sentiments in the Pansy Patch Stamp Set says, “The little things you do make a big difference.” That can be true in life—and when sitting down to create a fabulous card for someone special. All the little details and love put into making your card can add up to one big hug that will make someone’s day! To begin creating our lovely Besten Dank Pansy Patch step-ups, start simple. Fold Polished Pink Cardstock in half; add a layer of stamped Basic White Cardstock to the card front, then layer with just a few die-cut images. Notice that our artist used a Blending Brush to add subtle shading to the die-cut pansy bud. Easy to do. Fast. Fun! AVID We stepped up our Thank You card with tone-on-tone stamping and pops of gold for extra pizzazz. We also used a Bone Folder to curl the flower petals and give them extra dimension.ARTFULLY AVID To create our Mille mercis card, apply Granny Apple Green ink to the Basic White Cardstock layer using a Blending Brush, then run it through the Stampin’ Cut & Emboss Machine with the Tasteful Textile 3D Embossing Folder. Also, did you notice the pretty Baker’s Twine? We colored it with Flirty Flamingo Stampin’ Blends to make it really stand out! What do you think? What kind of stamper are you? happy Stampin Steph  Kits Collection by Stampin’ Up! is the perfect program for new customers and beginner crafters with its variety and all-inclusive projects. We will continue to strengthen that variety by regularly adding new kits to the offering. With that, we are excited to announce the latest Kits Collection addition. The latest addition to the Kits Collection by Stampin’ Up! is a fun one! With the Robot Buddies Kit, configure cards featuring cute robots and robot themed images that kids will love. Combine your bandwidth to craft this kit together for some offline fun with these awesome, friendship-themed robots
|

New 2023-2024 Stampin Up Annual Catalog


Kits Collection


Join today

Categories
All
Archives
January 2024
|


 RSS Feed