|
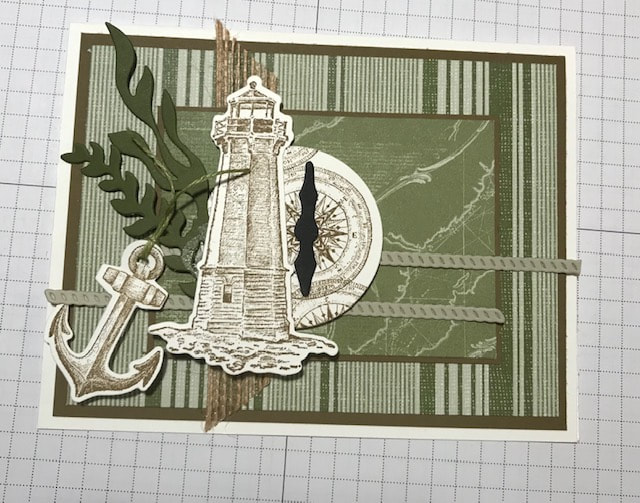
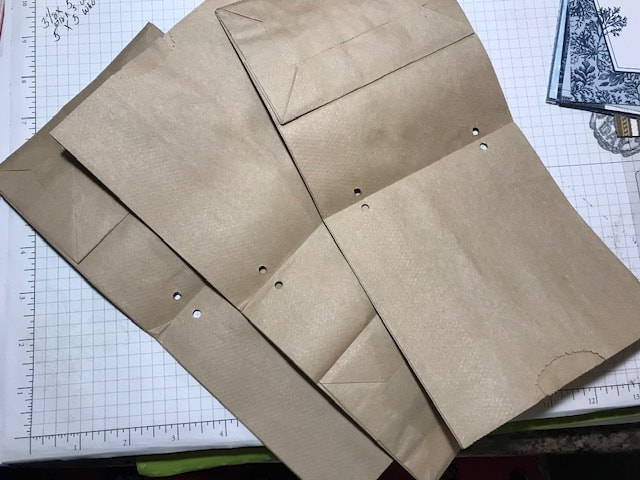
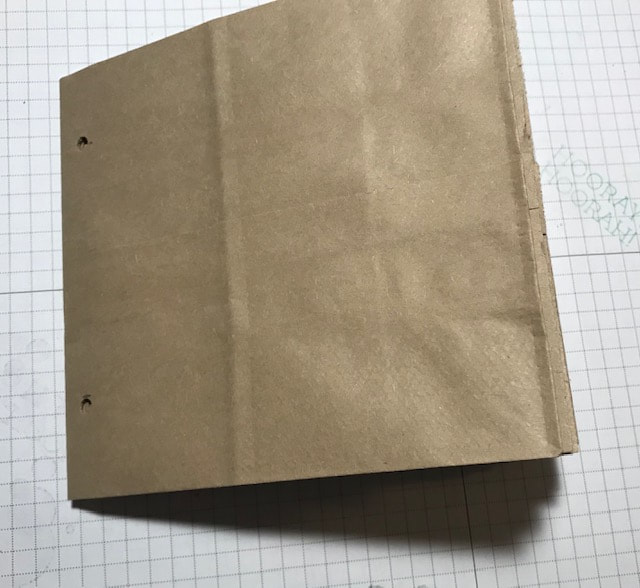
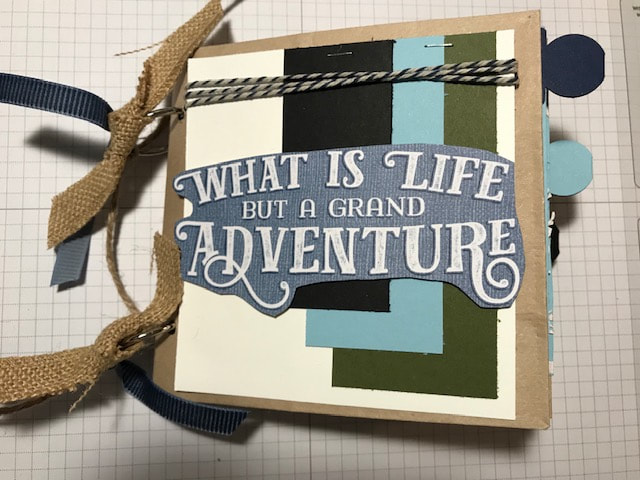
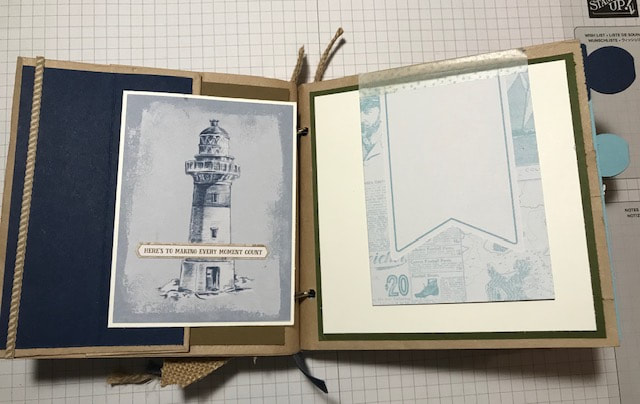
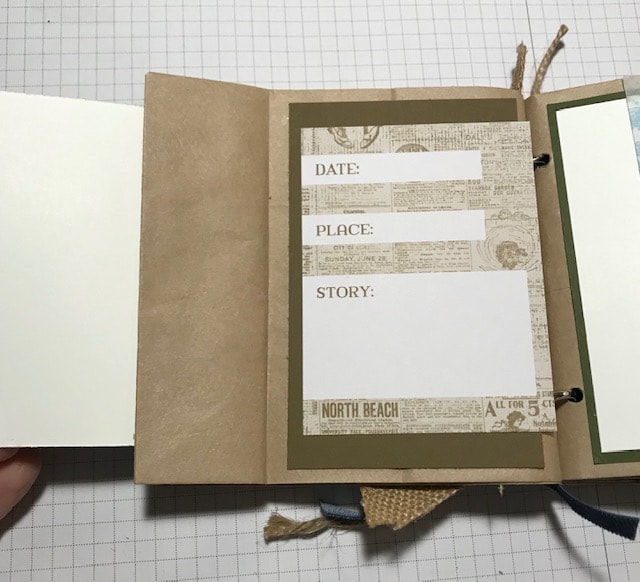
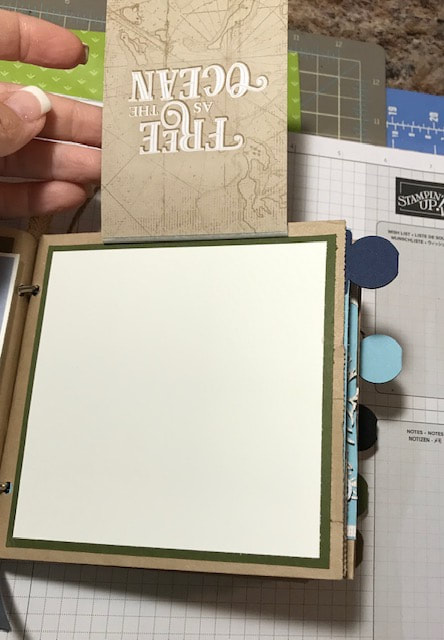
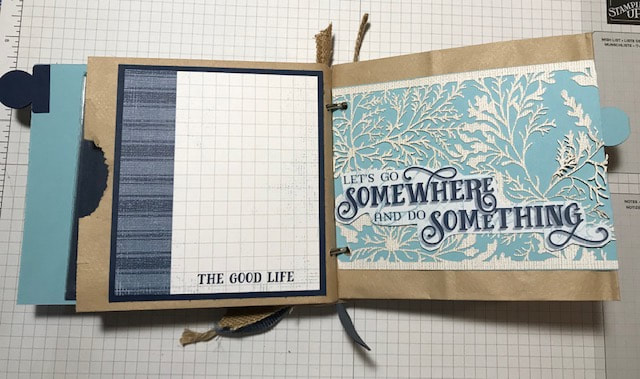
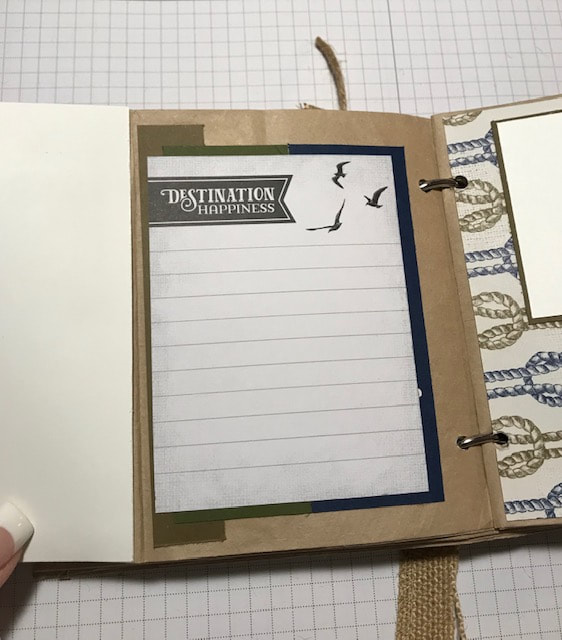
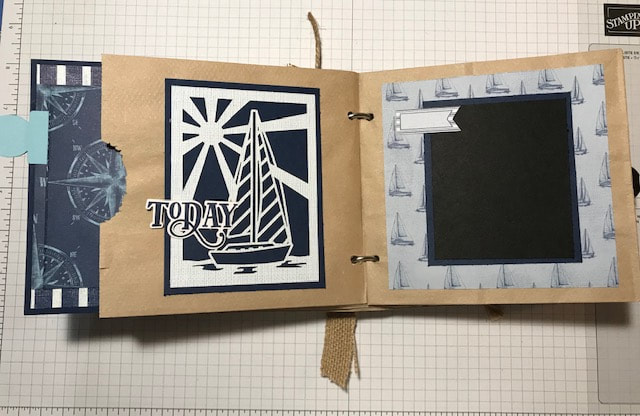
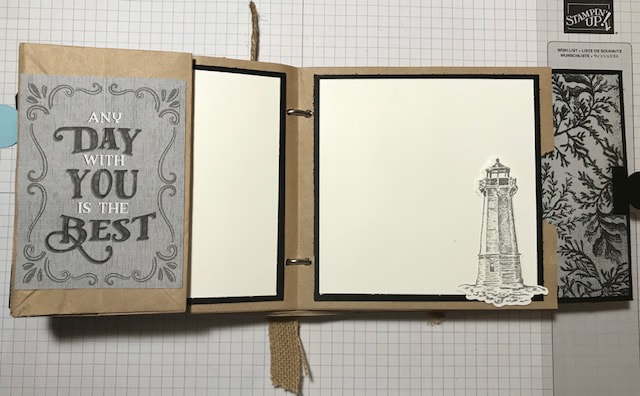
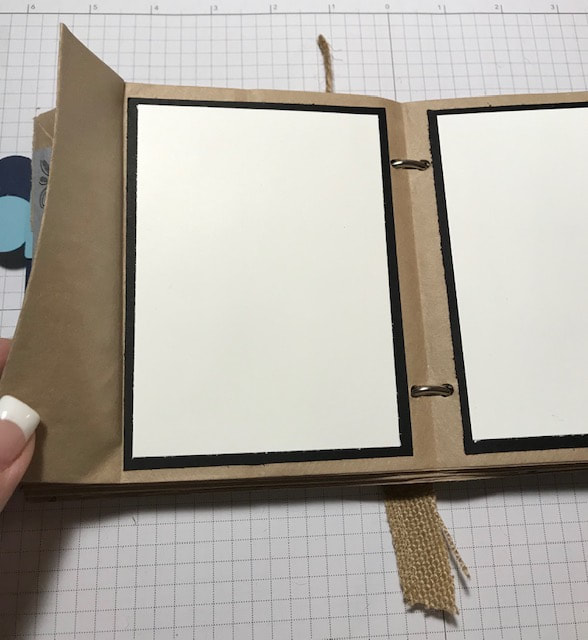
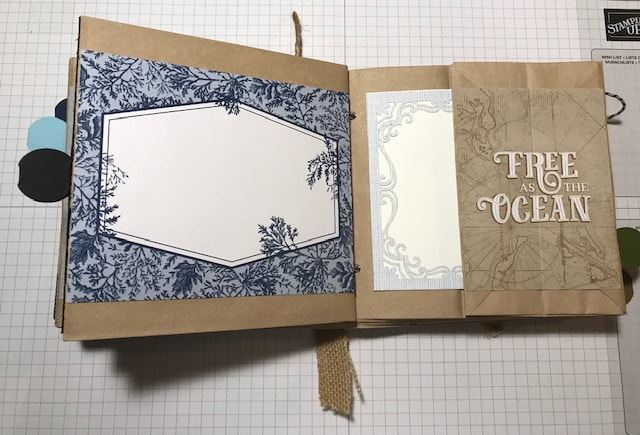
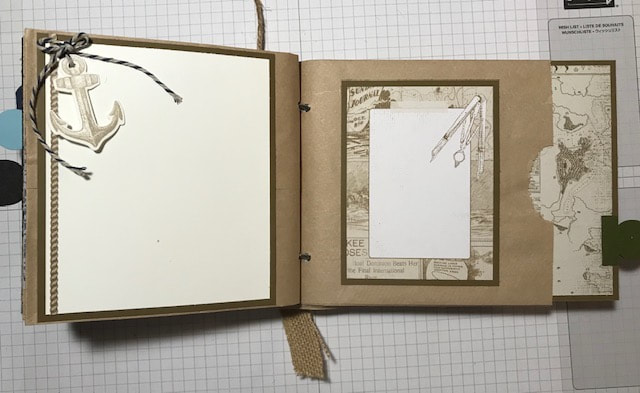
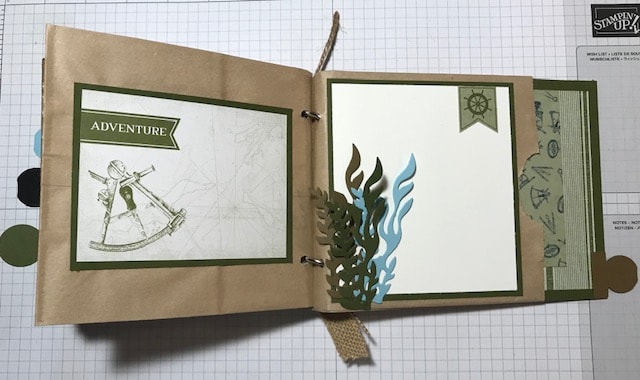
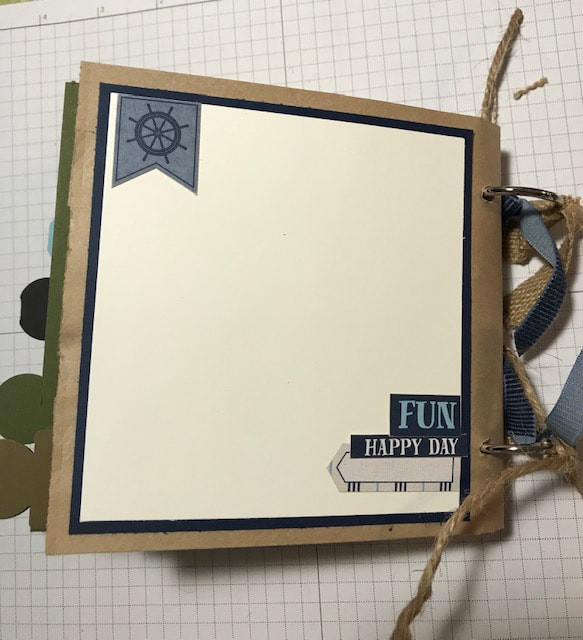
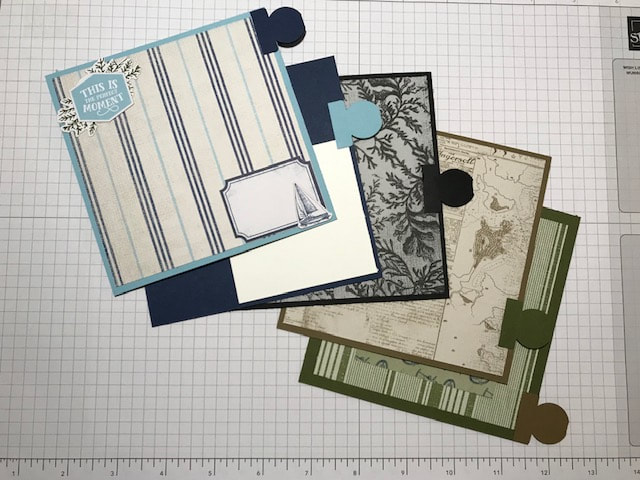
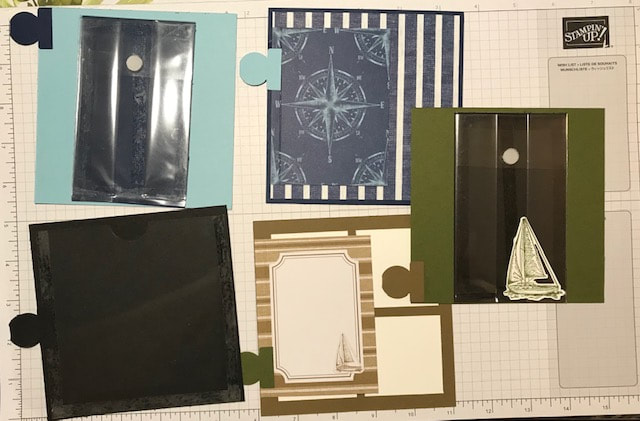
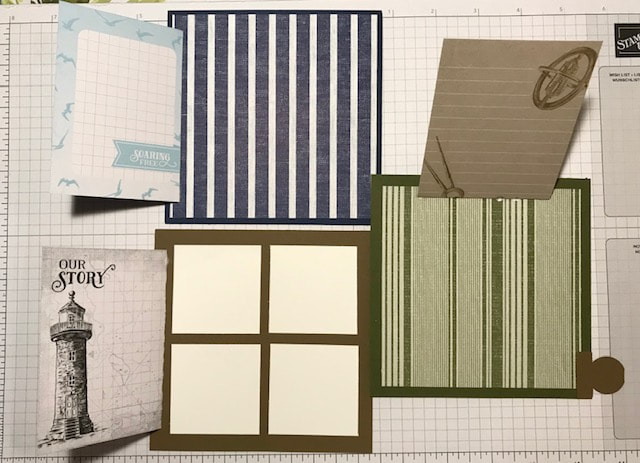
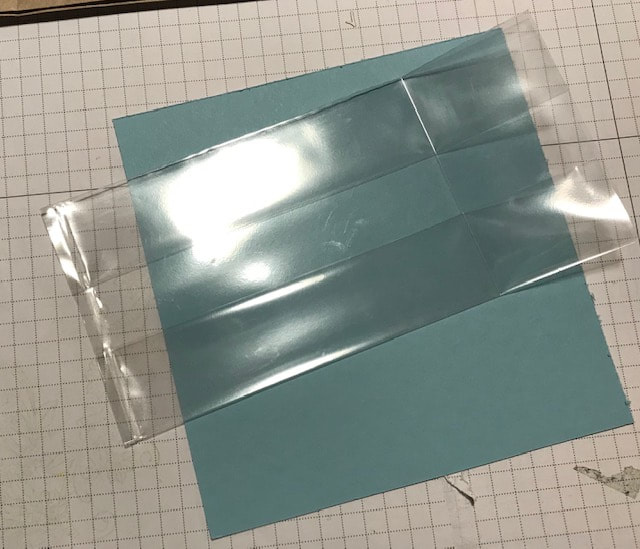
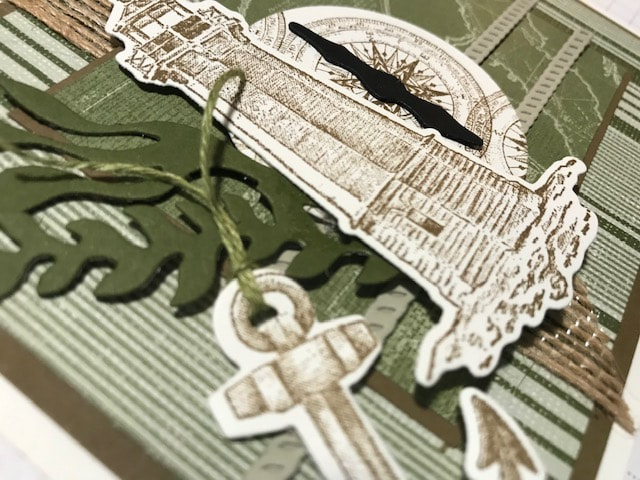
Welcome to our Stampin Friends June Summertime Blog Hop. I am so excited to share this month! School is out and sports are over! So I was able to design a little more this month, than I normally have time for! As you can tell, this month's hop showcases projects that have a summertime theme! Be sure to check out all our wonderful crafters and their amazing projects. Did you come from Maureen Rauchfuss's blog? Her projects were awesome! Be sure to continue to Barbara Welch's blog once you have finished viewing mine!!!  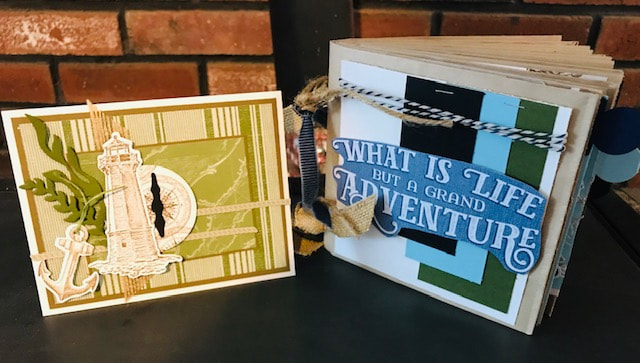 I am really happy with my project this month and I hope you enjoy! I made a travel album from brown paper lunch bags. Super easy! The projects feature products from the Come Sail Away Suite! Brand new in our Stampin Up Annual Catalog. I used coordinating cardstock colors; Balmy Blue, Basic Black, Mossy Meadow, Night of Navy, Soft Suede and Whisper White. The first thing you need to do is figure out how many bags thick you want to make your album. I used 5 brown bags. Then fold each bag in half and make sure you burnish the folds so the bags sit flat! Lay them one on top of the other alternating top and bottom of the bags. Once they are stacked and folded (make sure they all line up on edges or when you punch your holes the bags will be off), use a heavy duty hole punch or Cropidile. I measured from the top and bottom about 1" in and punched. Now for decorating I used the Come Sail Away Memories and More Cards, as well as the Come Sail Away Designer Series Paper. I basically looked through the cards to see what I wanted to use and then just went from there creating photo & journal layouts! Now, let's not forgot that with the bags folded in half, the top of the bags (the open ends) become a pocket. You can leave them empty, but what fun is that! I created 5 cards for the 5 pockets. Each card is a 5x5 piece of cardstock. I used the Circle Tag Punch to create the tabs on the ends so the cards can slide in and out of the pocket easily! Again, some of the cards have parts that flip up or out! You may have noticed on 3 of the cards there are pockets. I thought since this was to be a keepsake from traveling, you may want to have a place for some memorabilia. Creating the pockets was super easy. Lets start with the black card. To make the pocket, I took a piece of transparency (you can find these at office supplies stores) and cut it to 4 1/2x4 3/4. I cut a half circle at the "top" of one side. The reason I didn't cut it square is that you have a little more room to add things in and out. I added Tear N Tape to 3 sides and adhered to card. To make the pockets on the Balmy Blue and Mossy Meadow cards; 2- 3x6 Gussetted Cello Bags 2- small Velcro dots. Fold each bag, on the opened side, about 1"-1 1/4" down. Cut along the fold, be sure to leave 1 side still on (this is the closure to the pocket)SEE PICTURE 2 BELOW. Add the velcro dots. I then took a different color cardstock than the card base and cut it to the size of the pocket (you could skip this step and just adhere it right to the pocket. Some of the decorating throughout the album is from the Memories & More cards as well as a few stamped images from the Sailing Home Cling Stamp Set cut out with the Smooth Sailing Dies. The album is bound together by Binder Rings, you can find these at Walmart and other office supply store. The size you need will depend on how thick you made your album. I tied on some retired ribbon scraps to the binder rings to add a little more embellishment.
 Thank you so much for viewing my projects for the Stampin Friends June Summetime Blog Hop! I hope you liked what I made for you to share! PLEASE, leave a comment so I know you were here and I'd love to hear with you thought! Be sure to continue with the hop and visit on the list. If you missed a blog along the way you can see all the participant's blogs below! Thank you again for stopping by Happy Hoppin' and Happy Stampin' Steph Here is a list of all the bloggers for the Stampin Friends June Blog Hop
9 Comments

Thank your for joining the June Stampin Friends BLOG HOP, where we are celebrating the first day of summer! We have an amazing Hop for you this month!!!
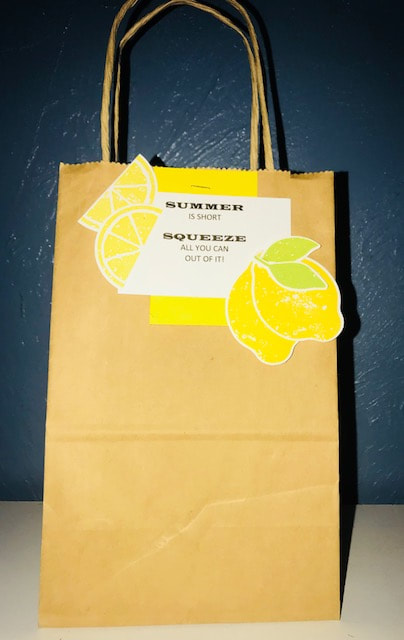
Be sure to follow each blogger to see all 12 of the awesome projects that have been created and shared for you! If you get lost a long the way, there is a list of participants at the bottom of each of the blogs! Since today is the first day of summer and school is almost over, I decided to make some teacher gifts! All of my projects use current Stampin Up products! I hope you enjoy what I have planned for you!
My projects theme was from a Lemon Verbena car air freshener I came across from a local store. I was very excited to see the Lemon Zest was carried over to the new annual catalog. So it was a perfect fit for this month's hop.
The projects use some new and returning products. My color choice was the New In Colors Pineapple Punch, Grapefruit Grove and Call Me Clover; 2017-2018 In Color Lemon Lime Twist. Stamp sets are returning Lemon Zest and Daisy Delight. My First project is a large clothespin. I found them at AC Moore, pretty inexpensive. I cut the cardstock to 1 1x2 x 6 1/8, embossed with the Layered Leaves Dynamic Embossing Folder. I stamped, punched and layered 3 daisies and finished the center with a Faceted Gem. I added a few strands of the Gold Mini Sequins Trim. The books mark is 2x4 1/2. I found the sentiment online and printed it out on Whisper White. They can use the bookmark or keep it display in the clothespin. Finished with the Pineapple Punch Grossgrain ribbon and a bow made from Linen Thread. 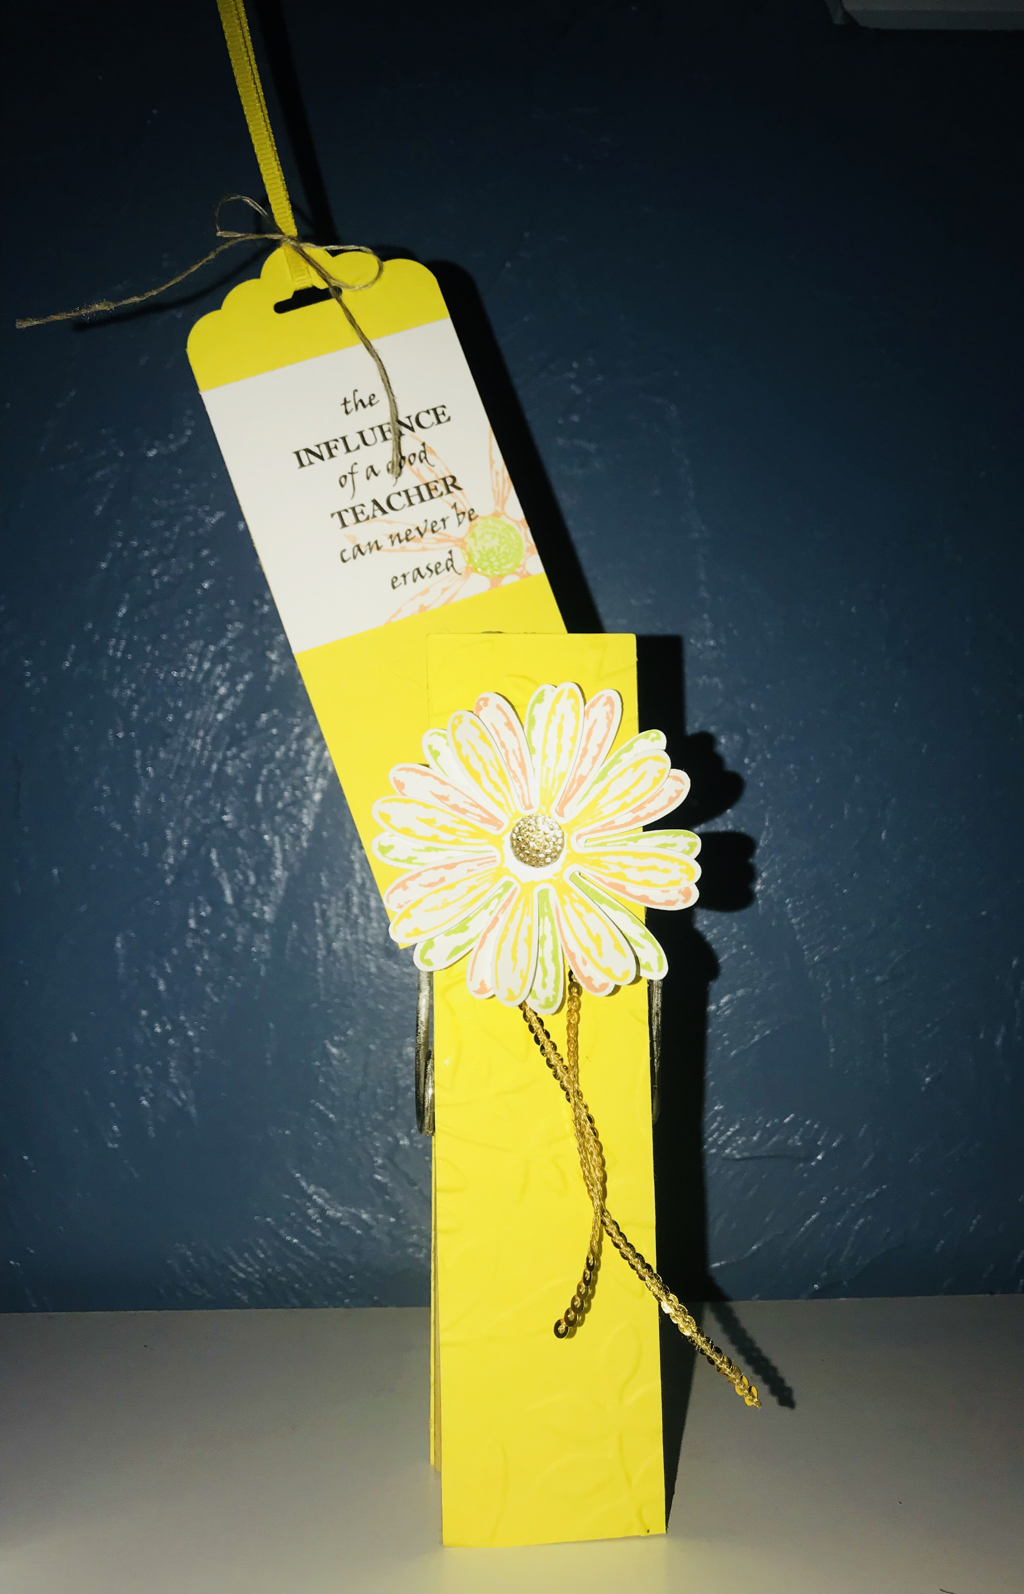
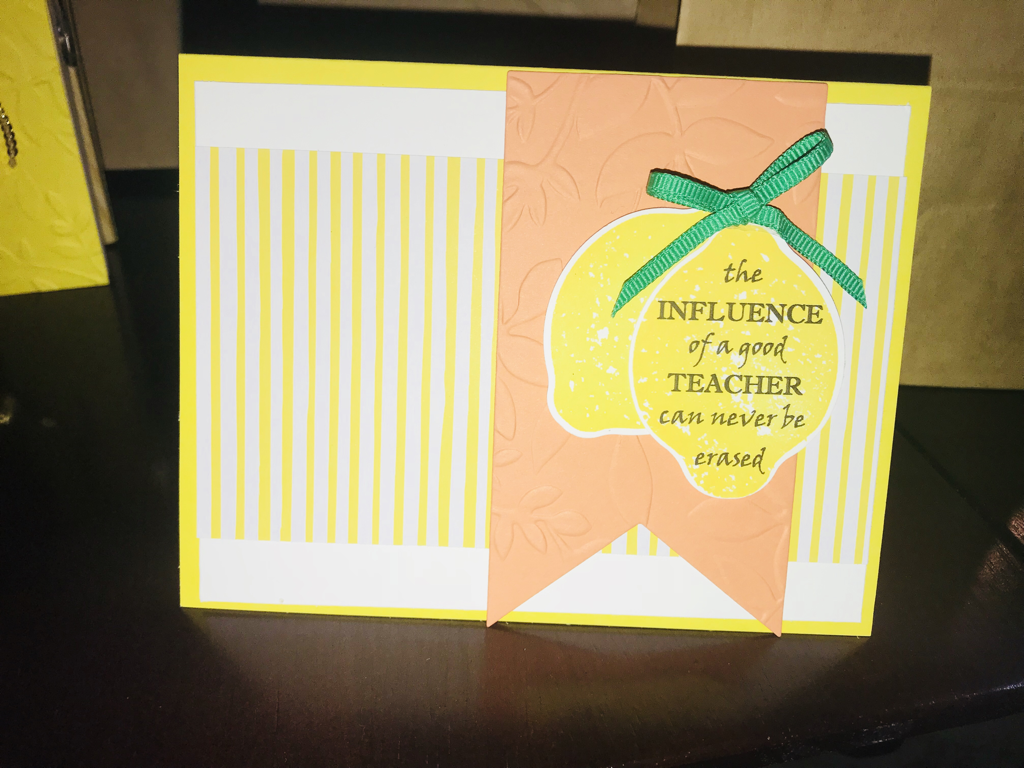
My card was super easy. Pineapple Punch base layers are Whisper White and the coordinating new In Colors DSP 6x6 Stack. Then a banner cut from the Grapefruit Grove paper that was embossed with the Layered Leaves Dynamic Embossing Folder. The sentiment was printed on Whisper White then stamped over with the Lemon. Finished off with the Call Me Clover Grossgrain ribbon.

I hope you enjoyed my projects, be sure to leave a comment. I'd love to hear your thoughts. I appear to be the end of the hop, but incase you missed someone along the way, you can find all the hoppers listed below!
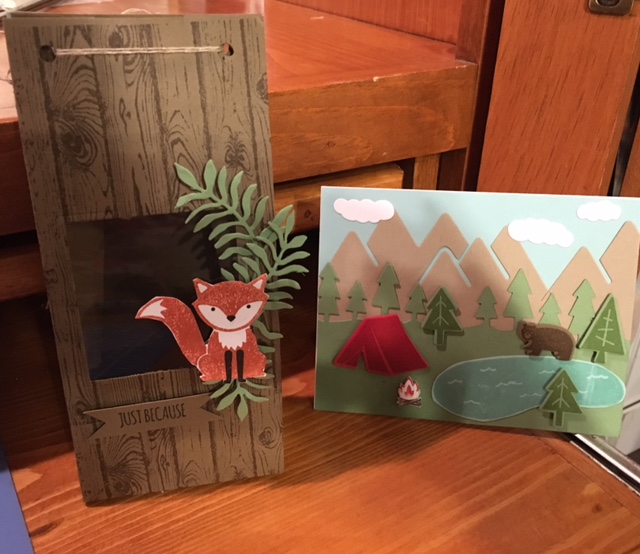
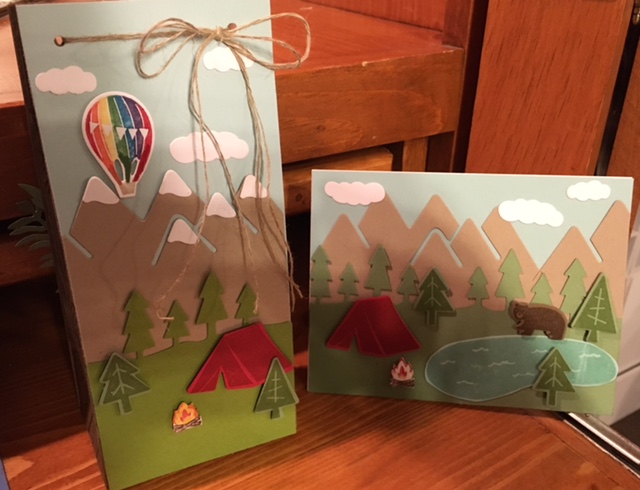
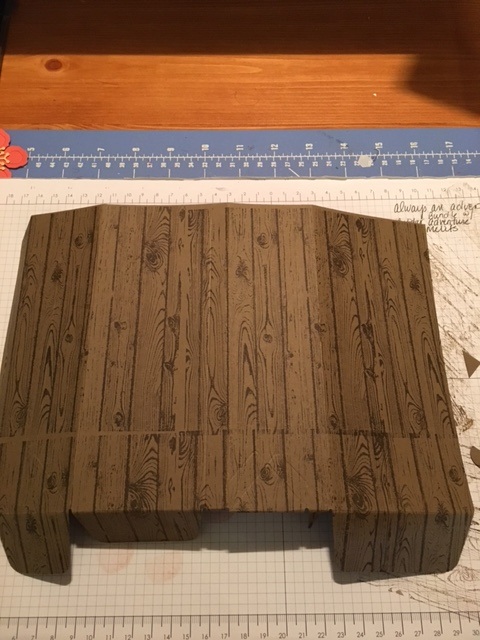
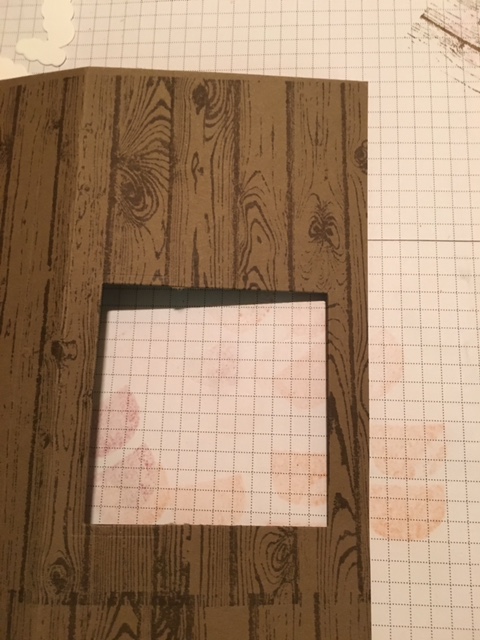
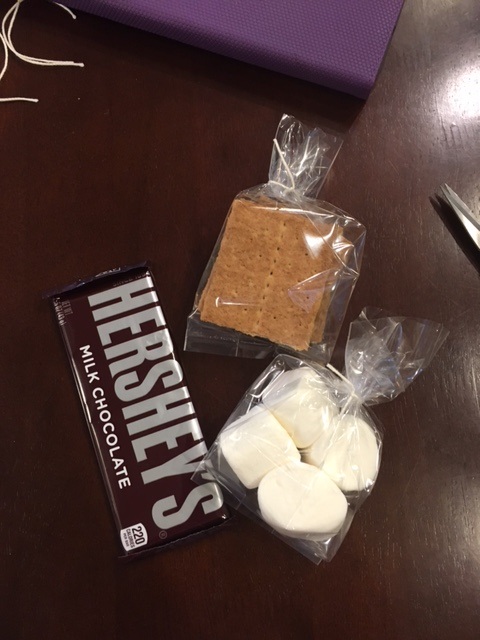
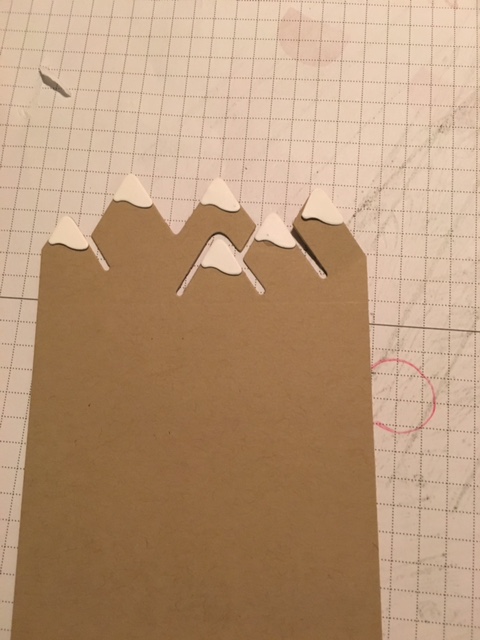
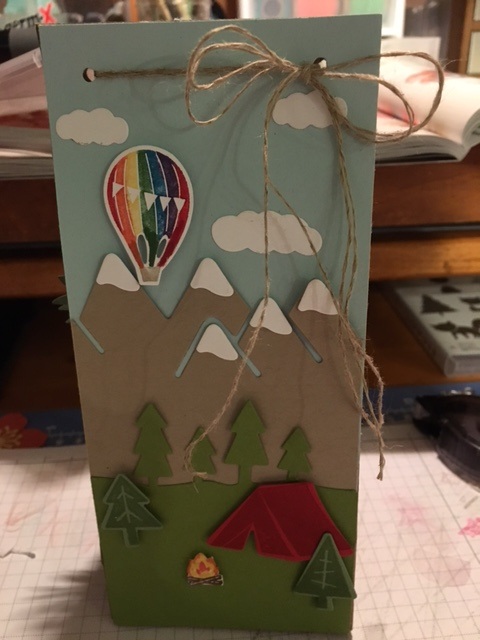
Hope you have a wonderful summer Thanks for stopping by and Happy Stampin Steph  Welcome to our Stampin Friends July Summer Fun Blog Hop! I'm so excited that you have decided to stop by. We have 12 amazingly talented crafters this month. You're going to have so fun when you follow along and check out everyone's blogs and fabulous projects. Make sure to leave a comment to be entered in the Blog Hop raffle. Read each blog, scroll to the end, and leave a comment with #SFJulyHop!! Each member and guest blogger, will randomly select a winner from our blog comments. We will then pool those together and randomly select the overall hop winner. I would love to hear some feedback and you will earn a chance to win some Blog Candy! Thank you for visiting my blog from Siara's site, and thank you for continuing with the Blog Hop. Enjoy my project and at the end click the NEXT button to continue to Kathie Rotti's Blog. Didn't come from Siara's blog?? That's ok, just click the PREVIOUS button towards the bottom of the blog or scroll to the end and click on Siara's name to visit her blog.  My project uses the new Always an Adventure, Foxy Friends and Harwood Stamp Sets and Outdoor Adventure and Botanical Builder Framelits, and the Fox Builder Punch. Sooo fun. I started with making the giftbag. I wasn't 100% on my design, so I just went with what I was feeling at the time. I used the giftbag punchboard and I used a full sheet of 8 1/2x11 cardstock and followed the directions for a medium bag. Before assembling the bag, I took the Hardwood Stamp and stamped the entire bag. Cut out a square on the front of the bag.from the Layering Squares framelits. I used a post it note to hole the framelit in place. You will need to fold up the other sides to fit through the Big Shot. Make sure you fold the sides ontop not under or the square will cut all the layers. To finish off the bag, I cut a piece of window sheet slightly large than the square framelit used. I adhered it on the inside. I cut out a few leaves from the Botanical Builder Framelits. I punched the fox image out with the Fox Builder punch on Whisper White. And I stamped the coordinating images in Cajun Craze. Face was stamped in Black. SOOO cute I love seeing all the Foxy Friends all over Facebook and Pinterest. I added a little S'mores kit to the bag. I mean whats more summer than S'mores. So my card focusing on the Outdoor Adventure Framelits. I used a piece of the Thick Whisper White and created to cardbase. I made 2 cards with the same design. You can see from the photos below. I stamped or colored the stamped images and cut them with the framelits. To create I the sky I cut a piece of Soft Sky card stock at about 2 1/2" x 5 1/4. Then I just layered everything onto the base. I realized after the hot air balloon just looked to big on the card so I omitted it. Sooooooo, after the card was done, I decided to make a second bag to match the card. I made with the same size as my Fox bag. Cut out the same Outdoor Adventure layers and assembled. I am happy with the results. But I think at some point I will make a card the matches the Fox Bag a little better. I had fun just making everything with no real plan just lets see how it goes!! Not usually my style. I hope you liked it Thanks for visiting. Please continue the Blog Hop by clicking next below to hop over to Kathie Rotti's blog! Happy Stampin Steph  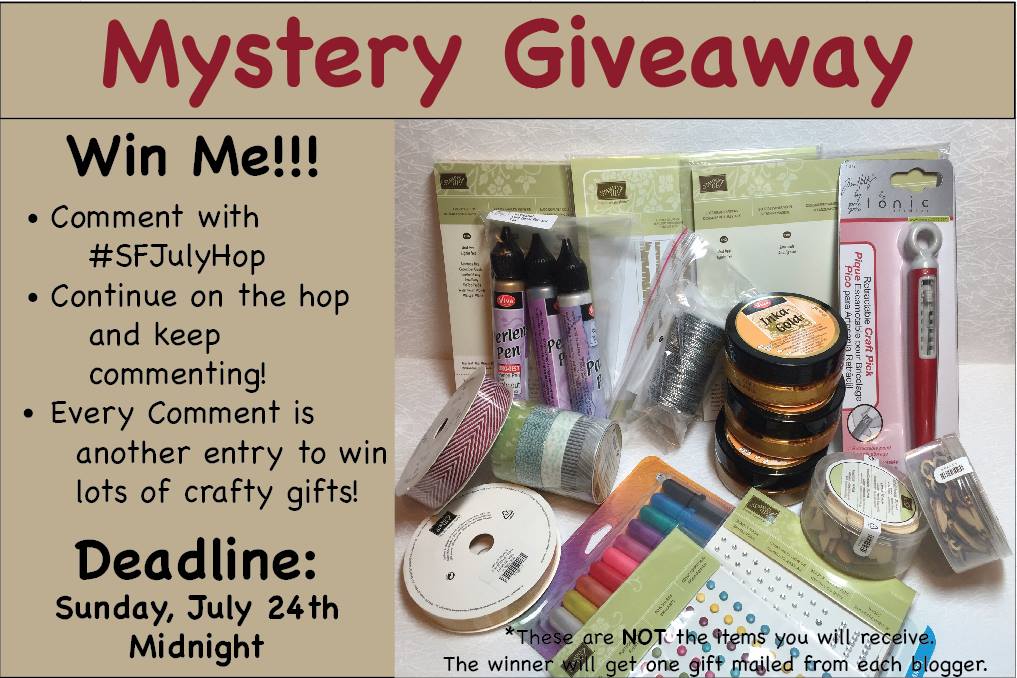 Here is a list of all the Hoppers this month
|

New 2023-2024 Stampin Up Annual Catalog


Kits Collection


Join today

Categories
All
Archives
January 2024
|


 RSS Feed