Welcome to April Stampin Friends Blog Hop. It's spring and the flowers are blooming our theme goes hand and hand with the season. May is just around the corner and here in the US we celebrate Mother's Day so it's only fitting our theme is All About Flowers. I hope you visiting my page from Barb Pfeffer's blog and make sure to continue on to Maureen Rauchfuss and be sure to leave a comment.
Are you interested in joining a blog and sharing your projects? Contact me for more information! I decided to make a quick fun fold Mother's Day Card. I used the Stampin Up Perennial Lavender Suite Collection for my card! I let the paper shine and covered the card! The paper from this pack is a carryover into the new Stampin Up Annual Catalog. And I am so excited about that! 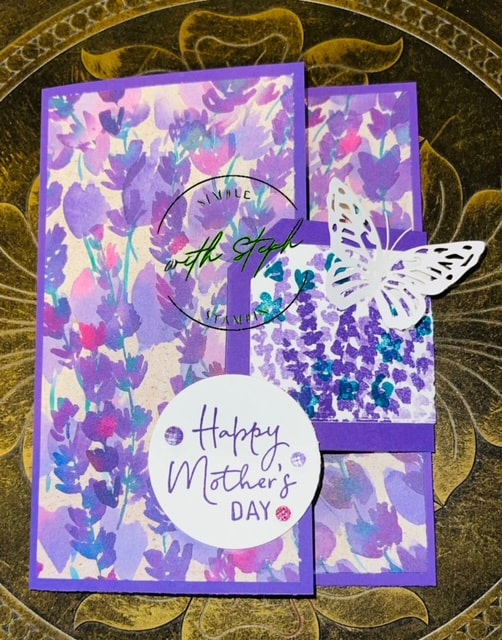
I used Gorgeous Grape as the cardbase which measure 5 1/2x7 1/4 and a piece for the diecut
DSP layers cut 2 at 2 3/4x5 1/4 and 1 at 1 1/4x5 1/4 Basic white 2 3/4x5 1/4 and for diecut and sentiment I used the 3rd largest die from the Countryside Corners and cut a piece in Gorgeous Grape - I scored this this at 2 1/4 Take the next smallest die and cut out a piece from Basic White and score at 2 I stamped the greeting in Gorgeous Grape and used a circle die to cut it out. Stamped some flowers onto the Basic White diecut and the Larger basic white piece for the inside of the card.
I hope you enjoyed my card. Be sure to leave a comment and continue hopping along. Below is links to everyone's blogs.
Thanks for stopping by Happy Stampin Steph
1 Comment
Our Thanksgiving has come to an end and Christmas is under way. I love to decorate for Christmas. It's my favorite holiday. I'm always looking forward to having the tree up. This I decided to bring back a favorite decoration. A Christmas Countdown.
I hope you join me today from Barb Pfeffer's blog. She is so talented!!! Make sure, take some time to visit each blog and leave us a little comment. Be sure to visit Maureen Rauchfuss blog after mine. You can find a list below! 
This project has been a family favorite to display and countdown to Christmas. I decided to use the Beary Christmas Suite Collection from Stampin Up. It is so adorable!!! I used some 3x3 Kraft boxes I had on hand and some number dies. Now Ican not take credit for the design. I found this project on Pinterest and have made it over the years using different papers and stamps. You can find instructions by Melissa Stout here.
You will need 2 pieces of cardstock, DSP stamps, dies and some embellishments. I used 3 different DSP patterns and cut 4 each at 2 3/4x2 3/4 pieces. Cut 1 piece of cardstock to 6 1/2x 8 1/2 and score on the long side at 3/8, 3 1/2, 4 1/4 and 7 7/8 Cut the 2nd piece of cardstock to 6 1/2x11 and score on the long side at 1/2, 1 1/2, 6 and 10 1/2 You will need a set of numbers per box. 1 box 1 2 3 4 5 0 2 box 1 2 7 8 9 0 You will see if you follow directions from the link, she cut out a 6 not a 0 for box 1 - I found the numbers work better with each box having a 0. The 9 can double as a 6 if you turn it upside down. You can countdown consecutively from 32 days to Christmas. You can see from my picture shows 57. But the numbers won't always line up. I like counting down 32 days - that is how long it is from Thanksgiving to Christmas. The stand is a little tricky. Fold on the score lines. On the smaller piece of paper add tear tape on the same side of each scored end. On the large piece fold, the score lines that are grouped together in an accordion style. The add a piece of tear tape to the end. Turn the cardstock over and add tear tape to the other end. Please refer to the pictures below. I would reference the video included in the Pinterest post as well. Afterall is assembled, you can start counting down to Christmas. I hope you enjoyed my project today. Be sure to continue hoping along Happy Stampin Steph 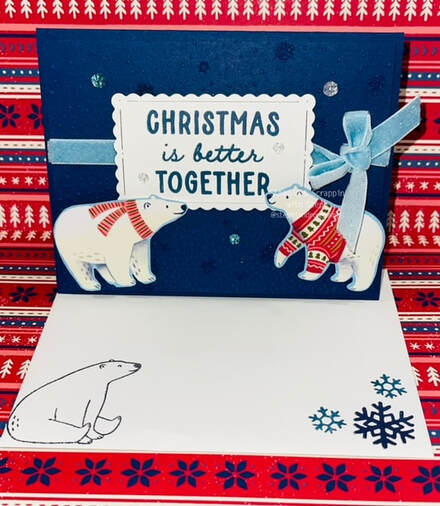
Welcome to September's Stampin Friends Blog Hop! This month we have fun projects to share with that feature Sentiments! I hope you are joining me from Barb Pfeffer's blog! Barb always makes such beautiful cards, don't you agree? After visiting my blog, be sure to hop on over to Jo Blakman's blog. Leave us comments - we love hearing what you think!!! You can find all the blog links at the bottom! Have you ever thought about participating in a blog hop? Let one of us know and we'd love to have you join our little group!
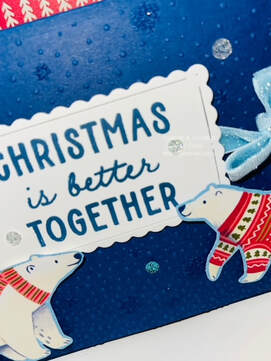
I chose the Stampin Up Beary Christmas Suite to make my card. It was the first suite that jumped out me when I was looking through the Stampin Up Holiday Mini. I was knew in the moment that this what the set I was ordering right away! I love the Polar Bear, it just makes me smile! This card is so fun and easy to make! I used Night of Navy Cardstock as the cardbase. And then I added an embossed layer in Night of Navy. The embossing folder is also new called Snowflake Sky 3D Embossing Folder. Before adhering the layer to the cardbase with dimensionals, I wrapped the Balmy Blue Sparkle Ribbon around the layer and finished with a bow. I stamped the greeting in Misty Moonlight and use the 2 smallest rectangle from the Scalloped Contour Dies. While I was stamping, I also stampin a piece of Basic White with a polar bear and snowflakes for inside of the card and also on my envelopes.
I added dimensionals to the back of the greeting and adhere to the card over the ribbon. For the Polar Bear on the right, I used the Beary Christmas Designer Series Paper and the Beary Cute Punch, to cut one bear out. For the bear on the left, I used scissors and just fussy cut. I finished the front of the card by adding a few Adhesive Backed Glitter Sequins.
Welcome to August's Stampin Friends Blog Hop. This month we all are All About the Paper. I love creating projects that focus on the beautiful DSP that Stampin Up creates!!
I hope you are joining me from Barb Pfeffer's blog! Wasn't her projects wonderful? After visiting my blog, be sure to hop on over to Tiziana Milano's blog. Leave us comments - we love hearing what you think!!! You can find all the blog links at the bottom! Have you ever thought about participating in a blog hop? Let one of us know and we'd love to have you join our little group!
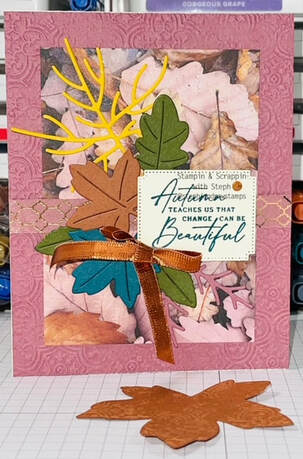
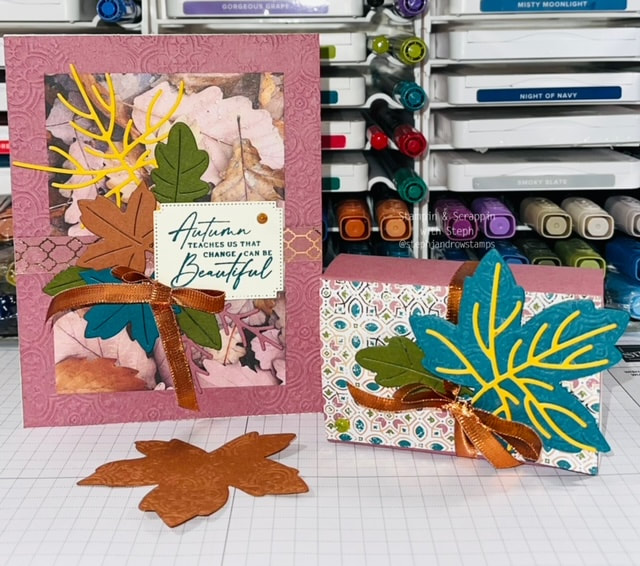
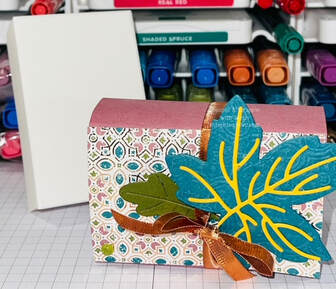
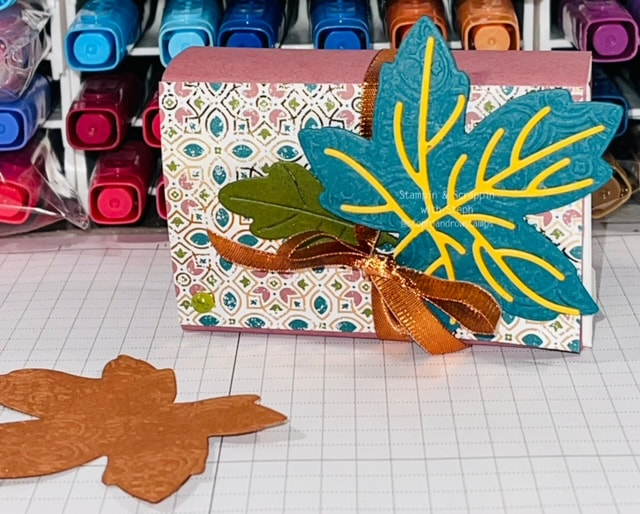
My favorite time of year is just around the corner. So I felt it was only fitting to use the brand new All About Autumn Suite that will be available in September. It so pretty and the paper is gorgeous. And the best part of these projects, my daughter, who will be off to college again in a week, helped me design and make them!!
I started with a card base of Very Vanilla and added the first layer of Moody Mauve which was embossed with the new Distressed Tile 3D Embossing folder. The next layer is a piece of All About Autumn DSP 3 1/2x4 1/2. I cut out several of the leaves in Mossy Mellow, Crushed Curry, Moody Mauve, Pretty Peacock and Copper Clay. The greeting was stamped in the Pretty Peacock and cut out with the dies. I finished it with the Copper Ribbon included in the suite and one of the adhesive backed speckled dots
I hope you enjoyed the projects I made for the hop! Please be sure to leave a comment and continue to Tiz's blog!
If you are interested in receiving a Stampin Up catalog, please feel free to send me a message! Have a great day and Happy Stampin Steph 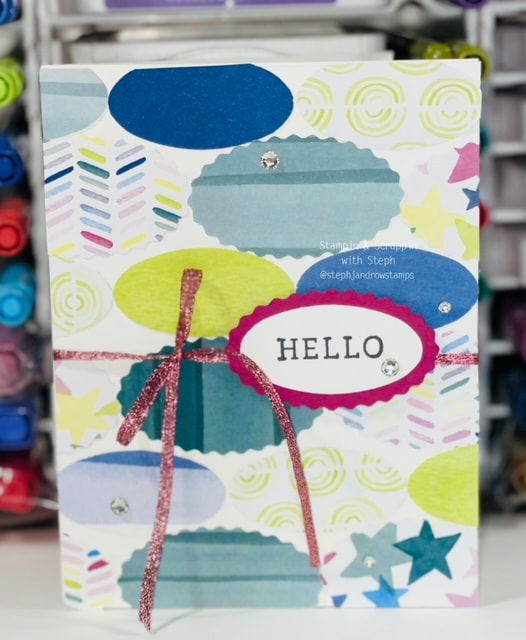

It's time for our monthly Stampin Friends blog hop! And this month we are focusing on punches. When I began designing the card for this month, I realized I have so many punches. But only a handful are current with Stampin Up. I had to really think about what I wanted to do.
I hope you're joining me from Barb Pfeffer's blog! Wasn't her card great? After reviewing my blog, be sure to leave a comment and continue on to Maureen Rauchfuss's blog. You can find all the blog links at the bottom! Have you ever thought about participating in a blog hop? Let one of us know and we'd love to have you join our little group!
To make this Perfectly Punched card, It is very easy to make. And you could make multiple cards in a short amount of time.
I used the Double-Oval Punch and punched out several ovals using the Bright & Beautiful DSP. Then I alternated the patterns and size as the background of my card. When I was happy with the layout, I used a piece of 4 1/4 x 5 1/2 Basic White and glued them down. I added dimensionals to the back and adhered that to the card base in Basic White as well. Then I took a piece of Metallic Woven Ribbon in Sweet Sorbet. I stamped the greeting from the Happy Labels stamp set and punched it out with same punch and then I punched out the larger oval in Berry Burst. I added that to the front of the card with dimensionals. I finished it off with Basic Rhinestones! How cute! I love it. I hope you enjoy the card I have shared with you. Be sure to leave a comment and visit Maureen's blog! You can find her link below. Thanks for stopping by Happy Stampin Steph 
I hope you enjoyed the card I prepared for you!!
Happy Stampin Steph
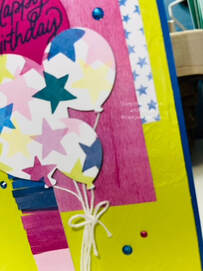
Welcome to May Stampin Friends Blog Hop. We create so many different cards for so many different reasons. But I feel like no matter the creation they definitely have more of a feminine touch this month I focus is celebrating men so our cards were featuring more masculine theme. And if your like me you will want to take a peek at each blog to get some ideas. I constantly struggle with creating the masculine cards. I usually make. Few at a time and that’s about it! I hope you visiting my page from Maureen Rauchfuss and after visiting my blog, hop over Tiziana Milano’s! The sure to leave a comment.
Are you interested in joining a blog and sharing your projects? Contact me for more information! 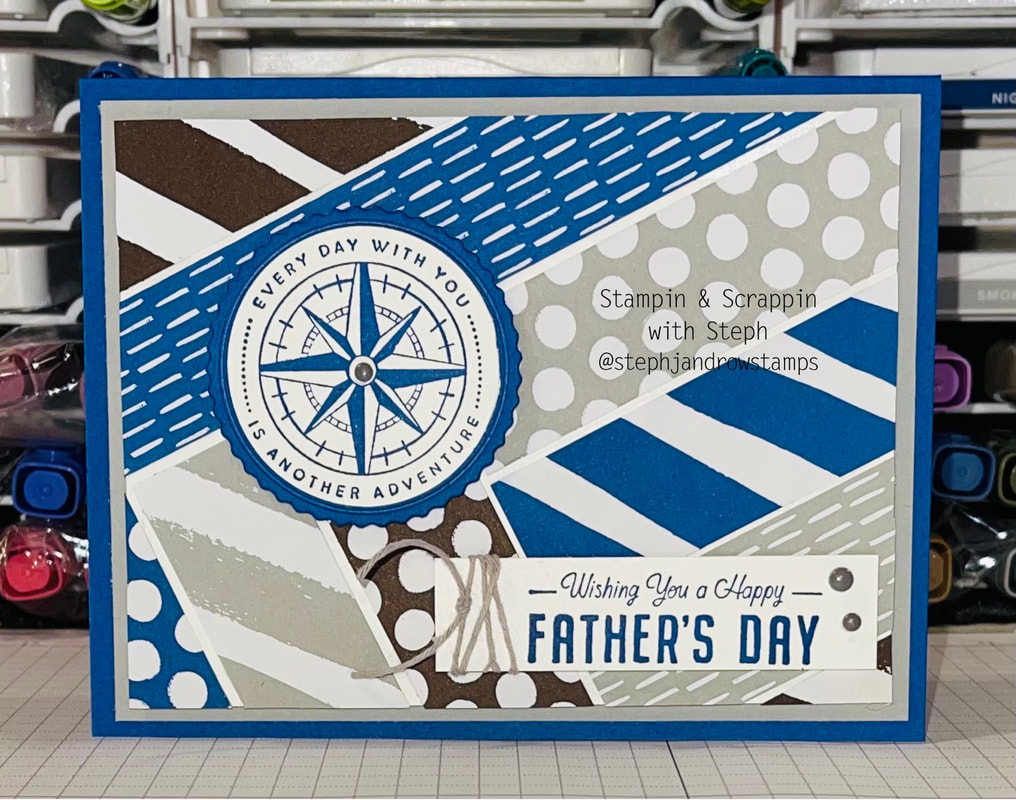
The card that I created uses strips of designer series paper to create a fun background. I chose the 6 x 6 paper stacks in neutral and regal. The colors are Blueberry Bushel, Early Espresso and Smoky Slate. The card base is Blueberry Bushel, with a 4x5 1/4 layer in Smoky Slate. Each DSP strip is cut 1x6 and laid out on top of a piece of Basic White that is 3 3/4x5. Once I was happy with the design I stuck the down to the white. And the. I turned it over and trimmed excess from the edges. See pictures below.
This pattern or style card is a great way to use up all those little scraps of DSP that you can’t bear to toss. I adhered the DSP layer onto the card base using dimensional‘s. For the stamped images I used that He’s All That stamp set with the coordinating dies called All That. I stamped both images in Blueberry Bushel. I used the coordinating die to cut out Blueberry Bushel circle and a smaller circle die I had on hand to cut out the greeting. For the Happy Father’s Day greeting I used a strip of Basic White 3/4” wide and then trimmed it down to side after I stamped. I wrapped one ended with some Smoky Slate Baker’s. Adhered the greetings down with dimensional’s and finish the card off with some Matt dots.
I love how this card came out and it’s definitely masculine! But it’s such a fun and simple card that can be easily adapted to any occasion. Thank you so much for joining our blog hop! Be sure to leave a comment and hop along with the other box as well. Happy Stampin Steph
Welcome to April Stampin Friends Blog Hop. It's spring and the flowers are blooming our theme goes hand and hand with the season. May is just around the corner and here in the US we celebrate Mother's Day so it's only fitting our theme is All About Flowers. I hope you visiting my page from Barb Pfeffer's blog and make sure to continue on to Maureen Rauchfuss and be sure to leave a comment.
Are you interested in joining a blog and sharing your projects? Contact me for more information! 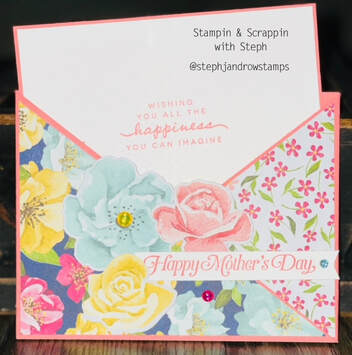
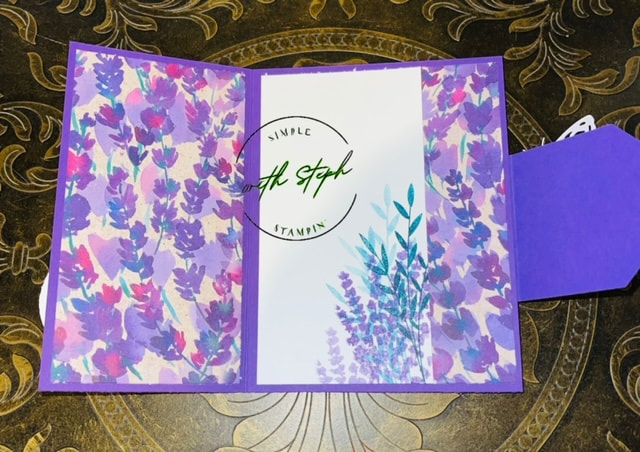
I decided to make a Mother's Day card. The card style I chose is a a fun fold called Criss Cross Pocket. But I like to call it an Envelope Pocket card, because that is what it looks like to me! It's such an easy card. I used the soon to be retiring Hues of Happiness Suite to make the card.
Here's how I made it: For the cardbase I used Flirty Flamingo cardstock and you need to cut two pieces 4 1/4 x 11 score the 11 side at 5 1/2. Then using your paper trimmer and cut one side of each panel on a diagonal from the top corner to the middle score at the bottom. When cutting the second piece of make sure the second sheet is cut so that it’s faces the other diagonal. Lay the pieces together so you have the 2 diagonal pieces lose. For the DSP, you need to create 2 triangles to fit ontop of the diagonal sections. DSP cut 4x5 1/4 on in half on the diagonal. Make sure you choose a DSP that has a pattern on both sides that you want to use. If you want the same pattern you will need to cut to pieces at 4x5 1/4 and cut 1 at a diagonal with the pattern you want to use facing up when you cut. Then the other 4x5 1/4 with the pattern you want to use facing upside down. This will allow you to have the same pattern cut opposite. Adhere the DSP to the front flaps of the cardbase. Then add adhesive to the bottom of each diagonal to creat the pocket. For the inside of the card inset you need Flirty Flamingo at 3 3/4 x 5 1/8 and then Basic White at 3 5/8x 5 The front of the card was so easy. Using the coordinating dies in the suite. Line up the flower dies with the flowers on the DSP and cut them out. I adhered them with dimensionals. And some glossy Gems. I realized as I was typing this out that I did not take pictures of making the card. So I will update this and add some assembly pictures to make it easier to follow. I hope you enjoyed the card I made for you today! Thanks for stopping by Happy Stampin Steph 
Welcome to the 2023 Stampin Friends March Blog Hop! This month we are sharing monochromatic cards. Monochromatic cards are fun to make, focusing on 1 color and making it shine! There are so many possibilities! For my card I chose Stampin Up Sun Prints DSP and the Blessings of Home Stamp Set. Be sure to hop along to each participant's blog, you can find a list of our blog hop participants below. After viewing my projects, continue on to Tiziana Milano'ss blog to see her monochromatic card! As you go through the hop, if you feel like you could do this, send me a message! We are always looking for crafters who love to create and share!!! Be sure to leave comments along the way, I'd love to hear what you think!!! 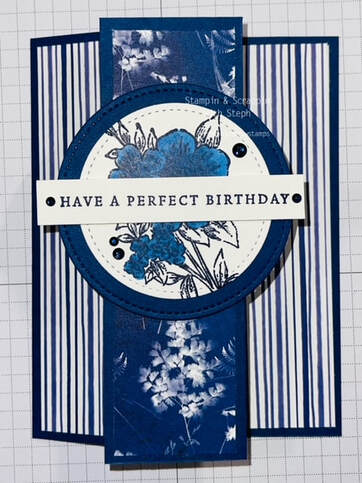
I chose a Fun Fold for my card using the Sun Prints DSP. This designer paper is so pretty it features a fern and botanical imagery with a mix of blue and with colors on one side and Gray Granite and white on the other side I thought it was perfect to use for a monochromatic theme.
To make the card, you need: Cardstock - I used Night of Navy Basic white and pieces for stamping. Rhinestones Circle punches or dies Night of Navy in and Stampin Blends Directions Cardbase 5 1/2x9 - on the 9" side score at 4 1/4 and 7 1/4 and piece to punch circle layer Basic White 4 x 5 1/4, I used Stitched Circle and piece that was 3/4 x 3 for the greeting
DSP 2 at 1 1/4 x 4 1/4, 1 3/4 x 4 1/4 and 2 3/4x 4 1/4
Fold the cardbase in half on the 4 1/4 score line and then fold back on the 7 1/4 score line. Stamp the floral images in Night of Navy onto the Basic White Layer. Stamp the greeting on the 3/4 strip,and stamp the flower on the circle. Add the Basic White layer to the inside of the card. Take the 2 - 1 1/4 adhere on to the section on the cardfront - left side. And the the other one on the inside to the right edge of the Basic White. Adhere the 1 3/4 piece to the top piece that is folded over. The 2 3/4 piece goes on the inside section. See picture below. 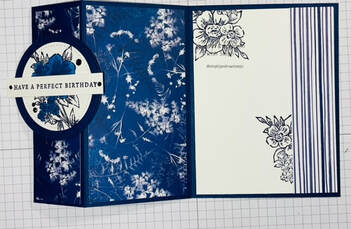
I colored the flowers using my Night of Navy blends and layered onto the Night of Navy Circle. Attached to the card front with dimensionals. Then I added the greeting with dimensionals over the center of the circle. I finish it off with Rhinestones, that I colored using the Dark Night of Navy Stampin Blends.
I hope you enjoy the card that I made for this month's blog hop. Please visit Tiziana's blog and leave a comment! Thanks for hopping with me today! Happy Stampin Steph 
Here's to the last Stampin Friends blog hop of 2021. This month we are sharing all projects just in time for the holidays. We all need tags, boxes and bags! So hop along with us and see all the wonderful projects in out Stampin Friends November Tags, Boxes and Bags Blog Hop. I hope you are visiting me from Teri Pocock's blog. Teri's projects are always so beautifully done! Be sure to leave a comment and tell us what you think, and visit Jo Blackman's blog. For a list of hoppers, just scroll down to then end.

I have a fun project set to share with you this month. I used Stampin Up's Santa Express DSP and Santa Express Memories & More Cards (M&M) along with Bermuda Bay, Shaded Spruce Cardstocks, Mint Macaron, Real Red, Petal Pink and Sahara Sand.
Let's talk cards! These cards are the fastest and easiest I ever made, the Memories & More packs include 2 different sizes of predesigned images and greetings, along with a few stickers and embellishments. They are designed for pocket-style scrapbooking but they are perfect to make quick cards. I CASE'd designs from Pinterest, as I stated in my quick video below, this week is a busy week especially with Thanksgiving, that I had a time crunch to be creative. For the cards, I used the Shaded Spruce Cardstock as a base. I made a sample of 4 cards to share, but will include 2 of each design, for a total of 8 cards to put inside the box. The Santa card includes a layer of DSP that measures 4x5 1/4. Santa was fussy-cut out placed over a stitched circle, I added a layer of Mint Macaron, just 1/8" wider than the striped M&M card. I also cut a strip of Mint Macaron 1x4 and added on top, added the greeting which is a sticker included in the pack. Most Wonderful Time of the Year includes a layer of DSP that measures 4x5 1/4, wrap ribbon around the DSP, as if you were wrapping a package, and tie off with a bow. If you want to save on the ribbon, you can just cut strips to just wrap the edges of the paper. Either way works! Add the M&M card on top with dimensionals. Add a few rhinestones to embellish. C is for Christmas, trim the Pink Snowflake Memories & More card to 4x5 1/4, wrap some ribbon around a 3 1/4x4 1/4 Real Red, and tie in a bow, Adhere the M&M card ontop and pop up with dimensionals onto the cardbase. And for the last card, Merry Christmas, trim trees M&M card to 4x5 1/4, wrap ribbon around, tie with a bow and adhere to the cardbase. Cut a piece Petal Pink, adhere the M&M card ontop and pop up with dimensionals onto the cardbase. Add a few rhinestones to embellish. How adorable! How easy!!! 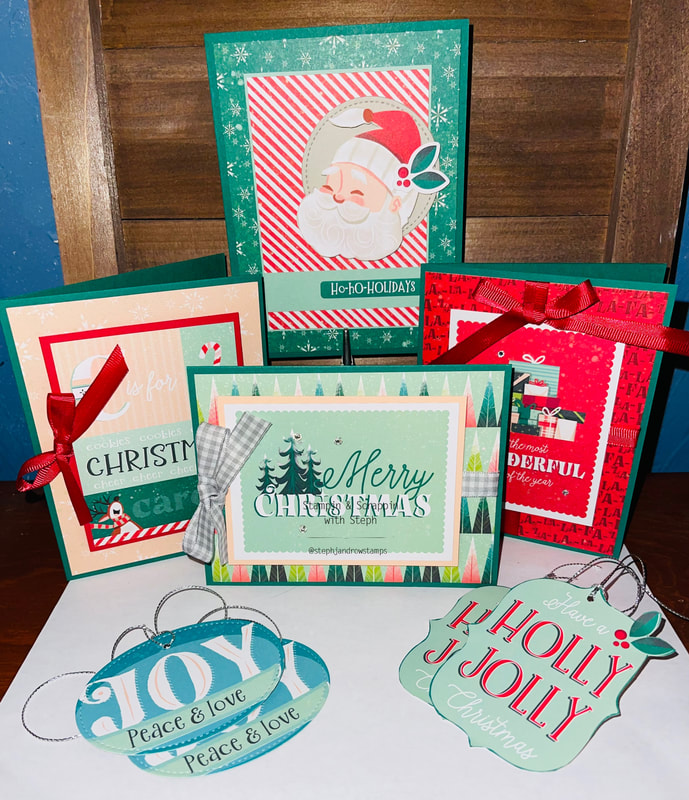
I made a Explosion Stationary Box to hold the cards and some tags. I had so much fun making this box. I LOVE how it came out. I will admit, I have been intimidated on this for a while, and it is not nearly as difficult as I thought it would be.
First, the tags. The tags are quick and simple. Holly Jolly is simply fussy cut from the Memories & More card pack. Joy, is cut out with a Stitched Oval die. I added the holes and some silver cording! Add a small piece of Basic White to the backside for addresses the tags. And there you have 4 easy tags that took a matter of minutes to make. 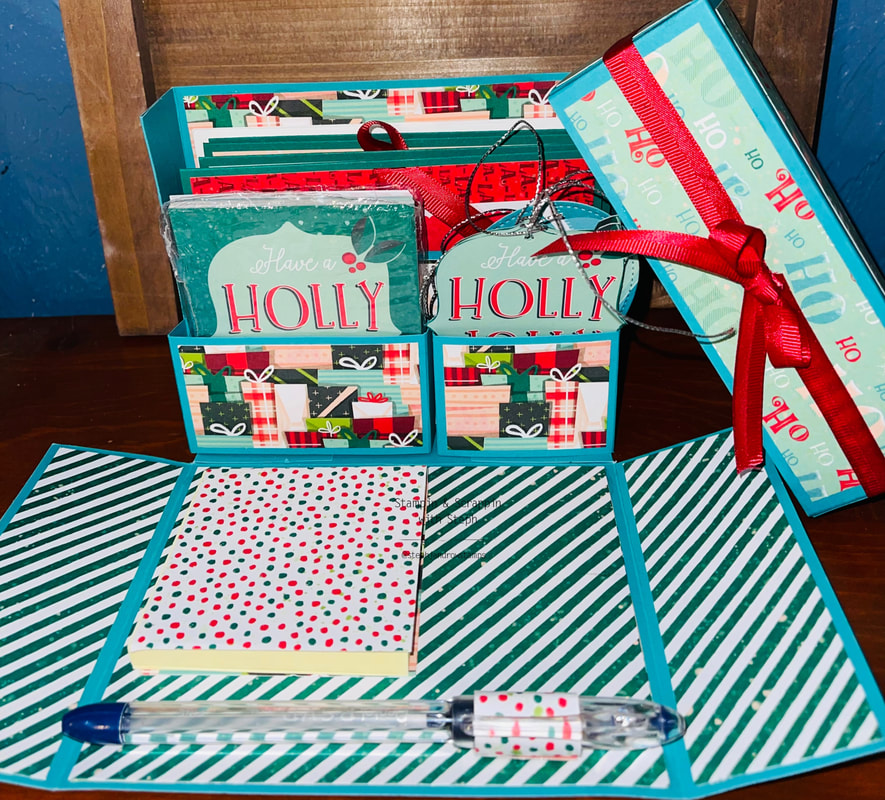
There are a few steps to designing the box. I had hope to get my video done, but I will have it by the weekend. I will say it is easier to assemble watching it made then just following the directions. SO I promise a tutorial is coming.
You will need A few pieces of cardstock, I used Bermuda Bay - 10x12, 6 1/8 x 10 1/8, 8 1/2x4 1/4, 2x5 1/2 and 2x4 1/2 Box 10x12 Score the 10" side at 2 & 8 turn and score the 12" side at 5 & 7 Turn back to the 10" side and score 3/4 just down to the horizontal score line, Do the same at 9 1/4 Lid 6 1/8x10 1/8 Score the 6 1/8 x 10 1/8 with the 6 1/8' side at the top score at 2 & 4 1/8 turn to the 10 1/8' side and score at 2 & 8 1/8 Card Divider 8 1/2x4 1/4 Score the 8 1/2x4 1/4 with the 4' side at the top score at 3", turn score at 1/4 and 7 1/4 Pocket 2x5 1/2 Score the 5 1/2' side at 1/2, 1, 4 1/2 & 5 Pocket 2x4 1/2 Scote the 4 1/2 side at 1/2, 1, 3 1/2 & 4 Holding the box paper horizontally, with the 12" side at the top, you need to trim out the little box that is formed between the lines. Repeat on the other side. Now fold on all the score lines. The side that has score lines at 3/4 is the box side and the part the has no 3/4 score lines is that part that pops down when the lid is removed. Before gluing the box, you will want to add you DSP - it's easier to adhere to the box before it's assembled. Just match up the layers to each side and make the paper is going in the right direction. Stand up the side that has the 3/4 and glue down the 3/4 strip gets to create support for the sides. Take the card divider add line it up to the score line (section where we cut the tabs off) and adhere to the sides of the box, do the same with each pocket - Assemble the lid, as if you were creating a box. DSP Layers Inside Outside Mat Lid 2 at 5 3/4 x 4 3/4 2 at 5 3/4x4 3/4 3 at 1 3/4x5 3/4 1 at 5 3/4x2 3/4 2 at 1 3/4x4 3/4 2 at 1 3/4x 1 3/4 1 at 1 3/4x2 1/4 2 at 1 3/4x4 3/4 1 at 1 3/4x3 1/4 Be sure to view the tutorial, it will make these directions make more sense. I have included a quick video explaining the cards and box below, and a full tutorial video!
Below is a full tutorial on how to put together the Stationary Box!
Thank you so much for joining me today and following along in our blog hop! I hope you enjoyed the projects we have created for you!
Join us 2023 for a brand new year of hops! If you're a paper crafter and have a blog, and are interested in joining our monthly hops, please contact me, we are always looking for creative people to share with us! Be sure to visit everyone's below and leave a comment! Happy Thanksgiving and Happy Stampin Steph |

New 2023-2024 Stampin Up Annual Catalog


Kits Collection


Join today

Categories
All
Archives
January 2024
|
 RSS Feed