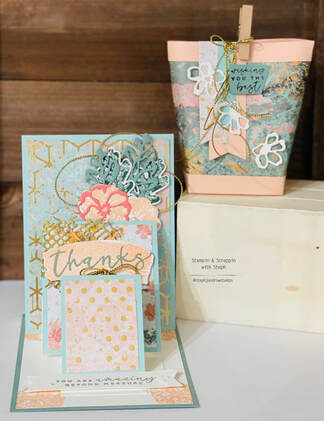
How crazy that it is June already! I feel like this month has just flown by!!! I guess that can just mean it is time or our monthly bl og hop sooner than later! Right?
Our theme this month is Lots of Layers. Who doesn't love cards with alot of layers and embellishments? I know I do! But in the craziness of life, I tend to make more simple cards, with a few layers and embellishments! I need to get them done!!! I enjoy this theme, because I get to pause and think about designing a card much different than I would. I don't want a card that will be over the top and too difficult to mail. And, a card like this would not be just for anyone, so I will definitely think about who I'd love to give a stepped up layered card to! To make my projecys today I choice to use the new Stamin Up Suite called Texture Chic. Its a beautiful set with color combo of Petal Pink, Mango Melody, Pool Party, Evening Evergreen, Soft Succulent and Gold accents in the DSP . The stamp set has stunning images of different seasons and coordinates with a 19 piece die set. Alright before we dive into the projects, I hope you visited from Barb Pfeffer's blog and saw her amazing projects. Make sure to visit all participants blogs and if your not sure whose blog you have been too, you can view a list at the end! Be sure to leave a comment! I love hearing what you think! 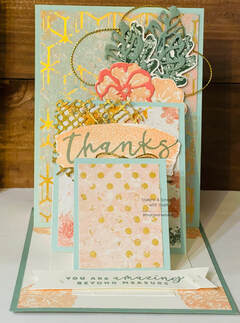
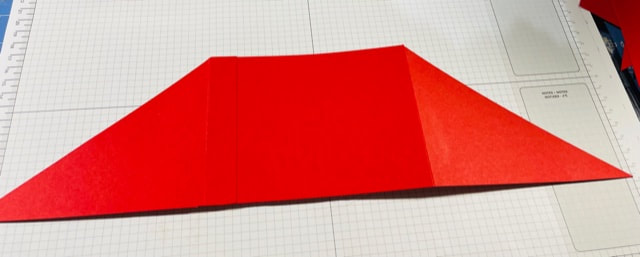
The card I chose was a Triple Easel card! I just love easel cards, I have never made a double easel card, let alone a triple! So, I gave it a go!!! I thought this type of fun card would definitely showcase layers, the beautiful DSP, Stamp set and dies.
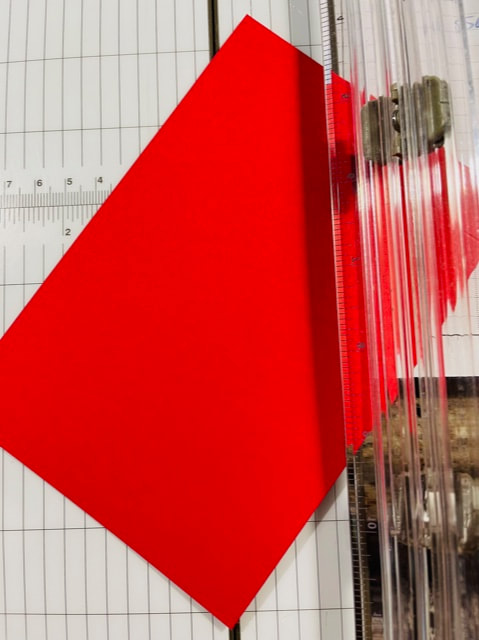
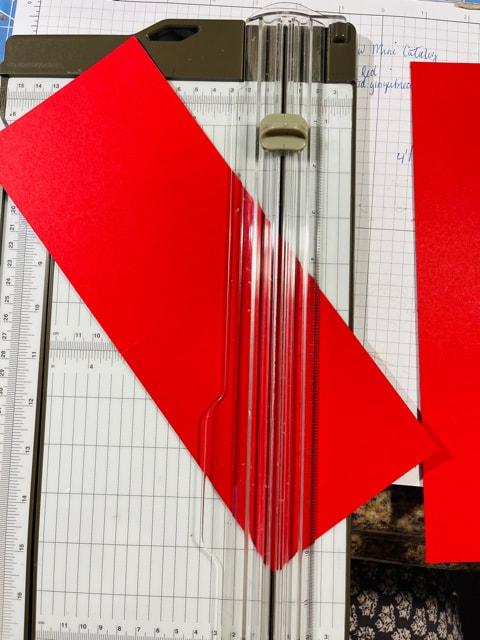
The card came together easier than I thought. Your basically making 3 separate easels and then putting them all together! Measurements: Cardbase
Adhere the DSP to the Pool Party layer. Stamp, diecut and embellish your card front!! Do the same to create the other easel frames lay each easel folding in half. Add adhesive only to the bottom half (section without the fold) and lay the cardstock on top. make sure to lay the card stock flat ontop (it should cover the all the basic white) but only the bottom half will be adhered. Adhere each easel ontop of one another like in the picture. Stand each easel up in the angle you prefer then adhere the next one down. To see how this card comes together, I made a video showing how to assemble from start to finish.
Full disclosure, it's been a while since I recorded, so I'm a little off my game. Its a bit longer than i wanted due to a few interruptions along the way!
I hope you enjoy the projects I shared with you today.
Happy Stampin Steph
7 Comments
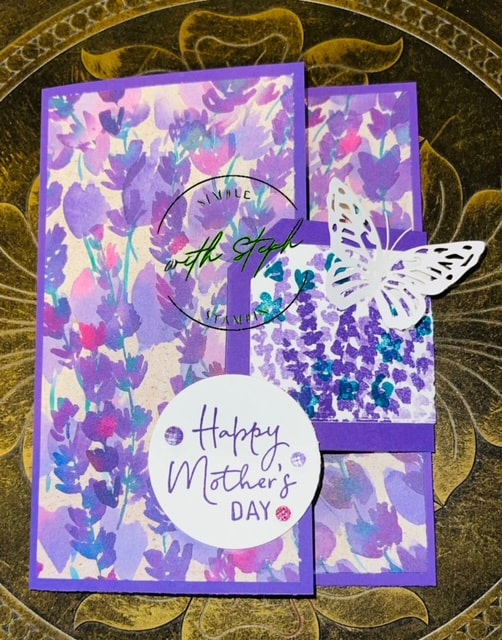
Welcome to the 2022 Stampin Friends March Blog Hop! We have a fun theme planned by starting off the year celebrating all Life's Occasions. This month we are sharing monochromatic projects. I love making monochromatic cards, focusing on 1 color and making it shine! There are so many possibilities! At first, I was going to create something using a green, green is my favorite color. But I decided to use Stampin Up's retiring In Color BumbleBee and paired it with the Pansy Petals Suite. I love all the In Colors, but I will probably miss BumbleBee the most! I used it all the time and will most likely keep using it!
Be sure to hop along to each participant's blog, you can find a list of our blog hop participants below. After viewing my projects, continue on to Teri Pocock's blog to see her awesome projects! As you go through the hop, if you feel like you could do this, send me a message! We are always looking for crafters who love to create and share!!! Be sure to leave comments along the way, we love to hear what you think!!! 
I love how my card came out! It is super easy!! It's a fun fold card. I'm calling it a front-panel card. I don't know if that is the actual name, but it works for me!
You will need: BumbleBee cardstock 4 1/4 x 5 1/2 and 2 3/4x11 (score on the 11' side at 5 1/2 and then fold in half) Basic White cardstock 4 x 5 1/4 and emboss with the Gingham Embossing Folder. Basic White 2 1/2x 5 1/4 and piece for stamping greeting Pansy Petals DSP 2 1/2 x 5 1/4 Pansy Dies - cut out 2 pansies from the DSP Stamp greeting and punch out with Elegant Punch Whisper White Ribbon from the Flowers for Every Season Ribbon Combo Pack Tuxedo Black Memento Ink Pad and Rhinestone Basic Jewels. Directions: Adhere the Basic White layer to the Bumble Bee piece. Adhere the DSP to the top of the folded Bumble Bee strip, adhere the Basic White piece to the inside. Tie a bow to the top of the strip. Adhere the strip to the Basic White, centering onto the layer. Arrange the pansies and greeting onto the front and a few Basic Rhinestones to embellish. And that is it! It is that easy!! 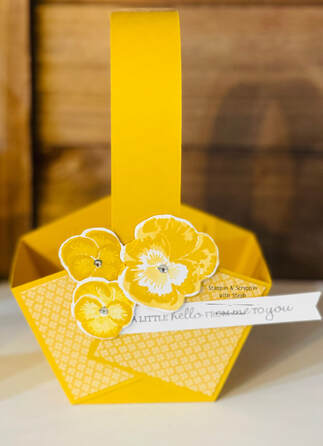
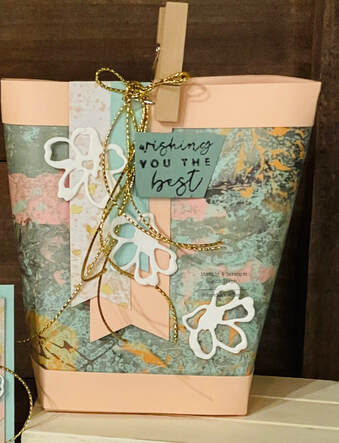
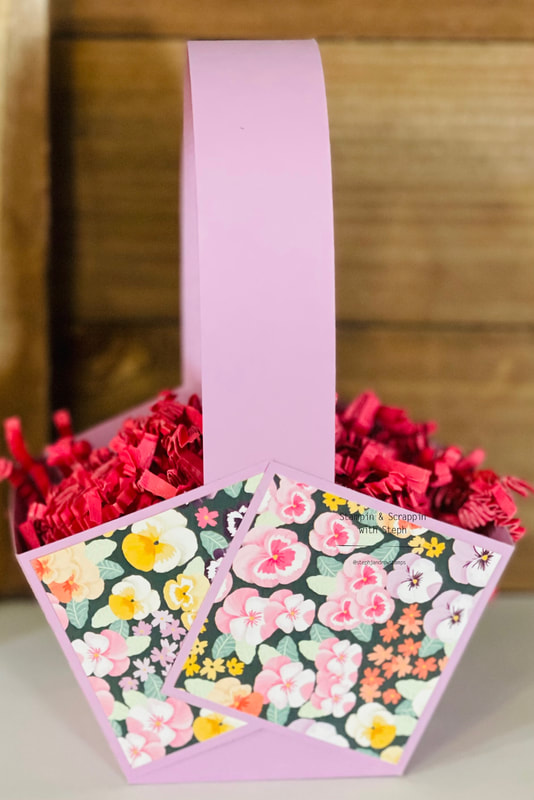
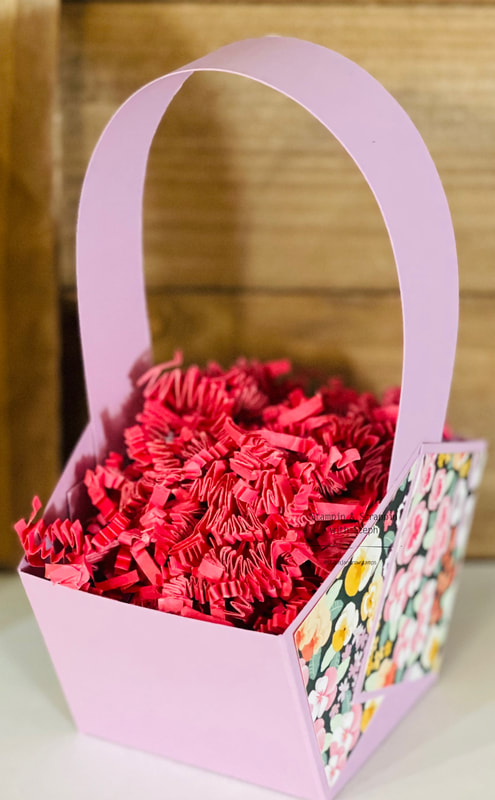
For my project, I decided to make a little paper basket. I call it a Springtime Basket. It can be used for Easter also or any occasion really. It is super easy and super quick to make!!! And all you need is 1 sheet of cardstock.
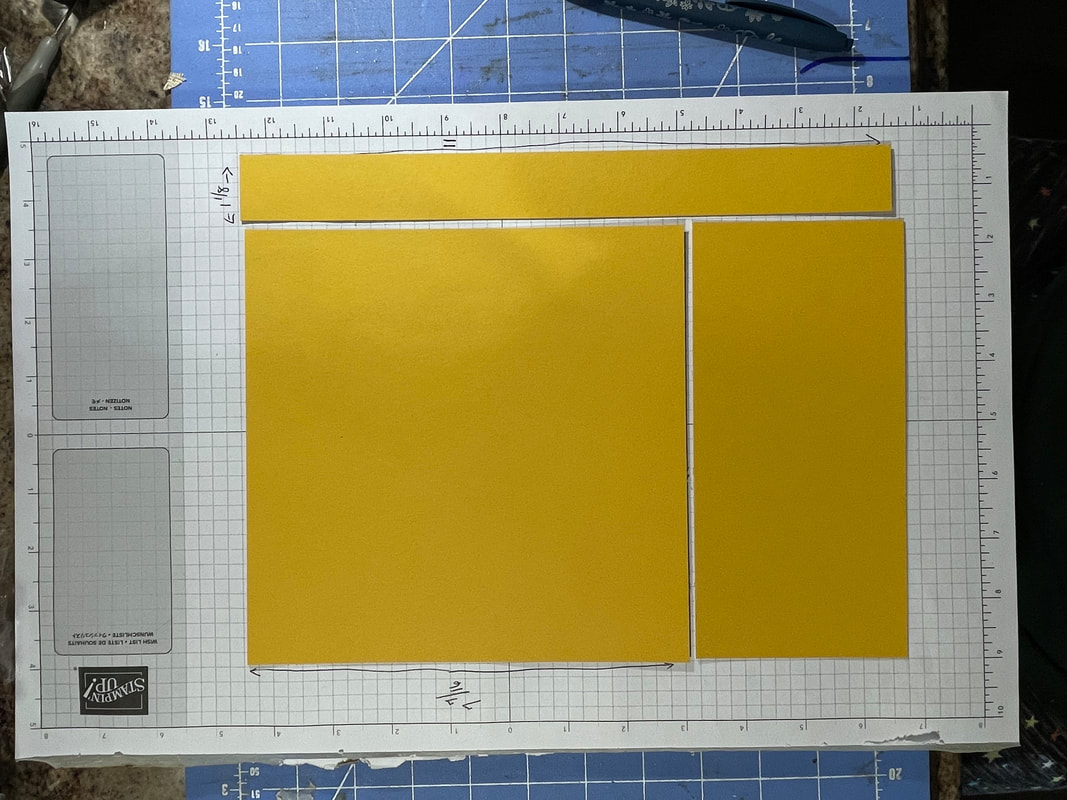
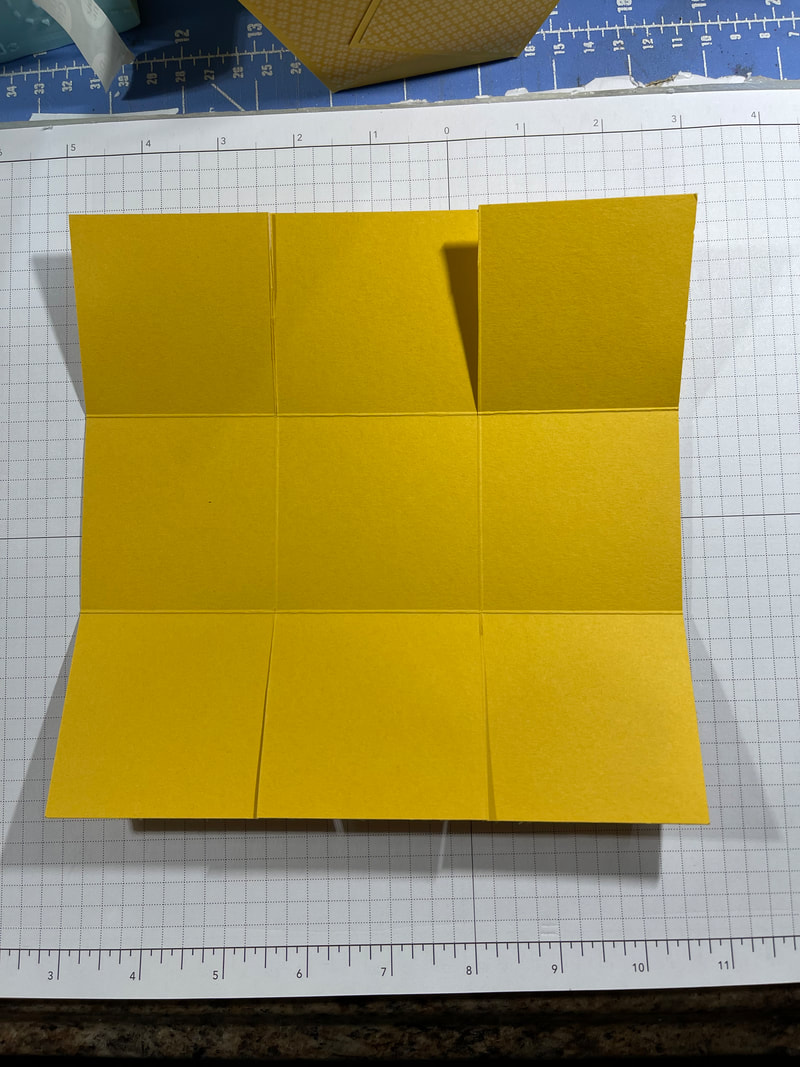
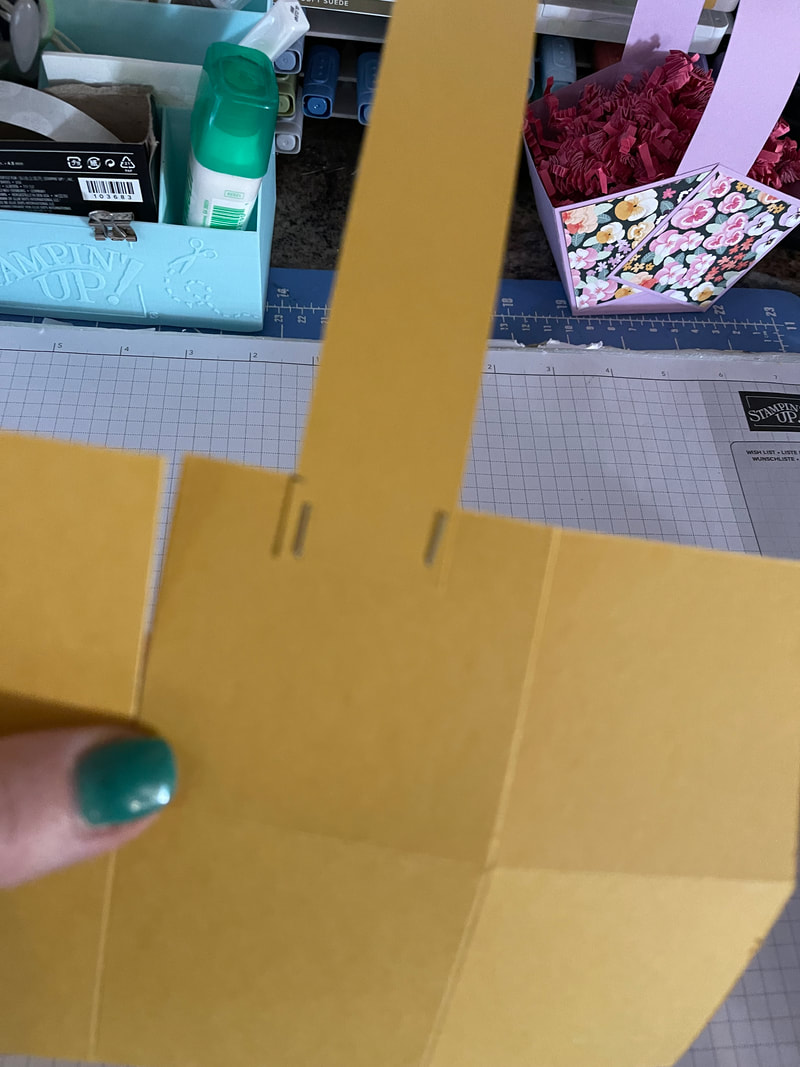
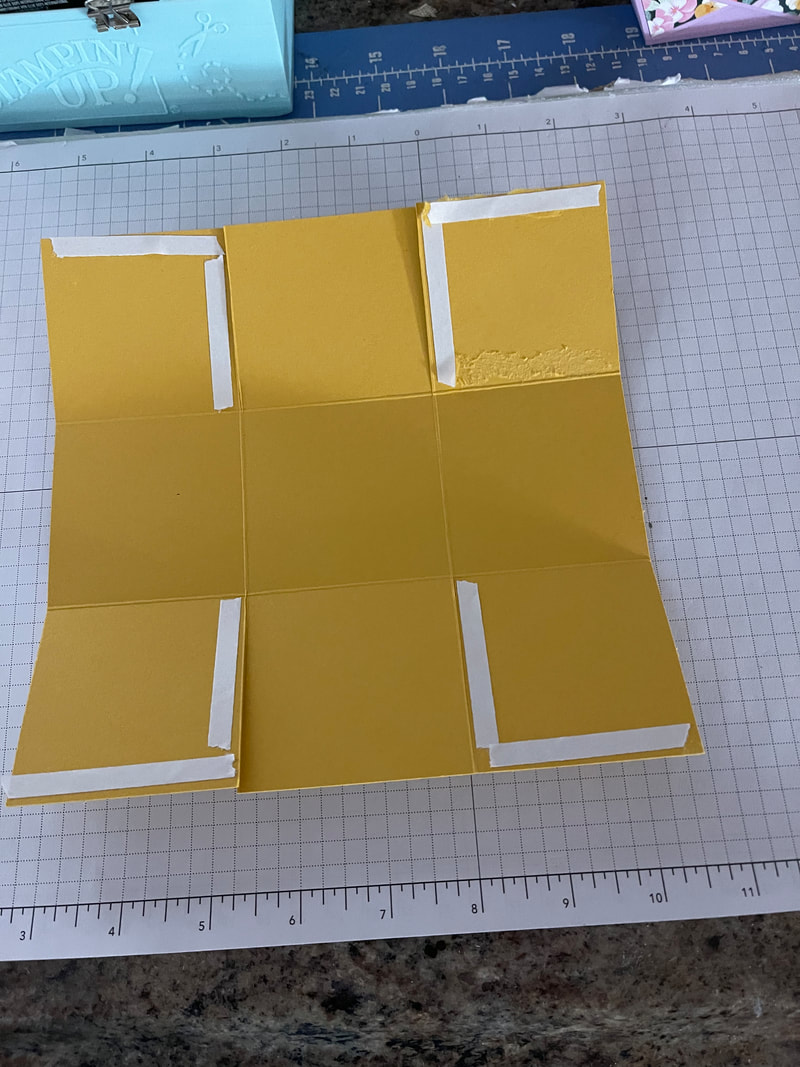
Refer to the pictures below, Cut the cardstock into 3 pieces, first, with the 8 1/2" side at the top, cut a strip at 1 1/8" Turn the remaining piece so that the 11" side is at the top and cut at 7 7/16." Set the smaller piece aside for decroating or another project. Take the larger piece and score at 2 7/16" on both sides, then turn and score again at 2 7/16" on both sides, you will have 9 squares. Cut 2 score lines from the bottom edge to the intersecting score line. Then repeat on the opposite side, See pictures below. I also created a quick video demonstrating how I made, the basket. Cut 4 pieces of DSP at 2 1/4" x 2 1/4" adhere to the 4 corners of the cardstock. Take the long strip and mark 1/2 inch on each end. Line that mark to the edge of the middle square, either adhere or staple, repeat the same on the opposite side. Add tear tape to the edges of the 4 corners. Bring them together lining up the 2 points and adhere. Repeat on other side. Use the Pansy Patch Bundle, and stamp and cut the Pansies, I used So Saffron, BumbleBee and Daffodil Delight I haven't filled my basket; my plan was to make a bunch for all my co-workers for Easter. But I am still deciding what I am going to use it for! I might fill it with candy for Easter, office supplies like post-its paper clips or a tissues, lotion and tea for a care basket. Whatever I end up with, I will make sure to post an updated picture! What do you think? So cute right??? I included the verison I created in the video at the end of the post! Which color is your favorite!
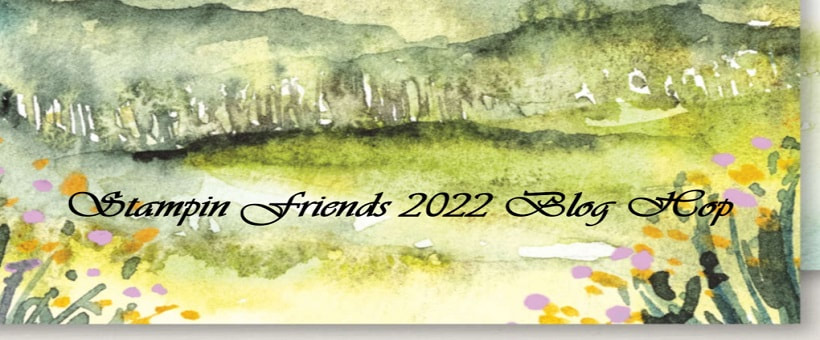
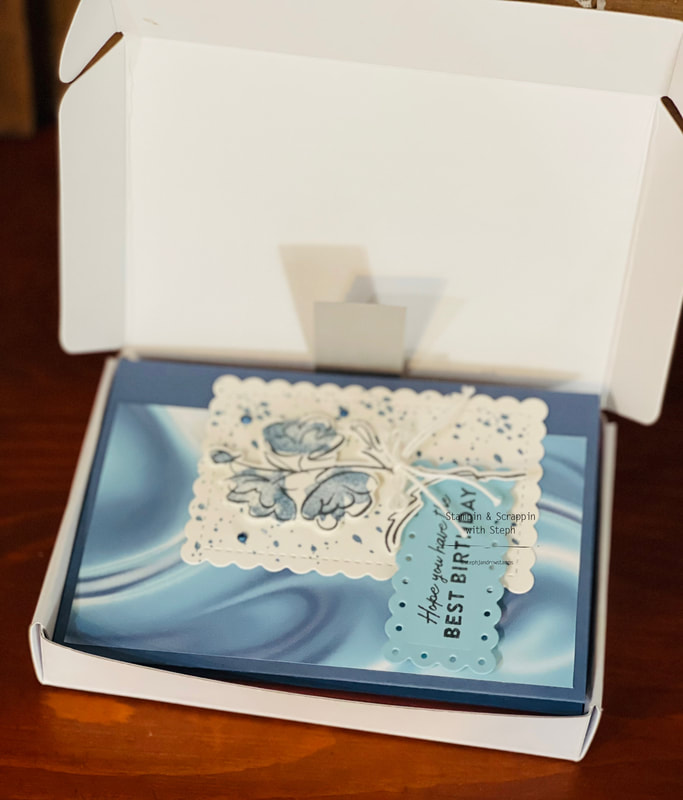
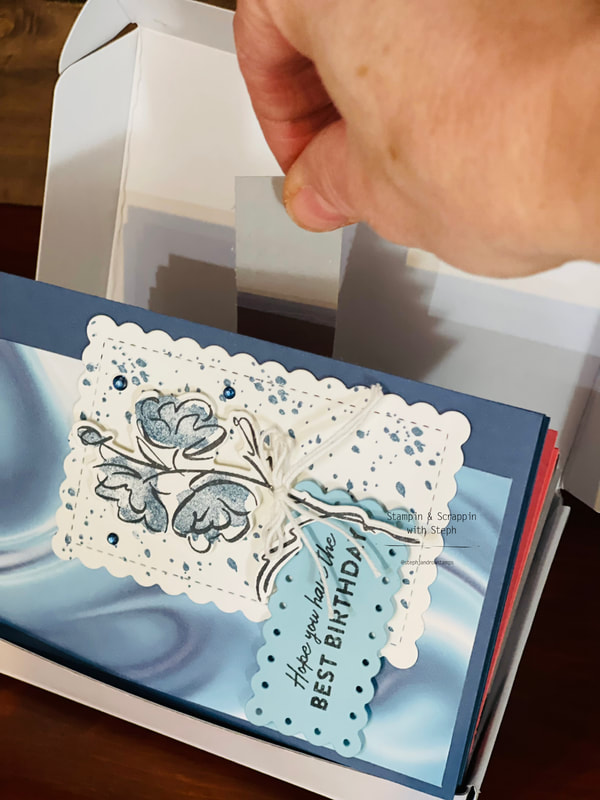
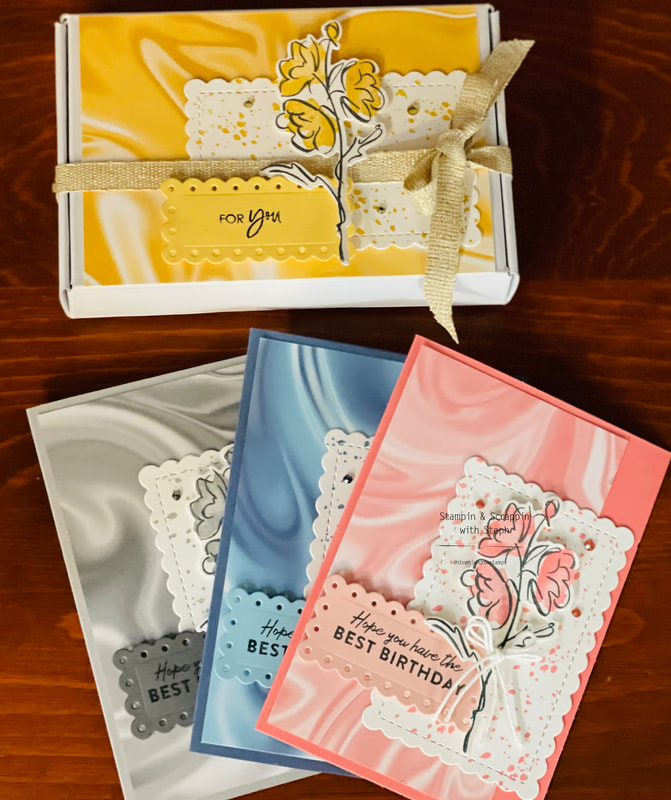
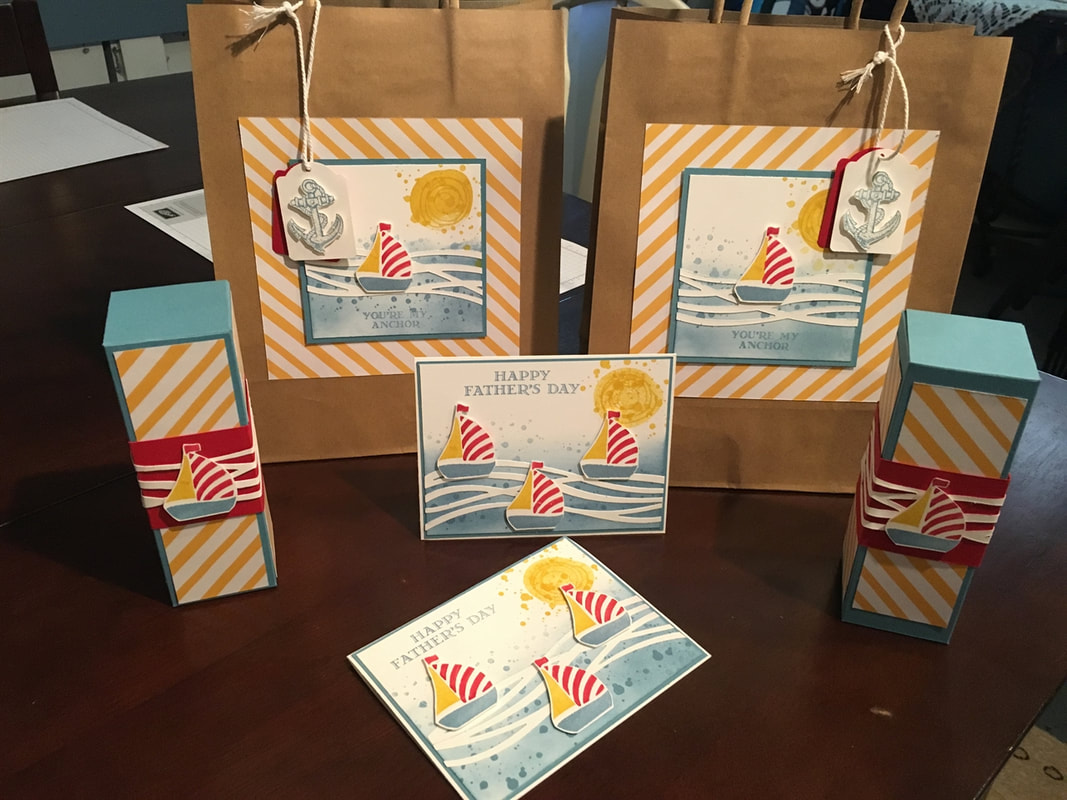
Welcome to the 2022 Stampin Friends Blog Hop! We have a fun theme planned by starting off the year celebrating all Life's Occasions. I chose Birthdays to focus on for my projects. I like starting the year by getting ready for all the upcoming birthdays.
Before we get started, you can find a list of our blog hop participants below. Be sure to continue on to Jean Beaulieu's blog to see her awesome projects! Leave a comment, I'd love to hear what you think!!!
For my cards, I chose a monochromatic look. I made 6 cards, 2 in each color & design.
I used the new Stampin Up Sale-a-Bration DSP called Simply Marbelous. The colors are Misty Moonlight & Balmy Blue, Flirty Flamingo & Blush Bride and Smoky Slate & Gray Granite. The stamps and dies are from the Color & Contour Bundle. Each card measures 3 3/4x5 1/2 over all. Directions: Cardstock 7 1/2x5 1/2 score on the 7 1/2 side at 3 3/4 DSP Layer 3x5 1/4 Basic White Die Cut - I used the middle size die in the Scalloped Contour Dies. Basic White for flowers - Stamp in black and add layer in the matchin ink color cut out with the coordinating die Cardstock diecut - I used the smallest size die in the Scalloped Contour Dies. 
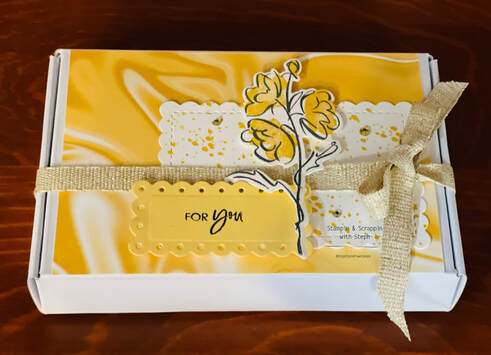
took the Mini Paper Pumpkin boxes and decorated it to match the cards. For the box I used the colors Bumblebee and So Safron. I made the horizontal to fit the lid of the box.
DSP 3 3/4x5 1/2 Basic White Die Cut - I used the middle size die in the Scalloped Contour Dies. Basic White for flowers - Stamp in black and add layer in the Bumblee ink and cut out with the coordinating die Cardstock diecut - I used the smallest size die and So Saffron in the Scalloped Contour Dies. For the greeting, I only colored the For You in black in before stampin. The cards will fit snug in the box, so to make it easier to take them out, I added a little tab. I had a strip of cardtock left over from the cards 1x11 I folded about an inch and glue it down to the inside of the box, added the cards and then folded the strip over a bit, and trimmed it down.
 Keep It Simple
A quick Google search will yield hundreds of thousands of results on how to make adorable Christmas, birthday, or greeting cards. With all this information, it’s easy to get overwhelmed. But there’s no need to be stressed—sometimes simple is best! Our Best Day Ever card is simple but sweet. We used Basic White and Costal Cabana cardstock for the base, then stamped with the In Symmetry Stamp Set to create a mirrored effect with Flirty Flamingo and Pear Pizzazz ink. We finished off this lovely card with a simple sentiment in Coastal Cabana ink. Our Merci mille fois card took no time at all but still left a great impression. We used Basic White and Fresh Freesia cardstock for the base and stamped out some multi-level flowers with Daffodil Delight, Highland Heather, and Pear Pizzazz ink. For our Du bist alles, außer gewöhnlich card, we used Subtles cardstock, cutting out 1-1/4" x 3-1/2" (3.2 x 8.9 cm) in Petal Pink and So Saffron and 2-1/4" x 3-1/2" (5.7 x 8.9 cm) in Calypso Coral. We adhered the strips to a 3-1/2" x 4-3/4" (8.9 x 12.1 cm) piece of Basic White cardstock with Stampin’ SEAL, then stamped out some cute images using VersaMark ink. We finished the card with an adorable sentiment stamped in Memento ink. Happy Stampin Steph  Simple Stamping Tips
One of the things people love best about stamping is that no experience is required to enjoy a satisfying creative experience. Over time, skills build—and meanwhile, everything you do looks amazing! A favorite beginner stamping hack is known as “stamping off.” (See the leaves on our Grateful for All You Do card for an illustration.) Simply ink the stamp, “stamp off” on a piece of scrap paper, then stamp your image. It’s such a simple trick, yet when combined with darker images it lets you achieve a professional-looking illusion of depth. For our Many Thanks card, we used a variation of tone-on-tone stamping by choosing ink with a hue that is slightly darker than the cardstock. You could also use VersaMark ink or the coordinating ink color to achieve a lighter tone-on-tone look. Our Twinkle card highlights a simple cardmaking classic with its impactful Designer Series Paper background. Looks like a lot of work, doesn’t it? No way! Just add stamped stars plus the whimsical sentiment and you have a make-it-in-minutes Christmas card! Got simple stamping projects you’d like to share? Use the social media hashtag #simplestamping and post them on your Facebook Page and Mine: Stampin & Scrappin with Steph Happy Stampin Steph
For details on how I assemble this card, be sure to check out my newest You Tube Video Thanks for Stopping by Happy Stampin Steph Click on the headings below, each is a link to the full Card Share and 3 other cards that I made
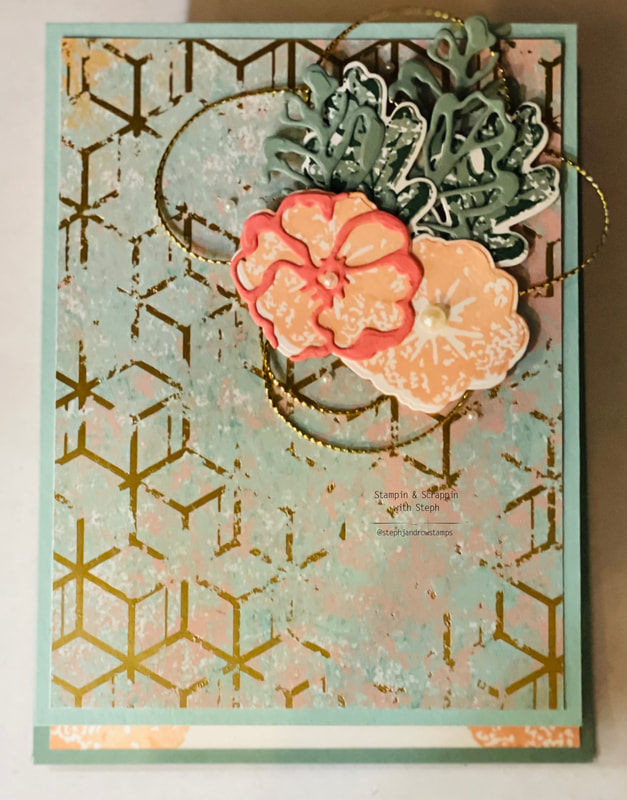
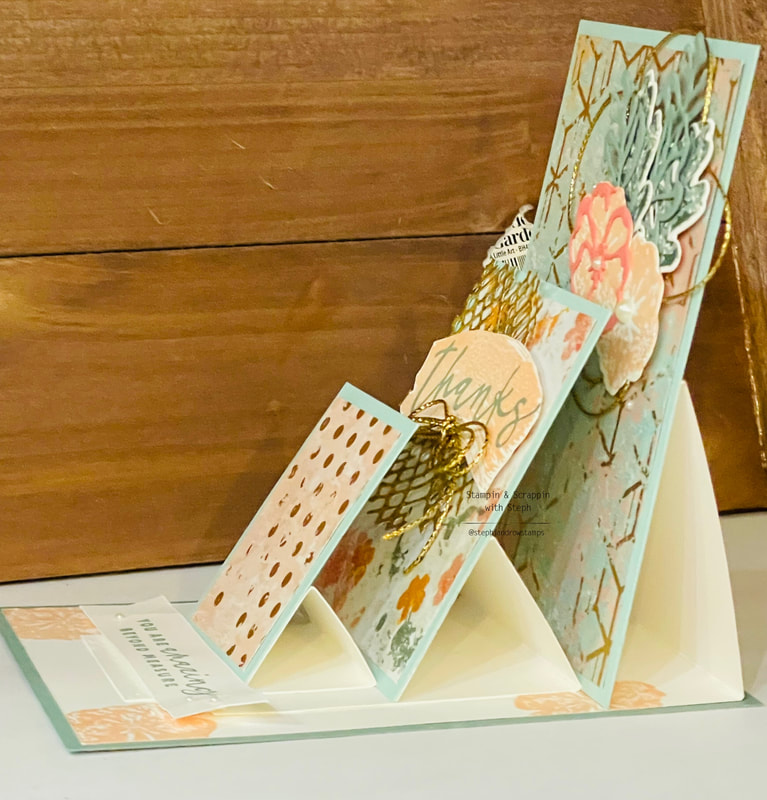
Card Share Cutest Halloween Fun-Fold Card Beautifully Penned Card Peaceful Prints  Today I am sharing with you a couple of my favorite projects! These are projects I have been making them for many years. This month's Stampin Friends Blog Hop Them is Rewind & Redo. Take something old and redo it to something new. How fun is that??? If you hopped from Tiziana Milano's blog, wasn't her projects AMAZING?? Be sure to continue to Kim Lamos after mine. And be sure to leave a comment I'd love to hear what you think! We have a packed hop with amazing projects so be sure to visit everyone. I have a provided a list of hoppers at the end of this blog. I knew right away the card I wanted to redo was the Triangle Flap Pocket card. And a go to box that I've made in different ways over the years. Now sadly I have searched for my original project and couldn't locate one. Which is crazy because I've made it so often! 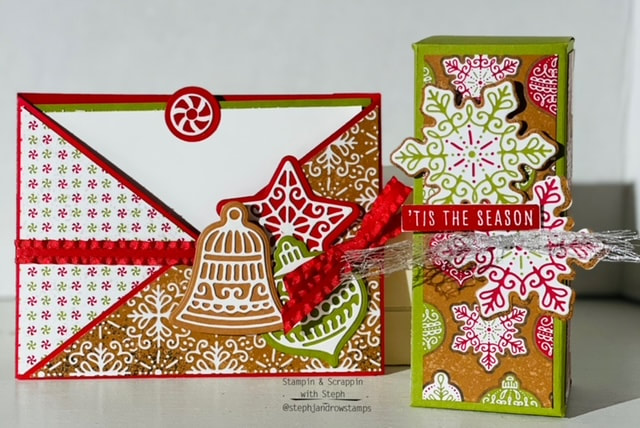 I used the brand new, not yet, available, Frosted Gingerbread Suite....It's just so stinkin' fun. I have never been successful baking or decorating gingerbread, so this suite is so easy to create fun designs!! To make the card I used Real Red Cardstock as my base and Old Olive for the card insert. You will need: 2 pieces of Real Red 4 1/4x11 and 4 1/4x 6 1/4 Old Olive 4 x 5 1/4 Basic White 3 3/4x 5 DSP 4 x 5 1/4 - cut on the diagonal. Some scrap pieces of Cinnamon Cider, Old Olive and Real Red and Basic White Take the largest piece of Real Red and with the 11" side at the top of the Simply Scored Score Board, score at 5 1/2 Using you Stampin Trimmer, line up the top of the score line to the bottom corner in the cutting line and cut...this will make a triangle flap. See picture. Take the smaller piece of Real Red and with the 6 1/4 side at the top score one side at 3/4 Then line up the bottom edge of the score line to the bottom corner in the cutting line and cut the triangle. Add adhesive to the 3/4 score section and adhere to the edge on the back of the large piece and fold over to the front, this will create the second flap. Now, take your triangles cut from the DSP and adhere to the flaps, reversing one side of the DSP.
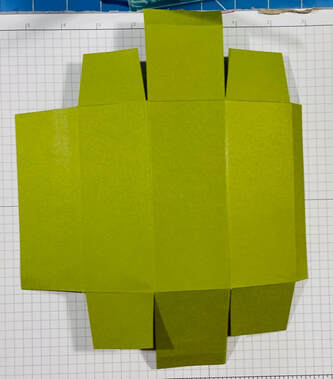 2. Cut down on the score lines to create tabs in the next section, remove the 1/2' section and then section below it then slight trim the next. 3. Keep the next sections in tact and round the corners, this will be the lid or bottom of box. 4. Repeat step 2. 5. Remove the 1/2 tab 6. Add adhesive down the remaining 1/2 strip, fold box over and seal. To decorate I cut the DSP 4 pieces 1 3/4x 4 3/o make the snowflakes, I used the dies that coordinate and cut them out using the DSP. I hope you enjoyed the projects I share with you. Be sure to leave a comment and visit everyone's Blog. Thanks for stopping by Happy Stampin Steph Below is a list of this month's Blog Hop Participants:
How can it already be March 26th...I feel like this month has gone by so quickly! And it's even more shocking to me how much our lives have changed since last March! I am excited that things seem to be moving along nicely lately. And with that said I am also excited to share with a fun Monochromatic Project for the March Stampin Friends Blog Hop. I hop you joined me from Heidi Collin's Blog and after viewing mine, be sure to continue on to Melissa Thomas's Blog. And if you get lost along the way, there is a list of hoppers at the end of the blog. And please welcome Kirsty Pattrick to the hop this month!!! We are excited to have her join us. I hop you check out her projects!! I chose my favorite colors to make my projects. I used Old Olive with a mix of the Forever Greenery Designer Series Paper. 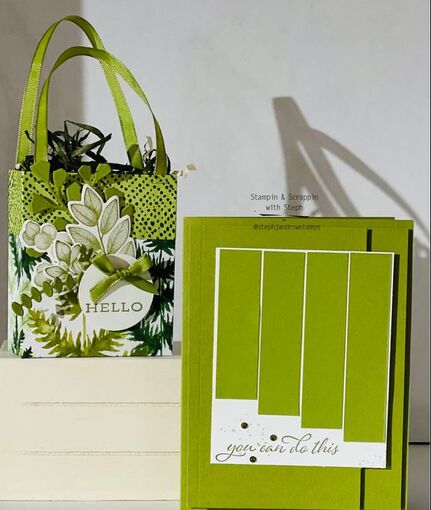 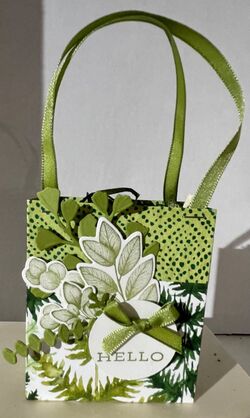 Lets start with the Mini Gift bag. It so easy to make. You will need a piece of card stock or DSP that measures 6x9. If you choose a patterned paper that has a directional pattern, be sure to make sure the paper is in the right position before you begin scoring. You can refer to my video below to see what I mean. Using your SImply Scored Score Bored, with the 9" side at the top, score at 1/2, 3 1/2, 4 3/4 and 7 3/4 Turn to the 6" side and score at 1 1/4 and 4 3/4. Fold and burnish your score lines. You will have 2 scores lines at the top and at the bottom that are 1 1/4 wide choose what will be the top of the bag and what is the bottom. The top, fold on the score line, opposite, so the fold is on the ouside of the bag and the reverse pattern is visible. On the bottom, remove that 1/2" bit up to the 1 1/4 score line. Then cut up to that score line for the others. Adhere the top fold down. Add adhesive to the remaining 1/2 side and fold to meet the opposite edge. Fold the bottom flaps in to create the bag. I deocrated the front by stamping the images with the Forver Fern Stamp Set, using Old Olive, and then cutting out with the coordintating dies. I stamped the greeting on a 1 1/2 circle. Finished with a Old Olive bow. Such a perfect little bag for a gift card, some candy or treats! Whatever you need!!!!
I used dimensionals to assemble the first layer, on Basic White I stamped the greeting and image from the Forever Fern Stamp set in Old Olive. I then added each strip, with Stampin Seal, from left to right, adding the smallest strip to the largest. I added the Basic White layer using dimensionals. I added some rhinsetones that I colored using the Stampin Blends Dark Old Olive marker. For the card with the DSP, I added the ribbon around the Basic White layer and finished it in a bow, before adhering it to the card. I have created this video for you to refer to while making the bag and card. I have also added a bonus mini card! I hope you enjoyed my projects. I had lots of fun designing them for you! Be sure to leave a comment and hop to the next! Thanks so much for visiting! Happy Stampin Steph Below is a list of participants in this month's blog hop!
Welcome to my favorite hop of the year! I look forward to January, when we kick off the new year with a fresh blog hop! I am energized and organized after a much needed December hop break! Each year I look at my perpetual calendar and review all birthdays for the year and begin to go through current cards to send! I then plan to make more birthday cards if I don't have enough....and then some! So it's so fitting that we start our 2021 Stampin Friends Blog Hop with Birthday Celebrations! So here’s to a new year, new beginnings, new possibitlities and a new 2021 Stampin Friends Blog Hop!! Be sure to hop along and visit everyone's blogs, if you miss anyone along the way, you can find a list of participants to the bottom of each blog. I hope you came from Teri Pocock’s blog, wow weren't her projects amazing?? After you view my blog, continue onto Maureen Rauchfuss’s blog, you're going to be blown away. You are guarantee to find projects that you will want to make! 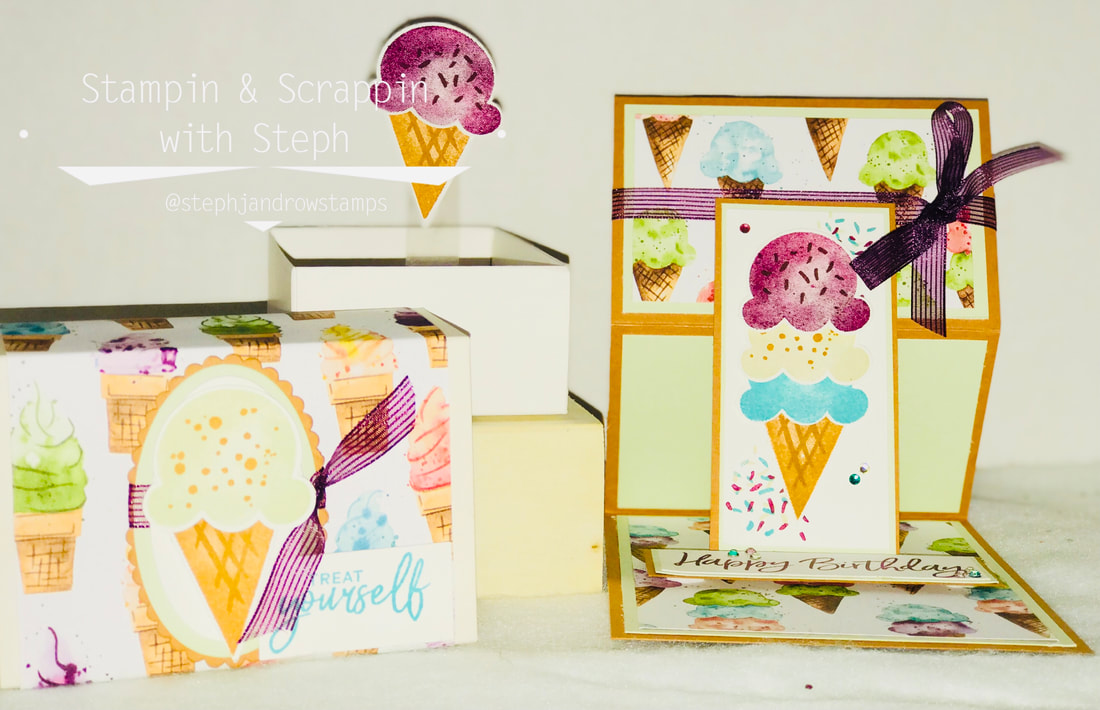
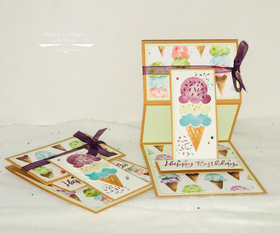
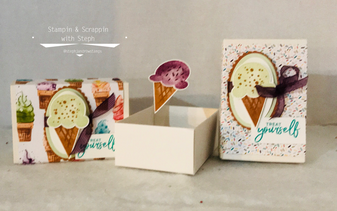
I chose a fun fold card that I have never made before! This Easel Card is so easy to make! I choice Cinnamon Cider as my base with a layer of Soft Sea Foam! Can you say Mint Chip? Ok, maybe just me!! Then, I added the layer of DSP. Rich Razzleberry, Soft Sea Foam and Bermuda Bay are the perfecct scoops! I see Black Raspberry, Mint Chip and Cotton Candy!! Well around here, those would be colors of so fun flavored ice cream. What about were you are??? Stamp the images and use the Ice Cream Cone Builder Punch to punch them out! Add the fun sprinkles or jimmies and chips on the scoops and then don't forget the criss-crosses to define the cone! The Happy Birthday Greeting can be found in the Sweet Ice Cream stamp set and I stamped that in Rich Razzleberry. Below is the measurements of the paper used! For more details on how I put this card & box together, I created a video for you to follow! To make the card: Cardstock: Cinnamon Cider 11x4 1/4; on the 11" side score at 2 3/4 and 5 1/2. Fold on the 5 1/2 score line and then fold back on the 2 3/4 score line. Layer 1: Soft Sea Foam 5 1/2x4, DSP 5x3 3/4 adhere to the bottom section of the card Layer 2: Soft Sea Foam 2 at 4x2 1/2, DSP 1 at 3 3/4x2 1/4. Adhere 1 of the Soft Sea Foam pieces to the center section (measures 4 1/4x2 3/4). Adhere the other piece of Soft Sea Foam and then DSP to the top section. Layer 3: Cinnamon Cider 2x4, Soft Sea Foam 1 7/8x3 7/8, and Whisper White 1 3/4x3 3/4. Stamp the sprinkles in different colors on opposite corners of the Whisper White. Adhere layers togther and then add about 1/2 way down on the top section. Use dimensionals. Make sure to only add the adhesive to the part that sticks to the card base. Layer 4: Cinnamon Cider 1 1/4x3 1/2, Soft Sea Foam 1 1/8x3 3/8 and Whisper White 1x3 1/4 Stamp the greeting in Rich Razzleberry. Ink Colors used to stamp ice cream scoops, jimmies/sprinkles, chips and cone on Whisper White. Bermuda Bay, Cinnamon Cider, Early Espresso, Rich Razzleberry and Soft Sea Foam. Punch out using the Ice Cream Cone Builder Punch. Add to the Whisper White Sprinkle layered piece. Wrap and tie in a bow, on top section, with the Rich Razzleberry Ribbon. Lift the card up, so the ice cream cone section stands almost up right, then add the greeting to the base of the card, so it holds up the top section.
To decorate the box;
What do you think? SO FUN right? I just love how adorably fun this suite is!! Thank you for joining me today, be sure to leave a comment and visit blog! Happy Stampin! Steph  Below is the list of hoppers for this month's Blog Hop.
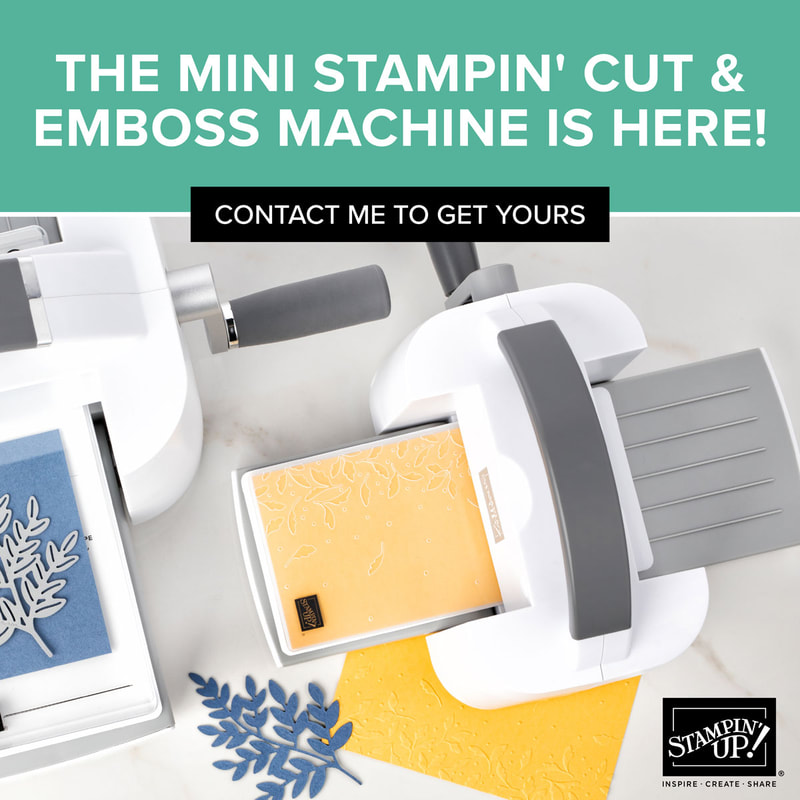 We thank you for your patience! The wait is finally over and the Mini Stampin Cut & Emboss machine is avaialble for purchase!
Contact me to today or visit my website to order yours now! Happy Stampin Steph |


Categories
All
Archives
May 2024
|


 RSS Feed