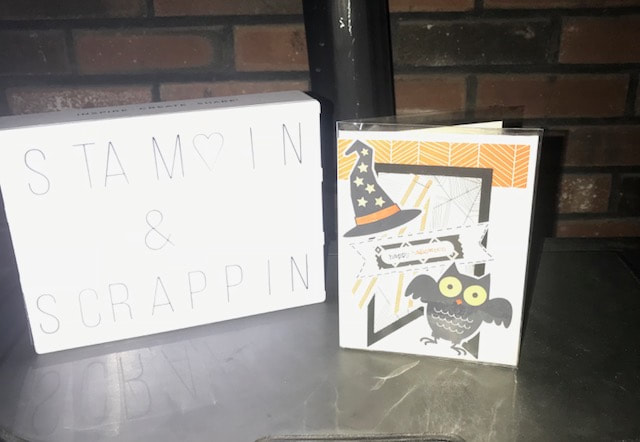
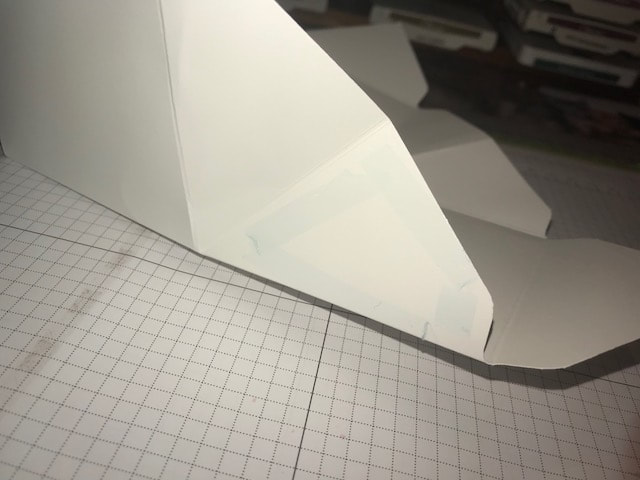
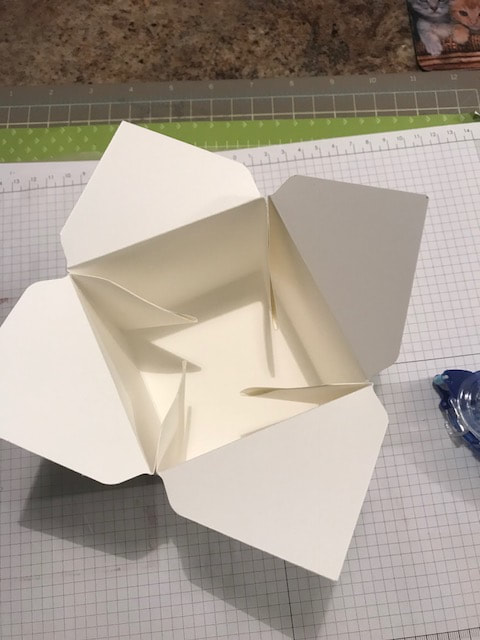
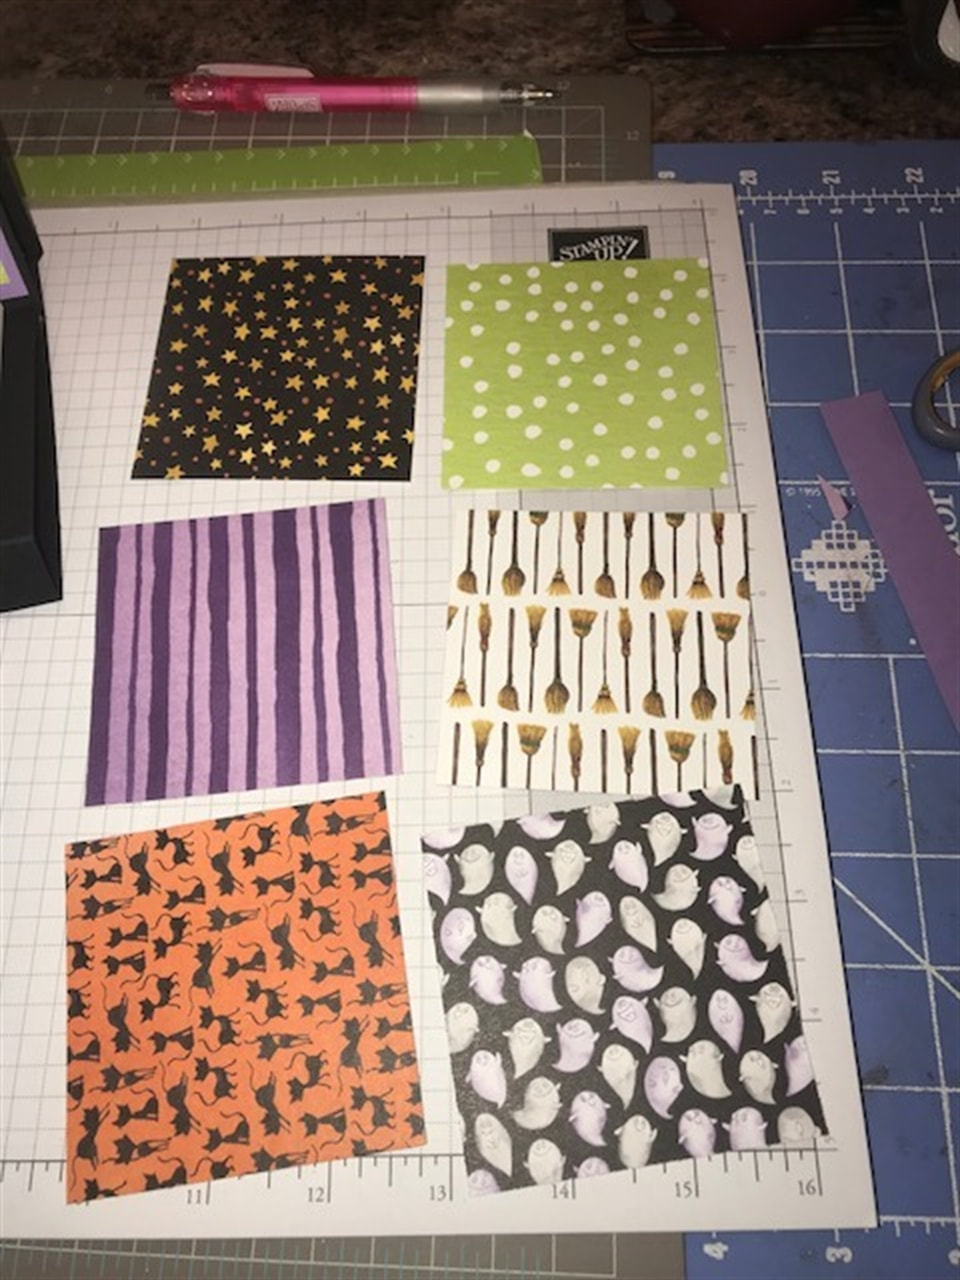
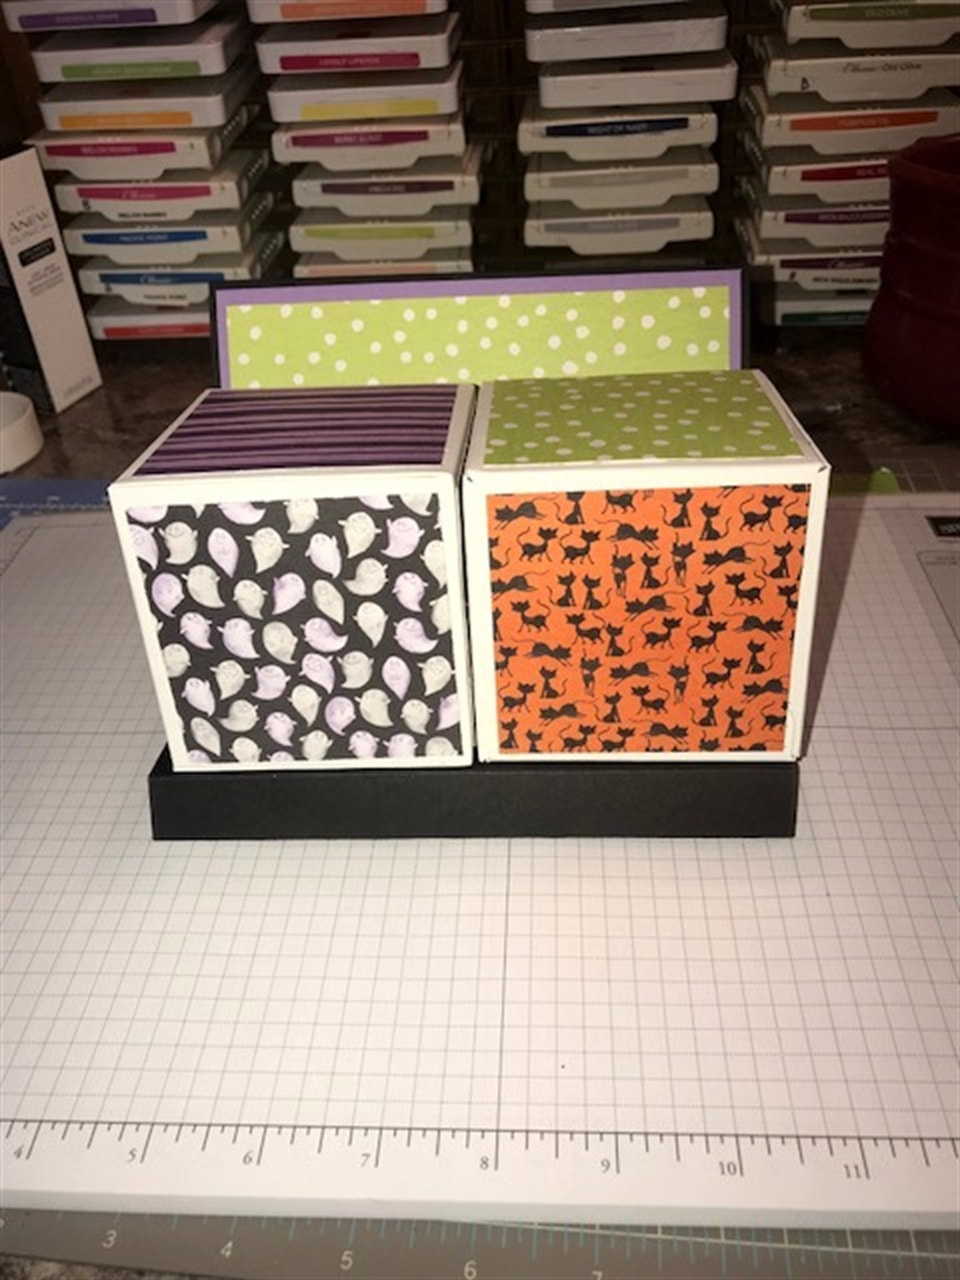
 I made 23 pencil boxes for my son's 4th grade class to hand out for Halloween. We can not hand out candy and Halloween really isn't celebrated in schools any more. But I was able to still give a little treat to each of his classmates! My daughters are too old in school now that they just don't want to share gifts anymore and they switch classes so there would be too many to make even if I wanted to!! :-(
I wanted something simple, and I know kids can always use pencils! I found directions for the box on Pinterest. I followed the directions by crafter The Stampin B, you can find the directions here. I used retired Stampin Up products to decorate! My son was so excited to bring them into school today!!! I can't wait to hear all about it when he gets home! Happy Halloween & Happy Stampin Steph
0 Comments
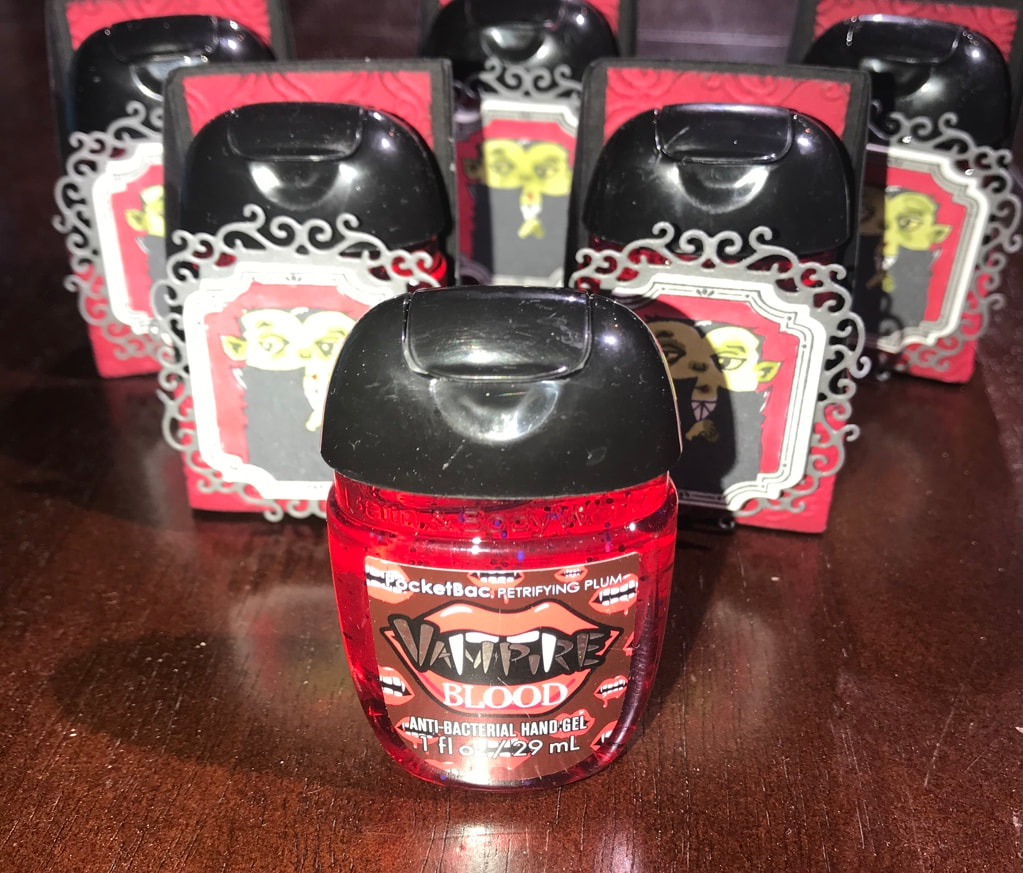 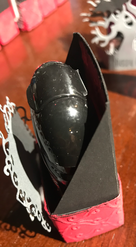 I love making little treats to give teachers, family, friends. The hand sanitizers from Bath & Body Works are perfect for this! They are affordable, have cute designs, smell amazing and everyone loves them! You can find many designs if you search Google or Pinterest. But I stick with this type of box to hold them! I like how it fits and you still have space to decorate! To make the box, you will need a piece of cardstock that measures 3 3/4" x 4 3/4". Score it on the 3 3/4" side at 1" and 2 3/4". Then turn the paper to the 4 3/4" size and score at 1" & 2" Fold all the score lines. On the sides that measure 4 3/4", cut the score lines to create tabs. Fold the middle tabs in and adhere the bottom tabs on the outside to create the box. The you going to cut at a diagonal from the top of the box side down to the top of the tabs. (My picture shows the completed box, but hopefully this makes sense) Contact me with any questions. I chose to match up the box to the style of the sanitizer, this one was called Vampire Blood. So I used a pieces of Real Red cardstock (measure 1"x6" and 1 3/4"x2 1/2") and embossed the pieces with the new Stampin Up embossing folder called Stylish Scroll. I then sponged the edges with Basic Black to give it an old look. The Vampire stamp is also from Stampin Up the stamp set is Spooktacular Bash. I made a layer by cutting the Vampire out and the greeting using a framelit from Stampin Up's Ornate Frames Dies. Added glue dots to the top of the greeting so you can lift the Vampire up. I adhered them to another die from the same size! Love it!! I also completed another set for the Ghoul Friends scent. I used the Stampin Up stamp set Spooky Fun & Halloween Scenes Dies. I think I prefer the witch flying across the moon, so I will up the rest of the boxes and finish them that way!!! I hope you enjoyed this project! Let me know what you think! Happy Halloween & Happy Stampin' Steph 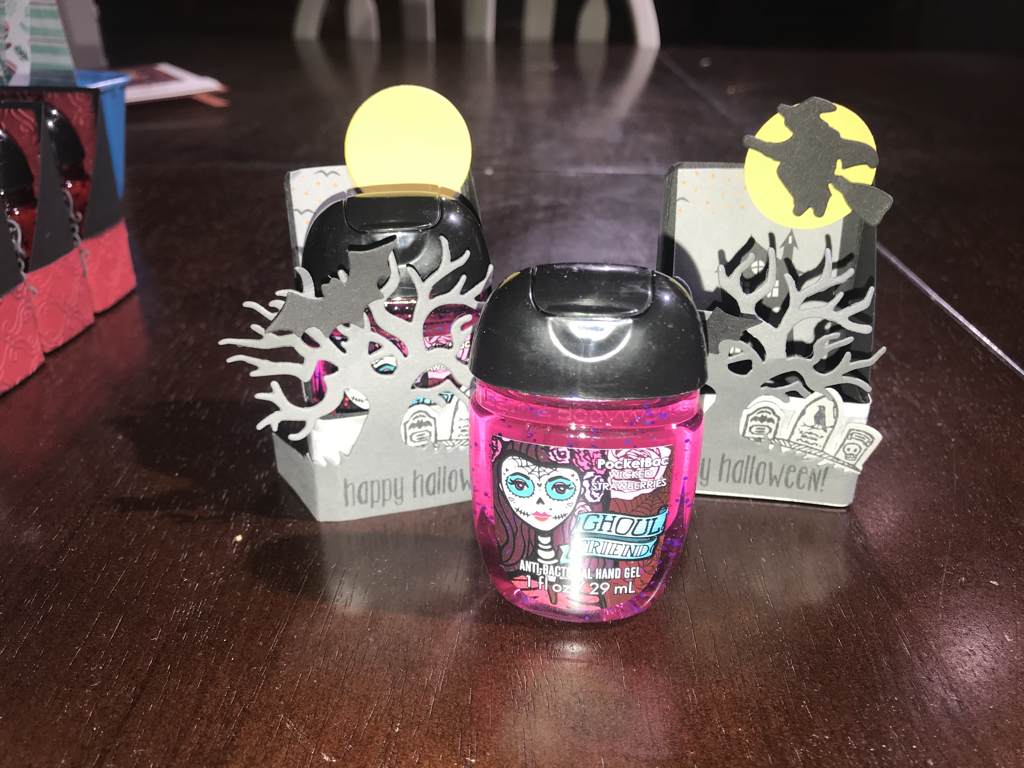 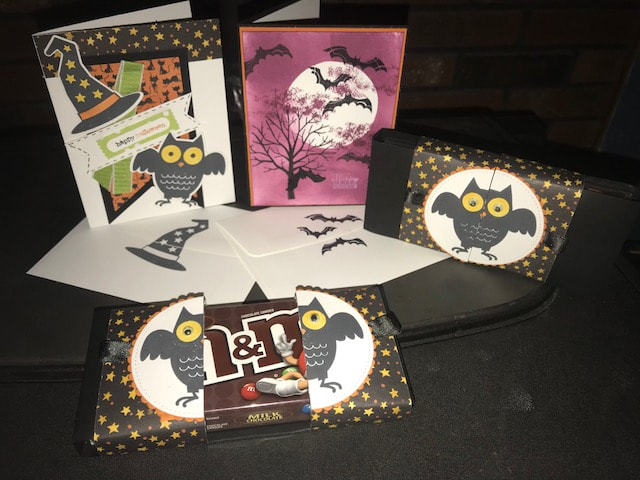 It might be a little warmer today than yesterday! But I'm enjoying the much cooler temperatures. Yesterday on Facebook I shared my projects that were a revisit of the past.
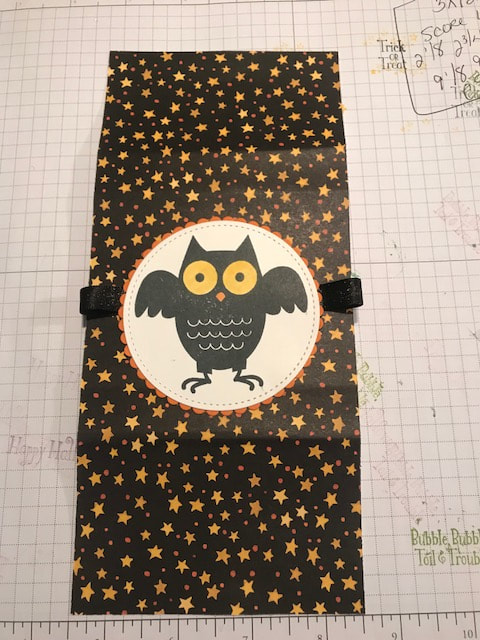
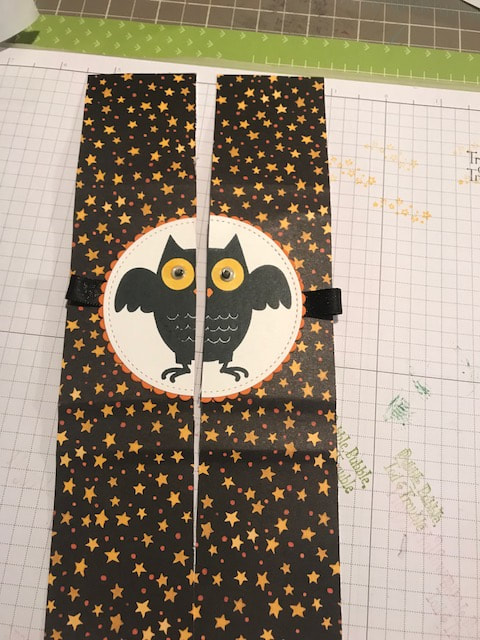
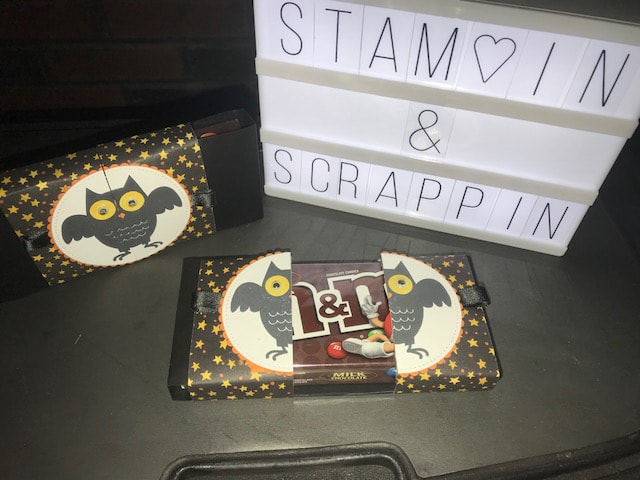 And the last project, which is the candy wrapper, was from an older project...I think I attended the event as a guest and made it! This also uses Howl-o-ween Treat and the Toil & Trouble DSP! I think my favorite part is the googly eyes on the Owl. So easy to make. First, the measurements will depend on the size of the candy box you are wrapping. I purchased some M&Ms I found at the Dollar Tree. Choose your wrap, I used 12x12 sheet of Basic Black CS. 3x12 on the 12' side score at 2 1/8, 2 3/4, 9 1/8 and 9 3/4.This will sit lengthwise on the candy box, it will not cover the whole top, we will create belly band. Again the size of the belly band depends on the size of the candy box. I cut DSP to 4x9. Wrap the DSP around the box, gently creating score lines at the creases. Do not adhere together. I used Layering Circles and Stitches Shapes for the embellishments. I stamped the owl in basic black and colored the eyes in with Daffodil Delight......do not add the googly eyes until you have cut the belly band. I added to pieces of ribbon, folded in half to create a loop under my circles. This will allow your to pull the belly band open. Adhere your embellishment to the center of the creases. This will be the top of the belly band. Line up the DSP in your trimmer and cut in have to 2x12. I made sure to choose an image that would cut in half nicely. Then wrap each half of the band around the box and adhere. Easy as that! Then I added the googly eyes and let them dry. 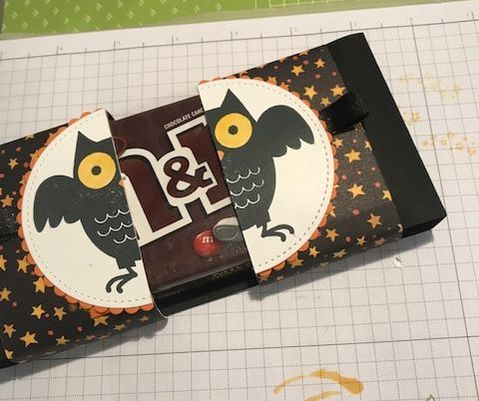 Here is the original project. Too cute right!! The googly eyes are the best!!!  I hope you try these projects too! Feel free to contact me if you have any questions!
Take Care Happy Halloween and Happy Stampin Steph  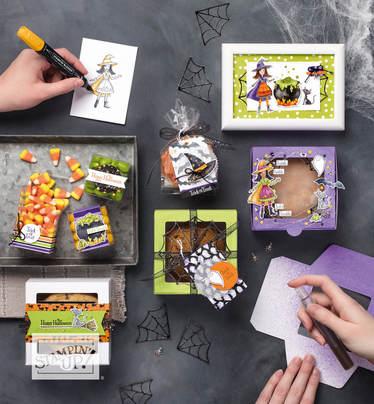 Stampin Up's Holiday Catalog is here! Do you have a copy yet? There is so many new products I am just so excited to share with you! You can enjoy endless hours of crafting as we enter each season! Halloween, to Christmas and New Year's and everything in between! The best part is Stampin Up remain true to their traditions....coordinating paper to stamps, inks and embellishments with Suites! There is 7 Suites in this catalog! And if you follow me on Facebook, I shared my favorite called Festive Farmhouse! Here are 3 more that I couldn't wait to get my hands on! Spooky ………...Toil & Trouble! I've been using this suite just about everytime I've crafted! See this suite on pages 48-49
The Country Lane Suite is on pages 42-44 combines some of my favorite Stampin Up colors, Blackberry Bliss, Cajun Craze, Crushed Crazy, Early Espresso, Mint Macaron and Old Olive. They are the perfect colors to create warm, cozy country projects. Santa's Workshop on pages 18-21 is such a fun Suite. Perfect for all ages to create! And just like the Suite says, Craft the perfect Christmas-just like Santa.
Check out my calendar of events on Facebook and Stampin Up. I have workshops coming up that feature several of these new products ….and more to come! Leave a comment for a chance to win a little blog candy! Thanks for stopping by Happy Stampin Steph 
WOW September is rolling right along! And here in Massachusetts it doesn't feel like fall is ready to make it's appearance yet! We've had record breaking temperatures with nasty humidity! I am hoping it cools done soon! I look forward to the cool crisp air, changing leaves...except when I have to rake them, and smells of fall like baked apple pies and pumpkin spices! I love to decorate and get into the spirit of Halloween for the kids! So, I am so excited to share my projects with you!
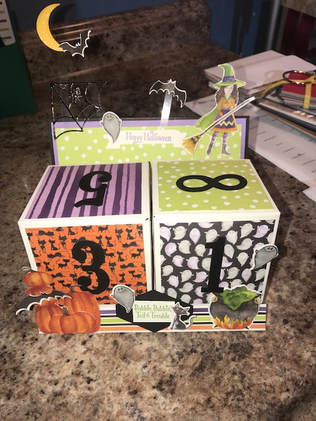
I want to welcome you and thank you for stopping by the Stampin Friends Blog Hop for September. My blog hop winner, from the August hop, is Barbara Welch! Congratulations! Barbara will receive 1 set of the completed projects I made in August. So be sure to comment on my blog for this month and I will send you a little prize from me! Did you hop over from Kim Jolley's blog! Weren't her projects just amazing?? Let's jump into the projects!!! If you haven't notice, this month's theme is Halloween! I decided to redo a project I made before. It's a Halloween Countdown Calendar! OMG It's adorable! I first, came across the idea either from Facebook post or something on Pinterest. But the information is all on Splitcoaststampers website. The project and directions are from Melissa Stout and you can find all the directions by clicking here. 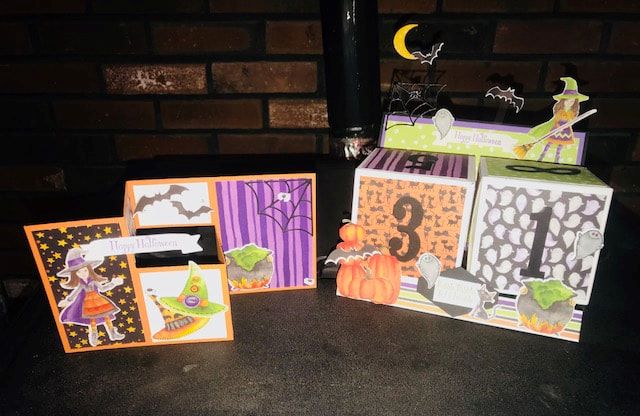
I won't go in to much detail about the directions. I made a couple modifications in mine, I will share those. My first modifications are the supplies used. From the original project, the boxes, DSP and tools were discontinued and I wanted to make sure I used current supplies. Of course, you can use whatever supplies you have!
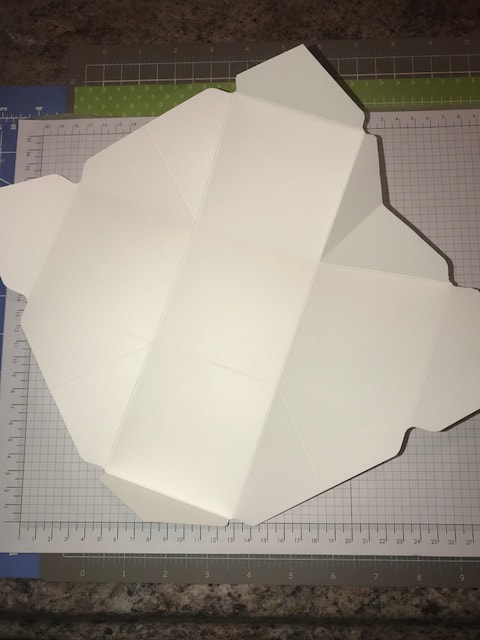
So..what I did was use the Giftbox punchboard and made a 3.25' box. I used 2 pieces of 12x12 cardstock and cut them to 10x10. I followed the scoring instructions on the punchboard. Now, if you are familiar with our punchboard, then you know it's going to allow you to have a box that will open out. Since I knew I wasn't use the box to put anything in, I just sealed it all up.
I put adhesive in each of the corners and then sealed the lid. Normally, if I wanted the box to be used but to stay square, I would have adhered the inside tabs to the sides so they don't get in the way of the contents. You can see in the pictures below regarding the tabs.
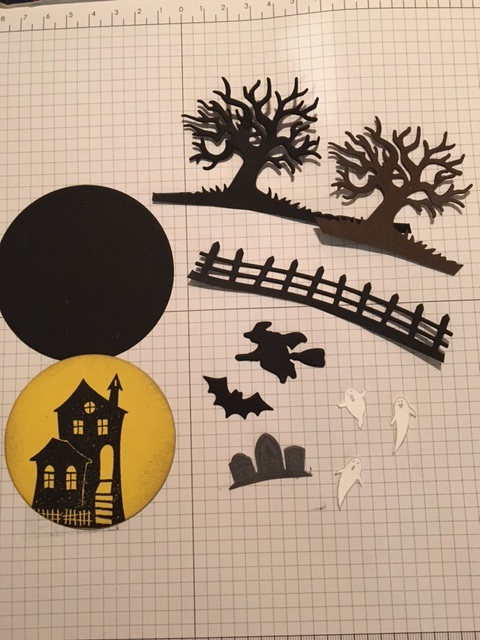
Because my box is 3.25' and the original project was 3'. I adjusted the paper size to accommodate. Melissa's directions was for 2 pieces of cardstock to measure 6 1/2x 8 1/2 and 6 1/2x10. I changed mine to 7x8 1/2 and 7x10. I changed the score lines on 7x8 1/2 paper to 3/8, 3 3/4, 4 1/2 and 8 1/8 and this work fine. I did not need to change the score measurements on the 7x10 paper. I picked out 6 patterns of the Toil & Trouble DSP. I cut 2 of each pattern to 3x3. I adhered this to the sides of my box. I followed Melissa's instruction on what numbers to cut out.
I didn't have to do too much stampin with this project. I used the Cauldron Framelits and matched up the shapes on the DSP and cut them out. I did use the greetings and ghost from the Cauldron Bubble stamp set and the moon from the Spooky Treats stamp set.
To get the look that the moon and bats are floating and flying in the air, I attached them to thin strips of transparencies. I know I have window sheets somewhere, but I can't find them. But good ole transparency sheets worked perfectly. I love this project. It is super easy and really fun to make. Melissa's directions show a Christmas version, which I think I am going to have to add to my list!!!
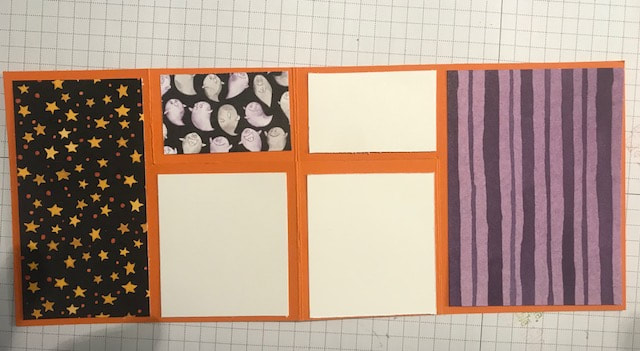
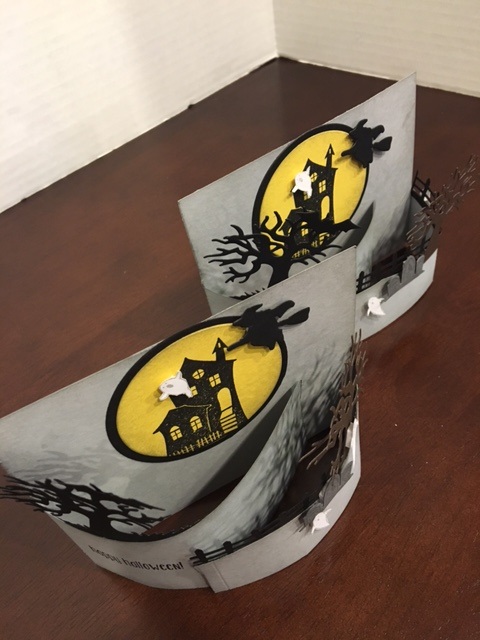
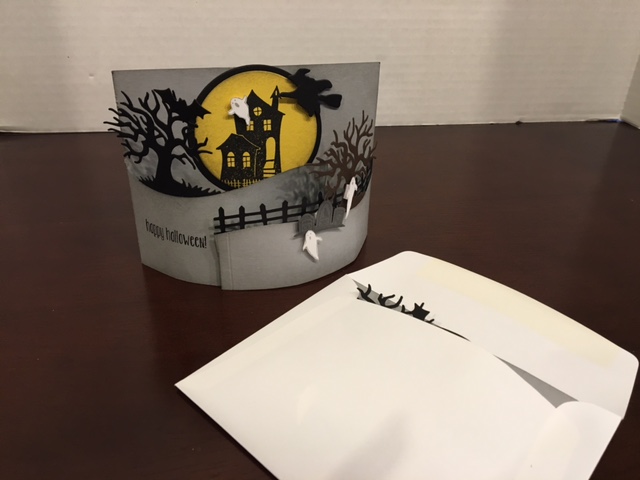
For my card, I made a Simple Step-Out Fancy Fold. I love this fold. You can get 2 cards from one piece of cardstock which is perfect. I was also able to use some of the DSP bits leftover from my project. It was super easy to make and I found the directions from the website Song of My Heart. Lisa Griffin Zwolanek shared her tutorial on how to make the card here.
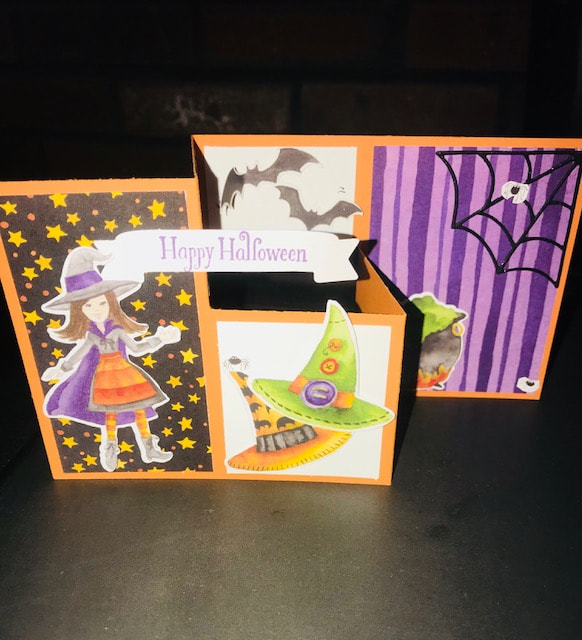
I used Pumpkin Pie CS as my card base. It gives nice pop to the Highland Heather and Granny Apple Green in the DSP. Lisa provides the measurements for the layers as well! I chose my layers first, then decided what I was going to use for images. I said this earlier, I did very little stamping with both the card and the project. I love that the framelits match up to the images on the DSP! When you're in a rush or time is limited this really helps complete projects quickly!! Love how Stampin Up thinks of everything!
I hope you enjoyed my projects, be sure to continue along to Melissa Thomas's blog you can fine her name below and continue from there.
Before you go, be sure to comment, and I will draw one lucky winner of a little blog candy by October's blog hop! Thank you again for joining us Happy Halloween and Happy Stampin Steph 
Did you come from Kathie Rotti's blog? Wow, right she made some awesome projects!!!
After taking the month of August off due to the craziness of summer, I am happy to be back for my favorite time of year!!! In this month's Blog Hop we have 8 hoppers sharing their awesome projects, so be sure to check them all out. Thanks for stopping by my hop....... Be sure to leave a comment on my blog, as well as each participant's blogs in this hop, with SFbloghop2017 and share what you love about my projects and we will then choose 1 lucky winner to receive BLOG CANDY! and not just any blog candy.....a full project kit!! 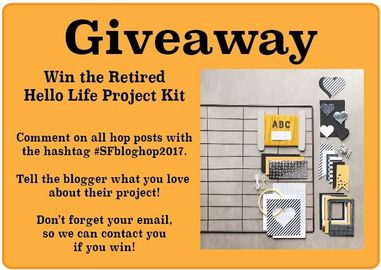

.During this time of year in New England, I tend to have a hard time thinking about fall...well we just never know what the weather will bring us. We have the kids going back to school, sports starting and leaves begin changing colors. But, the cool crisp days seem to come a little later now more mid-October to November. As this past week has been hot, in the 80s and humid! BLAH. Today is a little cooler but the air is so humid makes it uncomfortable to get motivated!!!! Hopefully were ever you are reading this, your weather is more enjoyable!!! And on to my projects.
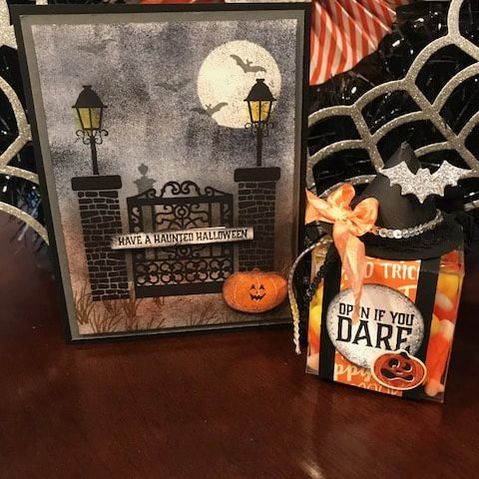
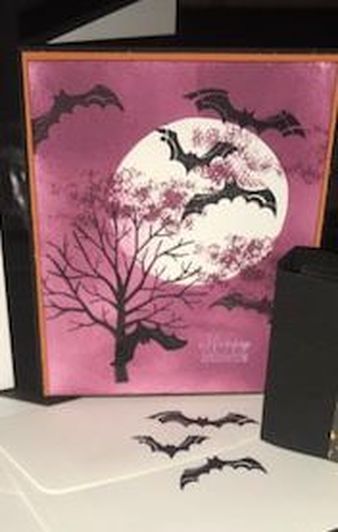
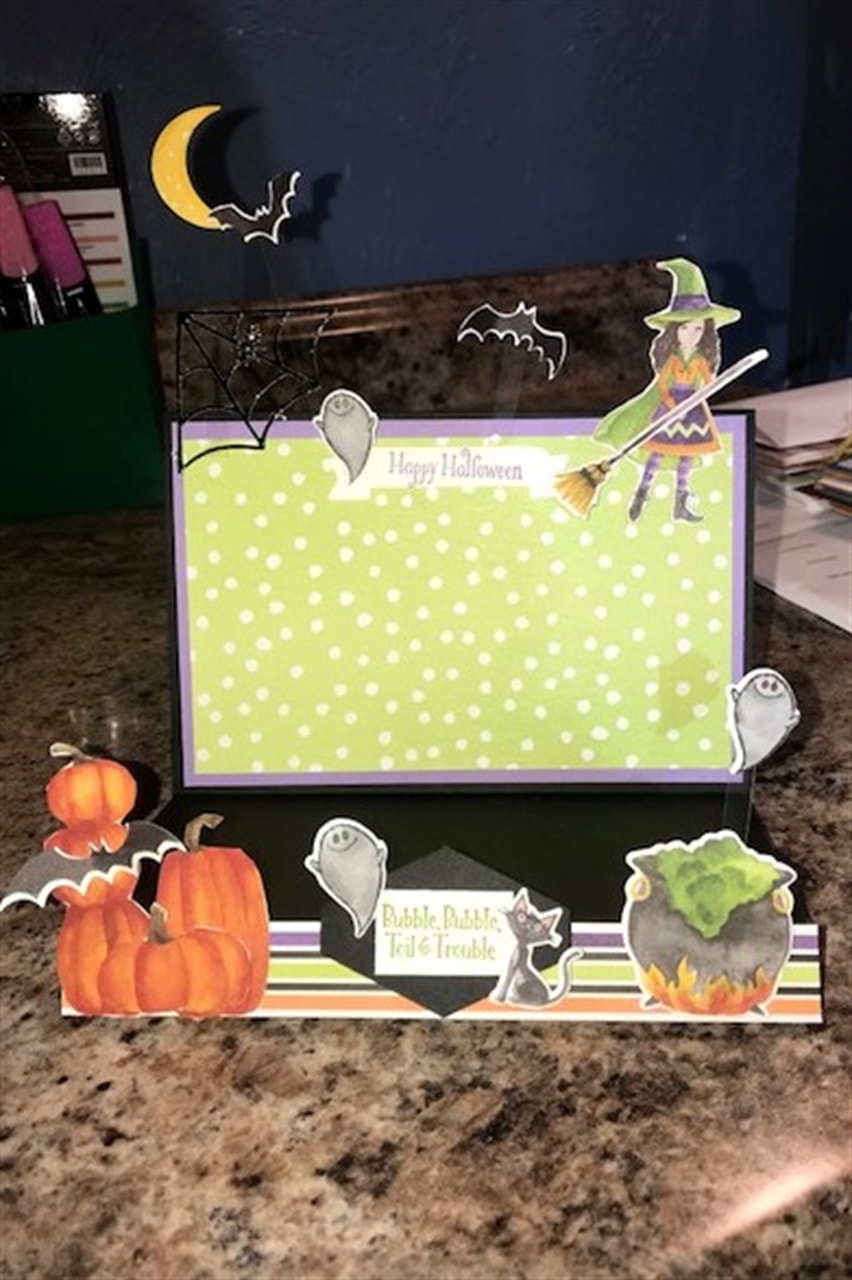
The card I am sharing today is a little out of my comfort zone. I do not typically create cards that make a scene, but I felt that it needed alittle more. My projects use only Stampin Up products. The card features two new stamp sets form the Holiday Catalog; Graveyard Gate and Pick a Pumpkin. I used several inks for the sponging, Basic Black, Basic Gray, Chocolate Chip, Night of Navy and Soft Suede. I also used Pumpkin Pie for the jack-o-lantern. 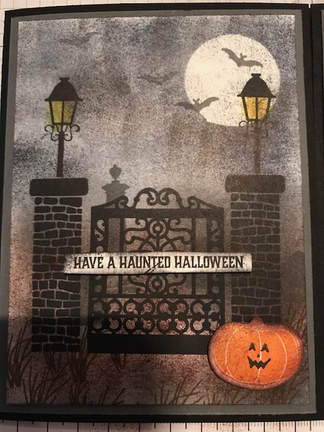
The card was very easy to make and I was able to whip a couple up in no time. I forgot how fast sponging can actually be.
I stamped the gate and brick pillar images first in basic black. I stamped some grave stones in basic grey and lightly stamp them behind the gates so they appear to be a shadow. I also stamped some grass, from the High Tide set towards the front. I punched a 1 1/4" circle out of a post it note, making sure the sticky part is included when I punched! I placed the circle towards the top right...this made a mask for sponging and wall-la I have a moon!!.. The top portion of the card I began to sponge in Night of Navy, I had an idea of where the light posts would be so made sure to go lightly so I could add so Daffodil Delight. I sponge in Basic Black next to add that foggy darkness. I tapped the sponge versus rubbing it. I removed the moon mask, added the light posts and lightly stamped the black over the white moon to make it look like it's in a cloud. Added a few bats! For the bottom, I sponged in Chocolate Chip to look like the ground. And then went over it with Basic Gray. I think it looks like a foggy night in a graveyard, what do you think??? Not to shabby!!! 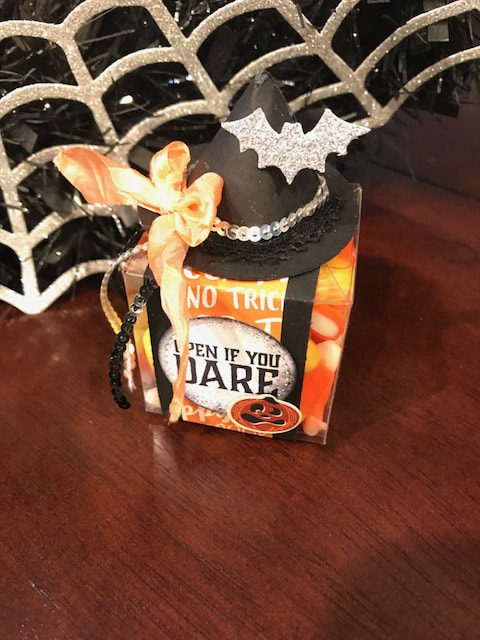
For the treat box, I used Stampin Up's Clear Tiny Treat Boxes. I filled them with Candy Corn.
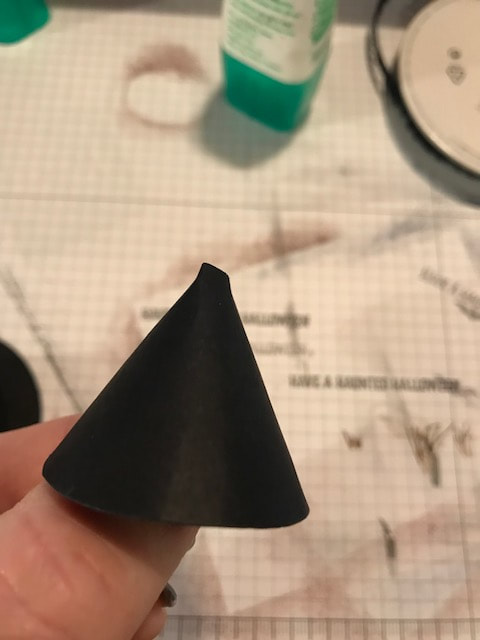
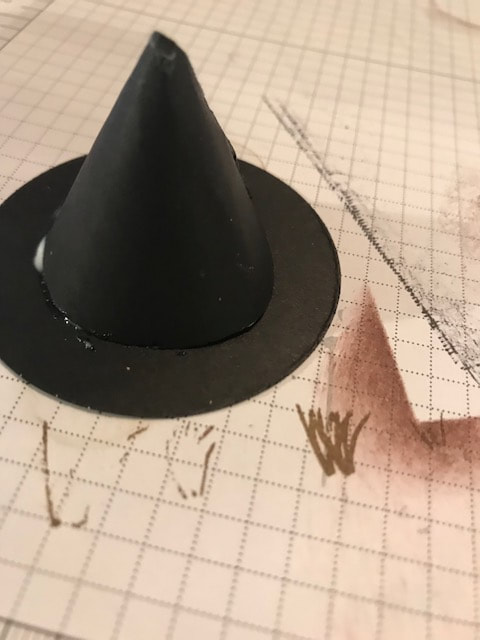
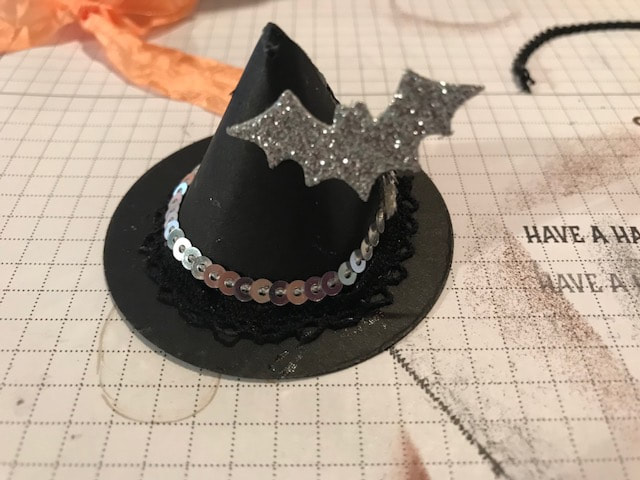
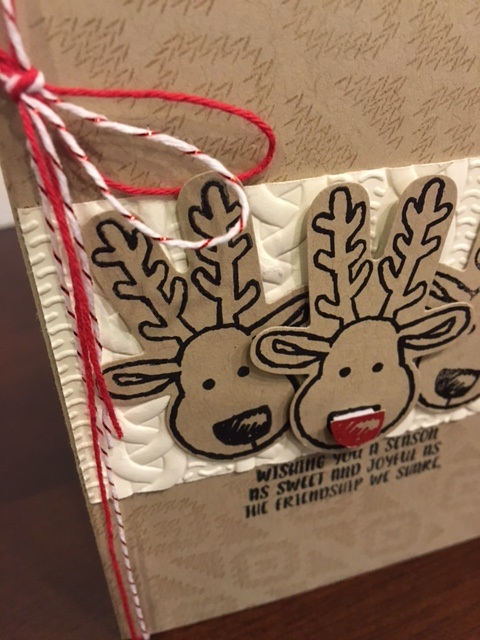
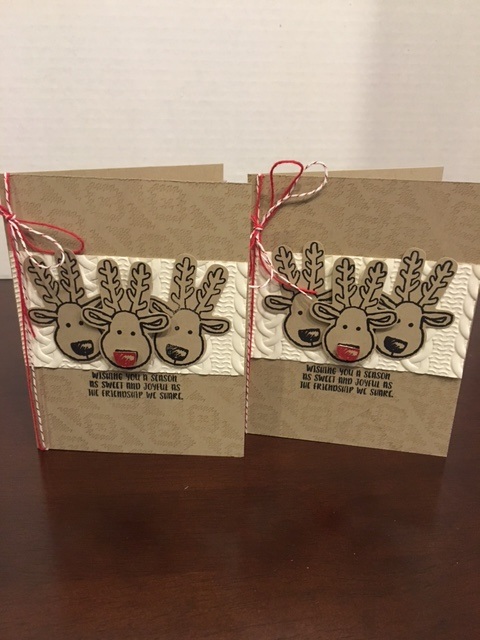
I cut a strip of paper 8 1/2x 1 1/2 and 8 1/2x 1 I used this for my belly band. To make the witches hat, I cut out the circles in Basic Black from the Layering Circles, I used the largest circle and one that's like 2". Cut the largest one in half and the fold one to make a cone, see pics below. I used Multipurpose glue to make sure it stays in shape. Then, glue the cone on the 2" circle with Multipurpose glue. I wrapped the base of the cone with the new Vintage trim, this hides the edges and any glue that shows. I also added a band of Mini Silver Sequins. I also added a Silver Glitter Bat. The bat was from the Halloween Scenes Thinlits. But any bat will due. A few strips of Mini Black and Silver Sequins and finished off with a bow (Crinkled Seam Binding Ribbon in Peekaboo Peach. The greeting is from the Graveyard Gate, stamped on Whisper White and cut out with the smallest Stitched Circle framelit. The Pumpkin is from the Spooky Night DSP, and I used the Patterned Pumpkin framelit to cut it out...How cool is that! I love that the framelit set matches the DSP!!! And there you have it!!! I hope you like the projects I have shared for you. Be sure to leave a comment with #SFbloghop2017 for your chance of blog candy!!!! Please continue to CINDY WALDROFF'S Blog you won't be disappointed. Happy Fall, Happy Halloween and Happy Stampin Steph 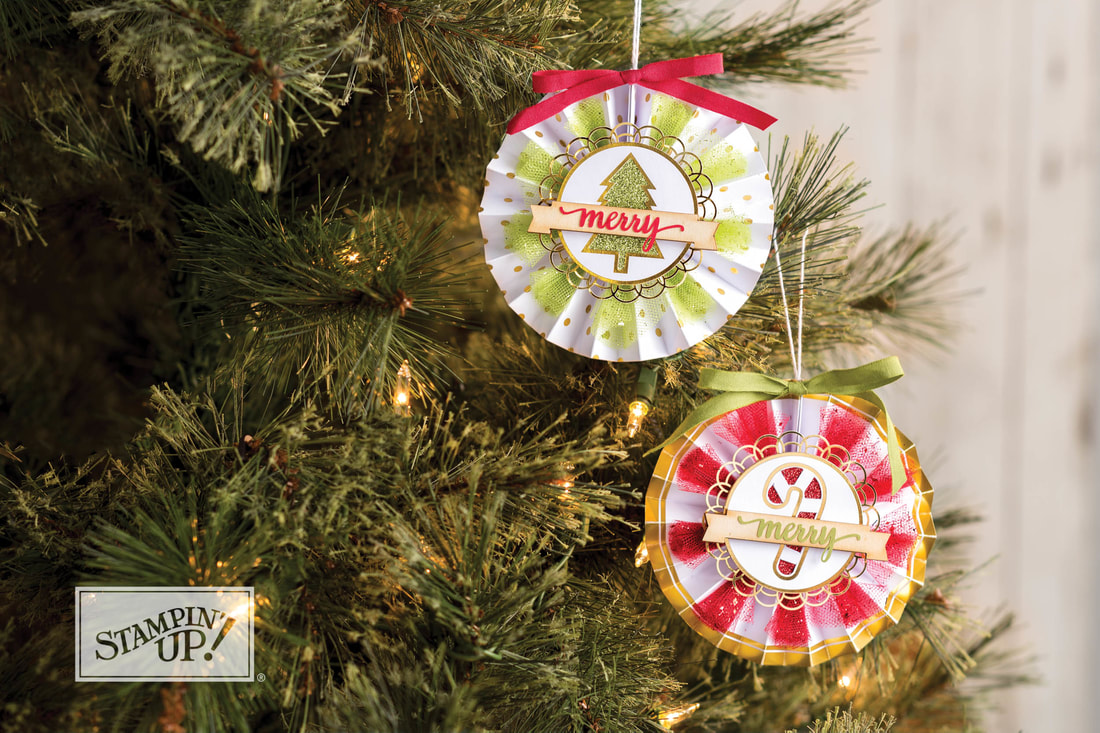 It’s the unofficial start of the holiday season: The holiday catalog sales period begins today! I want to share my favorite holiday products with be sure to attend my events and parties and I'd be happy to send you your very own copy of the catalog. You are going to be sooo excited about ordering their own all-new holiday products! If you haven't received a Holiday Catalog yet, you can view the online version here. There is something for everyone's likes! Holiday, New Year, Weddings, Fall and Halloween! And for those seasonal birthdays, you won't be disappointed! And if you're somebody who loves to craft, but doesn't have the time or supplies! Don't worry, the kits in this catalog will surely WOW you! The Be Merry Kit (picture above) is an all-inclusive kit! Yup I said all-inclusive! You receive everything you need to complete 12 Rosette Ornaments. These make perfect additions to your holiday gift packaging, little treats for your child's teachers or co-workers. And...a family project. I bought these gifts to sit with my children and craft together. Because it's all inclusive it's perfect for each of them to make. No guess work, no fancy directions! Below I shared a few of my favorite products! What's your favorite product?? Leave a comment, with you favorite holiday product in the catalog, for a chance to a free gift from me!!! I look forward to hearing from you Happy Stampin' 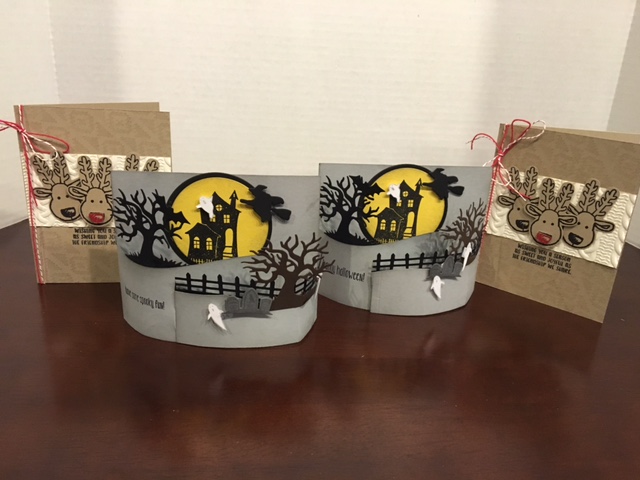 How adorable are these cards??? I love the new Holiday Catalog, there are so many awesome products in here, perfect for all your holiday projects. I was inspired by all the bendy cards on Pinterest that I just couldn't wait to make one. The Halloween card features a super cool bundle; Spooky Fun Stamp Set and Halloween Scenes Edgelits and I also used the Halloween Scares Stamp Set! And best of all, the card still fits in our standard envelopes. These awesome reindeer were made using another new bundle from the Holiday Catalog; Cookie Cutter Christmas Stamp Set and Cookie Cutter Builder punch. WOW Super easy! And check out the Cable Knit embossed Very Vanilla paper! You can whip a bunch of these up in no time!! Would you like to learn how to make them?? Make sure you come by my Card Club.
I am offering 2 dates (one evening and one morning) for your convenience. September 6th at 7pm or September 7th at 9am. Pick whichever date works for you!!! Be sure to RSVP by Monday the 5th. Check out my Facebook page or my Stampin UP website for event details. Need a catalog? Please contact me and I'll be sure to send you one. Happy Stampin Steph 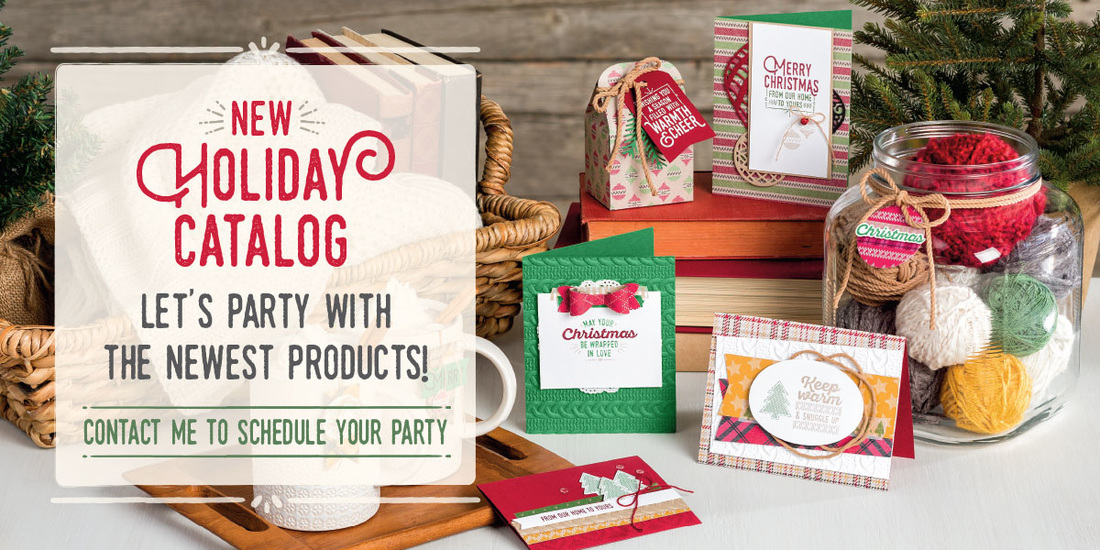 Finally, the new 2016-2017 Stampin' Up! Holiday Catalog is now available. You may have seen me or others share a few products from this catalog and wondered when you can get them. Well now, you can! The Holiday is jammed packed with beautiful paper, awesome stampsets and bundles. If you're like me your wish list is going to be huge. Please click the file below to view the catalog. Feel free to contact me if you'd like a physical copy of the catalog as well. I'd be more than happy to mail you one! Look forward to hearing from you Happy Stampin Steph
Stampin' Ups holiday catalog is jammed packed with holiday products. Whether you're interested in crafting from scratch or complete kits, there is something for everyone. You won't be disappointed.
This is the perfect time of the year to make something special with friends. Plan an evening together to craft away the stresses of the season.
Built for Free Using: My Stampin Blog
Please contact me if you have not received your Holiday Catalog or if you would like one. I will get it to you ASAP.
|

New 2023-2024 Stampin Up Annual Catalog


Kits Collection


Join today

Categories
All
Archives
January 2024
|
||||||||||


 RSS Feed