 Welcome to what is the last hop for Stampin Friends in 2021. But don’t worry we will be back with new projects in January 2022. For November hop we are Celebrating the Season wherever we are. I hope you can from Maureen Rauchfuss’s blog! Her projects are amazing. If not be sure to visit, And make sure you visit after mine. My projects use the suite from Stampin Up called Gingerbread and Peppermint. You can find this Suite in the Holiday Mini Catalog.  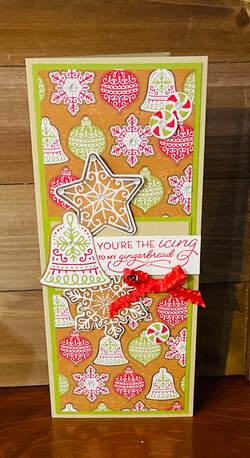 I decided to make a slimline card, I used Crumb Cake for the card base 8x9 1/4 score on the 8” side at 4. For the layers I used Old Olive 3 3/4x9 then I layered 2 pieces of DSP 3 3/4x 4 1/2. Adhere one to the top half of the old olive and one for the bottom half. You will have a piece of CS left from the crumb cake and old olive. Cut the old olive to 2x3 3/4 and layer the piece of crumb cake 1 3/4x3 3/8. I used the coordinating sides from the suite to cut the shapes from the DSP. I stamped the greeting in real red, Add the ruffled ribbon in a bow and added some rhinestones to finish it off. I also cut a few more shapes to line the inside of the card. See photo below.
I plan to add a gift card as well. I will add to a large cellophane bag and tie with a bow before giving as a gift to my son’s bus driver.
I hope you enjoyed my projects. Be sure to continue to Melissa Thomas's Blog. Her projects are beautiful.
Thanks for joining us today. I hope we inspired you to create! Happy Holidays and Happy Stampin Steph
8 Comments
For details on how I assemble this card, be sure to check out my newest You Tube Video Thanks for Stopping by Happy Stampin Steph Click on the headings below, each is a link to the full Card Share and 3 other cards that I made
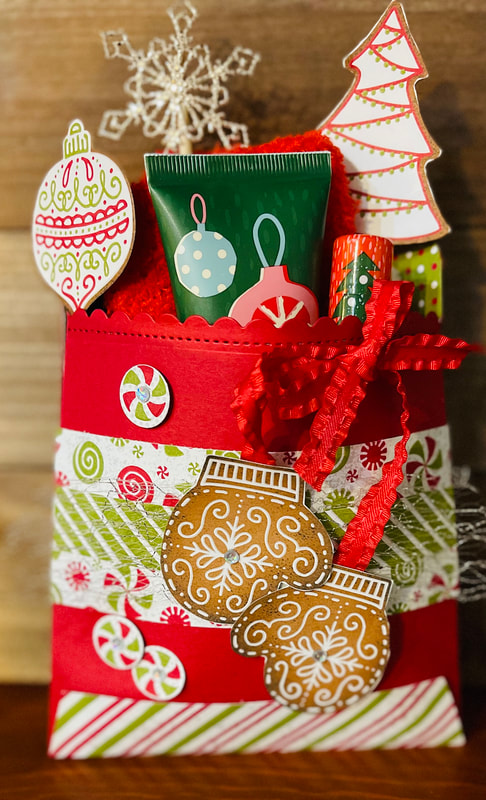
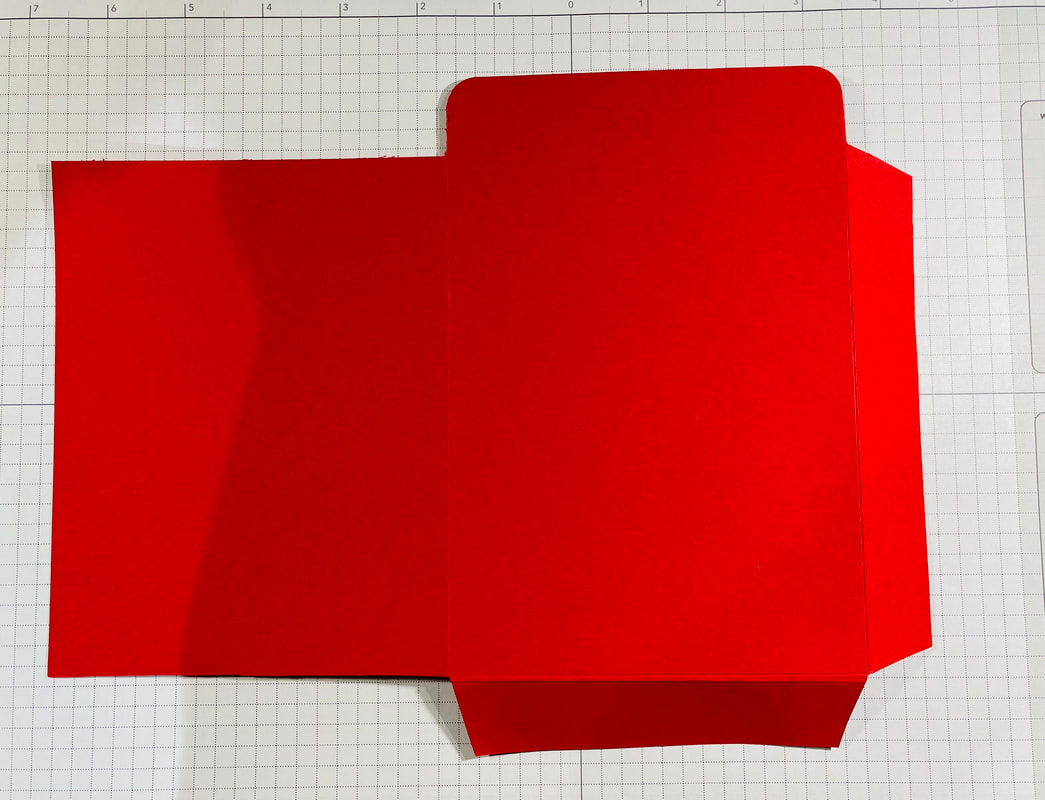
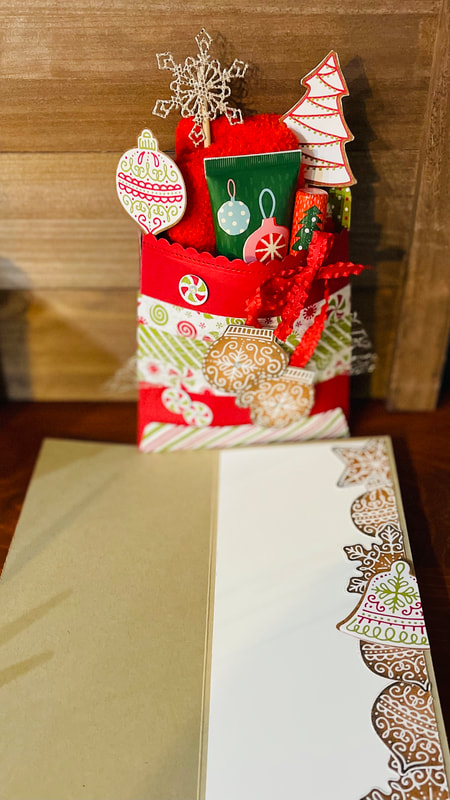
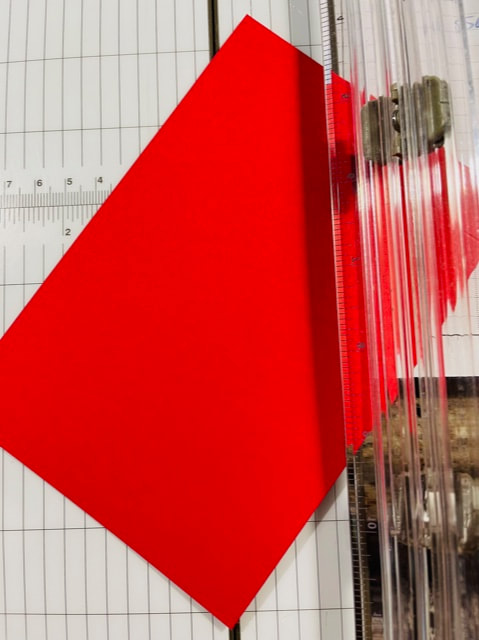
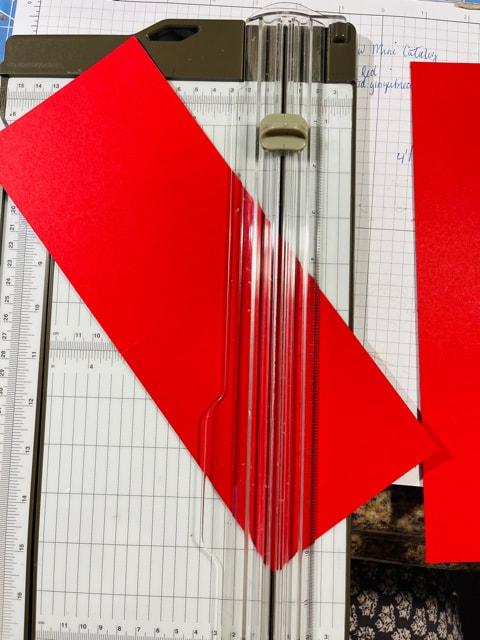
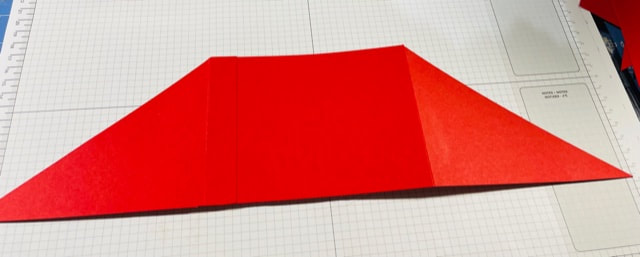
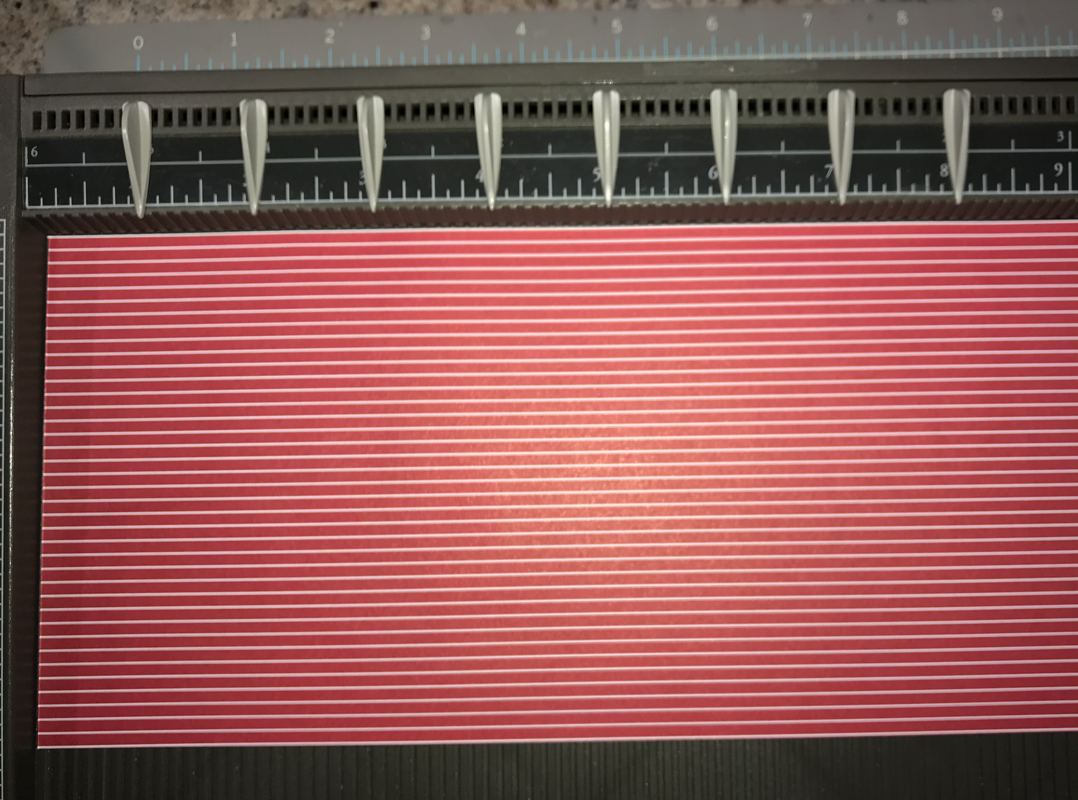
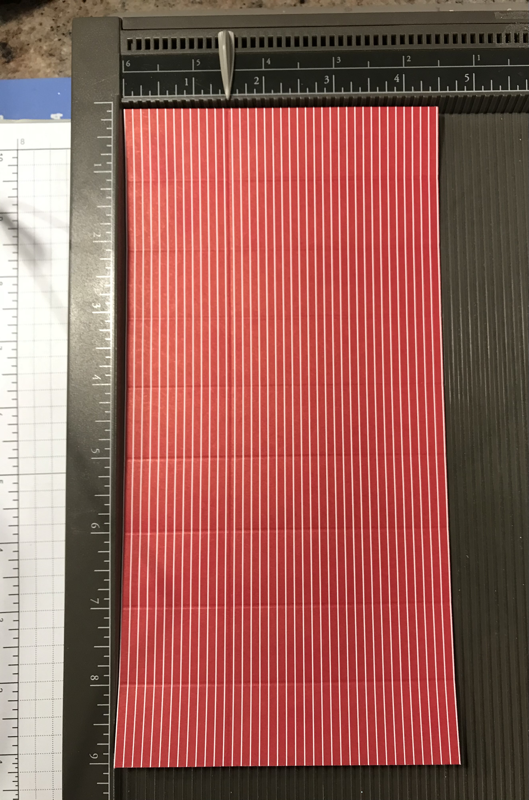
Card Share Cutest Halloween Fun-Fold Card Beautifully Penned Card Peaceful Prints  Today I am sharing with you a couple of my favorite projects! These are projects I have been making them for many years. This month's Stampin Friends Blog Hop Them is Rewind & Redo. Take something old and redo it to something new. How fun is that??? If you hopped from Tiziana Milano's blog, wasn't her projects AMAZING?? Be sure to continue to Kim Lamos after mine. And be sure to leave a comment I'd love to hear what you think! We have a packed hop with amazing projects so be sure to visit everyone. I have a provided a list of hoppers at the end of this blog. I knew right away the card I wanted to redo was the Triangle Flap Pocket card. And a go to box that I've made in different ways over the years. Now sadly I have searched for my original project and couldn't locate one. Which is crazy because I've made it so often! 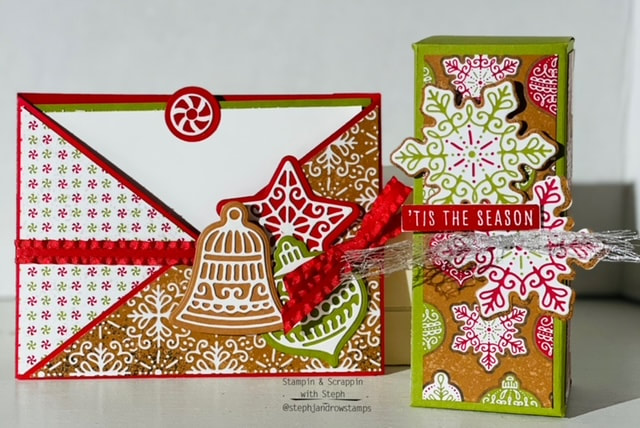 I used the brand new, not yet, available, Frosted Gingerbread Suite....It's just so stinkin' fun. I have never been successful baking or decorating gingerbread, so this suite is so easy to create fun designs!! To make the card I used Real Red Cardstock as my base and Old Olive for the card insert. You will need: 2 pieces of Real Red 4 1/4x11 and 4 1/4x 6 1/4 Old Olive 4 x 5 1/4 Basic White 3 3/4x 5 DSP 4 x 5 1/4 - cut on the diagonal. Some scrap pieces of Cinnamon Cider, Old Olive and Real Red and Basic White Take the largest piece of Real Red and with the 11" side at the top of the Simply Scored Score Board, score at 5 1/2 Using you Stampin Trimmer, line up the top of the score line to the bottom corner in the cutting line and cut...this will make a triangle flap. See picture. Take the smaller piece of Real Red and with the 6 1/4 side at the top score one side at 3/4 Then line up the bottom edge of the score line to the bottom corner in the cutting line and cut the triangle. Add adhesive to the 3/4 score section and adhere to the edge on the back of the large piece and fold over to the front, this will create the second flap. Now, take your triangles cut from the DSP and adhere to the flaps, reversing one side of the DSP.
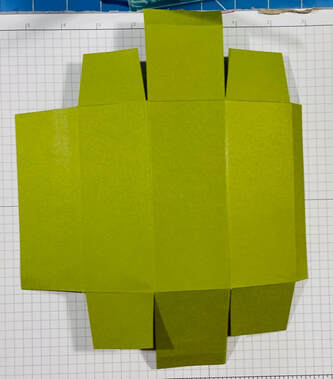 2. Cut down on the score lines to create tabs in the next section, remove the 1/2' section and then section below it then slight trim the next. 3. Keep the next sections in tact and round the corners, this will be the lid or bottom of box. 4. Repeat step 2. 5. Remove the 1/2 tab 6. Add adhesive down the remaining 1/2 strip, fold box over and seal. To decorate I cut the DSP 4 pieces 1 3/4x 4 3/o make the snowflakes, I used the dies that coordinate and cut them out using the DSP. I hope you enjoyed the projects I share with you. Be sure to leave a comment and visit everyone's Blog. Thanks for stopping by Happy Stampin Steph Below is a list of this month's Blog Hop Participants:
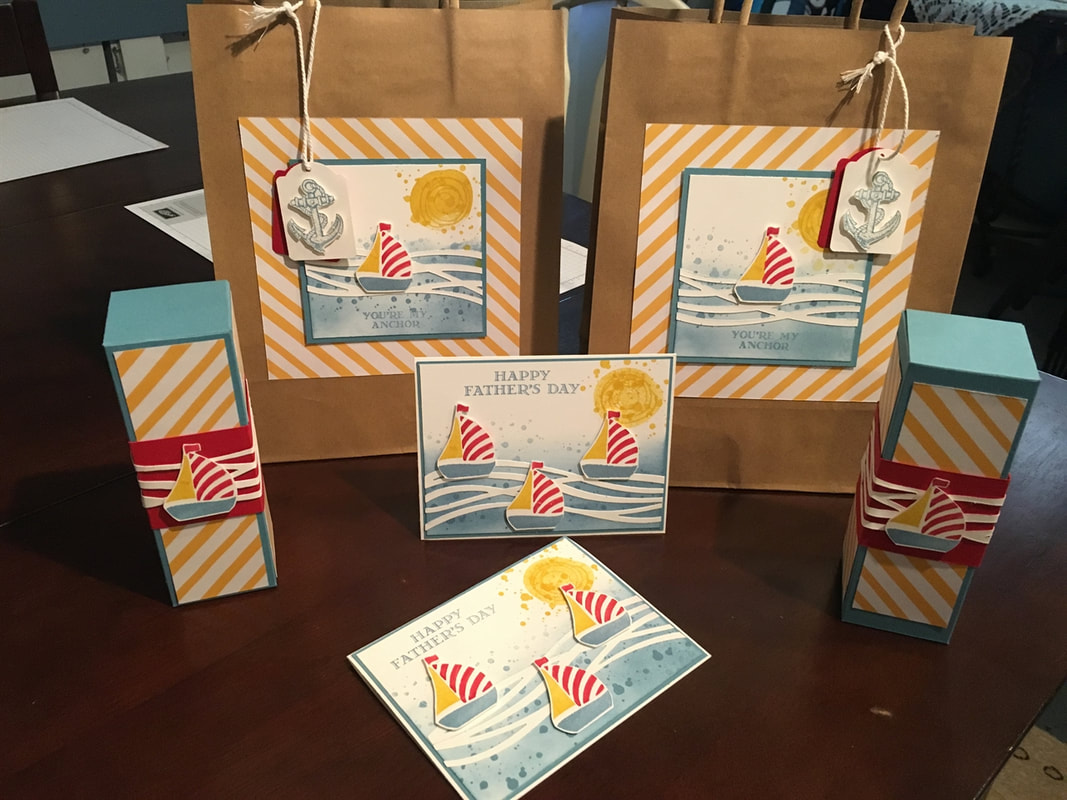
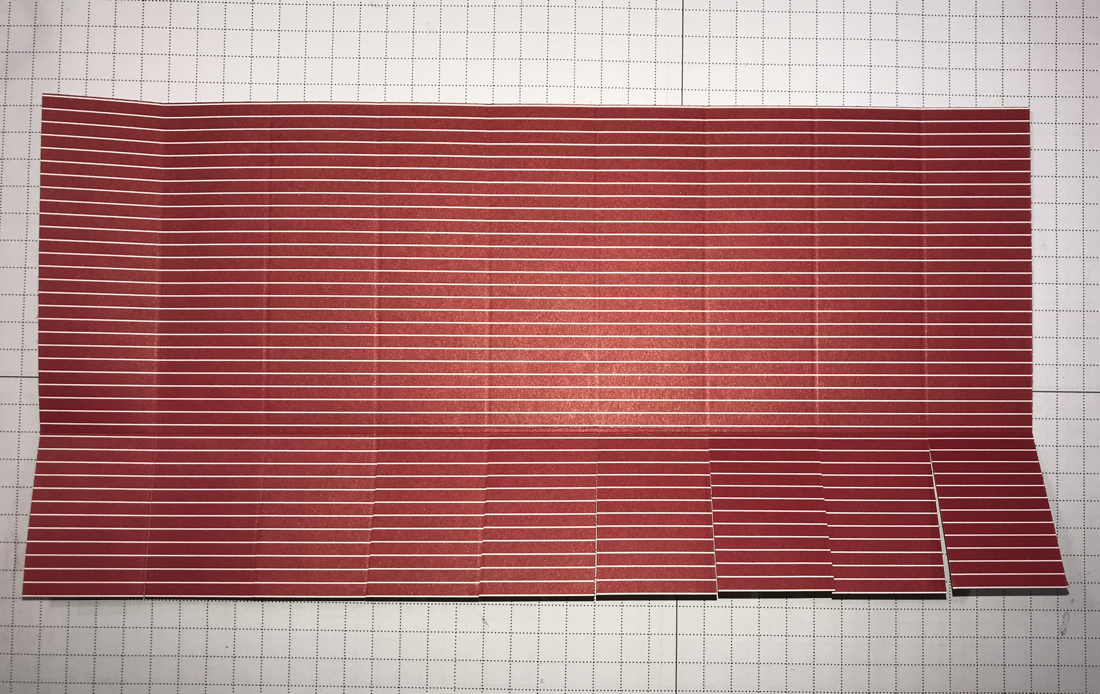
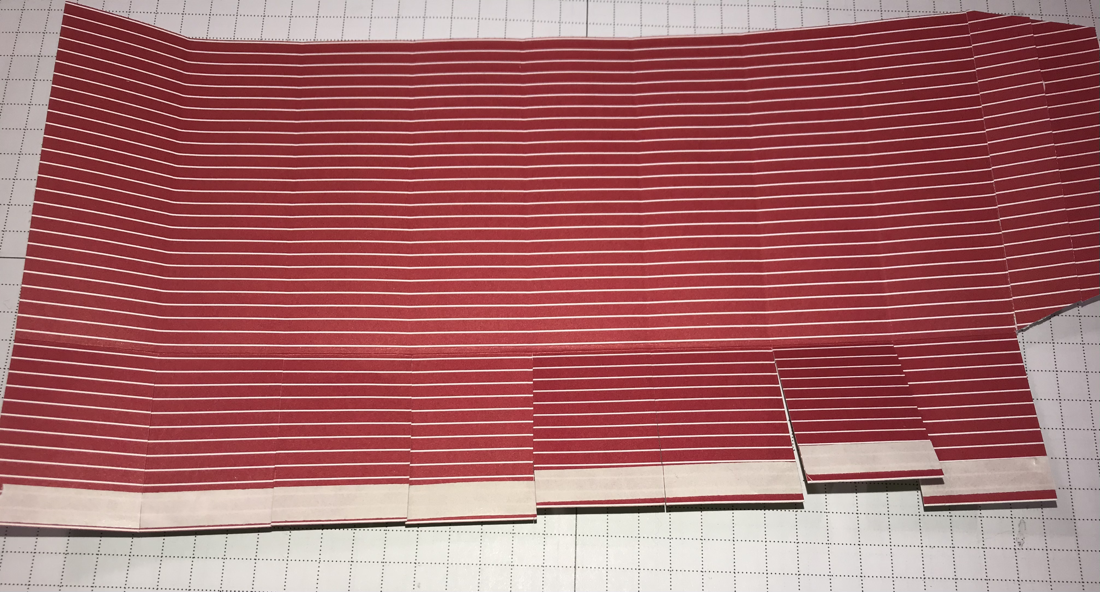
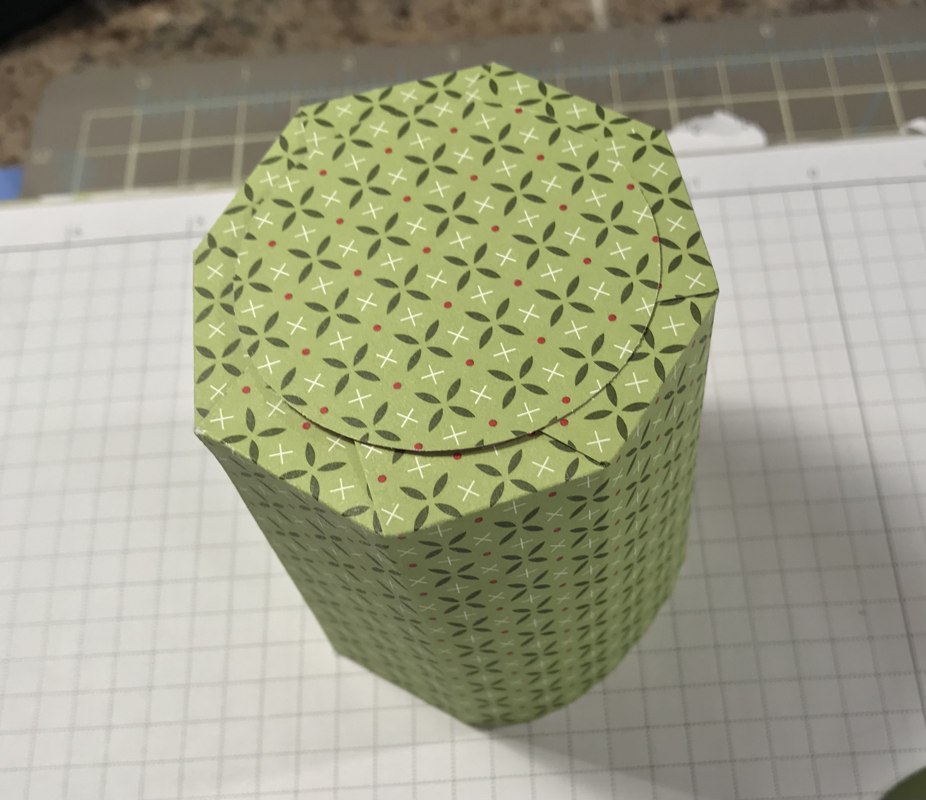
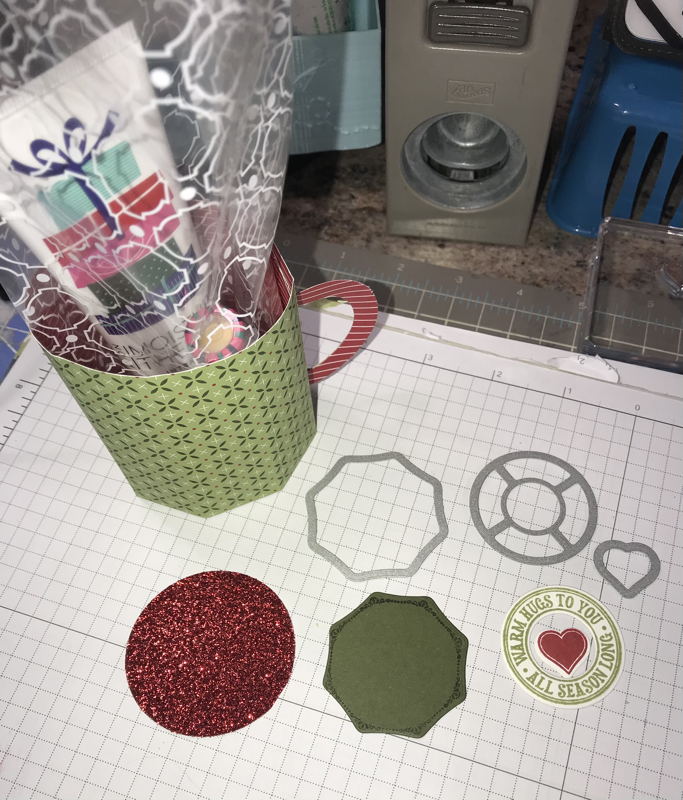
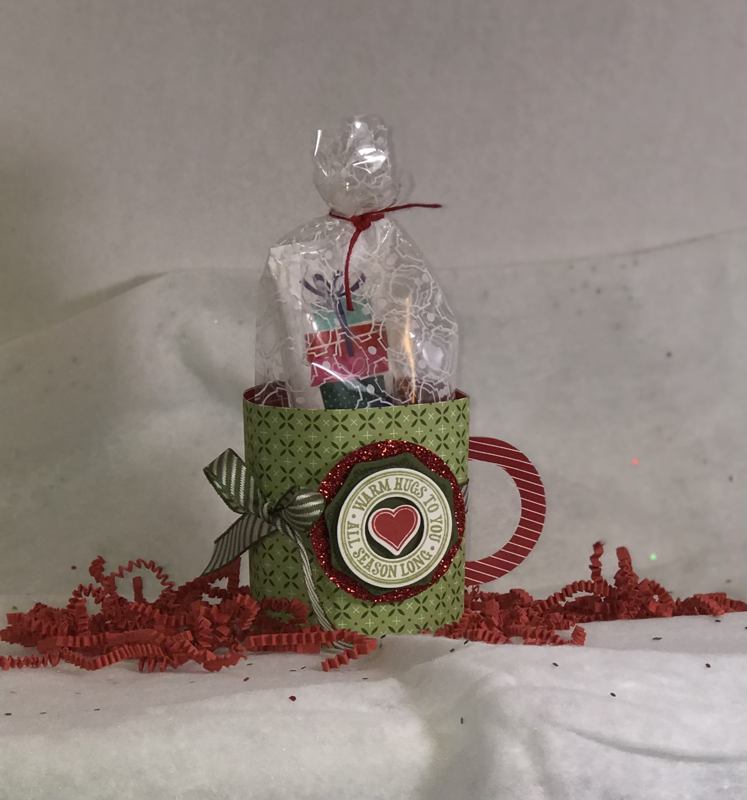
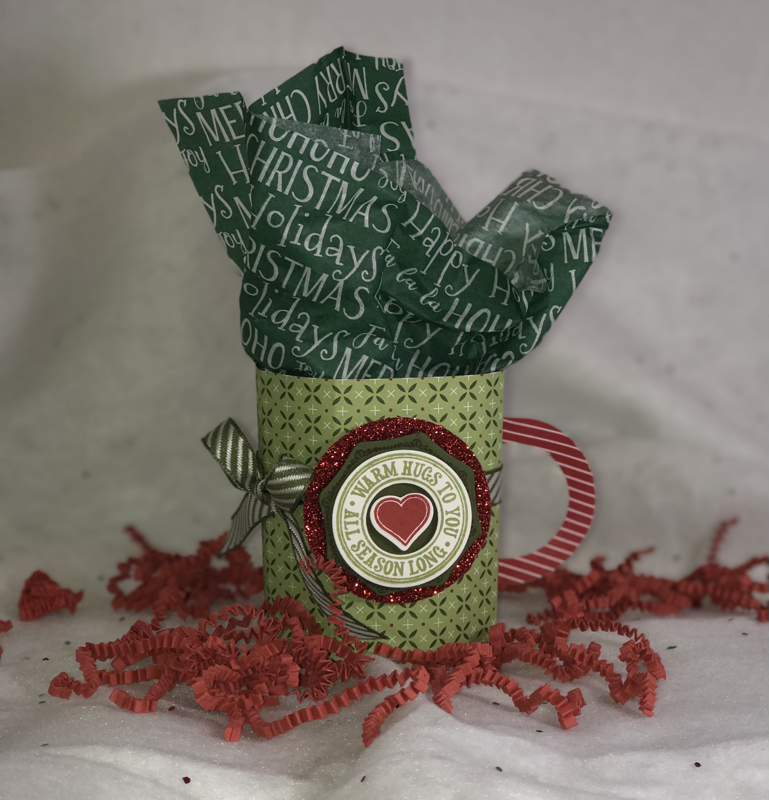
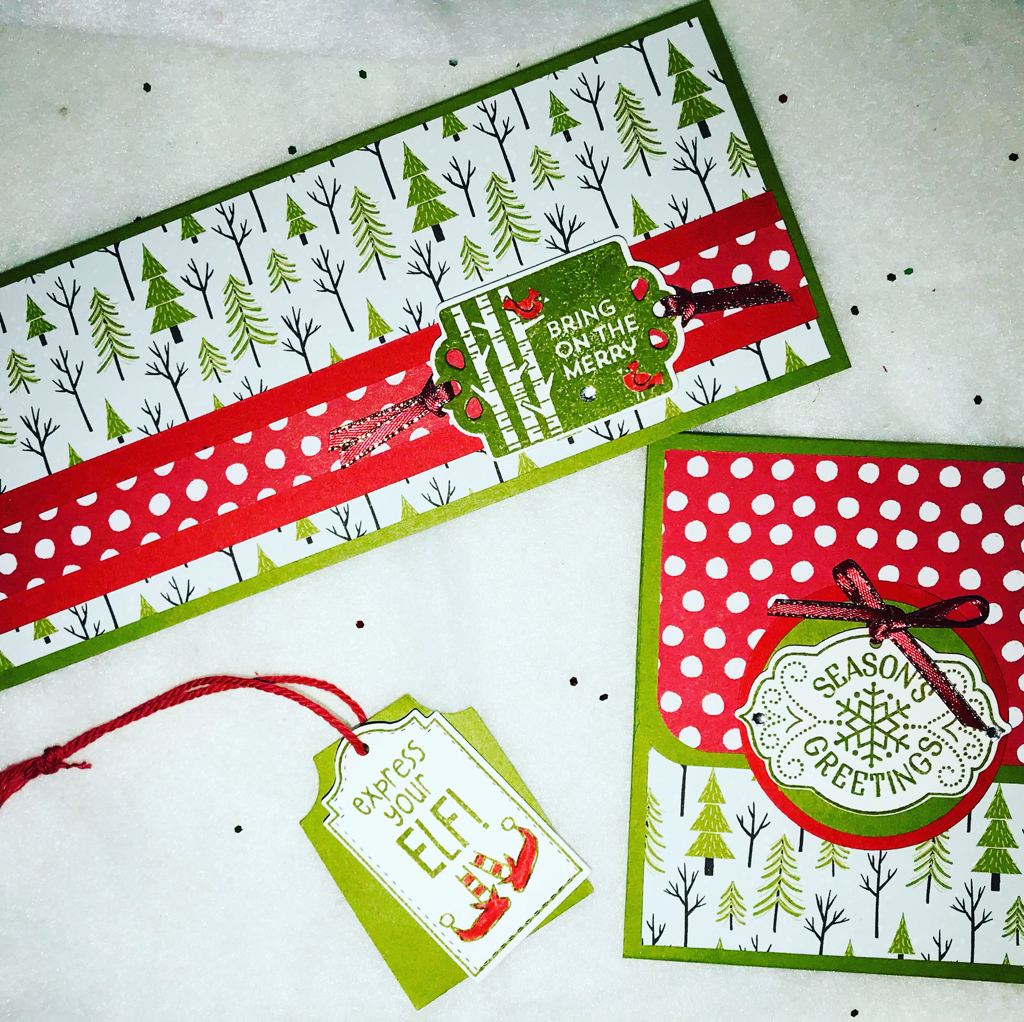 Who says money and gift cards are boring?!? Dress them up by placing them in these features holders! Add a little tag to any gift and give a plain gift bag a jolly look!! Learn how you can make these really easy gift projects with a few supplies; using 1 piece of Cardstock, 1 Tags, Tags,Tags Stamp Set and the Trimming the Town DSP! Stamp once, cut once and assemble!! Check it out below! Happy Gift Giving & Happy Stampin Steph  Welcome to the Stampin Friends November Blog Hop! You will notice as you hop along our theme is Happy Holidays! Make sure to view all of this months hoppers! You’re guaranteed to be in the holiday spirit with some crafting inspiration!!!! This is our last hop of 2020, don’t worry we will be back in January 2021. With all the craziness this year has brought us, I am so happy to be a part of this blog hop! As I look back over the last several years, I love how my crafting has evolved and improved!! I truly feel honored to be a part of this group! It’s so fun each month to stay creating, to be inspired and to continue to be challenged! And for me the best of it all, is seeing all the beautiful projects that are shared!! I look forward to each month! It’s just so exciting to hop along aside these amazing and talented ladies from all over the US, UK, Australia and Germany! If you’re a paper-crafter, with a blog, and you’re interested in joining us, please contact me! I hope you are following along with our blog hop and you came from I just love her projects, or if you're just getting started with me, you can find the full list of hoppers at the end of this post. Once you finish with my blog, be sure to continue to Tiziana Milano's Blog and make sure to leave comments so we know you visited!! We love to hear from you!! 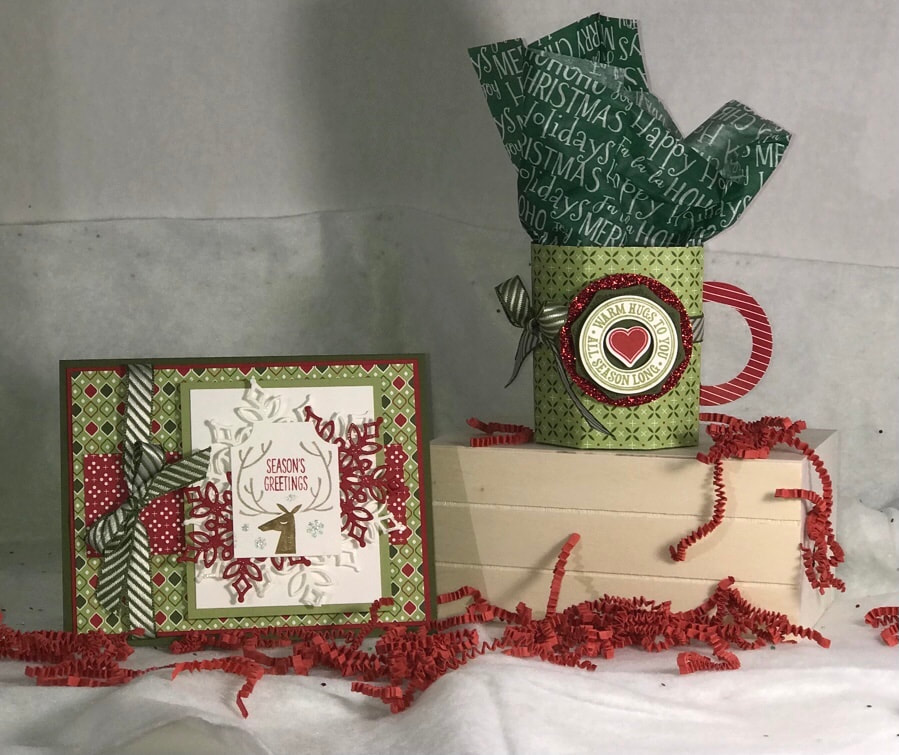 My project this month features a paper mug. I’ve been noticing these paper mugs all over Pinterest as I was searching for some packaging inspiration! I immediately shared this project with a friend who has been working endlessly on making Hot Chocolate Bombs!!! So fun and such a cute way to package a yummy treat! I used products from the Heartwarming Hugs Suite. I have also included a video showing you how to make the mug! To make the paper mug; you will need a piece of card stock or designer paper that measures 4 1/2” x 9” I used the Heartwarming Hug DSP. Now if you are using a piece of designer paper you want to have the side that is the inside of your mug face up on your Simply Scored Scoring Board. Start with the 9” side along the top and score every inch at 1”, 2”, 3”, 4”, 5”, 6”, 7”, & 8” Then turn the paper to the 4 1/4” side and score at 1 1/2” NOTE: before you score, make sure if your paper has a directional pattern that the pattern is facing the right way on the score board, the 1 1/2” line is the bottom of the mug! So when it's assembled that larger section should be facing correctly. Hope this makes sense!! Continue to have paper for the inside of the mug face up Cut the 1” score lines up to the 1 1/2” line. Then remove the bottom right corner section from the 8” score line up to the 1 1/2” line and then cut the top section at an angle....see the 3rd picture below! Add adhesive to the bottom tabs, flip over to the outside of the mug and then adhesive along that tab! Now lightly fold on the score lines as you roll the paper to adhere the sides! Attach the bottom piece overlapping each other to form the bottom! I punched out 2 - 2” circles one for the bottom and one for the inside, you don’t have to do this but it makes it look finished to me and adds a-little more support to the mug! For the handle I just layered 2 different sizes circle dies I cut out 2 glued them together and cut the almost in half! Bend the ends alittle and glue them to the mug! You could also use ovals, as well! Fill with some candy or whatever treats you like! I added some lotion and lip balm in a pretty bag! I used the Warm Hugs Stamp and coordinating Warm Wraps dies to make the greeting on the front and I also cut the Real Red Glimmer paper using a 2” punch! You can refer to the pictures below for more details! What do you think?? So fun!!! And so EASY. In order to accomodate the size of the Hot Chocolate Bombs, I had to adjust my measurements, but I will show that as another post when I make the final version! I can’t wait to make a bunch for my friend to package her goodies in! And now my card!!! Super easy layers! I used the same paper pack Heartwarming Hugs DSP and chose a couple different patterns. Start with a Mossy Meadow card base 4x5 1/4 piece of Cherry Cobbler DSP that measures 3 7/8”x 5 1/8” DSP that measures 1 1/2”x 4 3/4” 3”x3 1/2” piece of Pear Pizzazz 2 3/4”x3 1/4” of Whisper White Adhere the DSP onto the Cherry Cobbler add then add the DSP strip, wrap some Mossy Meadow Diaganol Striped Ribbon around the left side and tie in a bow, before adhering to the card base. I stamped using on a scrap piece of white using the Everything Essential stamp set. To get the different colors I used my Stamp n Write markers. I colored the stamp, the huffed on it to moisten and then stamp! So cool right? Then punched it out with the Tag Punch. I die cutted a few snowflakes from a retired set called Snowfall, I’m sorry I don’t have any news ones! And layered behind the tag before adhering to the card. 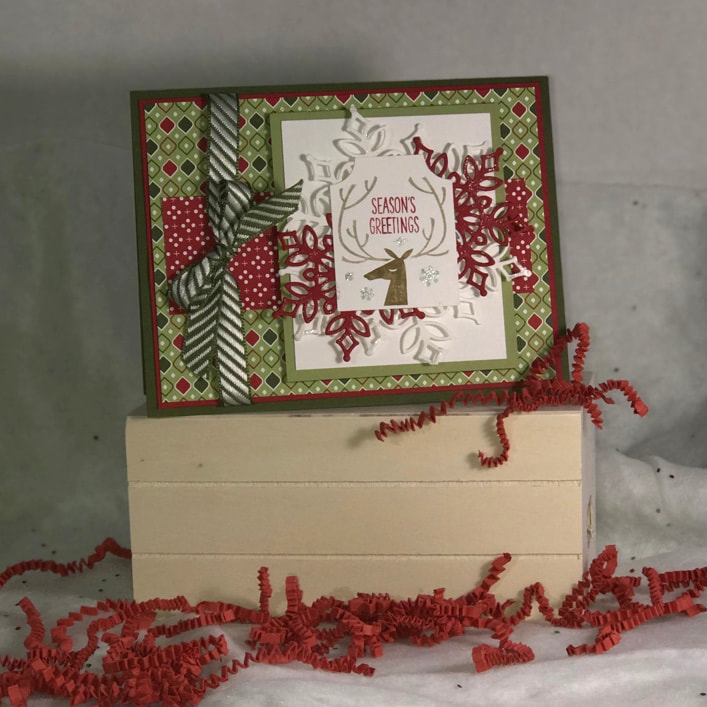 You can see below I have to cards, one with Real Red Braided Linen Thread and one with ribbon! Which one do you like better??? I can’t decide!!! 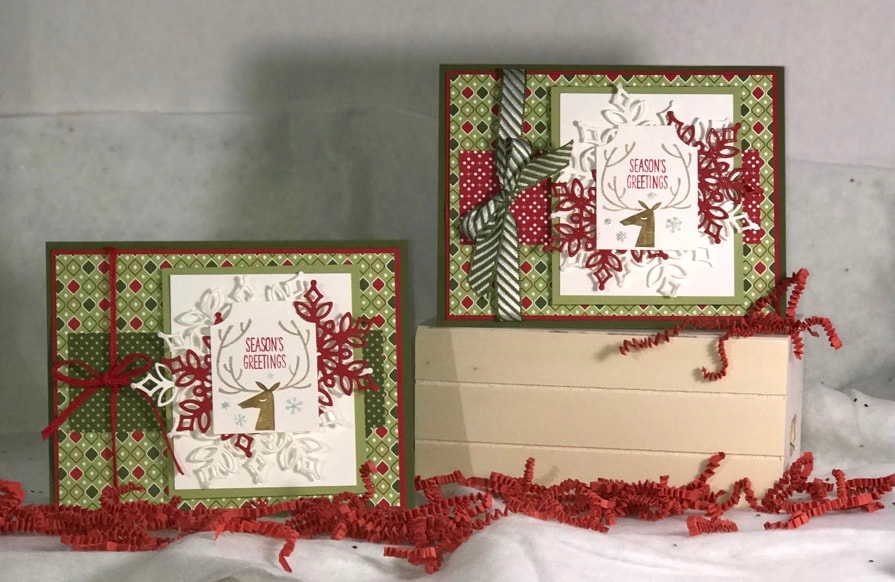 Thank you so much for joining me today!! I had so much fun creating my projects I hope you enjoyed them!!! Be sure to continue to Tiziana Milano’s blog for her awesome projects!!! Thank you again Happy Holidays & Happy Stampin Steph Below is a list of participants in this month’s Blog Hop. Be sure to visit everyone’s and leave a comment we love hearing from you!
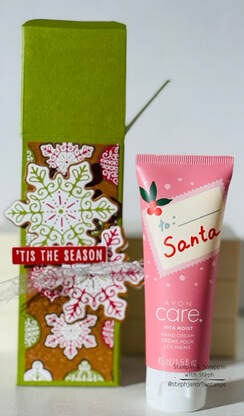
 We’re all papercrafters, here. And that means visions of sugarplums (and Christmas crafting) start dancing in our heads as soon as October hits. I can help you get those visions translated into reality by planning now to create handmade packaging for your family and friend! Keep it simple or make it fancy. All that matters is that you add a bit of yourself to your giving this year by making it handmade and heartfelt. CASUAL The standout on this sweet Christmas packaging is our adorable, rustic tag. And trust us—once you make the first one, creating multiples is easy. Tip: Besides using the ripped paper technique, stamp off the solid trees to add depth. Once you finish stamping, tie the tag to the Mini Shipping Box with a bit of Linen Thread. So cute! AVID We fancied up our second tag by adding a variety of stamped embellishments. Just run the stamped images through the Stampin’ Cut & Emboss Machine with the Warm Wraps Dies, then adhere them with Stampin’ Dimensionals. We also added die-cut Real Red Cardstock trim along with open-weave ribbon and gold metallic trim from the Forever Greenery Trim Combo Pack for extra charm. ARTFULLY AVID We stepped up our final project by embossing the tag with the Wrapped in Texture Embossing Folder. We then adhered pretty wreath sprigs and finished with a bit of ink splattering using the Aqua Painter. This tag is so festive you could almost hang it on the Christmas tree! Regardless of the type of crafter you are, we have something for you!!! Contact me to get your gift packaging into a reality Happy Packaging Happy Stampin Steph 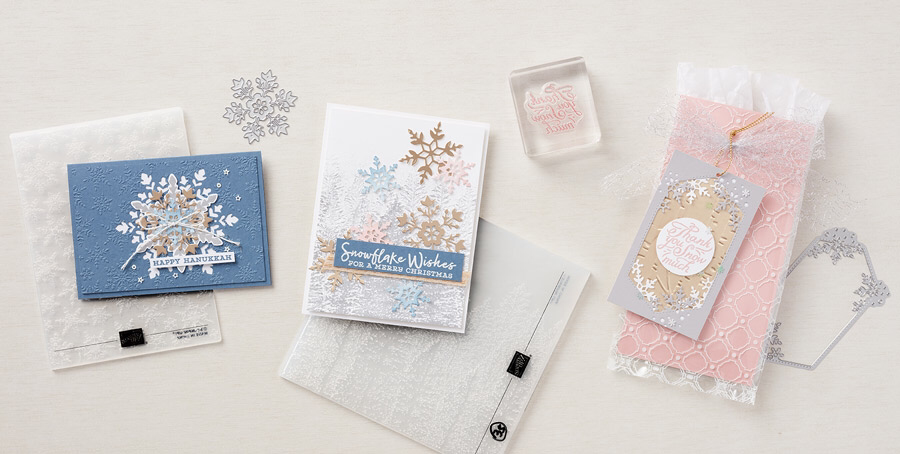 Nature has many ways of showing off her genius, and one of the most notable examples is found in the delicate patterns of snowflakes. Stampin UP’s concept artist decided to highlight the whimsical beauty of these fabulous ice crystals using the So Many Snowflakes Dies (item 153560), a variety of embossing folders, and subtle, pastel color combinations to create truly breathtaking cards—which can be easily adapted to suit any winter occasion.
To make the watercolor snowflake accents featured on the Happy Hanukkah and Snowflake Wishes cards, we simply applied Blushing Bride and Misty Moonlight ink to the die-cut snowflakes using Sponge Daubers (item 133773)—replicating the soft hues of a wintry, twilight sky. Our artist enhanced the texture and beauty of these cards using the Winter Snow (item 153577) and Evergreen Forest 3D (item 153576) Embossing Folders, respectively. To create our Thank You Snow Much gift bag, we embossed Brushed Metallic Cardstock (item 153524) using the Woodland Embossing Folder (item 152881) and added peek-through snowflake die-cut pieces for extra charm. Who wouldn’t love to receive this darling gift bag, tied with a 1-1/2" (3.8 cm) Metallic Mesh Ribbon (item 153550)? This project would also make the perfect host or booking gift! How many ways can you showcase the beauty of snowflakes with your cards and 3D projects? Remember to share them in the comments or on Facebook Page Stampin and Scrappin with Steph, so we can all enjoy them! Happy Stampin Steph 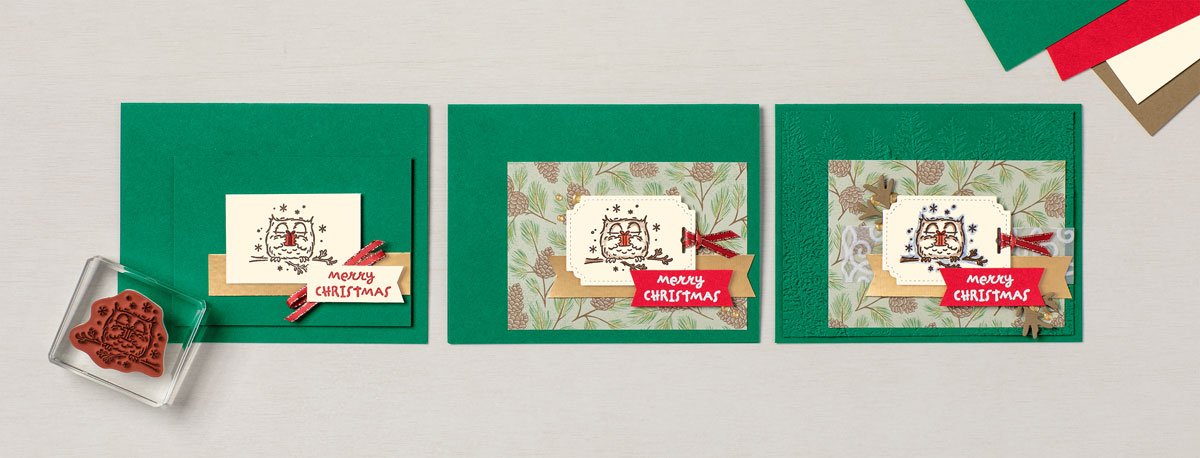 HAVE A HOOT STEP-BY-STEP
CASUAL Kept things simple on the first version of this cute card. A few simple layers, a splash of color, ribbon, and a sentiment popped up using Stampin’ Dimensionals. This cheerful, little project takes just minutes to make and would be the perfect solution for a casual crafter. AVID Step up the charming second card by running the tag through the Stampin’ Cut & Emboss Machine using the Peek-A-Hoot Dies for a stitched-edge look. Fold the gold-trimmed satin ribbon in half, insert the ends through the hole in the tag, then pull them snugly through the loop at the end of the ribbon. Add a little extra pop to this card with a layer of Poinsettia Place Designer Series Paper, some Gold Glitter Enamel Dots, and heat embossing. STEPPED-UP AVID Our fanciest card is a real hoot. Emboss the card front using the Stampin’ Cut & Emboss Machine and the Evergreen Forest 3D Embossing Folder, adhered die-cut branches, and added a strip of Plush Poinsettia Specialty Paper. Perfect! Whoo wouldn’t love to have a Christmas cardmaking party featuring these cute, outdoorsy cards? I certainly wood . . . er . . . would! You can find the Have a Hoot Bundle here! #stampinup #giveahoot #stampinandscrappinwithsteph Happy Stampin Steph 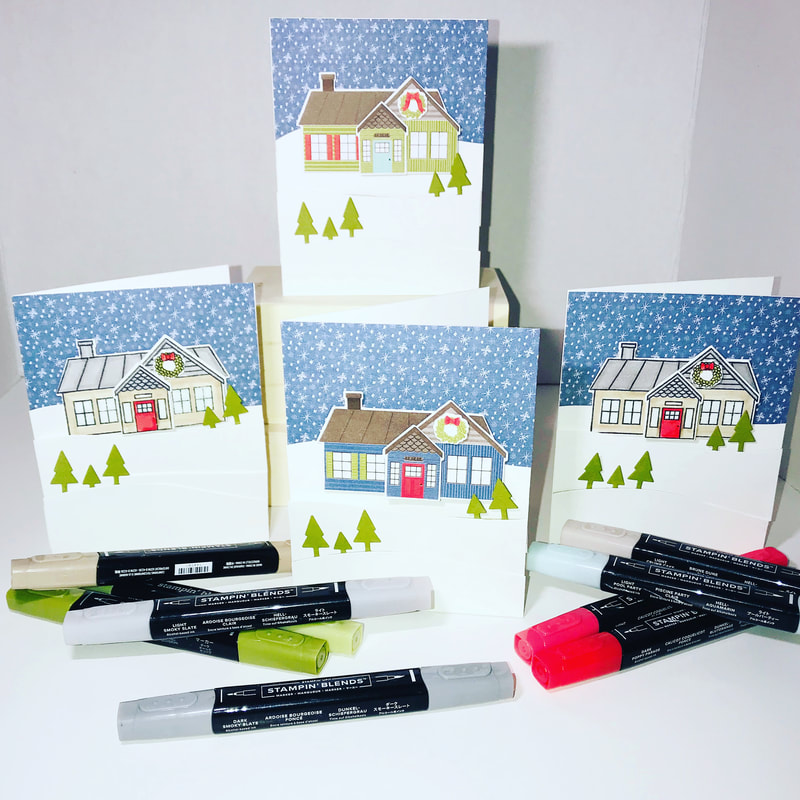 My cards feature a new suite that will be available August 4th!! I made the cards using the Trimming the Town DSP, Coming Home Stamp set and Home Together Dies! And what’s so cool, is the home dies will cut out the houses that are on the DSP! Love this!! But can you tell which houses I colored with the Stampin Blends and which are cut out from the DSP! Either way, they look great!!!!
The new Trimming the Town Suite captures the feel of a hometown holiday with whimsical imagery and coordinating trimmings! And in the spirit of the season, you can make a difference in your community by purchasing the Coming Home Stamp Set. The Coming Home stamp set is part of Stampin Up’s Making a Difference, purchase the stamp set as part of the suite, bundle or individually and $3 will be donated to charities devoted to adoption, foster care and infertility! You can make a difference today!!! Check out this fun holiday suite on pages 24-26 of the new mini catalog! Don’t have a catalog? Contact me today for yours!!! #trimmingthetown #makingadifference #stampinup #stampinandscrappinwithsteph @stephjandrowstamps Be sure to leave a comment, and I will choose 1 lucky person who will receive a complete card from me! Happy Stampin Steph 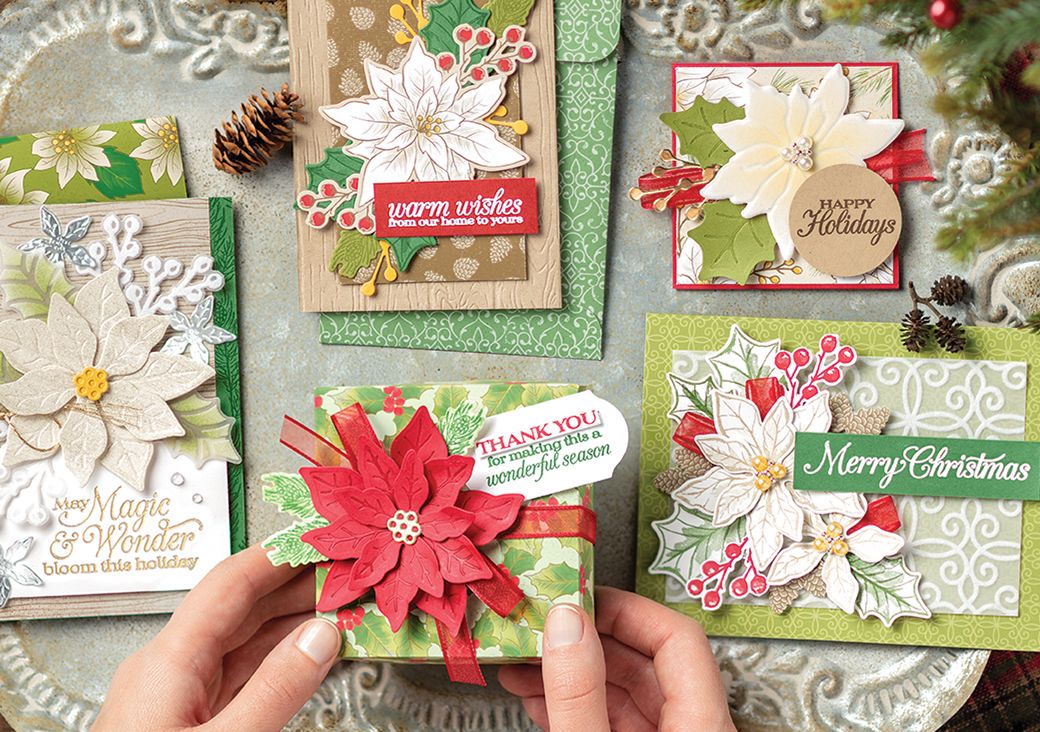 Nothing says class Christmas like these pretty seasonal blooms in a traditional color scheme. Create soft, tone-on-tone poinsettias that embody elegant beauty! The Poinsettia Place Suite features coordinating colors of Real Red, Old Olive, Garden Green, Bumblebee and Soft Suede. Poinsettias, pinecones and holly combine with subtle visual texture for a rustic feel. Some images in the Poinsettia Place Designer Series Paper can be cut using the Poinsettia Dies. Or layer behind the Plush Poinsettia Place Specialty Paper for an elegant look. The Poinsettia Place Suite includes 6 beautiful coordinating products: Poinsettia Place Designer Series Paper Poinsettia Petals Bundle (Stamp Set and Dies) Plush Poinsettia Specialty Paper Beaded Pearls Real Red 3/8 Sheer Ribbon Each item included in the Suite can be purchased individually as well. See the quick video below and see all the Poinsettia Place Suite has to offer this holiday season! Shop the Suite today! Thanks for Stopping by Happy Stampin Steph |

New 2023-2024 Stampin Up Annual Catalog


Kits Collection


Join today

Categories
All
Archives
January 2024
|


 RSS Feed