 We’re all papercrafters, here. And that means visions of sugarplums (and Christmas crafting) start dancing in our heads as soon as October hits. I can help you get those visions translated into reality by planning now to create handmade packaging for your family and friend! Keep it simple or make it fancy. All that matters is that you add a bit of yourself to your giving this year by making it handmade and heartfelt. CASUAL The standout on this sweet Christmas packaging is our adorable, rustic tag. And trust us—once you make the first one, creating multiples is easy. Tip: Besides using the ripped paper technique, stamp off the solid trees to add depth. Once you finish stamping, tie the tag to the Mini Shipping Box with a bit of Linen Thread. So cute! AVID We fancied up our second tag by adding a variety of stamped embellishments. Just run the stamped images through the Stampin’ Cut & Emboss Machine with the Warm Wraps Dies, then adhere them with Stampin’ Dimensionals. We also added die-cut Real Red Cardstock trim along with open-weave ribbon and gold metallic trim from the Forever Greenery Trim Combo Pack for extra charm. ARTFULLY AVID We stepped up our final project by embossing the tag with the Wrapped in Texture Embossing Folder. We then adhered pretty wreath sprigs and finished with a bit of ink splattering using the Aqua Painter. This tag is so festive you could almost hang it on the Christmas tree! Regardless of the type of crafter you are, we have something for you!!! Contact me to get your gift packaging into a reality Happy Packaging Happy Stampin Steph
0 Comments
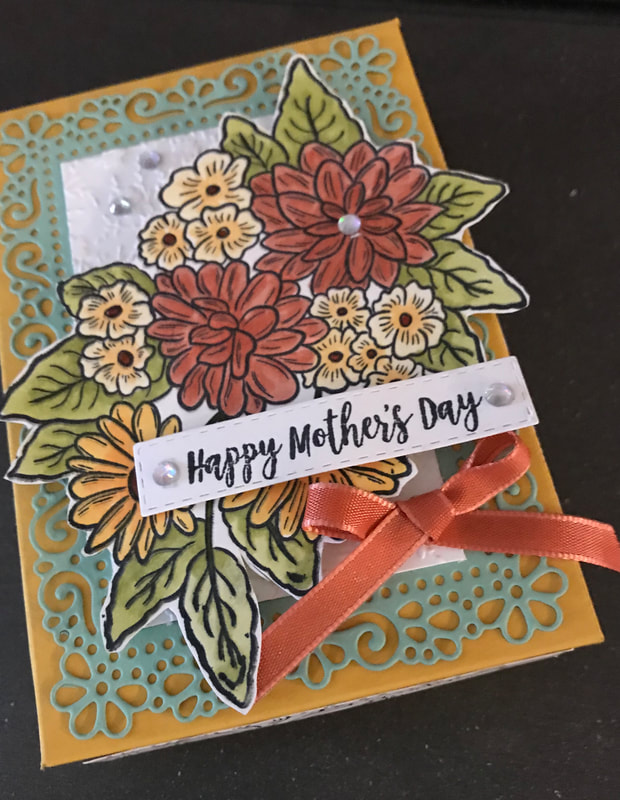
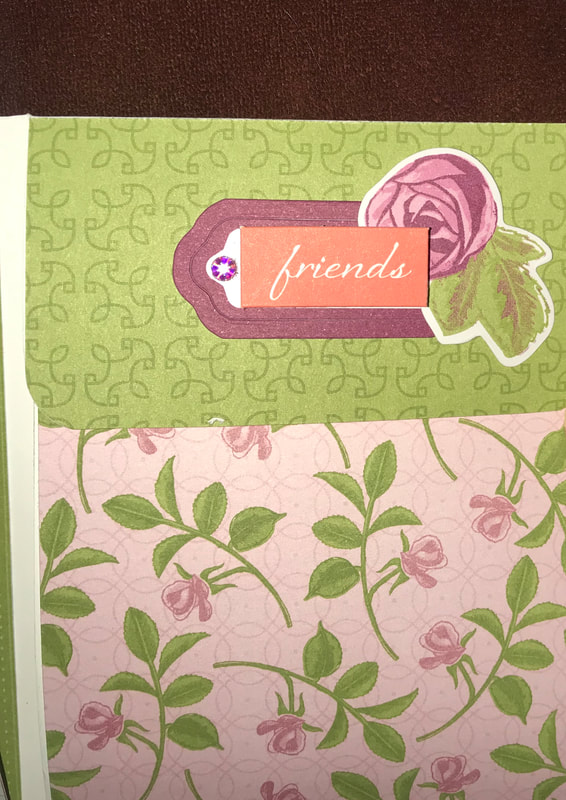
 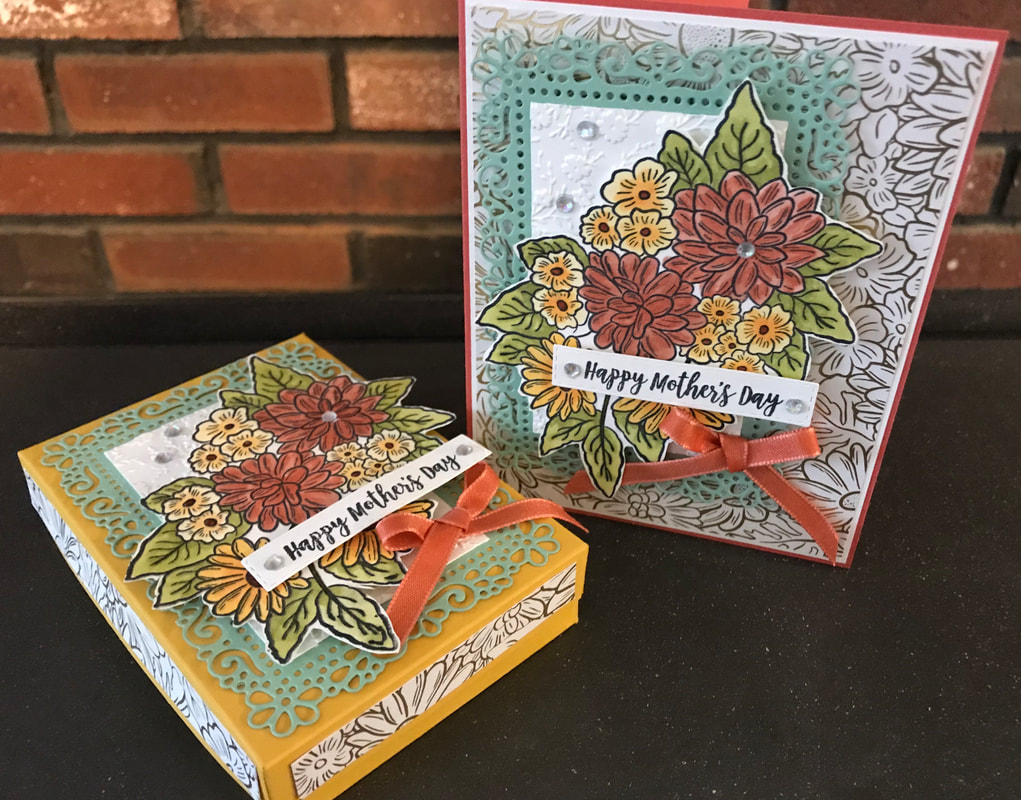 Welcome to the April Stampin Friends Blog Hop!! We are featuring Flowers and Mom's in this month's hop. Be sure to hop along and visit everyone's blogs, if you get lost, be sure to scroll down to the end of each blog to find a list of hoppers. I hope you came from Melissa Thomas, didn't you just love her projects?? So great! After you view my blog, be sure to leave a comment!!! And then continue to Jo Blackman If you are not sure whose blogs you have visited, you can find a list of hoppers at the bottom of each blog! Mother's Day is May 10, 2020 here in the USA. So I decided to not only feature flowers, but to also make my projects for Mother's Day! At this point, not sure if my projects will be hand delivered or mailed. We will just have to wait and see! I've been loving the new Stampin Up Ornate Garden Suite. I chose this suite this month because it has so many flowers in this suite. And the big flower arrangement stamp was perfect! I made this easy adorable lidded box and matching card for you! SO let's dive right in!
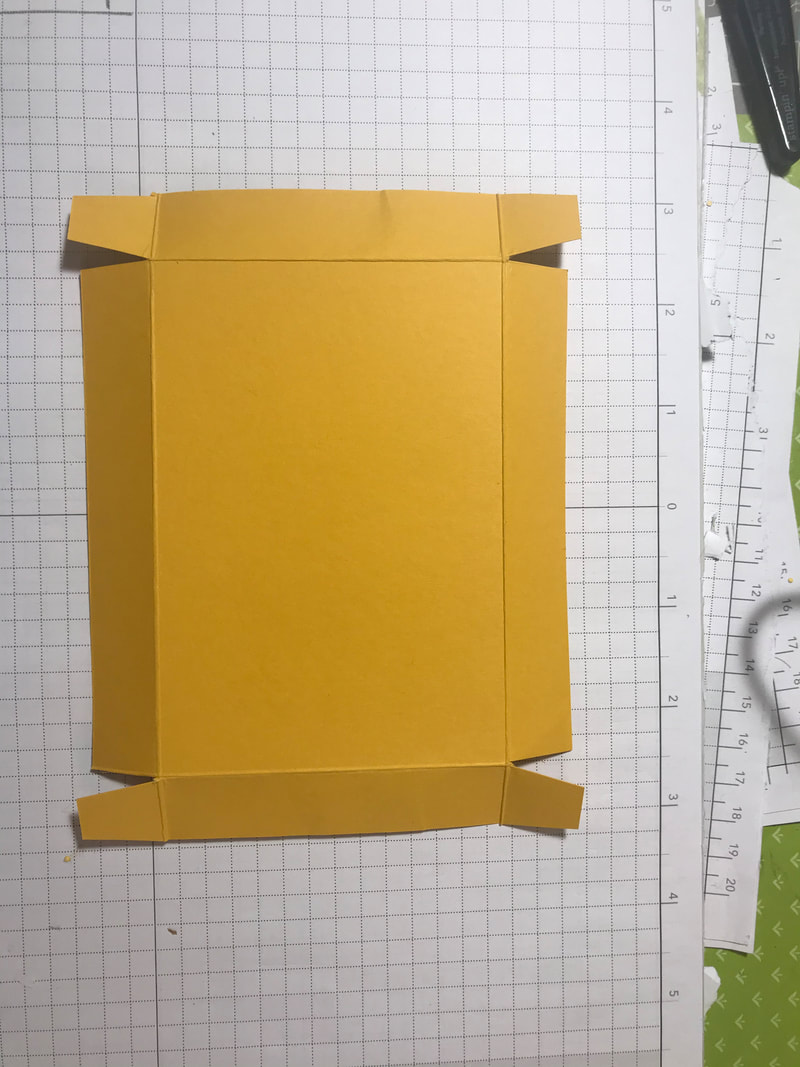
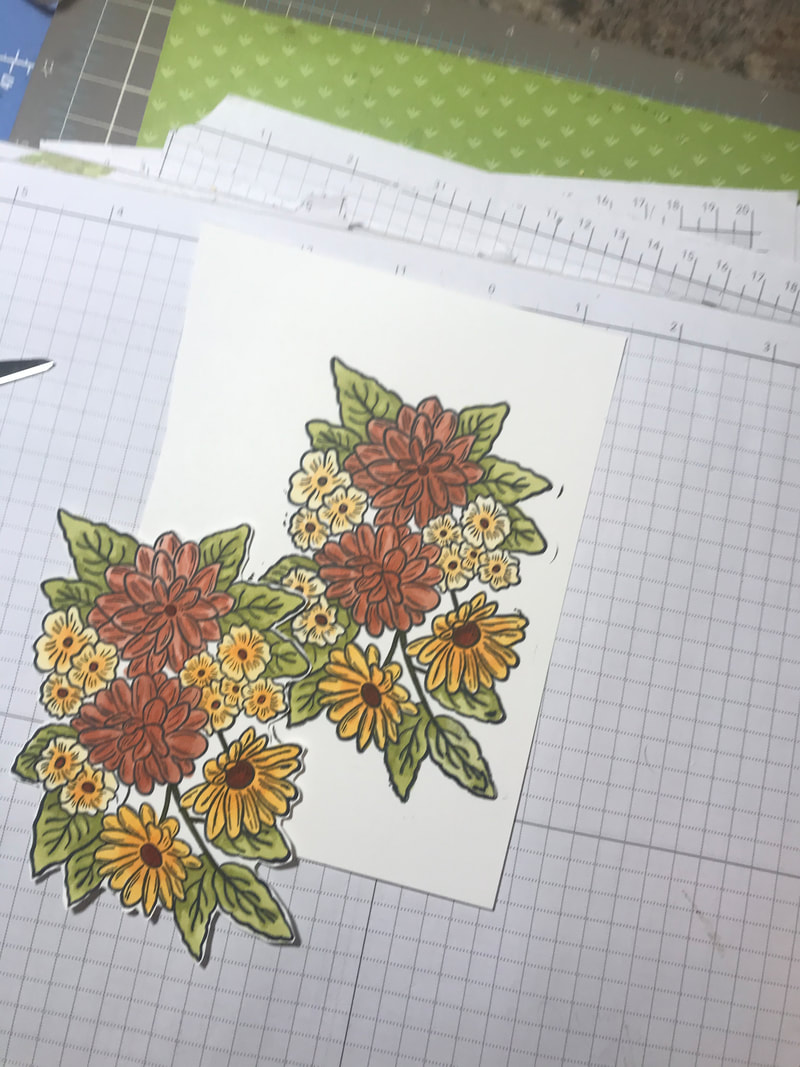
I cut the frame using the die from the Ornate Layers Dies. It is the second largest. Then I cut a piece of Whisper White to layer on top and embossed it using the Ornate Floral 3D Embossing Folder. I stamped the Flower image from the Ornate Style Stamp set in Black and colored with coordinating Stampin' Blends Markers; Calypso Coral, So Saffron, Daffodil Delight and Old Olive. Finished with some pearls and the Calypso Coral ribbon from the Ornate Garden Ribbon Combo Pack. Now I did all of this twice since I used the same design on the card. 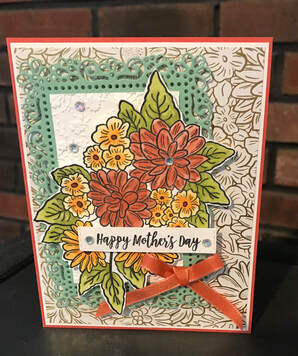 The box is a good size as you can see from the picture above, I included a travel tissue pack the and the lid goes on perfectly fine! You can tealights to this box too, so you can see just how much you can fit.
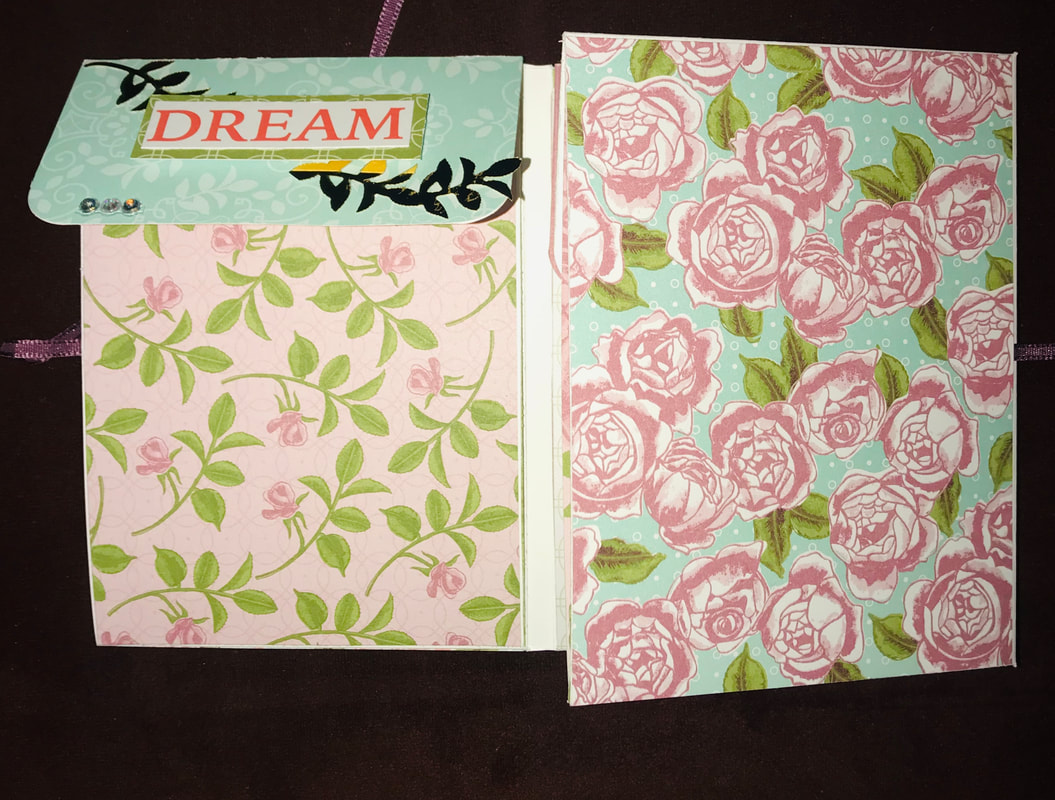
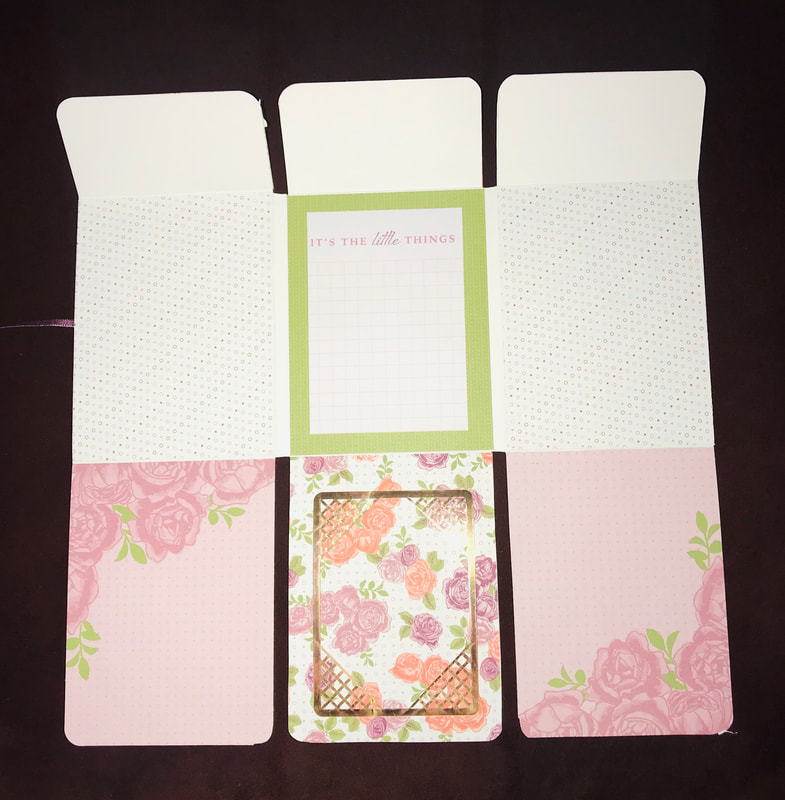
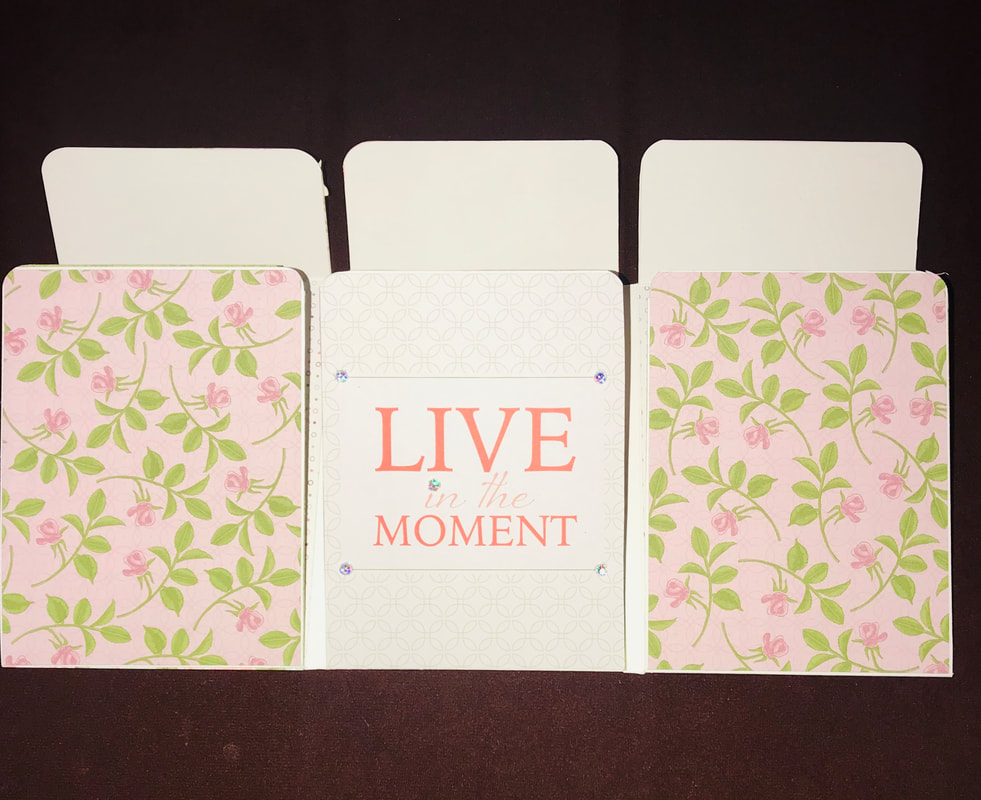
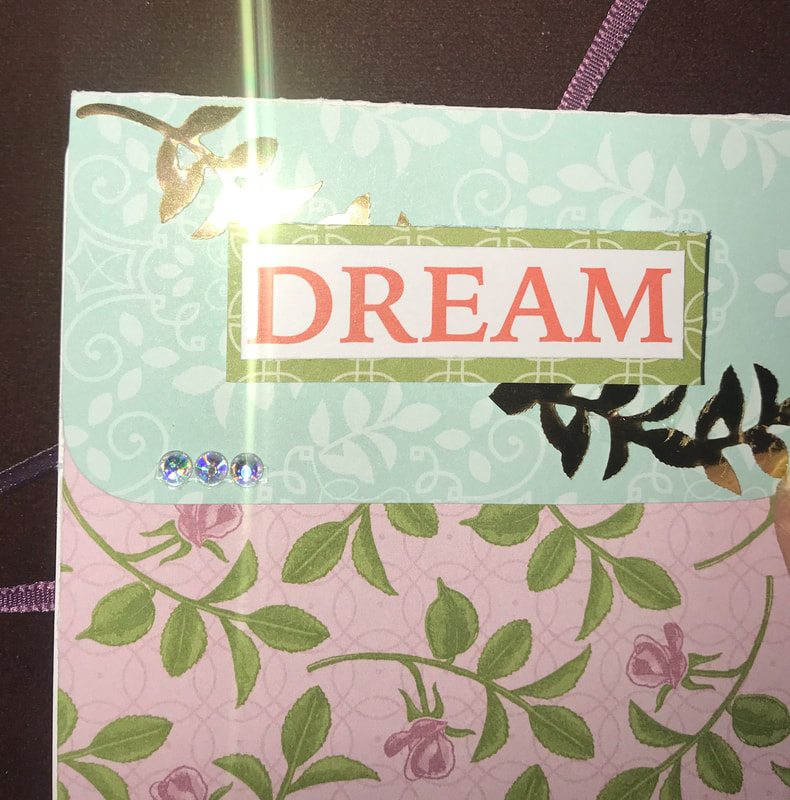
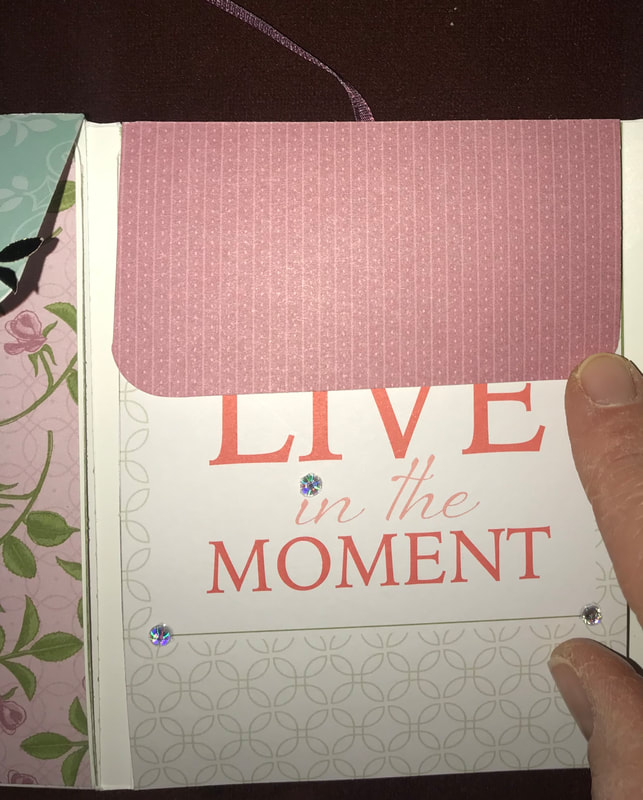
I made my card to match the box, so as I mentioned above, I stamped and cut the images twice so when I got the card, it was basically assembly. The card base is Calypso Coral. I added a layer of DSP first that measures 4 1/8'x 5 3/8". The DSP is from the Ornate Garden Specialty Designer Series Paper. I hope you enjoyed my projects today and I have inspired you to make one on your own! Please feel free to contact me with any questions!!! Be sure to check out the next blog during this month's blog hop, Jo Blackman! I'd love to hear what you think, so feel free to leave a comment!!! Take care Happy Stampin Steph  I've been working on keeping busy here. Homeschooling has had it's challenges and keeping our family doing some form of normal has been crazy....There's never a dull moment but we are doing our best. I find when I can being creative helps to keep my mind from wondering into all those "what if" thoughts! I am sure many of you can relate! Working on 3-D types of projects has always been a little bit of a challenge, finding the time and patience and sometimes supplies can hinder the projects. But now I seem to have nothing but time! And using what I have on hand has been great! Today I am going to share with you a really pretty, super easy photo brag book. I design this with my teenage daughter in-mind. She has several friends turning 16 this year, and having to be away from each other has been tough, but I thought she could put together a little memory book for them! So let's get started. This project used very little paper supplies. You could make this with one-sheet of designer paper, but I chose to use Whisper White as the background to add a little stability. I also used a retired Stampin Up paper set called Petal Garden DSP and the Petal Garden Memories and More Cards, coordinating ribbon in Fresh Fig. And I have to say, I did not stamp anything when I made the project!! And here's what you need:
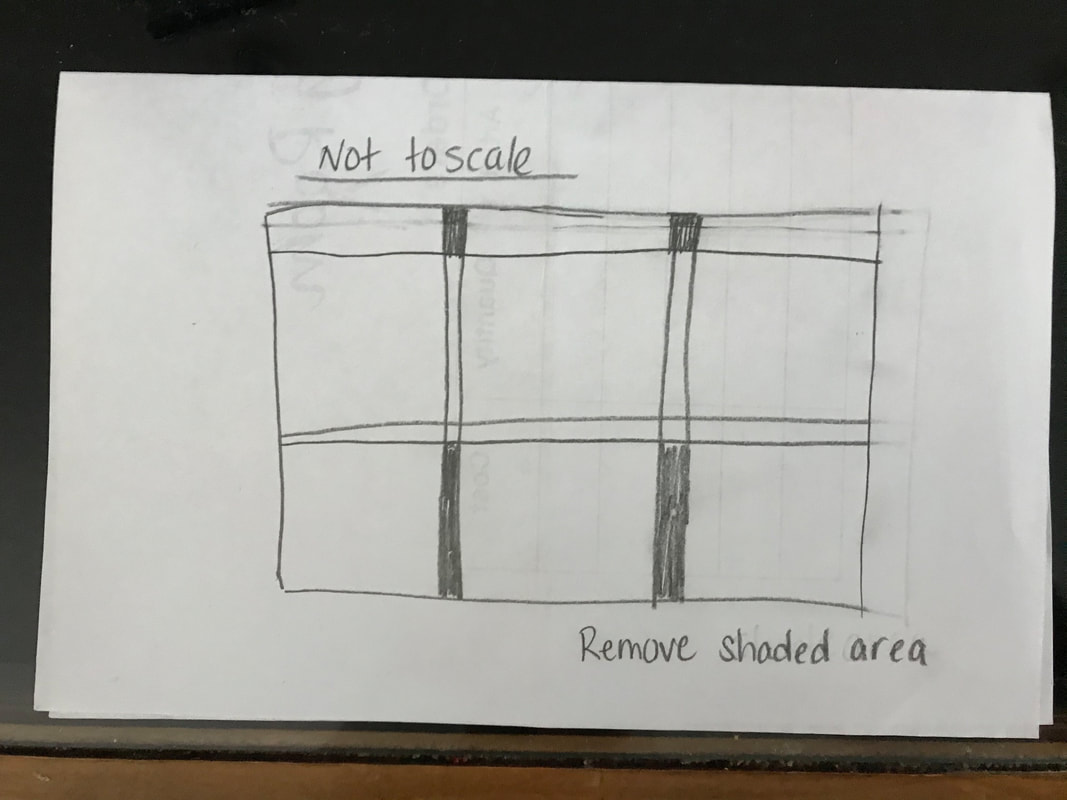
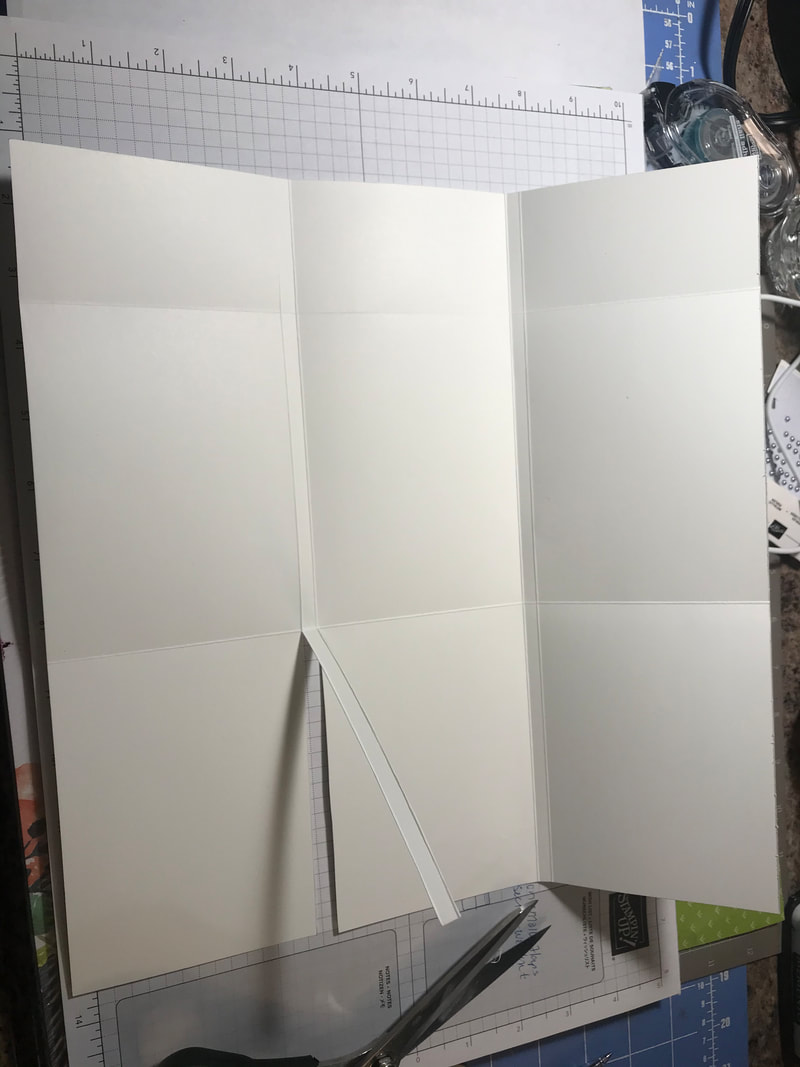
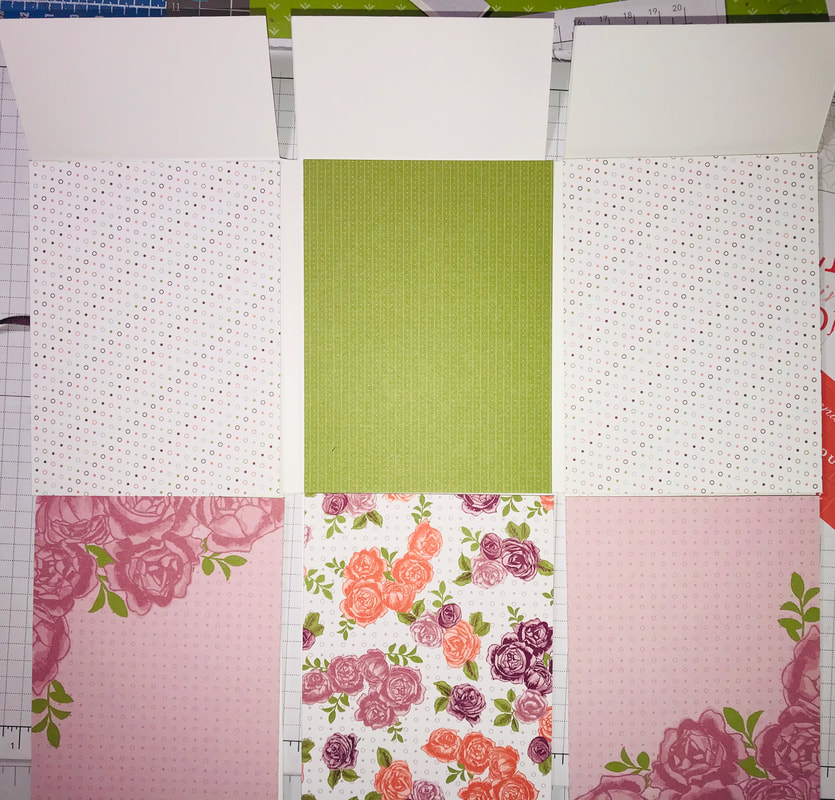
With your scoring tool and the 11 3/4" edge of the paper at the top Score at 3 3/4", 4", 7 3/4" and 8" Turn once to the 12" side and score at 5" and 10" Fold on all the score lines. The top of the brag book, is the small section, then there's the middle and the bottom The score lines are close together and create little rectangles, Remove the rectangles from the top section to the score line that begins the middle Do the same from the bottom, cut out the rectangles from the bottom up to the bottom score line of the middle section. I hope this makes sense, I have included a template so you see what I mean. Please note, my hand drawing is not to scale at all, it's just meant to give a visual of what needs to be cut. Now, we come to the fun part, the decorating! The big sections of the brag book measure approx. 3 3/4"x5". There are 12 sections; 6 on the inside and 6 on the outside (3 that fold in). I started with the front cover, first attach approx 10" piece of ribbon. Then lay the DSP on top, this is the front tie for the book. I used DSP cut at 3 3/4"x5 and trimmed a memories more card to about 3 5/8'x 4 7/8" and I also trimmed a smaller memories more card down so that just the wording was framed out. So for the front, you need:
for the sections that appear on the backside, just like the front, cover the white cardstock edge to edge so you will need;
 The backside again, I left simple. Added the DSP and a small card to add a space to write or add a photo, etc 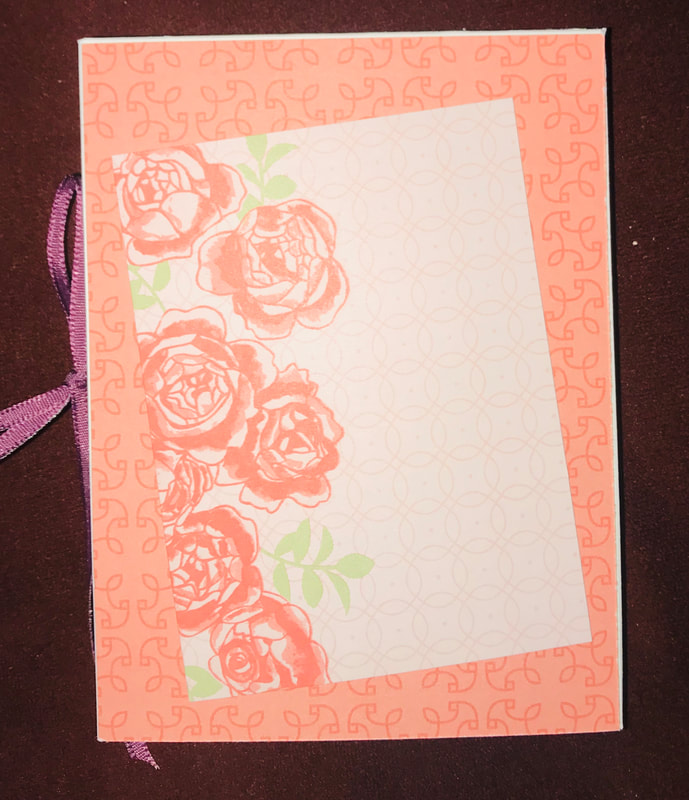 And just like that the brag book is finished. I'd say overall this took just a bit over an hour. That was probably spent decided what supplies I was going to use. But in the end this is one of those projects I am sure I will be making over and over because it's just so easy and makes a WOW projects when we are done!
I hope you enjoyed what I shared with you today! Thanks for stopping by Happy Stampin Steph 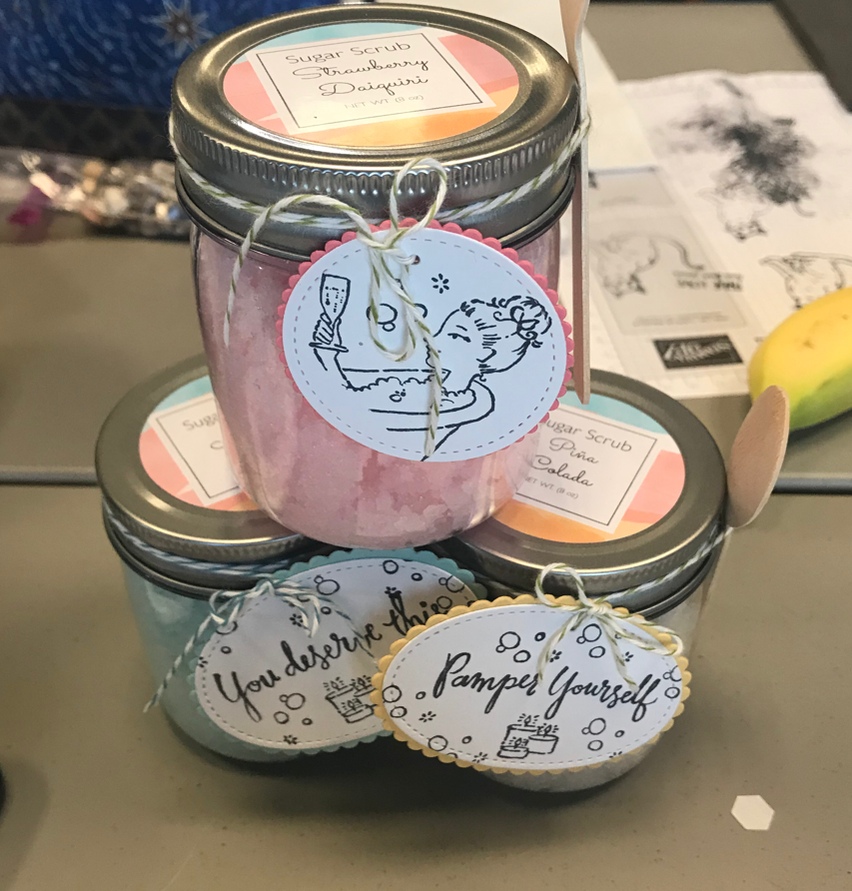 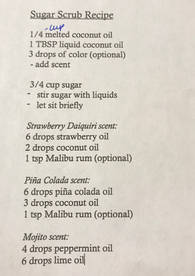 Who doesn't love a good sugar scrub???? They are super easy and affordable to make and can be dressed up for a perfect gift to that special friend, family member and teacher! Just add an adorable tag & ribbon!
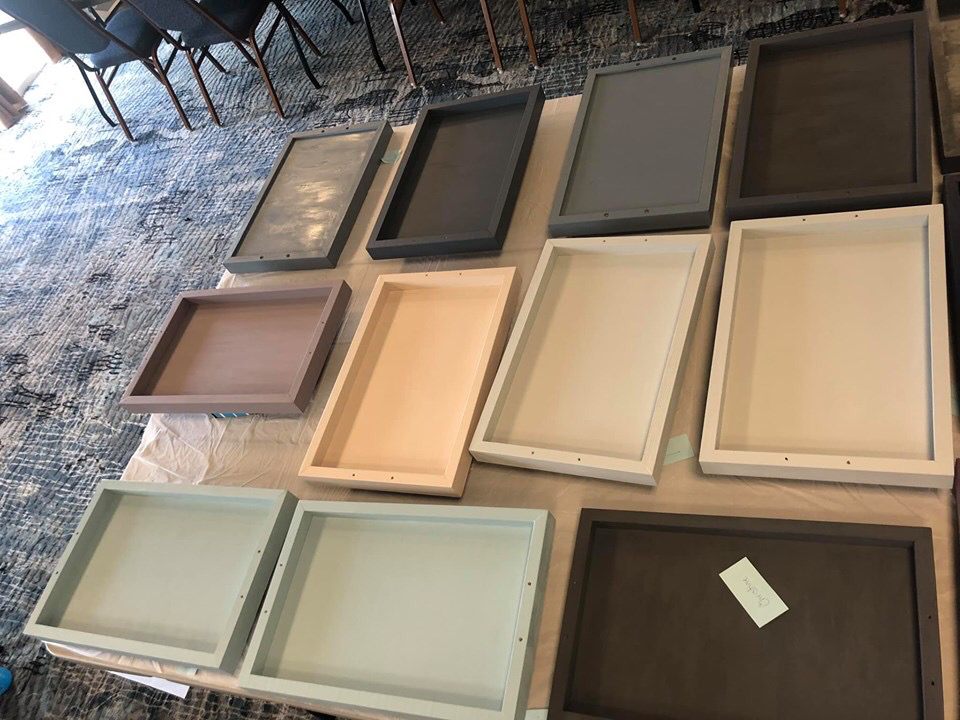
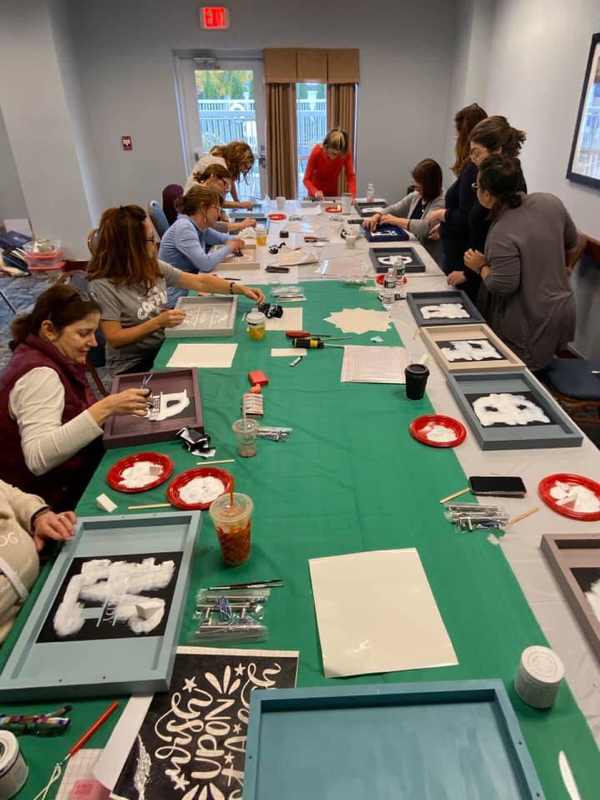
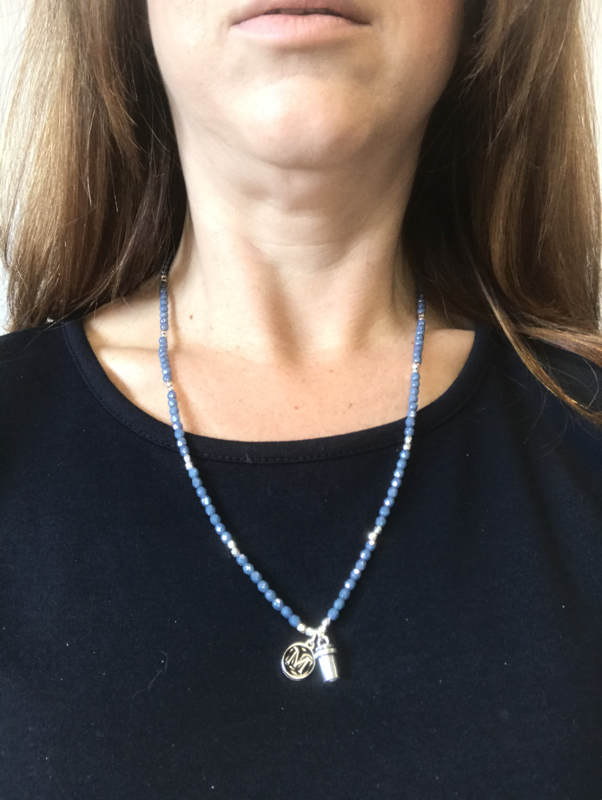
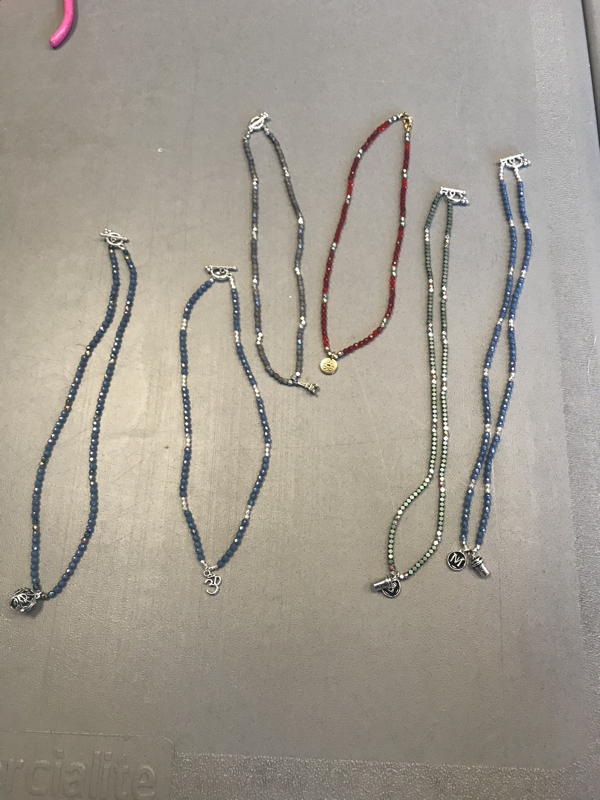
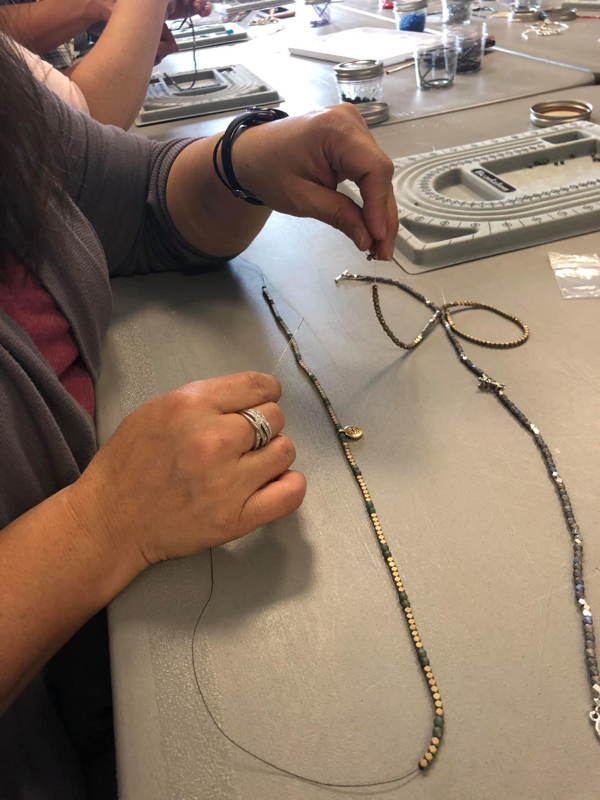
This was another class offered by The Crafting Room at the craft weekend. And OMG the scents are to die for!!!!! I would not recommend giving this to a child! As part of the recipes include adding RUM yes RUM to the mix. So I know how tempting these sweet scrubs are to taste! Just omit the rum and they are good to go!!! My favorite scent is the Mojito. I love the smell of mint so this was right up my alley! The Strawberry Daiquiri and Pina Colada also smelt soooooo good it seriously made me want the drinks!!! I just need to color my tags and these are good to go! But I have a hard decision to make! My big question is, do I keep these for myself or give them as gifts?? Enjoy!! Happy Stampin Steph 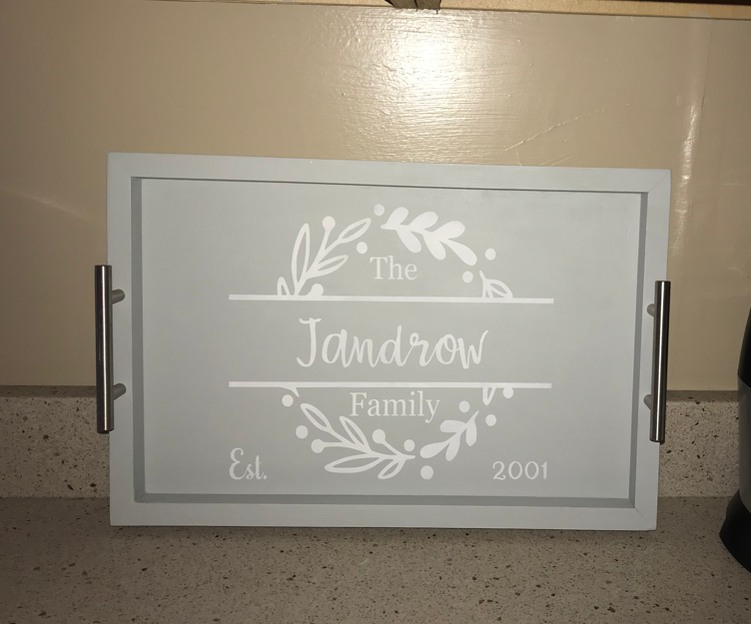 Painted wood decor is all the rave today! So I was excited to see that The Crafting Room offered a class at their craft weekend. Lara was gracious enough to bring lots of paint colors for us to choose from and gave us choice for our design prior to the weekend! Her attention to details was just awesome. Her father made the trays and they are amazing! Recessed bottom so you don't see the edges and recessed holes so the screws sit below the edge of the wood and little rubber feet for the corners to make sure the trays don't scratch surfaces! I mean c'mon!!!! AWESOME LOVE LOVE LOVE the end result and I have my tray proudly displayed on my kitchen counter!!! Thanks for stopping by Happy Stampin Steph 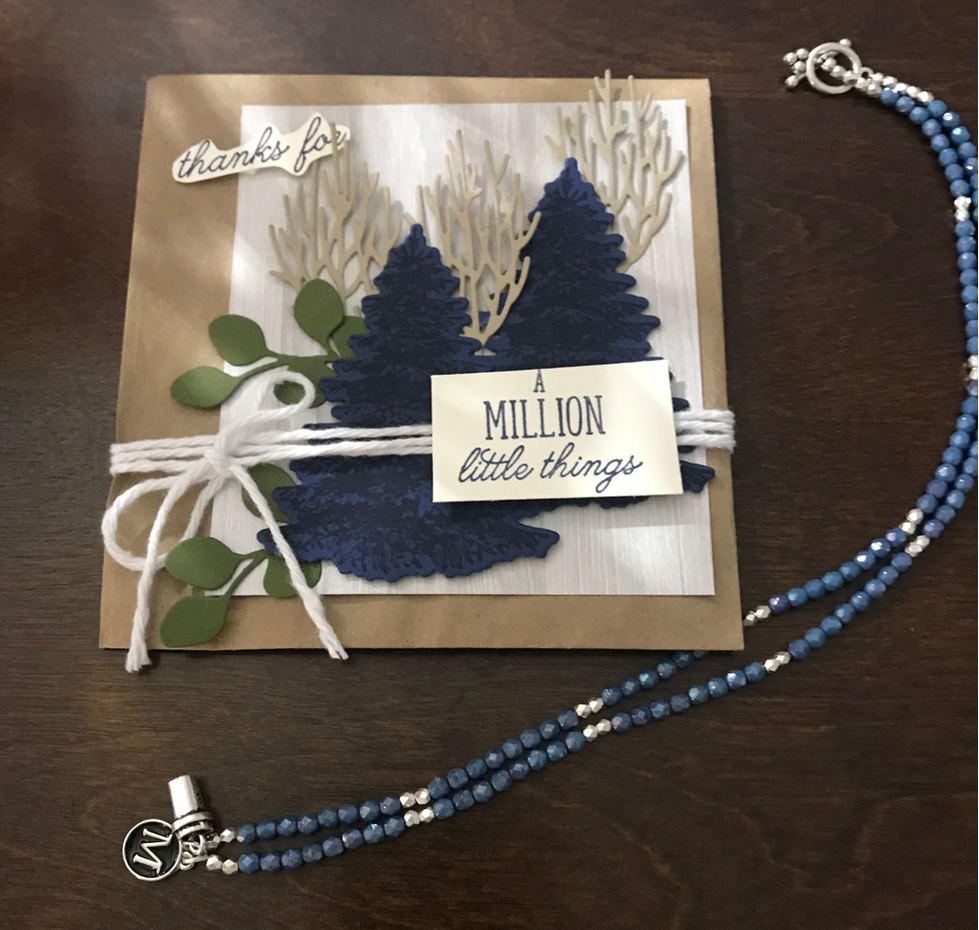 One of the classes offered at the craft weekend was making a beaded necklace! I was a little intimidated, definitely not something I would do on my own. The thought of threaded little beads onto a string had me a little stressed. But honestly this was so much fun and relaxed. We were able to pick out the colors we wanted and layout the beads to see how it would look! I can't tell you exactly what we used, because I haven't a clue about jewlery, but Michele from The Crafting Room was an awesome teacher. She kepts us relaxed as we learned each step! I made the necklace for my mom as a thank you for her staying the weekend at my house with the kids. I chose blue beads (blue is her favorite color) M for her first name and a little coffee cup, because like me she loves coffee!! I also decorated a little craft bag using the Stampin Up Winter Woods stamp set and Into the Woods Coordinating dies. I think it came out nice considering my resources were limited and this was not planned :-) I really like making the necklace, and Michele, was gracious enough to let me make a bracelet for myself! The beads are so pretty!!!!! Love it! So what do you think? Are you a jewelry maker too?? Do you think I should add this to my hobbies or stick with paper-crafting??? Happy Stampin or jewelry making :-) Steph 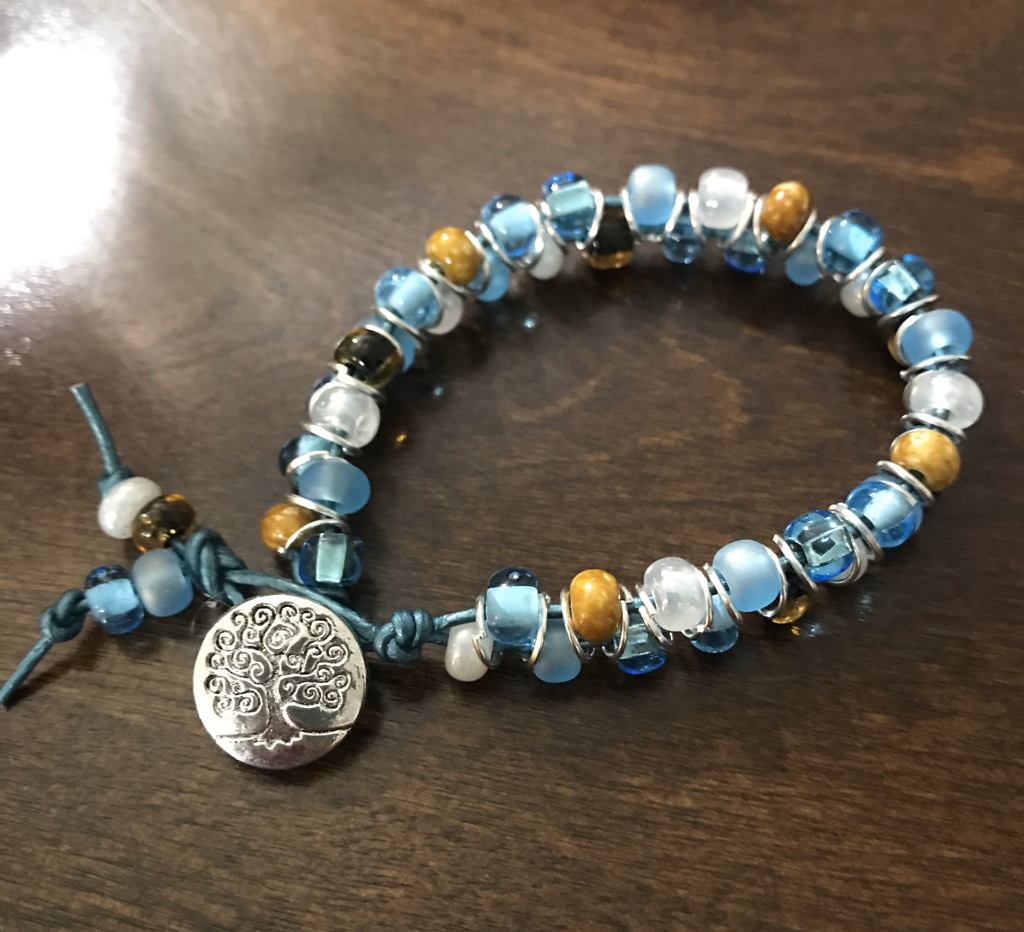  I am very honored to be a part of something amazing. A wonderful friend of mine is putting together Chemo Care packages that will be donated to a local cancer center. I offered to make the cards they will include in each kit. These are the cards I will be designing to donate! Below I have included the original Facebook Post. If you are interested in being a sponsor and donate a kit, please contact me for more details! Thank you so much and Happy Stampin Steph I am so excited for this collaboration with one of my best friends, we both know loss to cancer way to well, as many of you have, too. 💕 In honor of so many loved ones and the warriors that are fighting each and every day please consider sponsoring a Chemo Care Package. A collaborative effort between Amanda Matthews, ThirtyOne Gifts and my R+F team, “Team Hustle & Heart” every Chemo Care Package will be donated to the Dana-Farber/Brigham and Women's Cancer Center at Milford Regional Medical Center. If you are interested in sponsoring a package please let me know. Each ThirtyOne caddy will be filled with R+F Essentials Moisturizer, Essentials Lip Shield, hard candies, fuzzy socks, other necessities, and cards from the amazing Stampin & Scrappin with Steph. — with Steph Jandrow, Amanda Matthews and Craig Leger.  
Thank you for joining us on our Stampin Friends Happy Holidays Blog Hop! Holidays? Wasn't it just summer??? For us here in New England we've had our roller coaster of temperatures and rain! I'm done with the rain....lets ask Mother Nature to send the rain to California and help end these horrigic fires! If you've been following along with the hop, you can from Barbara Welch's blog!! Weren't here projects awesome!!!!
During this time of year I begin my teacher gifts. I try to stay ahead of the game on this because, and I am sure you know, you blink and Christmas is here! I've been toying with this project now for over a month ........and I have finally started it! It's going to be one of things that will take some time to get done. My son's classes switch between 2 classrooms so there is 4 teachers total! I am working on a Monthly Calendar!!! So...ya I have to come up with a theme for each month and then X 4. I am also a vendor at our High School fair soooo I am debating making some for there too!! 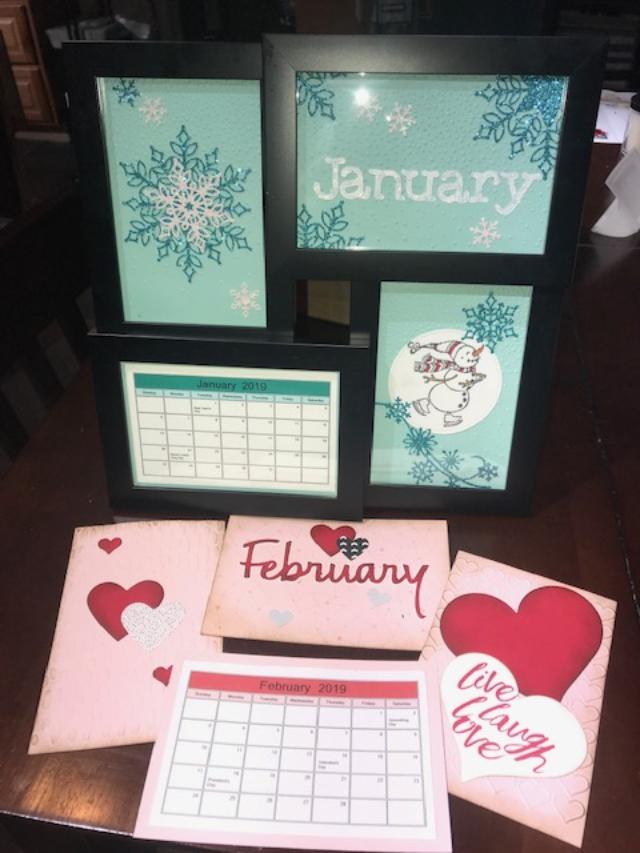
After several attempts at different layouts I am happy with what I've done so far. AND THANK THE LORD FOR MY CRICUT....It's makes doing multiples so much easier!!! Well all except the snowflakes! This is a new die set from Stampin UP called Snowfall Framelits! I ordered the frames on Amazon, yeah Prime!! I ordered them Monday .....and they arrived today...perfect timing. So for the paper, I have used glitter paper I found at AC Moore, Pool Party, Whisper White and Blushing Bride Cardstock. The project keeps evolving as I continue to work on it. But I so happy with the results.
Ok first of all I want to apologize for my photos they aren't the best. I do have a designated area to take pictures so sometimes there's just a lot going when I need to photograph
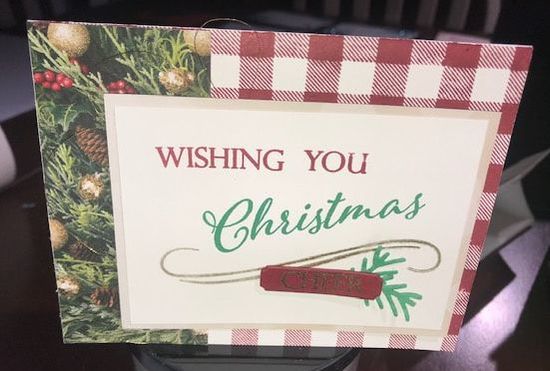
My card is from the All is Bright Suite featured in the Stampin Up Holiday Catalog. I got the idea right out of the catalog itself! The Designer Series Paper is absolutely beautiful and this card/photo does not do it justice at all! The photographic images in the DSP really makes the card pop! The Buffalo plaid is a new background stamp also in the Holiday Catalog. I hope you enjoyed my projects and our Happy Holidays Hop If you haven't visited everyone's blog be sure to check them out. You can find all the participants listed below. Thank you for stopping by Happy Stampin and Happy Holidays Steph 
Thank your for joining the June Stampin Friends BLOG HOP, where we are celebrating the first day of summer! We have an amazing Hop for you this month!!!
Be sure to follow each blogger to see all 12 of the awesome projects that have been created and shared for you! If you get lost a long the way, there is a list of participants at the bottom of each of the blogs! Since today is the first day of summer and school is almost over, I decided to make some teacher gifts! All of my projects use current Stampin Up products! I hope you enjoy what I have planned for you!
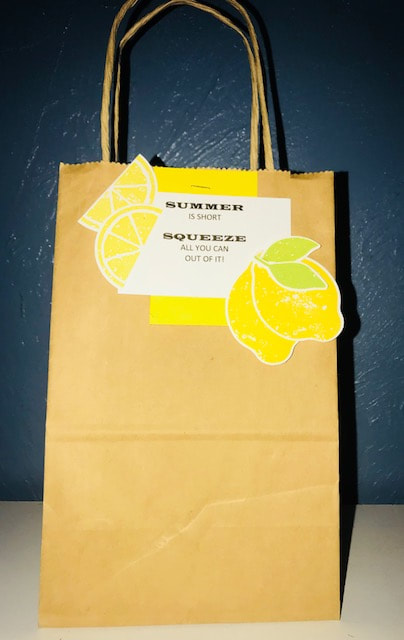
My projects theme was from a Lemon Verbena car air freshener I came across from a local store. I was very excited to see the Lemon Zest was carried over to the new annual catalog. So it was a perfect fit for this month's hop.
The projects use some new and returning products. My color choice was the New In Colors Pineapple Punch, Grapefruit Grove and Call Me Clover; 2017-2018 In Color Lemon Lime Twist. Stamp sets are returning Lemon Zest and Daisy Delight. My First project is a large clothespin. I found them at AC Moore, pretty inexpensive. I cut the cardstock to 1 1x2 x 6 1/8, embossed with the Layered Leaves Dynamic Embossing Folder. I stamped, punched and layered 3 daisies and finished the center with a Faceted Gem. I added a few strands of the Gold Mini Sequins Trim. The books mark is 2x4 1/2. I found the sentiment online and printed it out on Whisper White. They can use the bookmark or keep it display in the clothespin. Finished with the Pineapple Punch Grossgrain ribbon and a bow made from Linen Thread. 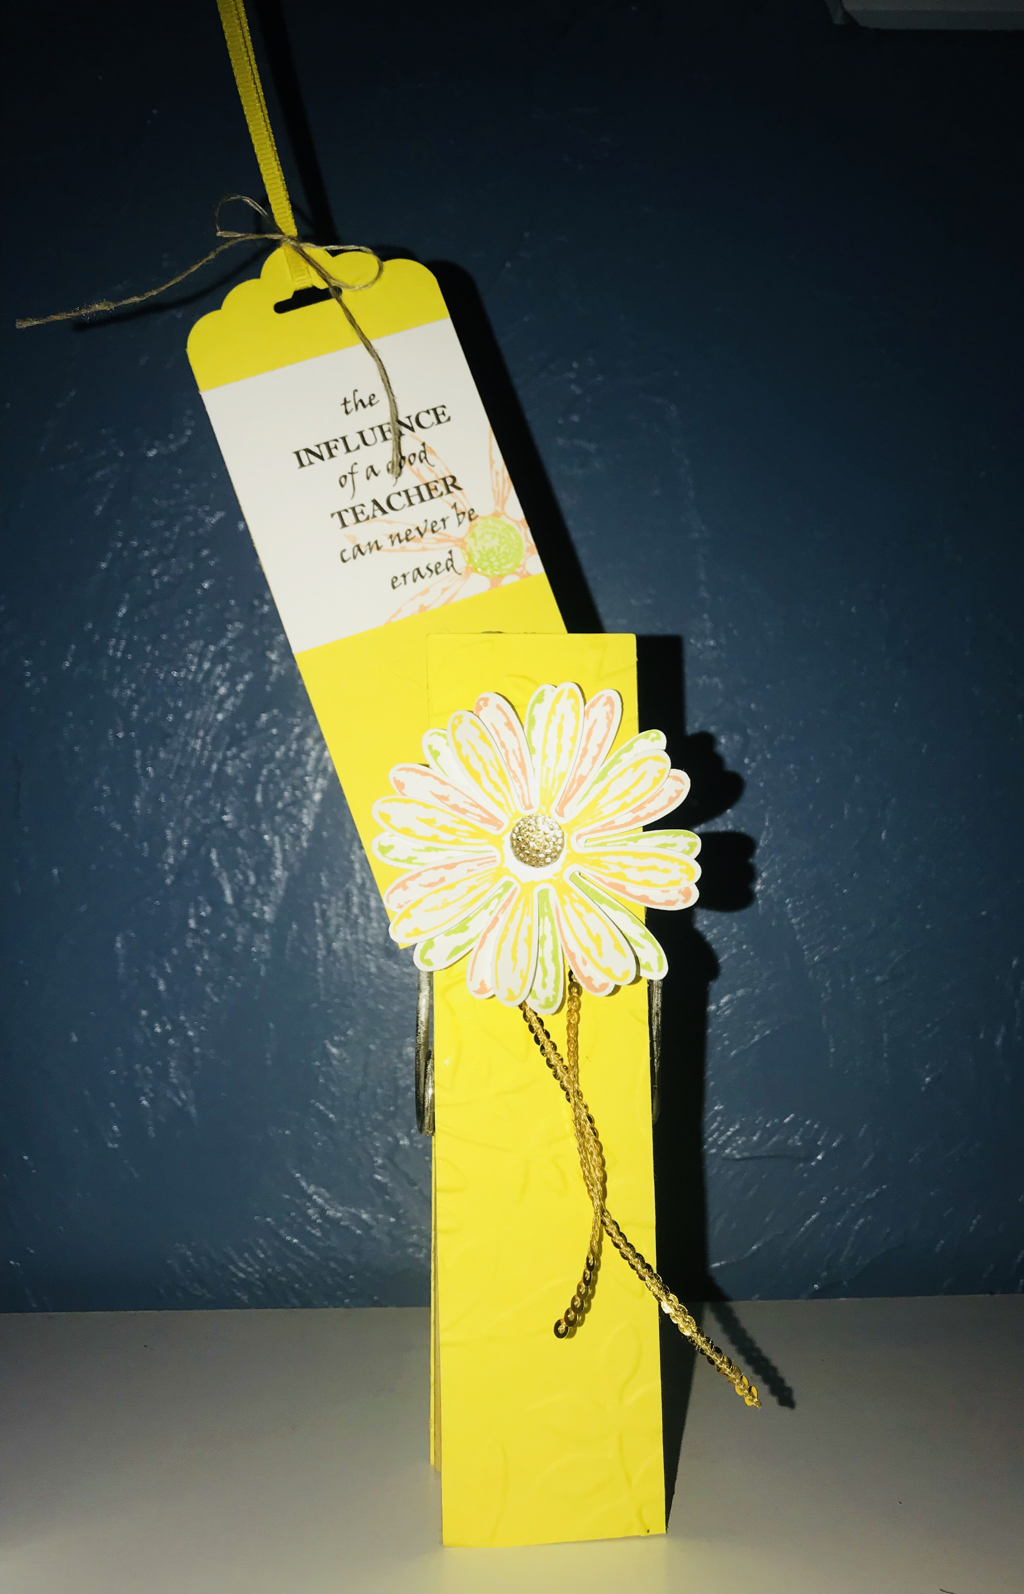
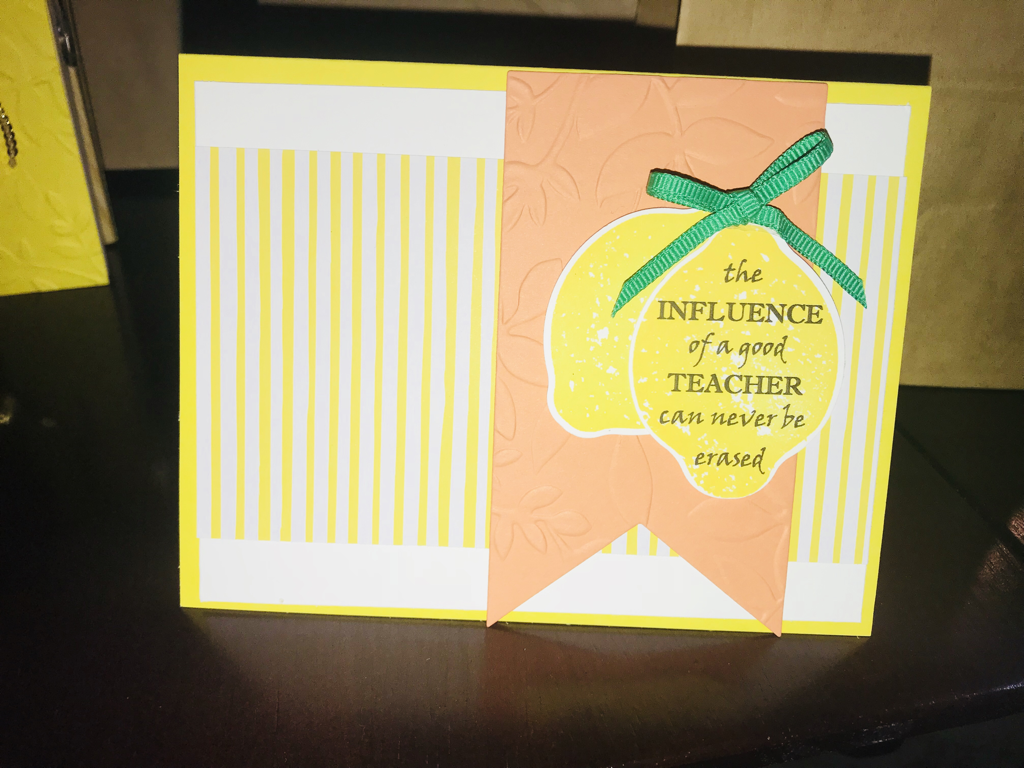
My card was super easy. Pineapple Punch base layers are Whisper White and the coordinating new In Colors DSP 6x6 Stack. Then a banner cut from the Grapefruit Grove paper that was embossed with the Layered Leaves Dynamic Embossing Folder. The sentiment was printed on Whisper White then stamped over with the Lemon. Finished off with the Call Me Clover Grossgrain ribbon.

I hope you enjoyed my projects, be sure to leave a comment. I'd love to hear your thoughts. I appear to be the end of the hop, but incase you missed someone along the way, you can find all the hoppers listed below!
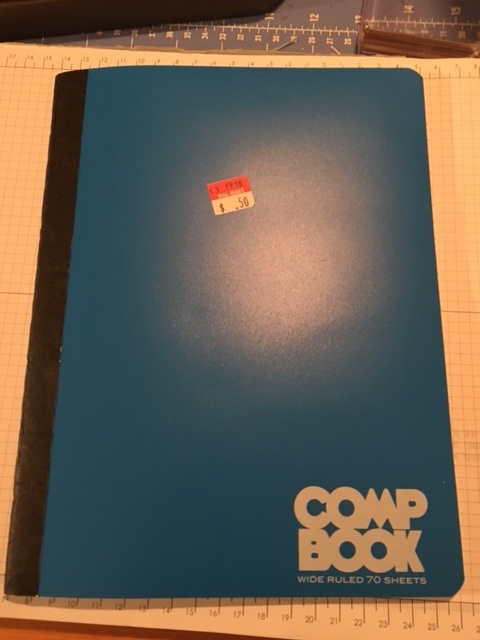
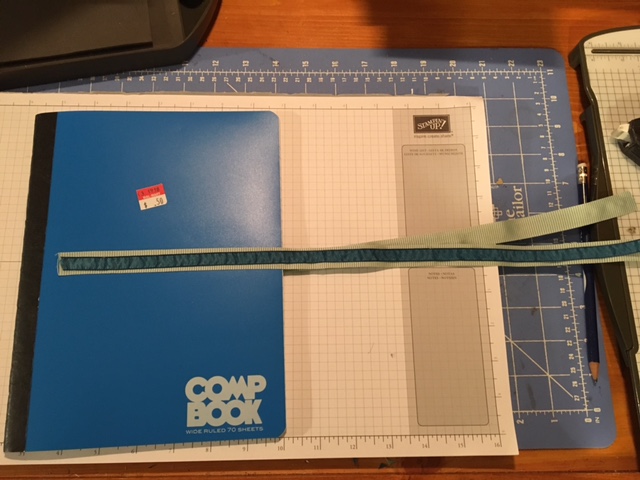
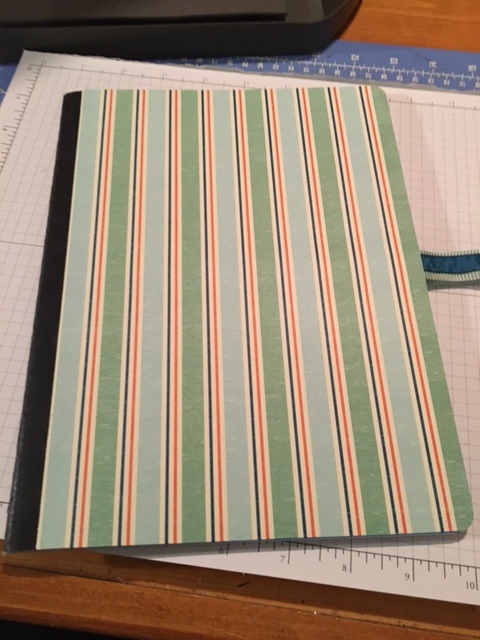
Hope you have a wonderful summer Thanks for stopping by and Happy Stampin Steph   Welcome to our Stampin Friends September Back to School Blog Hop! I'm so excited that you have decided to stop by. We have 15 amazingly talented crafters this month. You are really going to love the projects shared this month! Be sure to follow along and check out everyone's blogs and fabulous projects. Make sure to leave a comment to be entered in the Blog Hop raffle. Read each blog, scroll to the end, and leave a comment with #SFSeptHop!! Each member and guest blogger, will randomly select a winner from our blog comments. We will then pool those together and randomly select the overall hop winner. I would love to hear some feedback and you will earn a chance to win some Blog Candy! Thank you for visiting my blog from Barbara Welch's site, and thank you for continuing with the Blog Hop. Enjoy my project and at the end click the NEXT button to continue to Kristen Bell's Blog. Didn't come from Barbara's blog?? That's ok, just click the PREVIOUS button or scroll to the end and click on Barbara's name to visit her blog.  Our guest hoppers this month are: Yolanda Dixon Barbara Welch Mandy Reedyk This month's projects were inspired by my oldest daughter, who is 12 1/2. She knows I always make a quick back to school treat and she asked me to make her something that wasn't so "kiddish"! OH BOY!!! Where did my baby go??? She told me she likes all my goodies, but wanted something she can bring to school and have her friends, really, really want it too!!! Well, I get it, she's a pre-teen, fitting in is so important! But hmmm a few more years of her enjoying the little things would be OK too!!!! 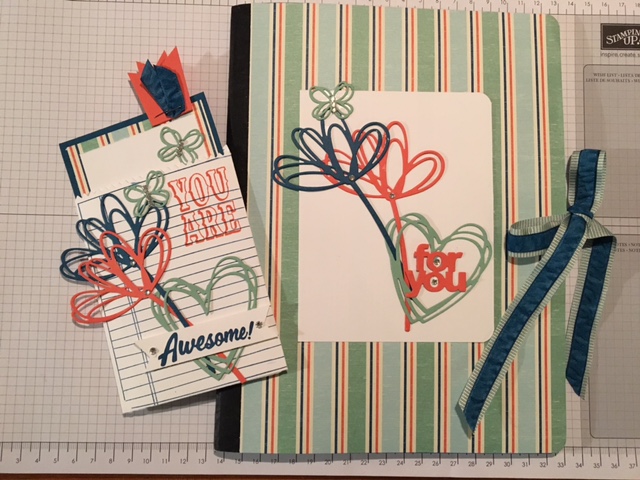
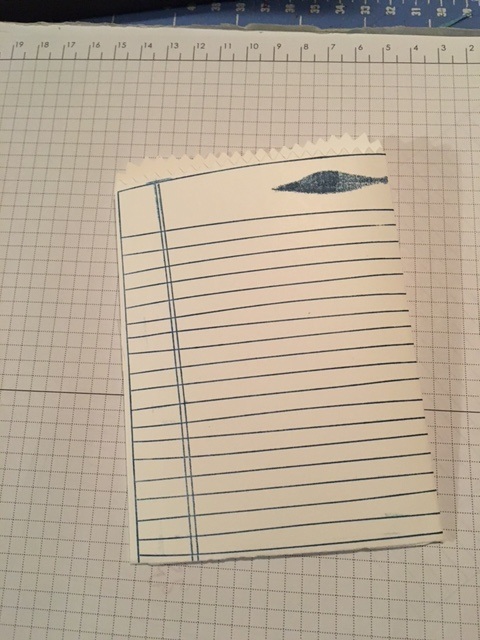
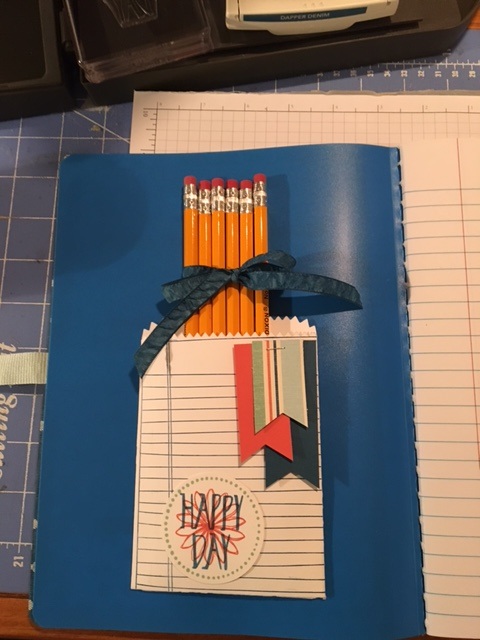
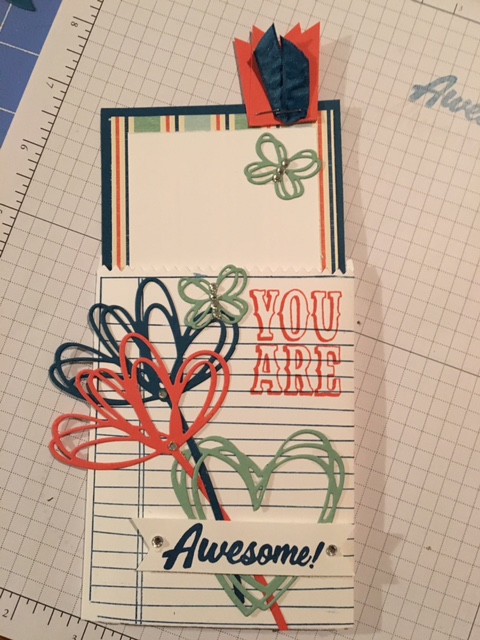
I decided to make a little pocket for the inside of the notebook to hold pens/pencils or notes. I just love the Mini Treat Bag Thinlits and Writing Notes stamp. Perfect! I cut 2 sets of the mini treat bags in Whisper White. I stamped the Writing Notes with Dapper Denim. I am making two treat bags, one that will be the pocket for the notebook and one that will be my daughter's card. Don't you just hate when you stamp and everything is perfect except for a smudge ahhh. Well I decided to cover the smudge rather than starting over! I used the colors in the DSP which were Dapper Denim, Calypso Coral and Mint Macaroon. I cut a few 1" strips and used the Triple Banner Punch to flag the ends. Stapled them to the treat bag. I grabbed a handful of pencils and tied them together with the Dapper Denim Ruched Ribbon. The pocket looked a little bare, so I used the Perfectly Wrapped stamp set. Stamped the circle, flower and sentiment and punched it out with the 2" circle punch! Now for the cover; I decided to use the Sunshine Wishes Thinlits, I cut out a few flowers, hearts and butterflies. The "for you" is from the Mini Treat Bag Thinlits. I also doubled each flower/heart and butterfly to use on her card, as well, so I wouldn't have to do it later. Finished off the front with some Basic Rhinestones. Love it!!!!
I really love how the projects came out! Best of all I had a very happy 12 1/2 year old! I hope you enjoyed them too. Thanks for joining me in the Blog Hop Happy Stampin Steph  Make sure to leave a comment to be entered in the Blog Hop raffle. Read each blog, scroll to the end, and leave a comment with #SFSeptHop!! Each member and guest blogger, will randomly select a winner from our blog comments. We will then pool those together and randomly select the overall hop winner. I would love to hear some feedback and you will earn a chance to win some Blog Candy! Click on the NEXT button to visit Kristen Bell's blog and continue in the Hop!  Below is a list of everyone who participated in the hop this month:
|

New 2023-2024 Stampin Up Annual Catalog


Kits Collection


Join today

Categories
All
Archives
January 2024
|


 RSS Feed