 Thank you for joining me for another month of Stampin Friends Blog Hop! We have a jam pack hop this month with so many talented papercrafters!!! July's theme is Anything Goes. So we get to pick and choose what and how we want to share! I hope you came from Melissa Thomas's blog, wasn't her projects wonderful!!! After viewing my blog, be sure to check out Barbara Welch's blog for her projects. And if you missed someone along the way, you can find a list of all hop participants at the end of my projects. 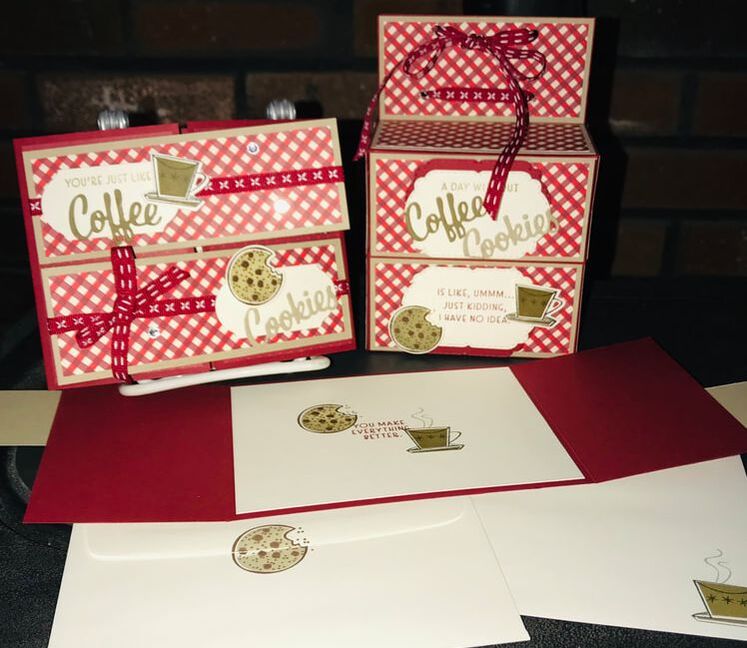
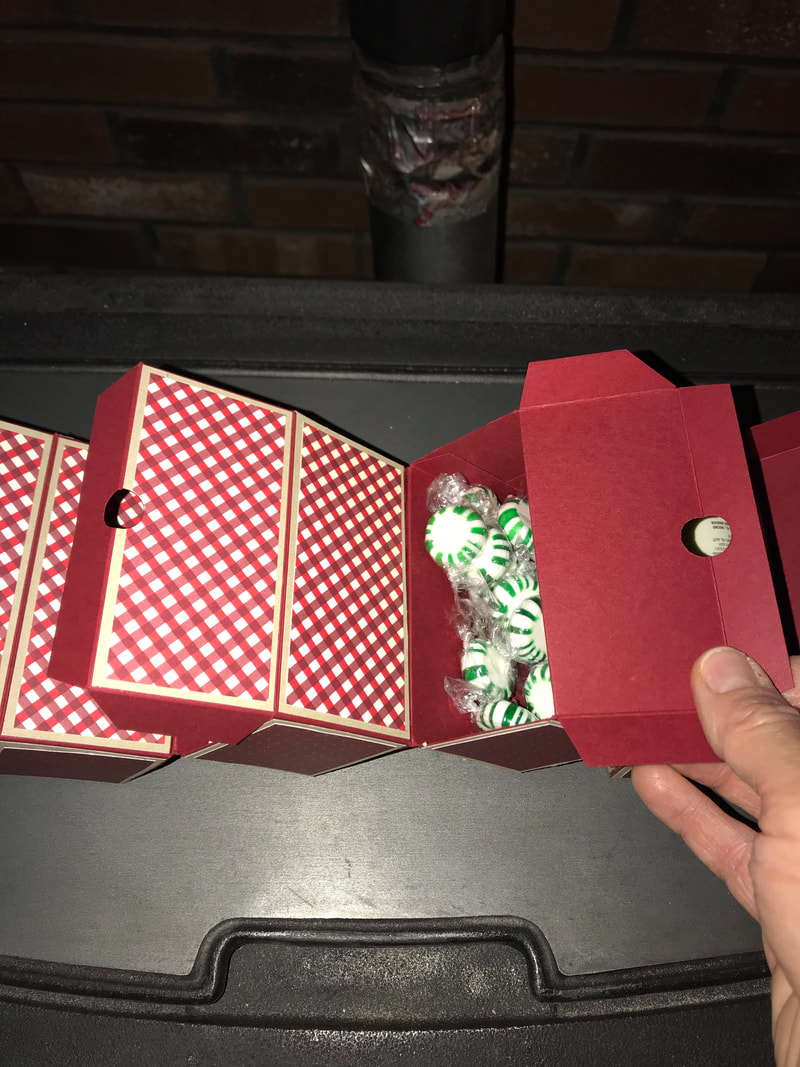
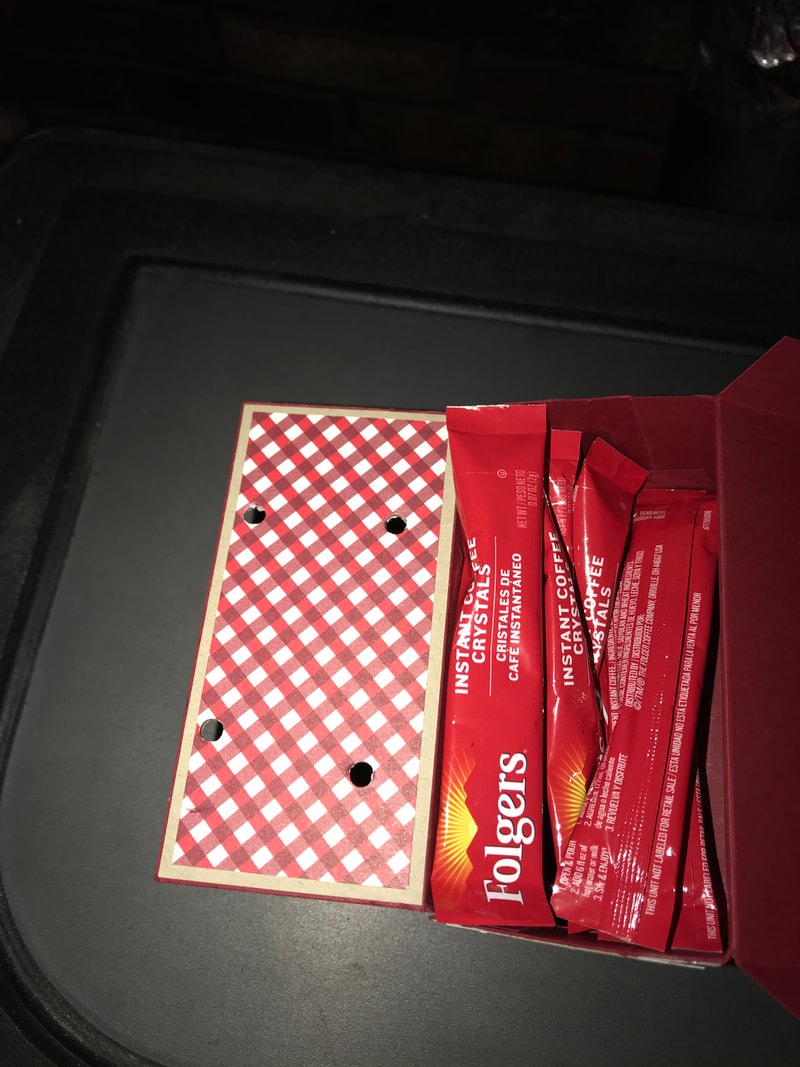
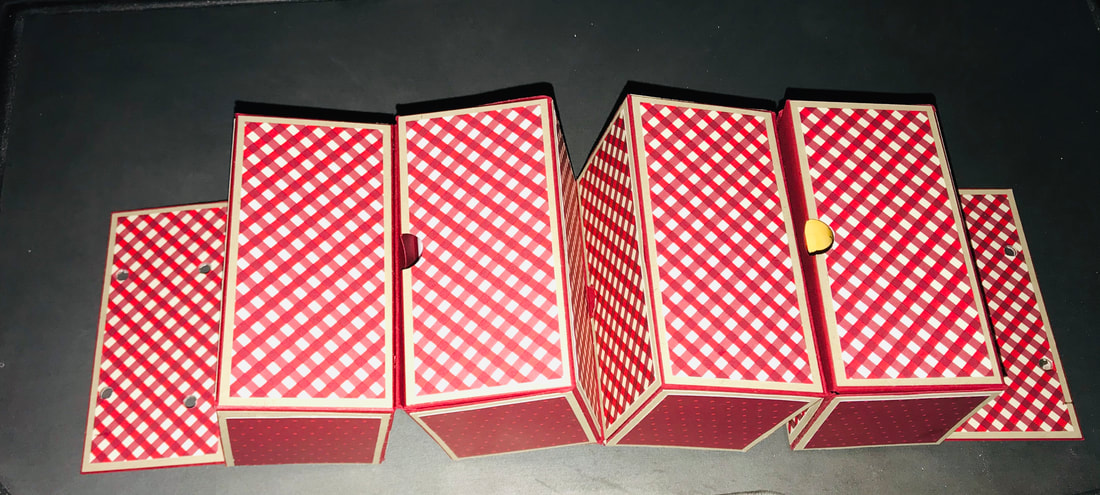
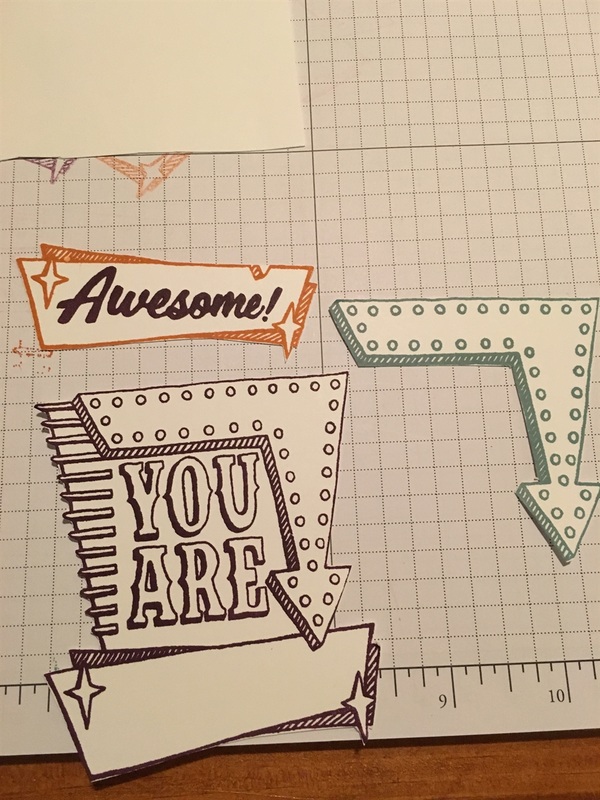
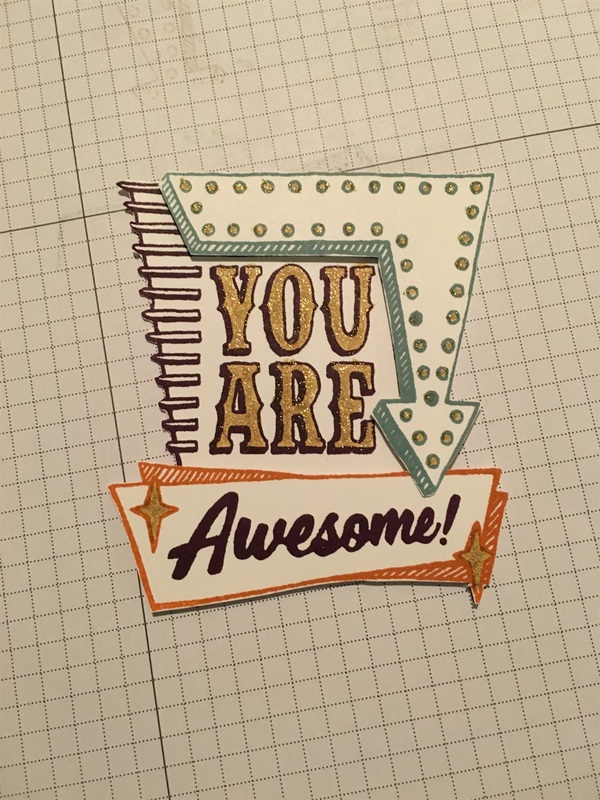
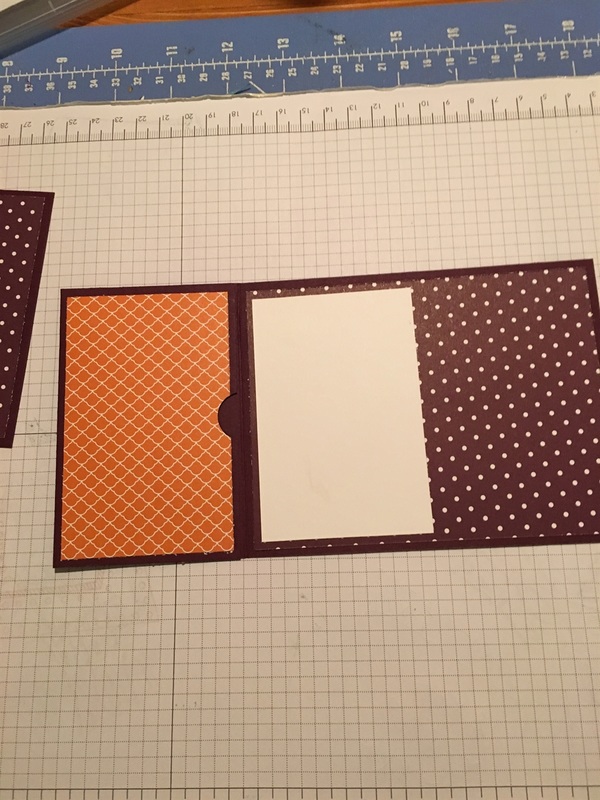
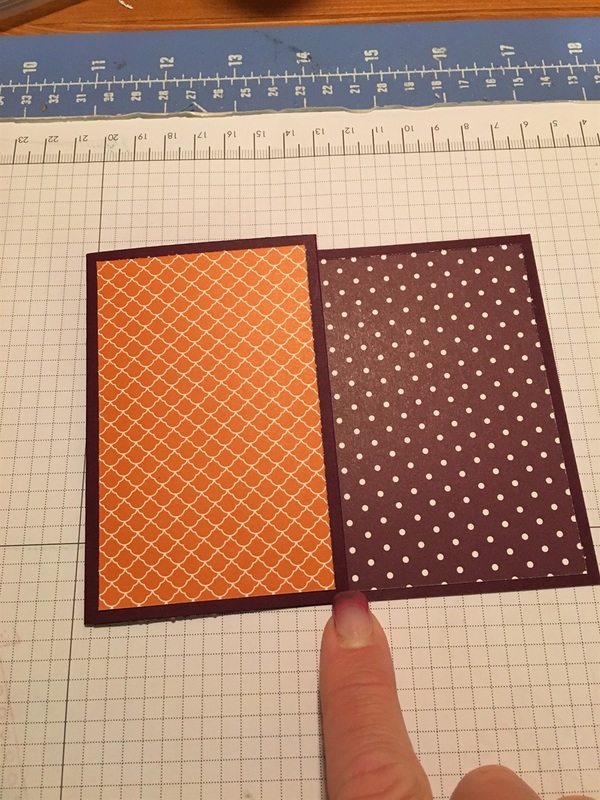
Using your Simply Scored Scoring Tool, Score with the 11" side at the top at 2 3/4" Then turn a complete 180 and score again at 2 3/4". I added a layer of card stock to each section that measure 2 1/2"x4" Next cut 2 piece of cardstock to 1 7/8"x5 1/4" I added the DSP layer on top of each which measure 1 5/8"x5". I then wrapped 1 with a ribbon and tied a bow and the other I just added the ribbon around. Take these pieces and added one towards the top on the left fold and then one towards the bottom of the right fold to create flaps. I stamped the images and cut them out. Added a layer of Whisper White to the inside and stamped the greeting and images again.
Thanks so much for stopping by and visiting my site during this blog hop! Be sure to visit everyone who participated and leave them a little comment so they know you were there. Happy Stampin Steph Below is a list of this month Blog Hop Participants, be sure to visit everyone's blogs to see their projects!
10 Comments
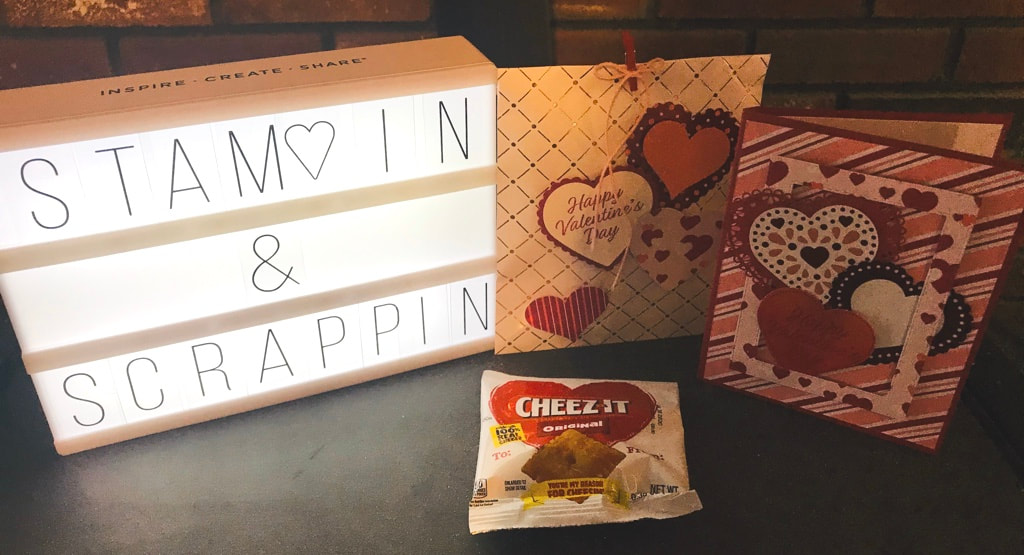 Today I created two fun projects for an upcoming card club! Since Valentine’s Day is a few weeks away, I wanted to focus and get a little head start. My projects feature Stampin Ups new From the Heart Suite! This gorgeous suite can be found in the new 2020 Mini Catalog! The DSP is beautiful and several of the sheets have a foiled appearance! And best of all you can use the Heart Punch Pack to punch out several of the hearts on the paper! 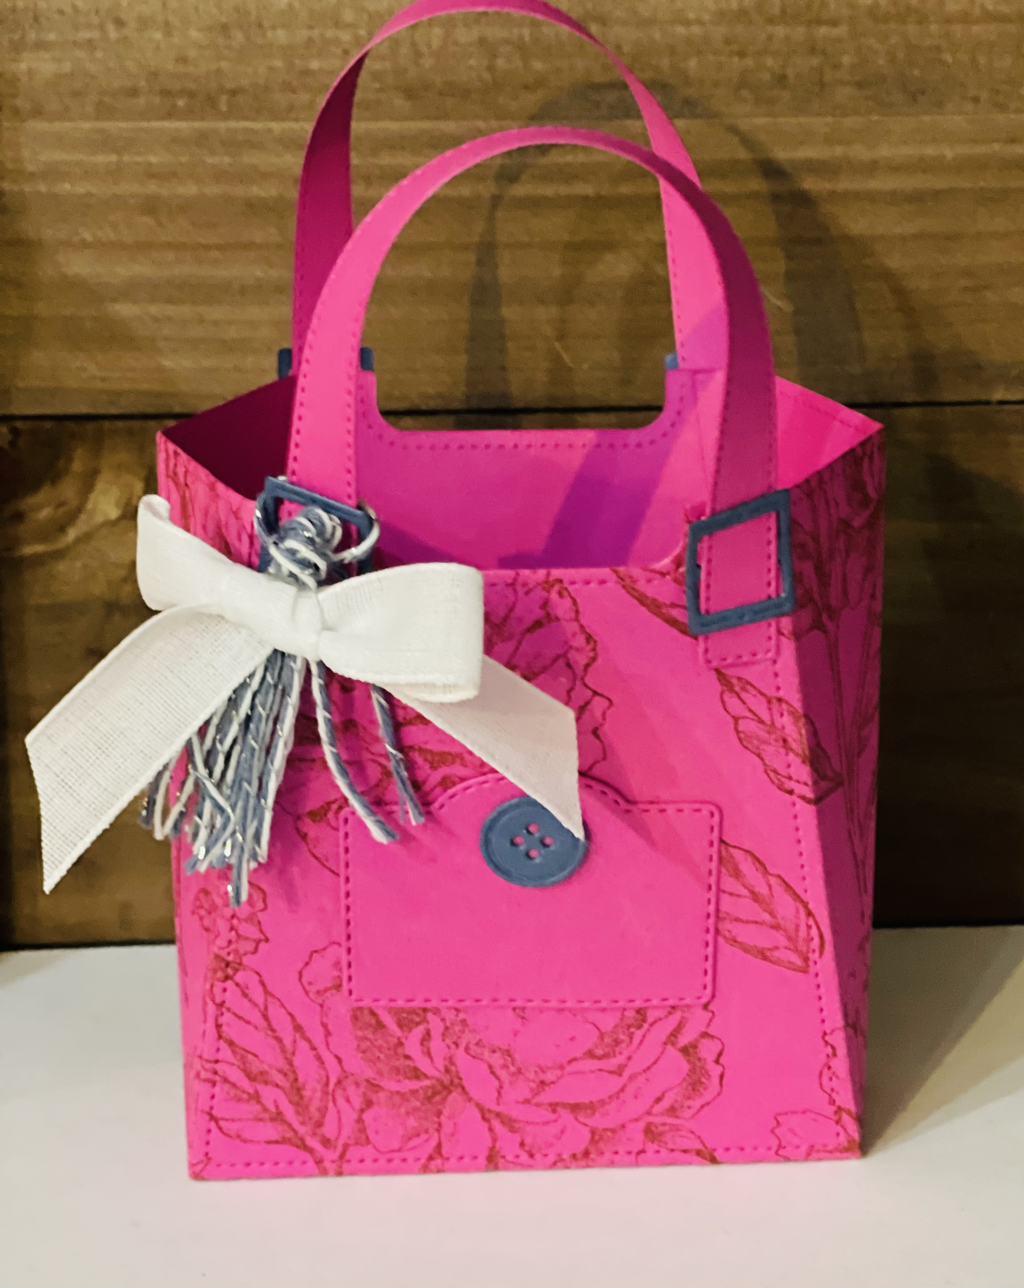 The card was created using a sheet of Real Red cardstock cut to 5.5x8.5 and scored on the 8.5 side at 4 1/4. I added a layer of DSP on top that measures 4x5 1/4 next I took another piece of DSP and cut a frame using 2 different sizes of the Rectangle Stitched Framelits. I cut out several hearts using the Heart Punch Pack. On one of the red hearts, I stamped the dotted outline from the Heartfelt Stamp set in Real Red, the punches it out nd 2 of the hearts are punched out right from the DSP! So easy! The Happy Valentines Day greeting is from the Meant to Be stamp set, which is in the current annual catalog! This card was so simple to make and so quick that I was Able to create multiples fast.  Have you tried the Copper Dotted Treat bags?? They are such pretty bags! I don’t know why I waited to use them! Similar to the card, I punched out a bunch of different hearts from the DSP and cardstock and I used the same greeting! I added a little Valentine Cheez-it snack that I found at Target. They are mini bags but so cute!!! Depending on who I give the bags to I might fill with candy or cookies too!! These bags are a great size at 4 3/4x 6 1/2 and are food safe!! I used a retired twine to make the bow and I came across these mini clothes pins I had on hand! I either purchased these at Walmart or A.C. Moore.
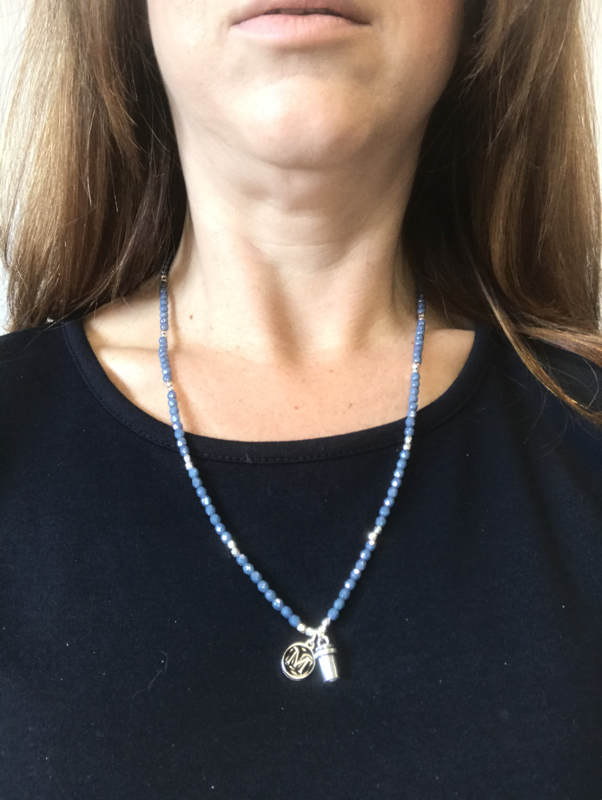
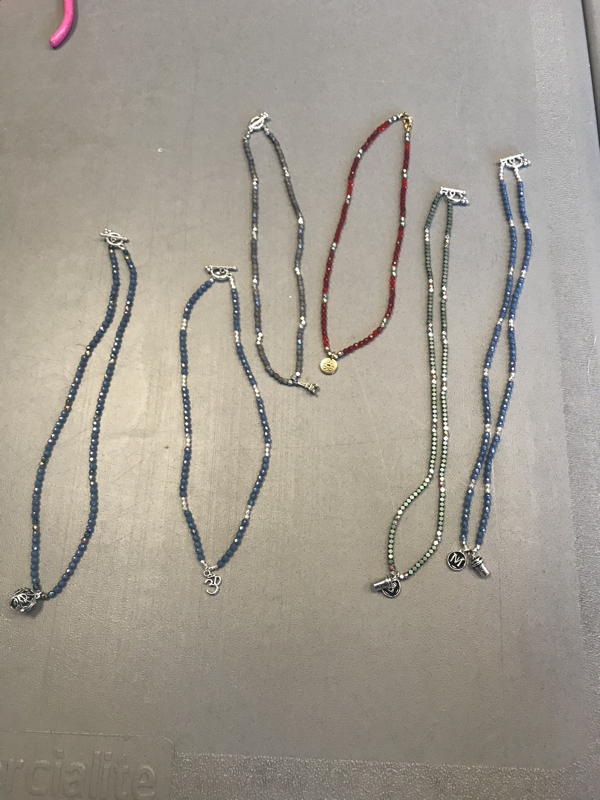
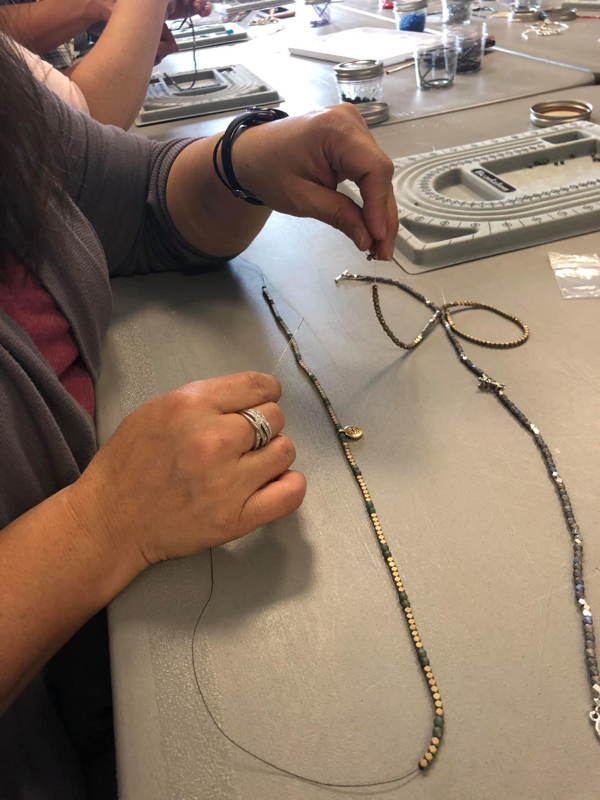
What do you think? Really cute and easy to make right?? Thanks for stopping by Happy Stampin Steph 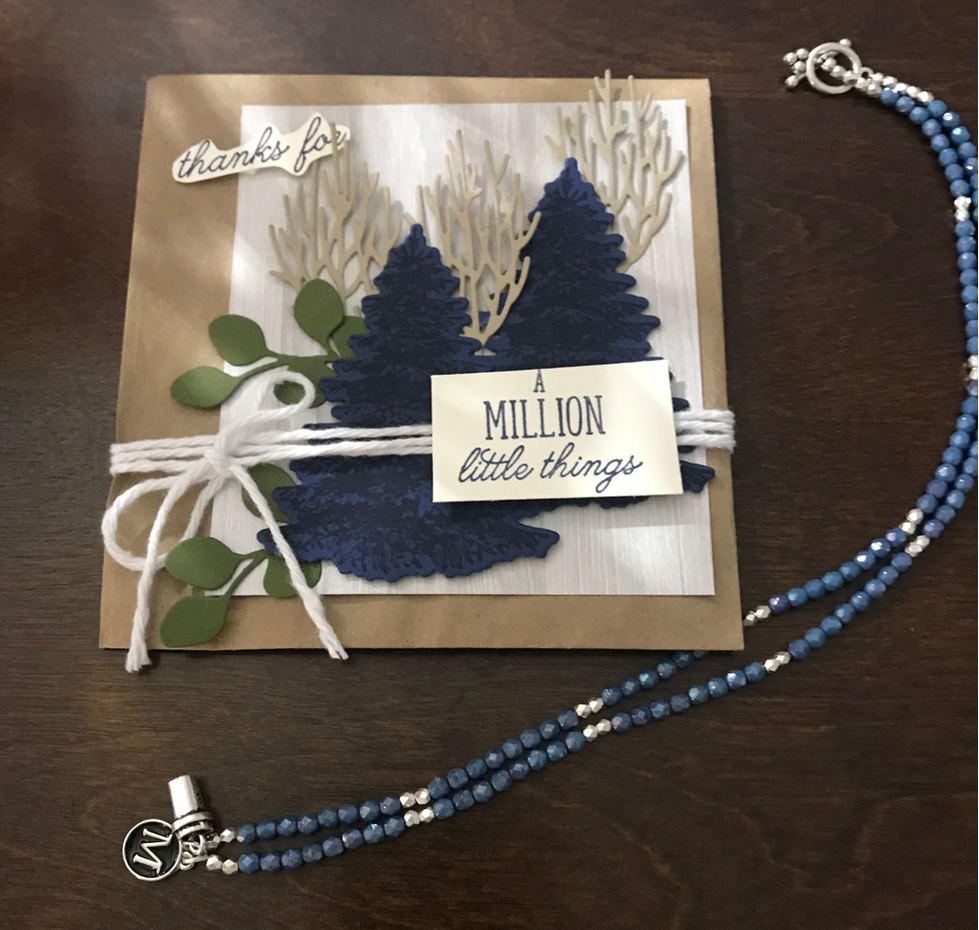 One of the classes offered at the craft weekend was making a beaded necklace! I was a little intimidated, definitely not something I would do on my own. The thought of threaded little beads onto a string had me a little stressed. But honestly this was so much fun and relaxed. We were able to pick out the colors we wanted and layout the beads to see how it would look! I can't tell you exactly what we used, because I haven't a clue about jewlery, but Michele from The Crafting Room was an awesome teacher. She kepts us relaxed as we learned each step! I made the necklace for my mom as a thank you for her staying the weekend at my house with the kids. I chose blue beads (blue is her favorite color) M for her first name and a little coffee cup, because like me she loves coffee!! I also decorated a little craft bag using the Stampin Up Winter Woods stamp set and Into the Woods Coordinating dies. I think it came out nice considering my resources were limited and this was not planned :-) I really like making the necklace, and Michele, was gracious enough to let me make a bracelet for myself! The beads are so pretty!!!!! Love it! So what do you think? Are you a jewelry maker too?? Do you think I should add this to my hobbies or stick with paper-crafting??? Happy Stampin or jewelry making :-) Steph 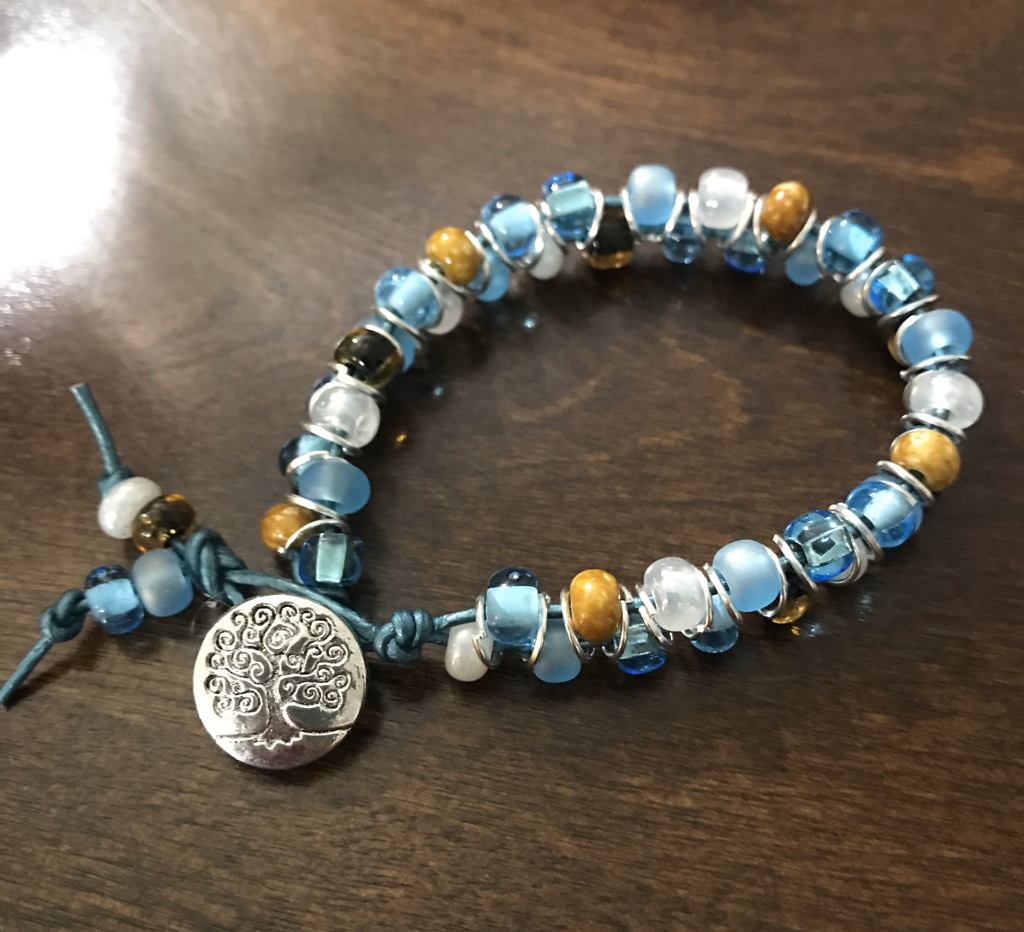 The holiday season is almost upon us and we will soon find ourselves scrambling to find the perfect gifts for our family & friends. Let me take away some of the stress and provide you with a fun event as you create fun gift packaging. Not only will your family/friends be excited to open their gifts....they will be super impressed that you created the packaging! I do the hard part...the cutting and preparation. You do the fun part...putting it all together! We will be creating a variety of Holiday Gift Tags, Gift Boxes/Bags and Money/Gift Card Holders. A total of 24 projects! Yes, 24.....10 bags/boxes, 4 money holders, 4 gift card holders and 6 gift tags! (Stampin Up designer paper may vary from what is shown based on current product availability) Come on by December 1 at 9am! Workshop fee is $30 this includes all the precut materials to complete each project. You may also add on additional projects please contact me for details. Can't make? Contact me about my to go option! To secure your seat, please register and pay at https://www.paypal.me/StephanieJandrow Stay up-to-date with event information by RSVP'ing to the Facebook Event. Click here to view the event. I look forward to seeing you Happy Stampin Steph  
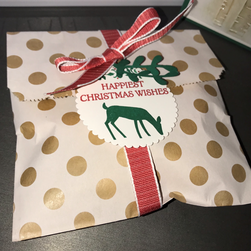 If you lose your way while hopping, you can scroll down and see the list of hoppers! Did you just come from Chery's blog? Wasn't her projects amazing!!! Be sure to continue to Anne Marie's after you finish! Today I am certainly taking advantage of the anything goes theme with a little Christmas in July!! It's never to early to start planning cards and gift packing! I have prepared for you a Christmas card and a little treat bag. I found these adorable bags at Walmart on clearance! They a good size!!! The rest of products used are all current through Stampin UP. I used the Dashing Deer Stamp set from Stampin Up on both the giftbag and card. I stamped the deer in Shaded Spruce, the greeting in Real Red and I colored the little holly strip with Real Red and Shaded Spruce markers and cut this out using the Layering Circles dies. I wrapped the bag in the Poppy Parade Textured Weave Ribbon and finished it with a bow! 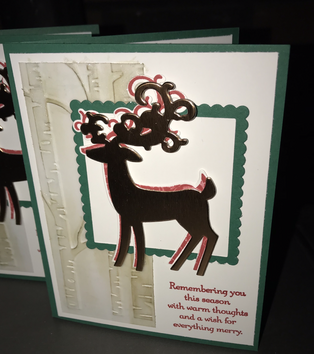 For the card I added the matching Detailed Deer dies and cut out a deer. The card base is Shaded Spruce layered with Whisper White. I used the Layering Squares dies to cut out the 2 squares. I also stamped a deer in Real Red and cut it out with the matching die. I used the Woodland Embossing Folder and embossed on a piece of vellum and then sponged over the images with Sahara Sand ink. I also added a little Wink of Stella over the trees to make them glitter, unfortunately you can't see it in the pictures!. I hope you enjoyed the projects I have prepared for you! I'd love to hear what you think, so please be sure to leave a comment below!
Thanks so much for stopping by! Happy Stampin Happy Christmas in July! Steph Cozy fall crafting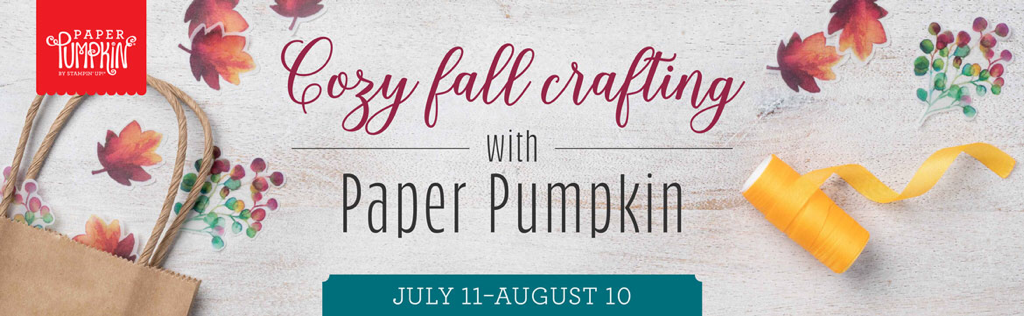 What’s the old saying? Variety is the spice of life? At Paper Pumpkin, we like to mix things up and keep your crafting experience fresh and fun. We plan each kit carefully, allowing you to check as many creative boxes as possible while keeping our projects simple—so you can explore the world of papercrafting with confidence. With this in mind, we are bringing an elegant fall gift packaging kit to Paper Pumpkin fans this August. Be sure to subscribe or have your subscription current before August 10th to receive this kit. And don’t forget about The Gift of Fall Add-On Bundle this a separate purchase for those who would like to convert their August Paper Pumpkin kit into cards. The price for the add-on bundle is $10.00 and is available for Paper Pumpkin subscribers only. This add-on is available beginning August 1, while supplies last! View the video below to see a sneak peak of the August kit and then click on this link to subscribe https://www.paperpumpkin.com/en-us/sign-up/?demoid=2127355 Please contact me if have any questions!! Happy Stampin Steph 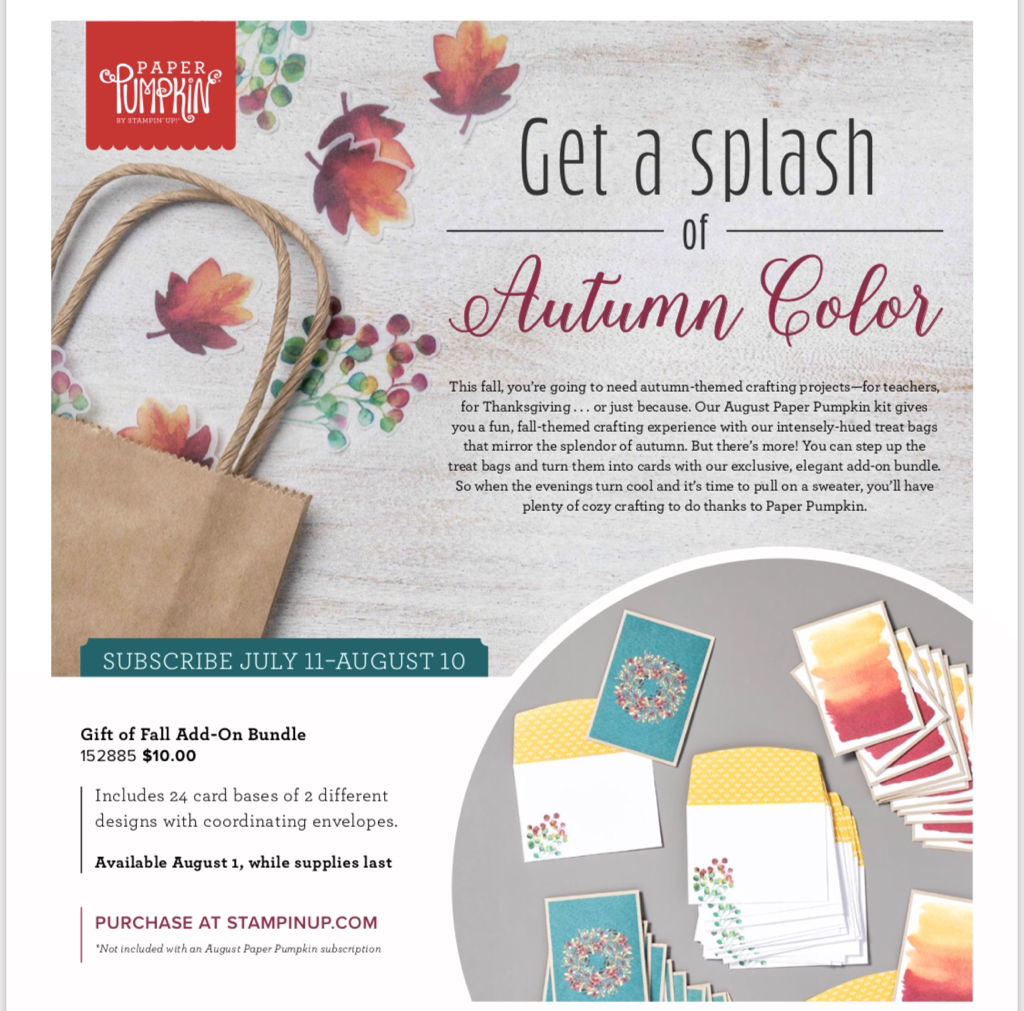 
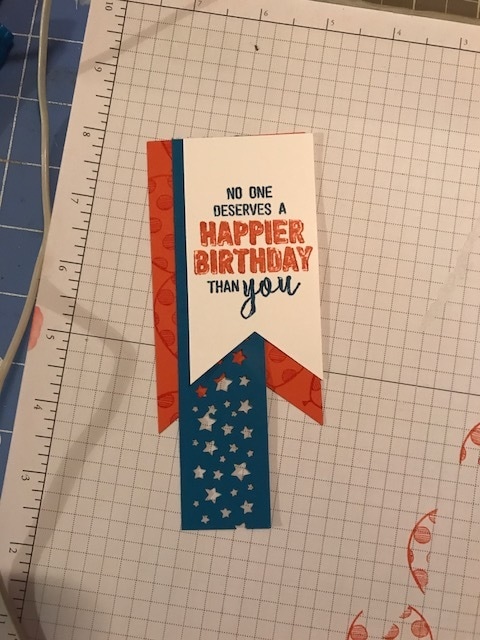
Welcome to our April Stampin Friends Birthday/Celebration Blog Hop! We have 14 talented crafters involved in the hop, including 1 Guest Hoppers.
Please, make sure you check everyone's blogs out. After reading my blog, scroll to the end, and please leave a comment for your chance to win a little blog candy from me! If you have visited my blog from Elizabeth Jeanne Thatcher's site, thanks so much for continuing with the Blog Hop. A full list of Blog Hop participants are listed at the end so you can continue along the hop! 
For the April Blog Hop I chose a bundle that I purchased awhile back when the Occasions catalog first went live! I have barely used it! The colors intimidate I think! And the DSP is more on the masculine side, which I don't typically make many projects out of!
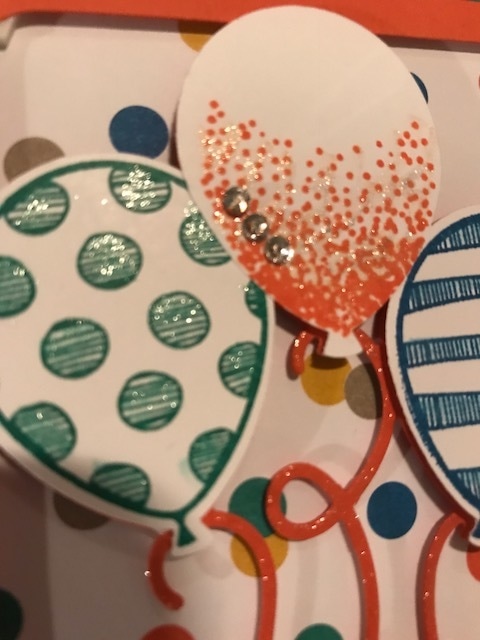
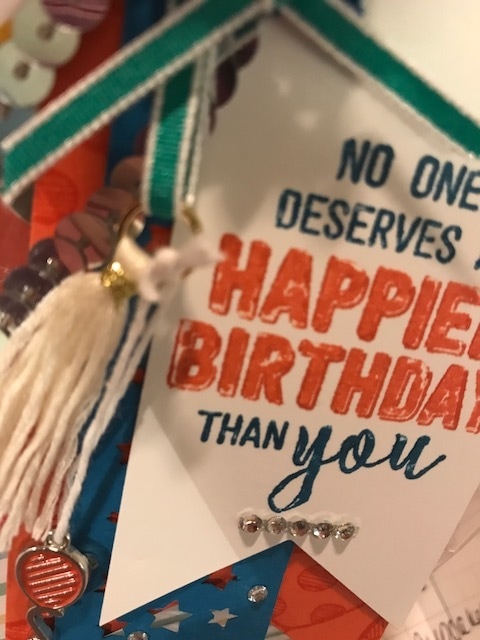
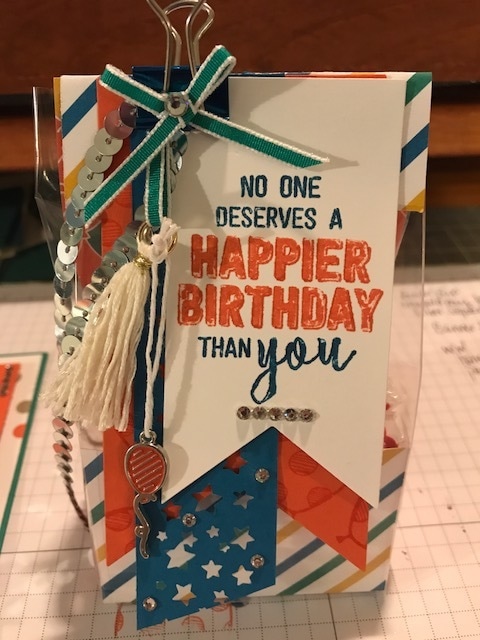
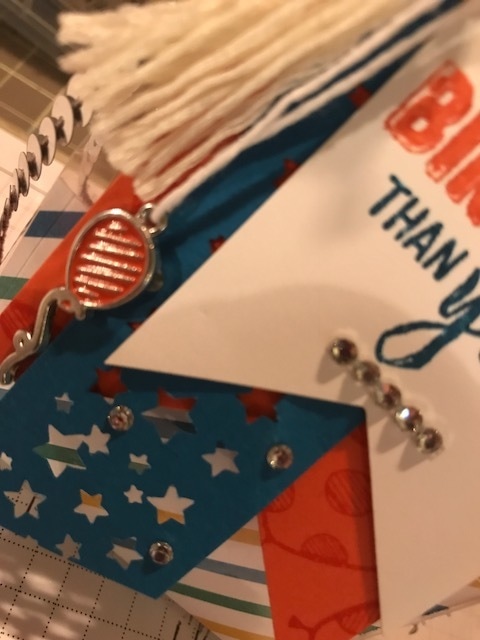
The card I chose to make uses all Stampin Up products. The bundle I chose was from the Party Animal Suite on page 4-5 of the Occasions Catalog and the stamp set is the Balloon Adventures. I also used the matching framelits (Balloon Pop-up) and Party Animal embellishments and Emerald Envy taffeta ribbon. I used a Paper and ink combination of Whisper White, Tangerine Tango, Emerald Envy and Pacific Point. Card: The card is pretty easy to make I used Emerald Envy for my cardbase and a piece of DSP cut to and 1/8" shorter than the cardbase. I cut out the balloon background with the Balloon Pop up framelits, then I trimmed the edges to the size I wanted it to be on the front of the card. Stamped the balloons using the Balloon Adventures and Balloon Celebration stamp sets. Punched them out using the Balloon punch. I stamped the banner and cut it out by hand. I added clear Wink of Stella on the balloons, banner and strings. I also added some Basic Rhinestones.
At the moment the bag is filled with Smarties. But I will be changing it up when I give it to my Aunt on Easter Sunday for her birthday. I plan to fill it with some of her favorite candy's and a gift card she can use shopping!!
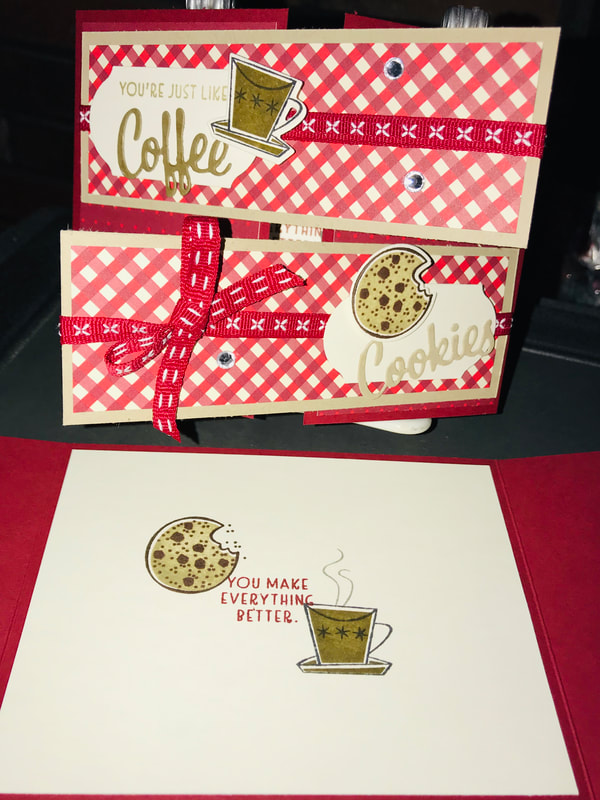
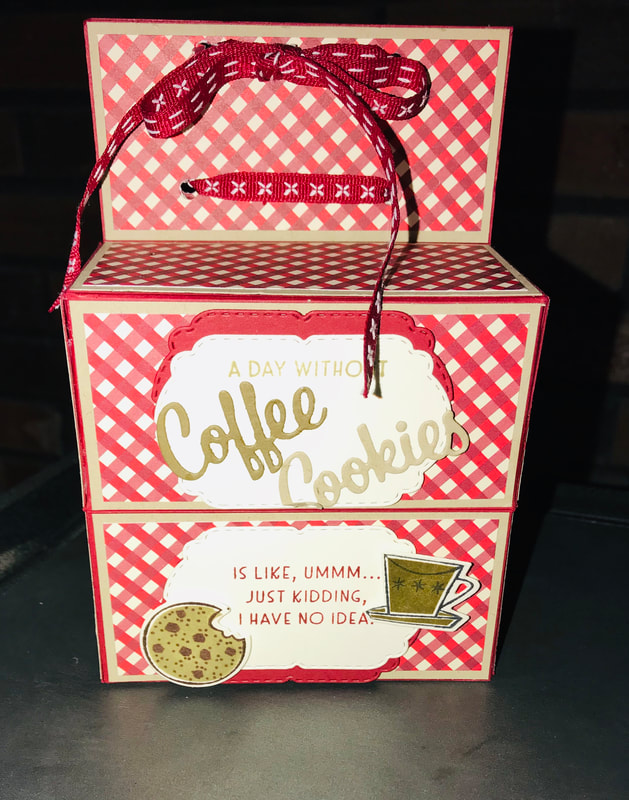
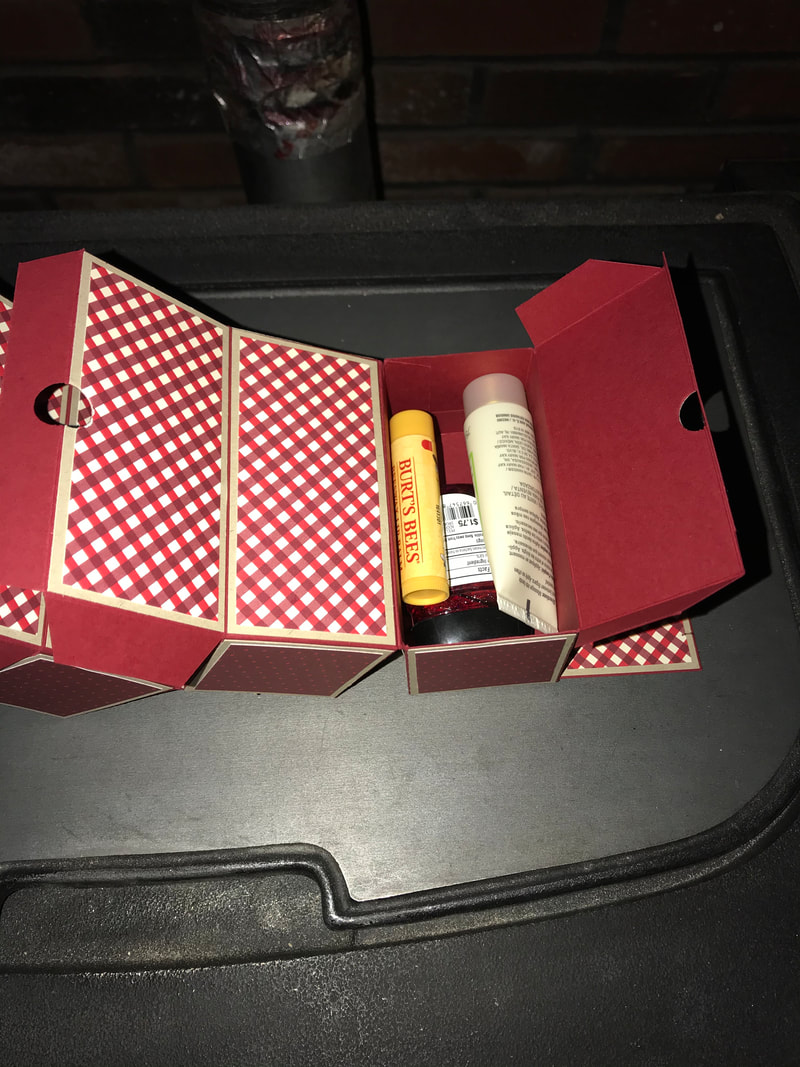
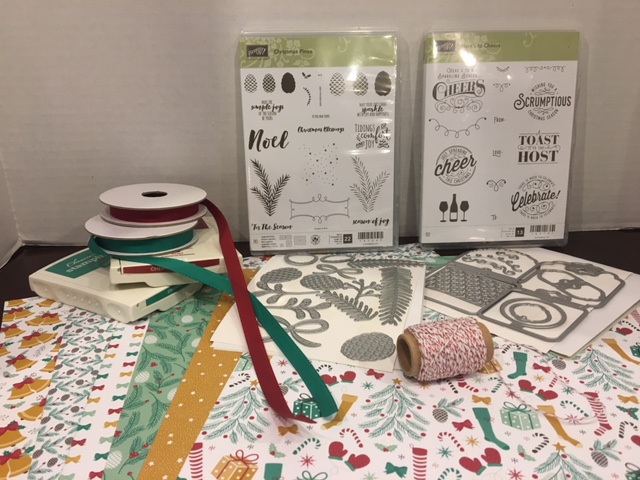
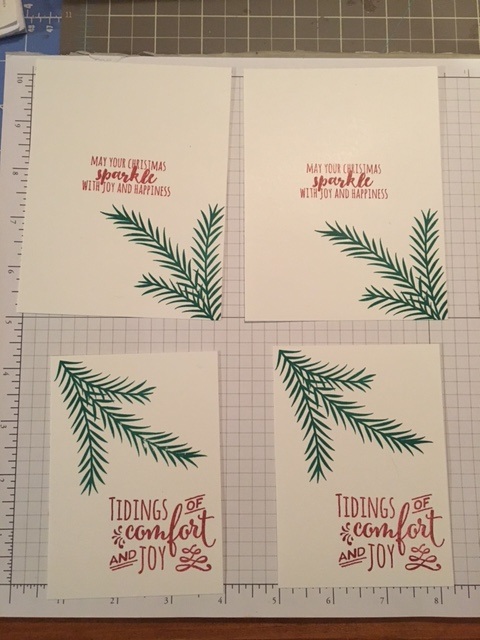
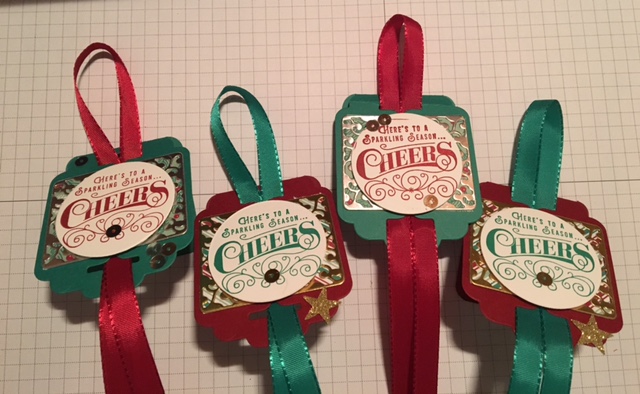
I hope you enjoyed the projects I made for you! Please leave a comment for your chance at winning some blog candy!!! Click on the next blogger, Lana Staab, below - you are at Steph Jandrow, incase you forgot along the way! Happy Stampin Steph   Welcome to our Stampin Friends November Happy Holidays Blog Hop! I'm so excited that you have decided to stop by. You are really going to love the projects shared this month! The Stampin Up Holiday Catalog was jammed pack with products to use for this hop, it was hard to choose just one this month!!!! We have 16 amazingly talented crafters participating in this month's hop, so be sure to follow along and check out everyone's blogs and fabulous projects. What's a Blog Hop without some Blog Candy?? Make sure to leave a comment to be entered in the Blog Hop raffle. Read each blog, scroll to the end, and leave a comment with #SFNOVHop!! Each member and guest blogger, will randomly select a winner from our blog comments. We will then pool those together and randomly select the overall hop winner. I would love to hear some feedback and you will earn a chance to win some Blog Candy! Thank you for visiting my blog from Carolina Evan's site, and thank you for continuing with the Blog Hop. Take a minute or two to enjoy my project and at the end click the NEXT button to continue to Kirsteen Gill's blog. Didn't come from Carolina's blog?? That's ok, just click the PREVIOUS button or scroll to the end and click on Carolina's name to visit her blog.  I purchased the Here's to Cheers stamp set & Cheerful Tags framelits bundle awhile back and finally got around to using it. I think at first glance, being in the Stampin Up! Holiday Catalog, we think it is a set that needs to be used during the holidays. But that is not the case!!! It's a very versatile set for gift giving, whether your giving a baked good or a bottle of wine, it all boils down to the colors and presentation. My card & project for this month's blog hop is for the holidays. All products used are from Stampin' Up! I decided to make a little gift set that all goes together or can be broken out into separate gifts if necessary. But the intent is to give it together. Perfect for a co-worker, friend/family, pretty much anyone! It's perfect as a hostess gift too! A nice gift of candles and wine. A perfect to unwind during all the holiday stress. I paired the Here's to Cheers bundle with the Perfect Pines suite. I just love the DSP! So festive. But again a versatile pack of paper that doesn't need to be all about the holidays. Since the paper is double-sided, and only a few sheets have gift-giving on them, the paper is perfect to use for winter gifts, treats or cards! And the COLORS are fabulous. The main colors I used are Emerald Envy and Cherry Cobbler!!! So for the card, it is fairly simple to assemble. Cutting out all the pines was time consuming but I used the Diebrush and that helped out a bit. I used Cherry Cobbler as my card base and layered DSP with Emerald Envy and Whisper White. I think the only thing I would change is a different patterned DSP. The one I choice gets covered to much. I cut all the pines using Emerald Envy and the berries with Cherry Cobbler. I stamped a set of pines onto the whisper white with Emerald Envy, greeting is in Cherry Cobbler. I used the fine-point pen adhesive to assemble that way I only put the adhesive at the tips to let the rest hang! 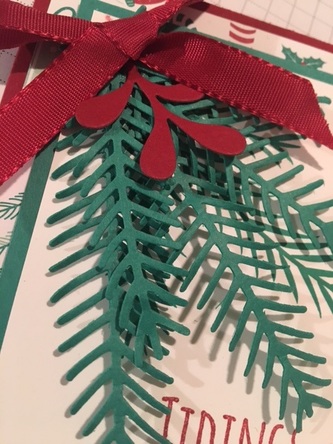
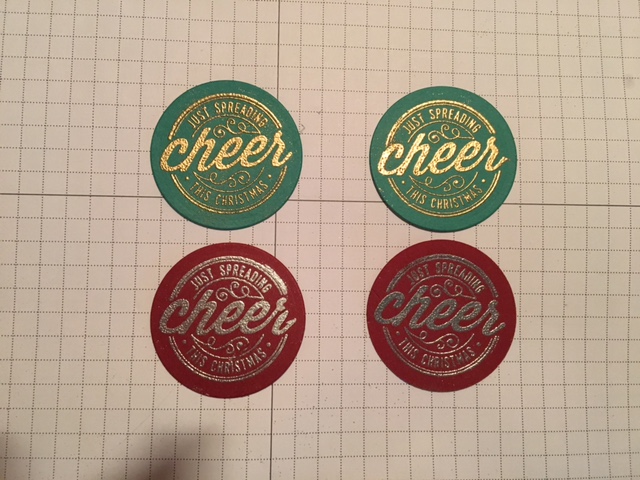
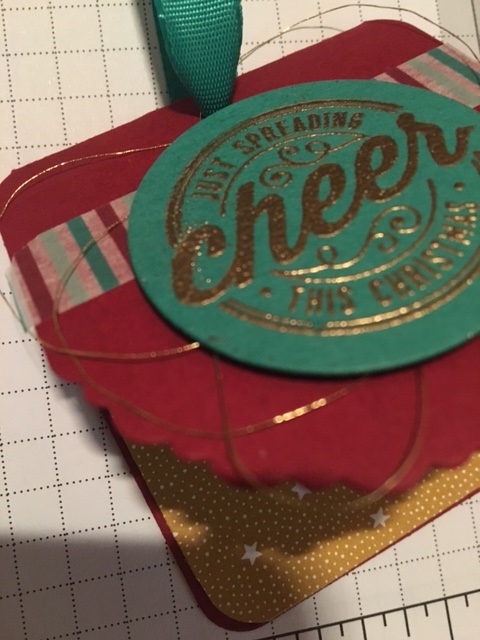
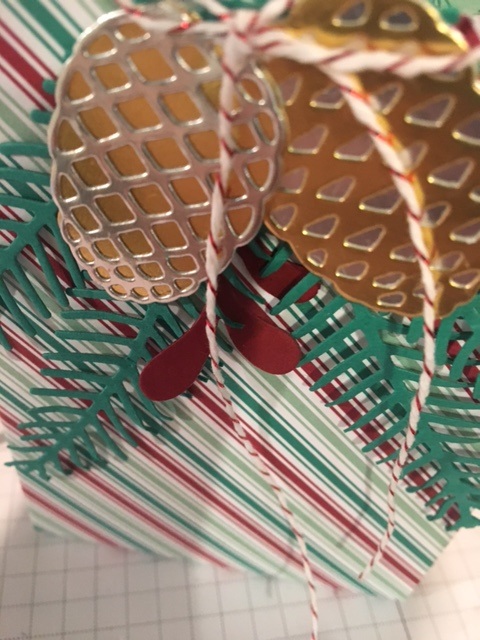
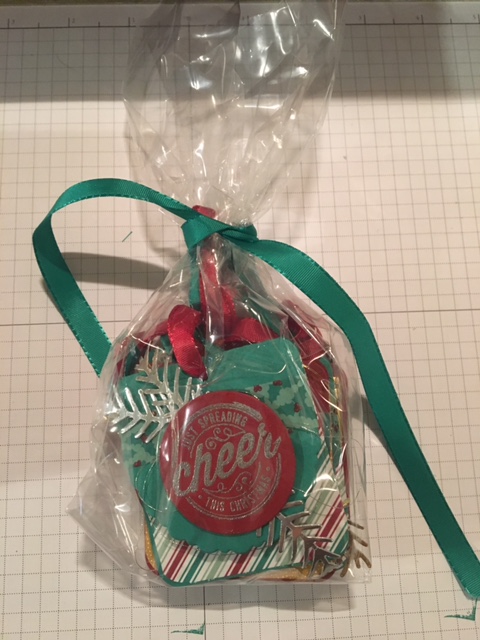
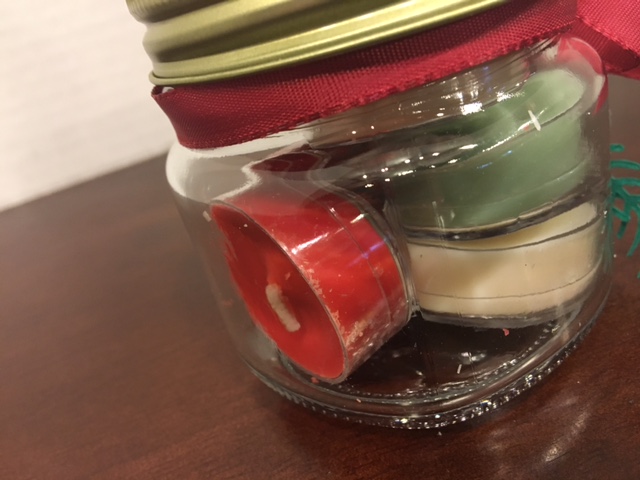
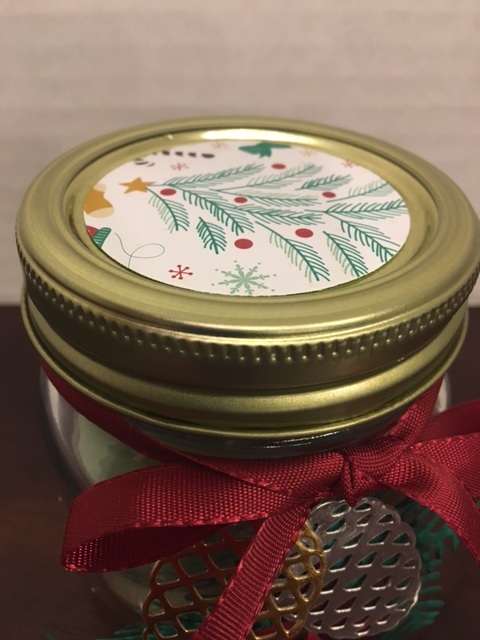
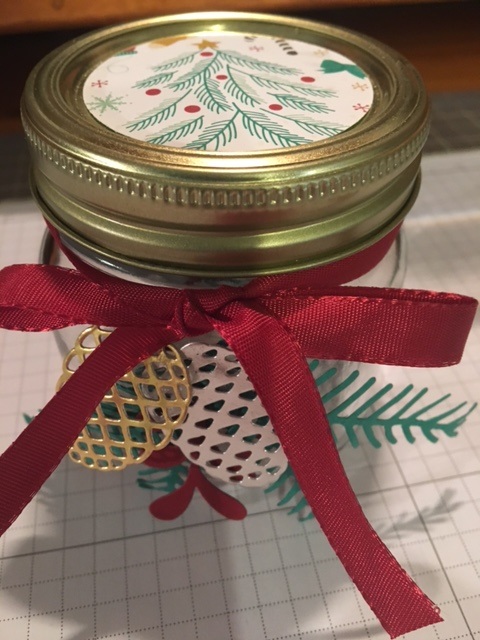
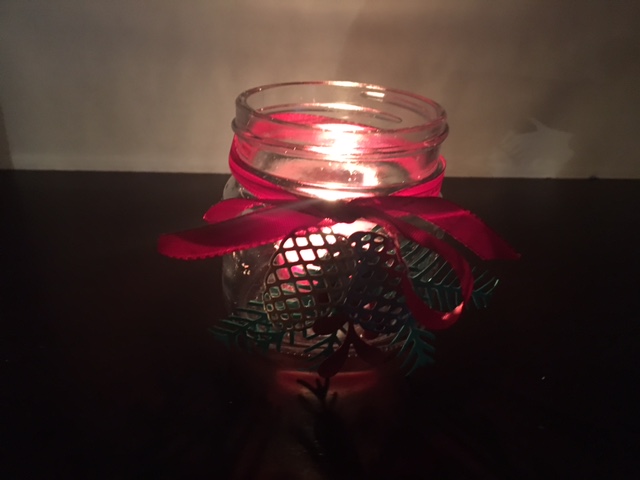
I used Gold and Silver Foil as accents to both sets of tags. I wanted them to pop! For the bottle tags, I used a piece of DSP behind the foil diecut to add a little more color. For the folding tags with the "Just spreading Cheer this Christmas, I embossed the greetings in Gold and Silver. I used the circles that are left over from the bottle tags. So no extra punching there. The framelits are really easy to use and assemble. It looks like alot, but honestly, once you get a system/assembly going they come together fairly easily. I made 8 tags (2 sets of four) you could certainly split this set up. But since I am doing a gift set, I needed something to put the tags in. I was going to just leave the tags in a cello bag and tie with a ribbon, but I felt it was missing something. So I quickly made a giftbag/box using the Giftbag Punchboard. I followed the directions to make a medium bag, I used a piece of DSP that measured 7w X 11L. I did not punch holes at the top. I wanted it to look more like the box than a bag. I had cut out a lot of pines, berries and pinecones while I was making the cards & tags. So I incorporated them on the box. Very cute!! 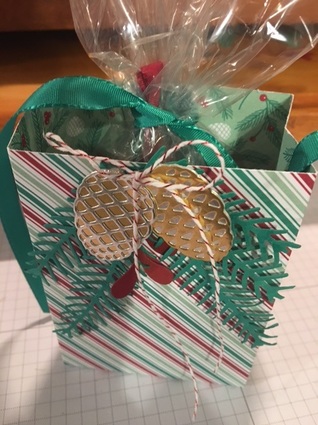 And the last project for today is this super adorable candle jar! The jar was truly my favorite from this whole set. I have alot of canning jars on hand from gift giving projects. And this jar style was perfect. I decorated the jar very similar to the gift bag above. I kept the gold lid as is. I felt it tied in perfectly with the Gold and Silver foil. I punched a 2" circle using the same DSP that I used on the card, just tonadd a little something to the lid. The jar fits 6 PartyLite tealights perfectly. I added 3 different scents for the holidays. It smells sooo good when you take the lid off. Now if you or someone your giving this to is not into candles, fill the jar with a scrub or holiday kisses, or whatever you prefer! It looks so pretty when I lit the candle and it's glowing!! Don't you just love how when you start a project and you're not quite sure how it's going to look when it is done! And then you end with such a WOW factor!!! That's how I felt after I finished and grouped it all together for the picture!! I really hope you like what you saw!! 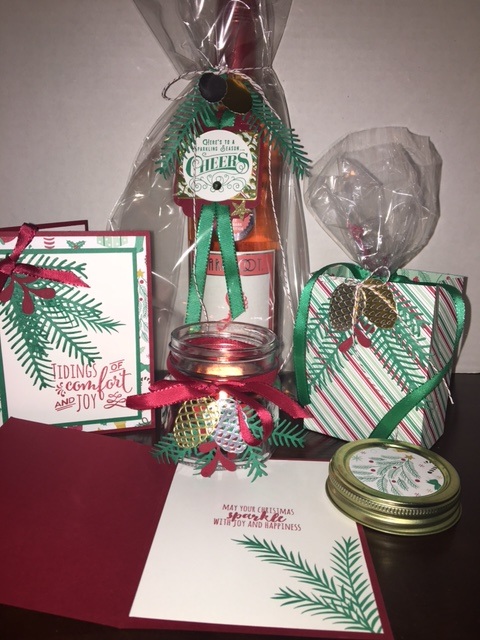 Be sure to leave a comment with #SFNovHop and then click the NEXT button below to visit Kirsteen Gill's Blog. Thank you for stopping by, feel free to contact me with any questions about the projects or products used. Happy Stampin Steph
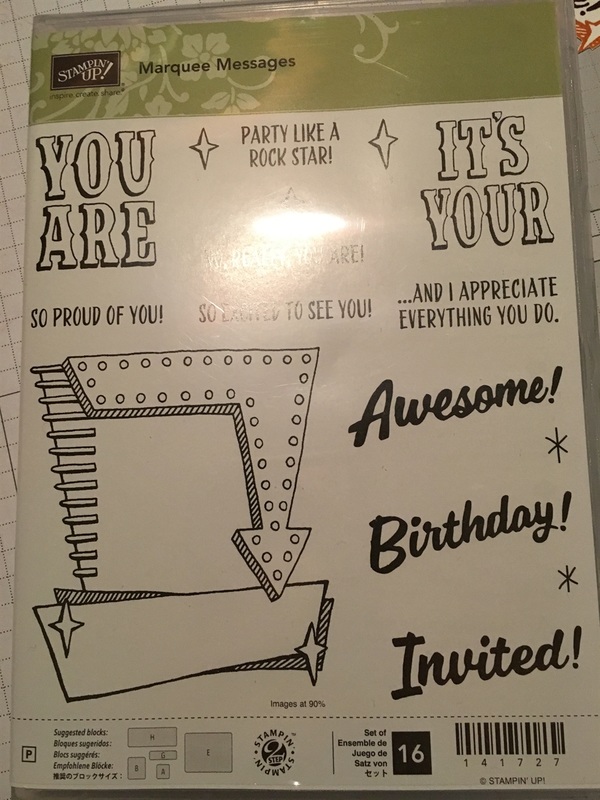
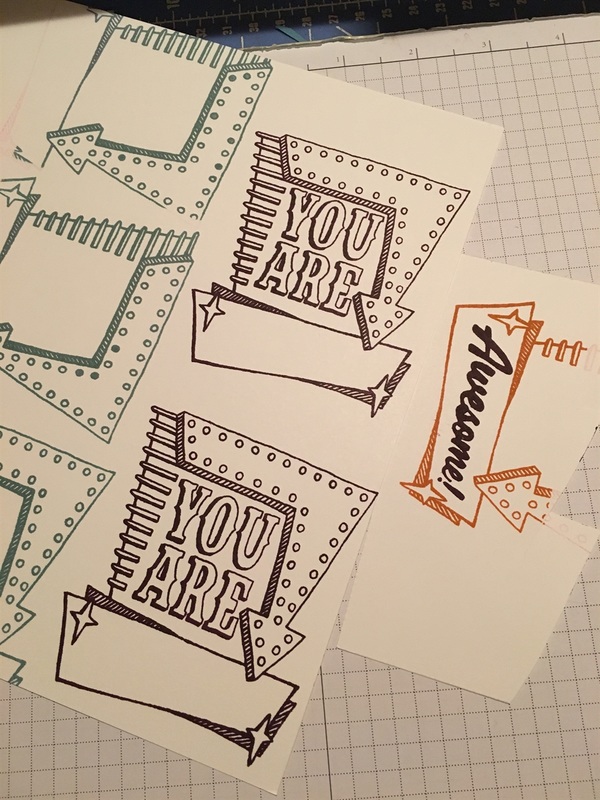
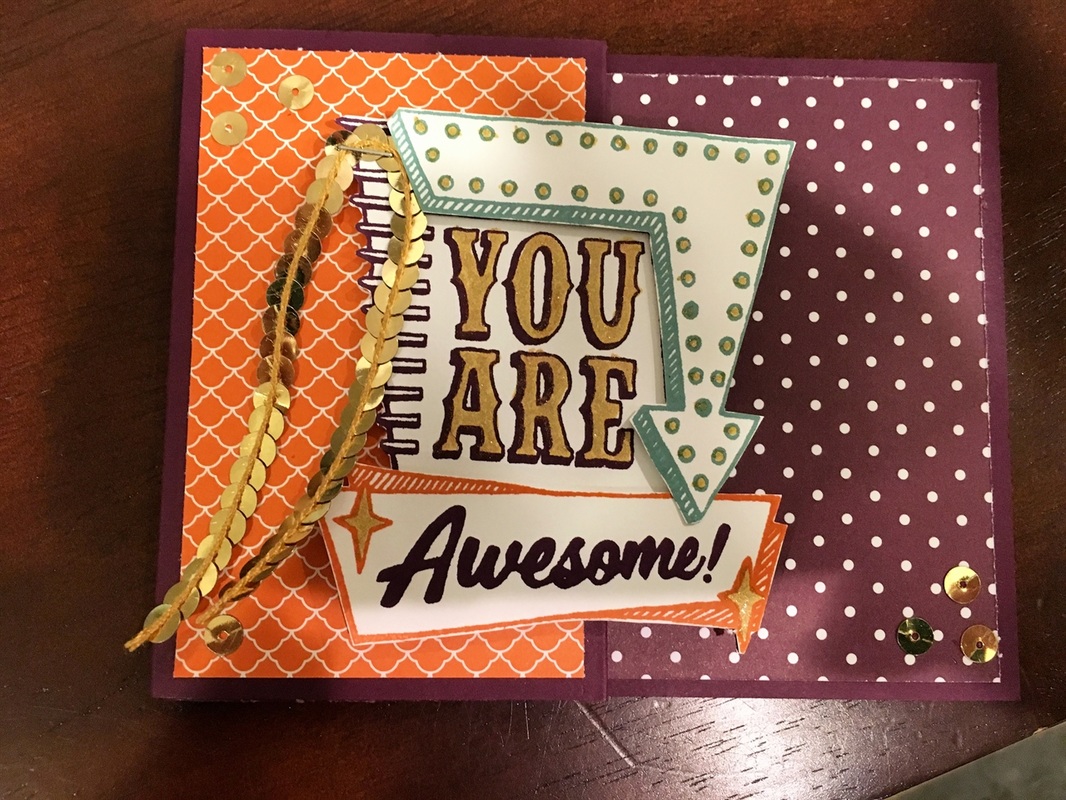
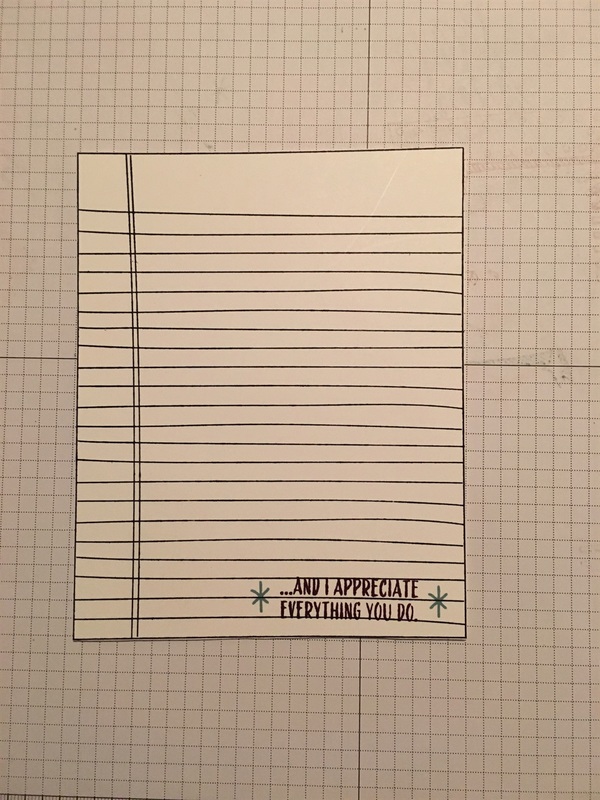
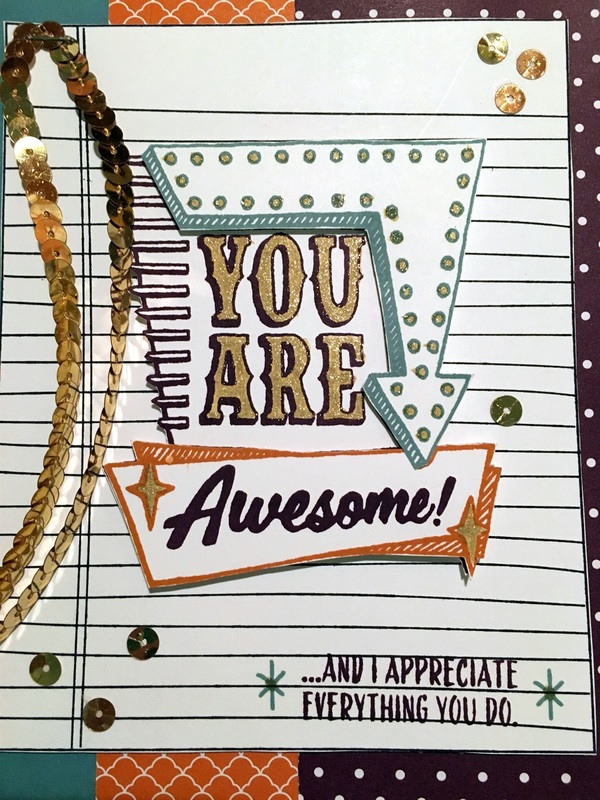
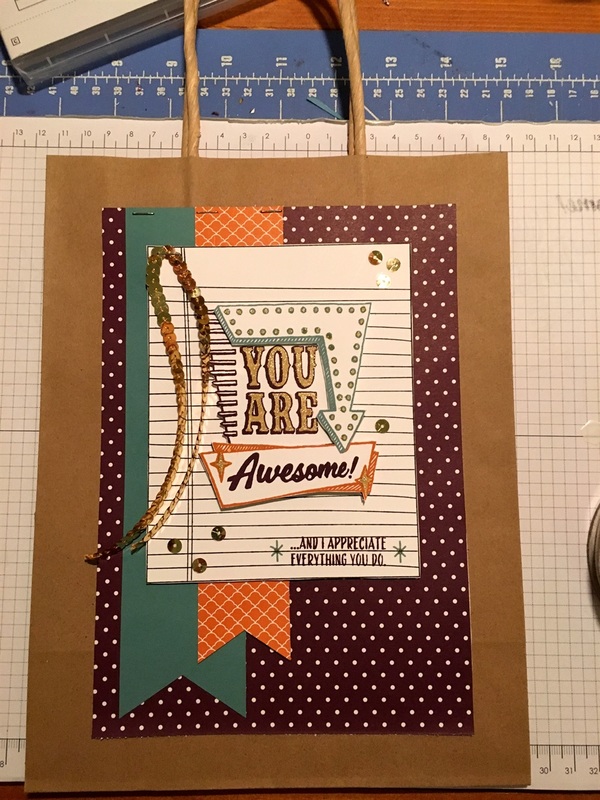
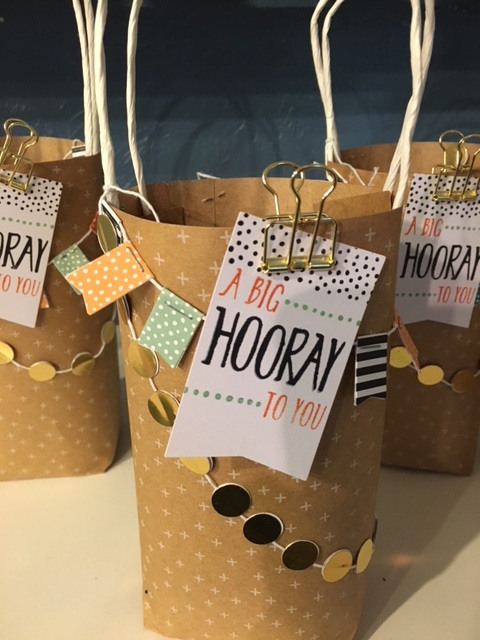
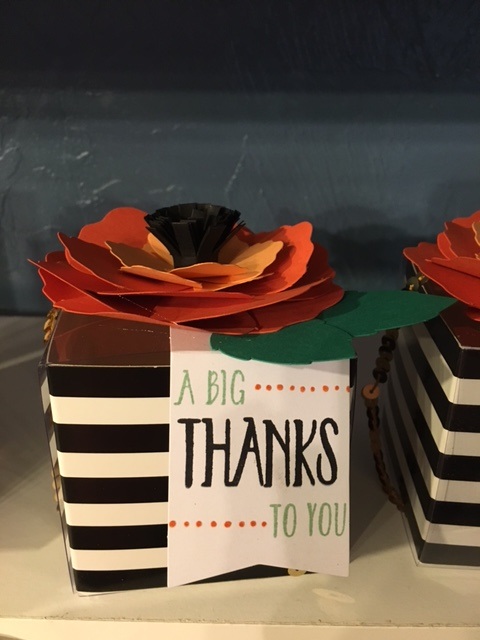
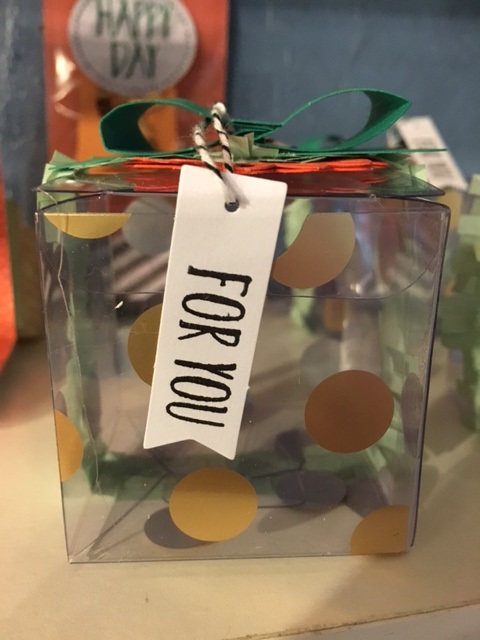
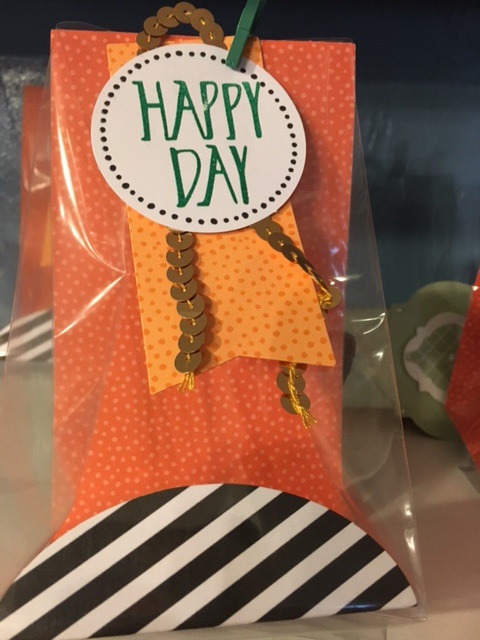
 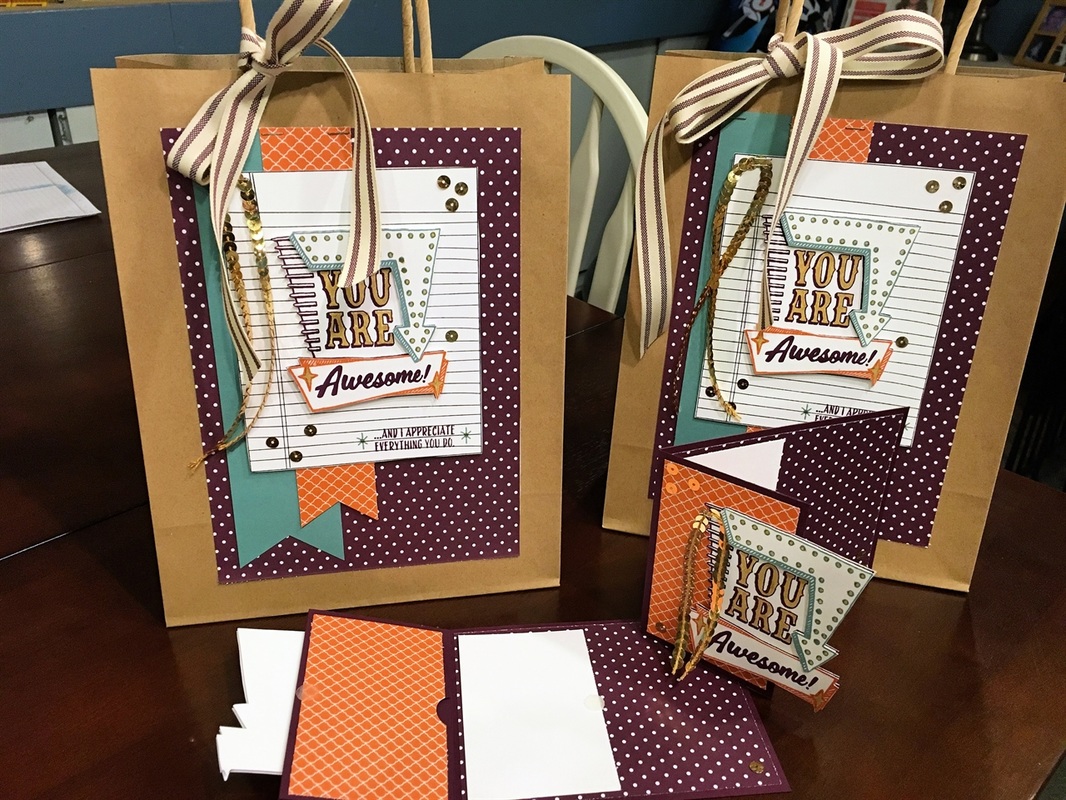 Welcome to our Stampin Friends No Rules June Blog Hop! We have 13 amazingly talented crafters this month. So much fun to be had by all when you follow along and check out everyone's blogs and fabulous projects. Make sure to leave a comment to be entered in the Blog Hop raffle. Read each blog, scroll to the end, and leave a comment with #SFJuneHop!! Each member and guest blogger, will randomly select a winner from our blog comments. We will then pool those together and randomly select the overall hop winner. I would love to hear some feedback and you will earn a chance to win some Blog Candy! Thank you for visiting my blog from Kirsteen Gill's site, and thank you for continuing with the Blog Hop. Enjoy my project and at the end click the NEXT button to continue to Kathie Rotti's blog. Didn't come from Kirsteen's blog?? That's ok, just click the PREVIOUS button towards the bottom of the blog or scroll to the end and click on Kirsteen's name to visit her blog.  This month I decided on a gift bag/gift card set. Fits into the no rules theme because when I decided on my project for the blog, I wasn't thinking, and had chosen the retired 2014-2016 In Colors. My thought was to use up some supplies I had on hand...but oops because typically I only use current products for my blog projects. Now, these projects are so versatile and can certainly be adapted to any papers/colors you have on hand! Let's begin. I decided on the new Marquee Messages stamp set. Love it!!! So fun to use! Since the projects I made were 2 bags and 2 gift cards holders. I stamped the images 4 times in each color. Clean the stamp in between colors. I started with the lightest color, I stamped the Lost Lagoon first, focusing mostly on the arrow section, then since I only need the bottom of the stamp in Tangelo Twist, I stamped closer to edge of the paper and last was Blackberry Bliss, I needed the whole image. Then I cut the images out. I layered onto the Blackberry Bliss using dimensionals. Finished them off with the Gold Wink of Stella. To make the gift card holder, you need a piece of cardstock measuring 4 1/4 x 11. Score on the 11" side to 5 1/2 and 2 3/4. Fold over and only adhere the outside edges, to make a pocket for the gift card and punch a notch using the 3/4" circle punch. See 5th & 6th photos. I decorated the pocket using a piece of DSP that measures 2 1/2x4. The inside piece of DSP measures 5 1/4x4. You could use a piece of white if you prefer to have more area to right on. I used the same DSP on the outside front section. I stapled a strip of gold sequins onto the Marquee and only added dimensionals on the left edge so you can lift open the giftcard. Then I glued on a few sequins here and there to finish it off. To keep the gift card closed I added a little velcro dot. The giftbag was pretty simple. I grabbed the bags at the Dollar Tree. I stamped the Writing Notes stamp using the Basic Black onto Whisper White. Then cut out around it. I also stamped the greeting at the bottom in Blackberry Bliss and 2 stars in Lost Lagoon. I used the same DSP and cut a piece that's 6 x8 1/2 and another at 1 1/2x8. I also cut a piece of Lost Lagoon to 2 x 8 1/2. I punched the ends of the 2 strips using the Triple Banner Punch. I stapled the strips to the DSP and then attached to the bag with Fast Fuse. I also stapled the gold sequins to the top corner of the Writing Notes. I added the Marquee image with the dimensionals. And again finished off with sequins here and there. Last but not least I added the bow with the Blackberry Bliss canvas ribbon. I hope you enjoyed my projects. Please leave a comment with #SFJuneHop and be sure to click next to visit Kathie's Blog. Thanks for stopping by Happy Stampin Steph  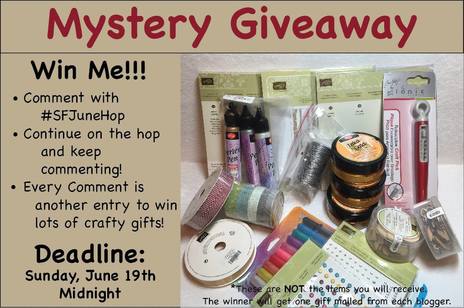 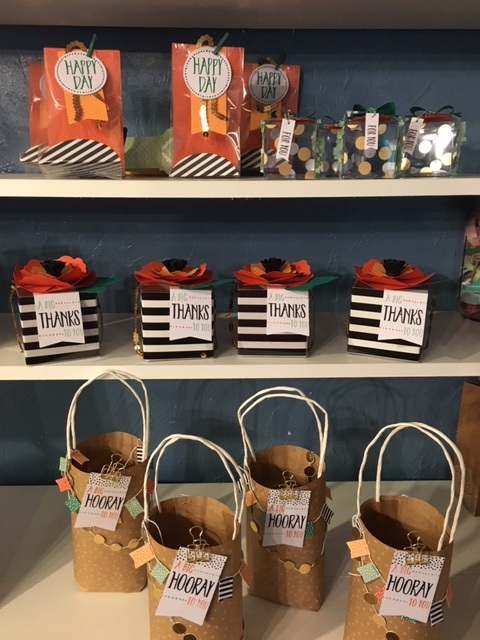 As we anxiously await the launch of the new Annual 2016-2017 Catalog on June 1st, demonstrators were able to pre-order select products in May. I grabbed the gorgeous Perfectly Wrapped Kit and coordinating Perfectly Wrapped Stamp Set that is found on page 159 If you can't wait till then you can join up as a demonstrator and add this item to your starter kit! You get $175 of product to add whatever you like to your kit and pay only $99!! Such a bargain. This kit was so easy to put together. I love how everything coordinates. It truly is the perfect solution for gift giving. And if you're like me, your always searching for the right packaging. The Perfectly Wrapped Project Kit • Makes 8 bags & 8 boxes! WOW crazy. I will be hosting a Perfectly Wrapped Workshop on Wednesday, June 13th at 9am. The kit includes 4 kraft bags, 3-1/4" x 7"; 4 cellophane bags, 3" x 6"; 4 clear acetate boxes with gold foil, 2" x 2" x 2"; 4 cardstock boxes, 3" x 3" x 3"; die-cut cardstock image sheets; Designer Series Paper; Baker’s Twine; labels; stickers; sequin and cotton paper trim; gold clips; mini clothespins. You will make 16 gift packages all for the low price of just $29 (includes tax and shipping) I will provide the stamp set and inks used to complete the kit. Please make sure to RSVP by June 1st so I can order ontime. Want to earn your kit for free? Host a workshop at your home and invite your friends and family to make the Perfectly Wrapped Kit. Each kit or Stampin Up products ordered, you will receive Host Rewards towards free merchandise. Feel free to contact me with any questions Make sure to RSVP on time, either on my Stampin UP website or Facebook page. |


Categories
All
Archives
May 2024
|


 RSS Feed