 FUN WITH PARTS & PIECES
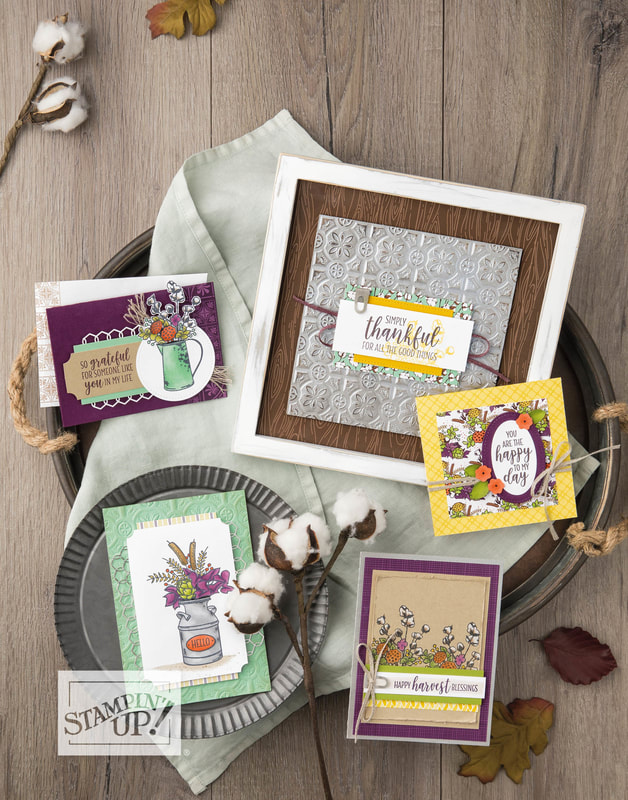
Challenge: Make three lovely cards using the following supplies, but give them each a unique look. A Crushed Curry card base A 3-3/4" x 5" (9.5 x 12.7 cm) piece of white cardstock A 4" x 3/4" (10.2 x 1.9 cm) piece of Cajun Craze Cardstock A 5-1/2" x 2" (14 x 5.1 cm) piece of Plaid Tidings Designer Series Paper Life Is Beautiful Stamp Set Stampin Up's concept artist accepted this challenge, and now look at all of the lovely cards: one for summer, one for autumn, and one all-occasion card! We particularly wanted to draw your attention to the card with three 1-5/8" x 3-3/4" (4.1 x 9.5 cm) panels. The first depicts late summer/early autumn, the second shows a tree in full autumn glory, and the third panel illustrates a tree preparing to cozy up and hibernate for the winter. By changing the number and color of the leaves in each panel, our artist was able to suggest the seasonal progression—and create a fun build-up of leaves on the bottom of the card, which gets bigger with each panel. #stampinup #stampinandscrappinwithsteph #lifeisbeautiful Happy Stampin Steph
0 Comments
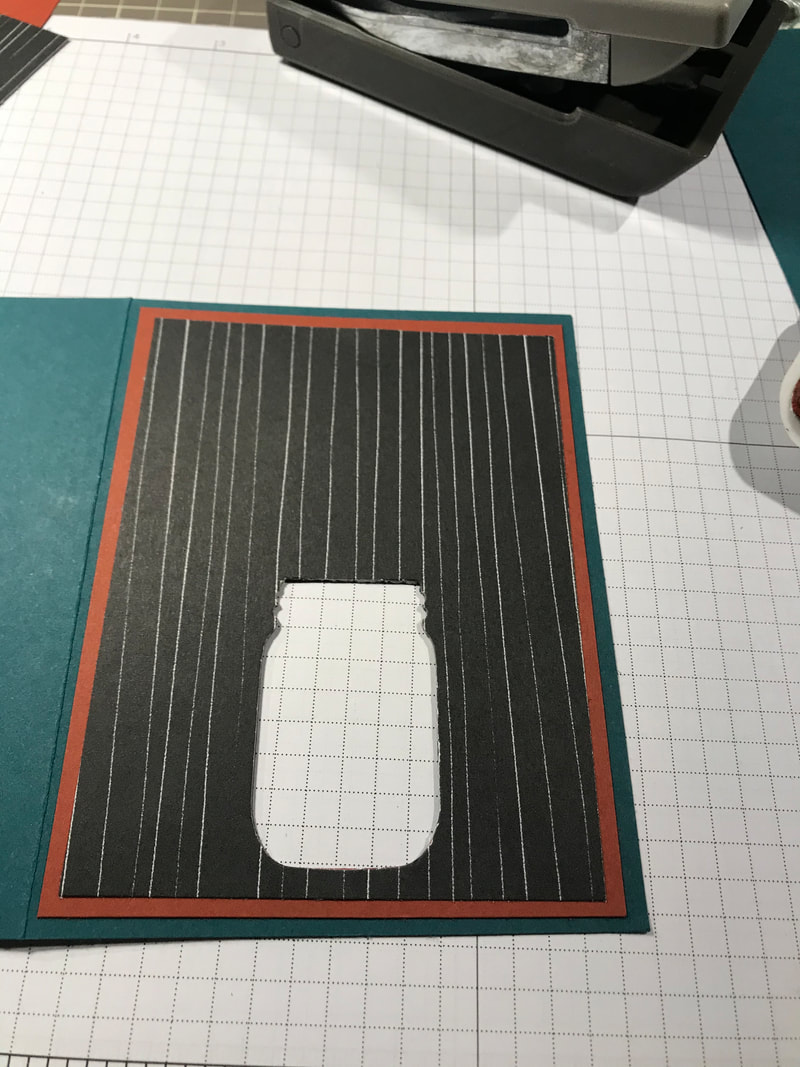
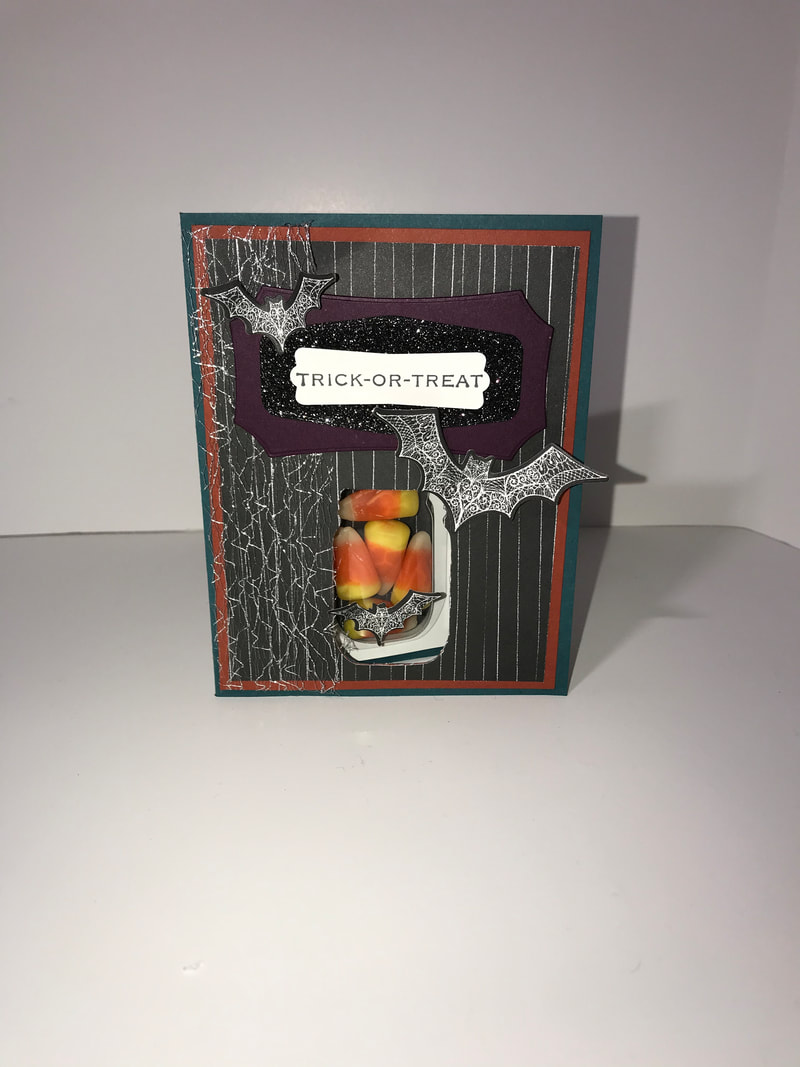
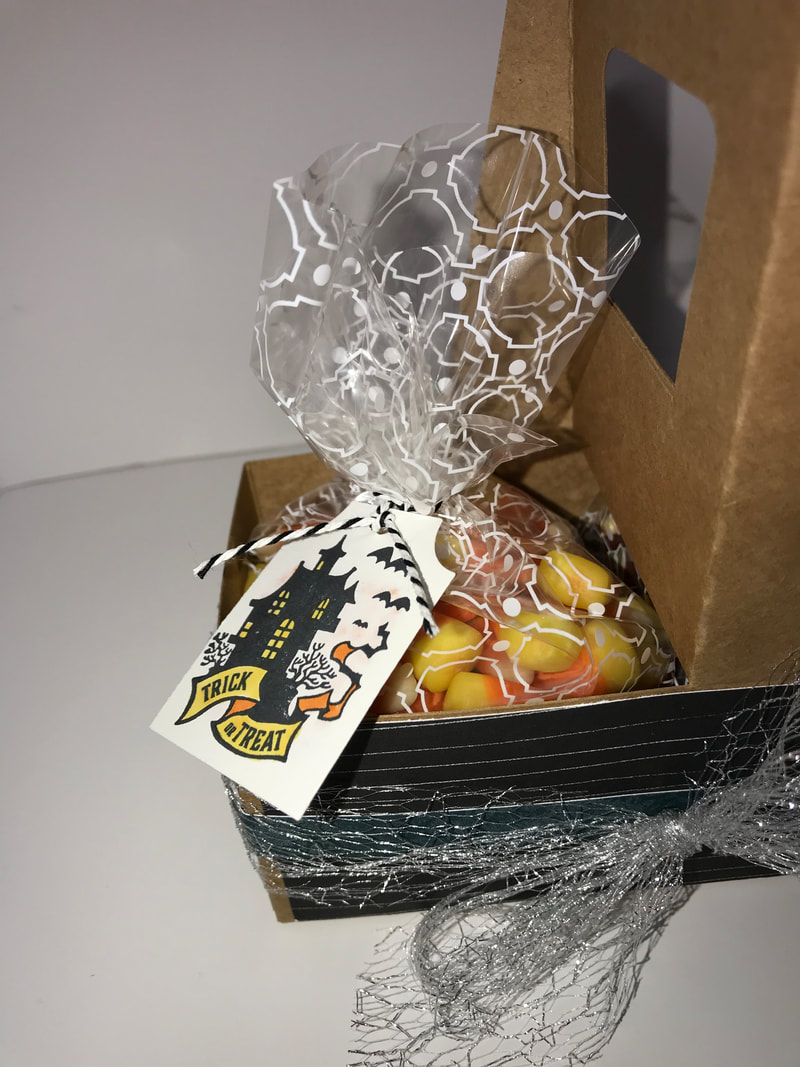
 I am excited to share with you September's Friends Blog Hop! Each month I work hard to come up with a card a projects that are new and different than what I've done in the past. This month's theme is Fall, Outdoors or Halloween depening on where we are located! Normally, I would be working on Hallween Treats to pass out when we are camping to all the Trick or Treaters. But, as you know, Trick or Treating may not be happening. So I wanted to come up with a few treats that I can give my kiddos. And... while I know they appreciate the time and effort I put into handmade treats for them, I know they don't keep the packaging.... I hope you came from Melissa Thomas's Blog and be sure to continue to Katja Ettig, their projects were really amazing! If you missed someone along the way, you can find a list of all hop participants at the end of my projects. 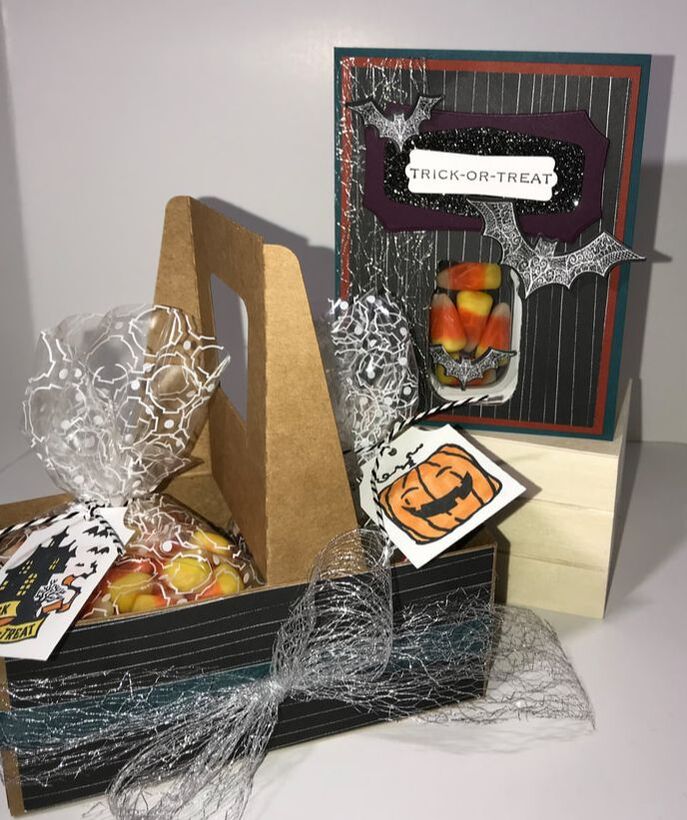 My projects were fun to make and feature new products from the Stampin UP Mini Catalog. Both projects use the Magic in This Night Suite. This suite, to me, doesn't use the traditional Hallween colors like black white and orange, but uses colors like Blackberry Bliss, Cajun Crazy and Pretty Peacock. Which together are just perfect for the season! 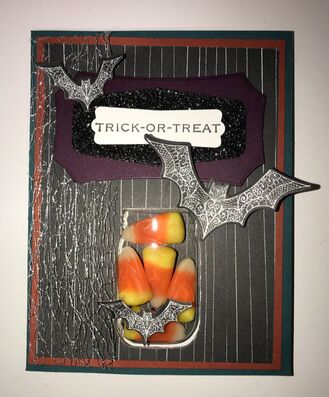 I kept my card layout pretty simple. I started with a Basic Black cardbase, the added a 4 x 5 1/4 layer of Cajun Craze then 3 3/4 x 5 layer of DSP. Before adhering the layers together, I used the jar punch and from the bottom, I put the paper into the punch as far as it would go and made sure it was centered. Then punched. Then I used this layer as a template for the next and for the cardbase. I wrapped the Metallic Mesh Ribbon around the layers and then added to the cardbase. Next, I added the new Mason Jar Shaker Domes, making sure the clear part is popped out of the top of the card. Add your contents. Then I took the black jar that gets punched out of the cardbase...... ...and add adhesive to one side. Add this to the backside of the dome. Make sure the adhesive side is out. Remove the tape off the dome and fold the back side of the card up. The dome will now be stuck to the inside of the card. But the dome will pop out of the opening you punched out!!! Hope this all makes sense. It really is easy too do! I will be sharing a Facebook Live on my Stampin & Scrappin Page, Friday to demonstrate the card. Next add the Blackberry Bliss cut of of the largest label Hallween Magic dies in the suite. I also cut out the Black Glimmer Paper using a die from the Tasteful Labels Dies. I cut the bats out of the DSP using the Hallween Magic Dies, they line up perfectly! It seems like theres alot but I promise it really is easy to make! To make the treat holder, I used the Mini Coffee Carrier and decorated it with DSP. I used the same pattern I used on the card. I got 2 of each sizes then I took a strip of 1/2x12 DSP and 1/2x6 to wrap around the base. Next I wrapped the Metalllic Mesh Ribbon and tied it in a bow. I used 2 Mosaic Gussetted Cellophane bags and filled one with candy corn and one with mini chocolates. Tied them closed using the Black/White Baker's Twine from the Playful Pets trim combo pack. For the tags, I used the Everything Essential Bundle. I stamped 2 tags, bothsides. One side was the Haunted House - Trick or Treat and the otherside the Jack-o-Lantern. I colored the windows and label on the house with Daffodil Delight and a little Pumpkin Pie. And I colored the Jack-o-Lantern with Pumpkin Pie. This way no matter which way the tag is laying there is an image showing. I used a whole punch and added the tags to the twine and finished with a knot. So Fun. You could also decorate and fill the Mini Coffe Cups with treats. But since I'd give these to my kids, I decided the bags will do!!!! I hope you enjoyed my projects. Be sure to visit Katja Ettig blog and see her amazing projects! Thanks for stopping by Happy Stampin Steph Below is a list of all the Stampin Friends Blog Hoppers.
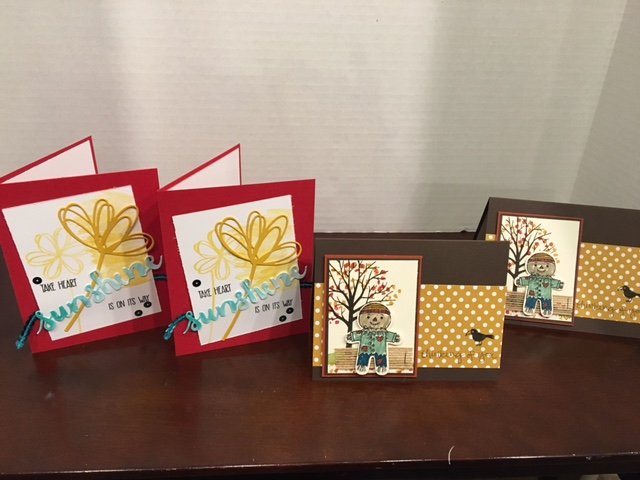
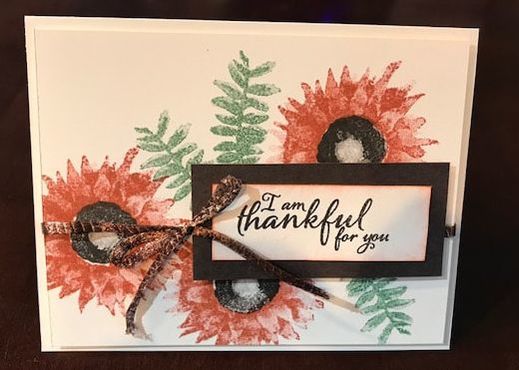
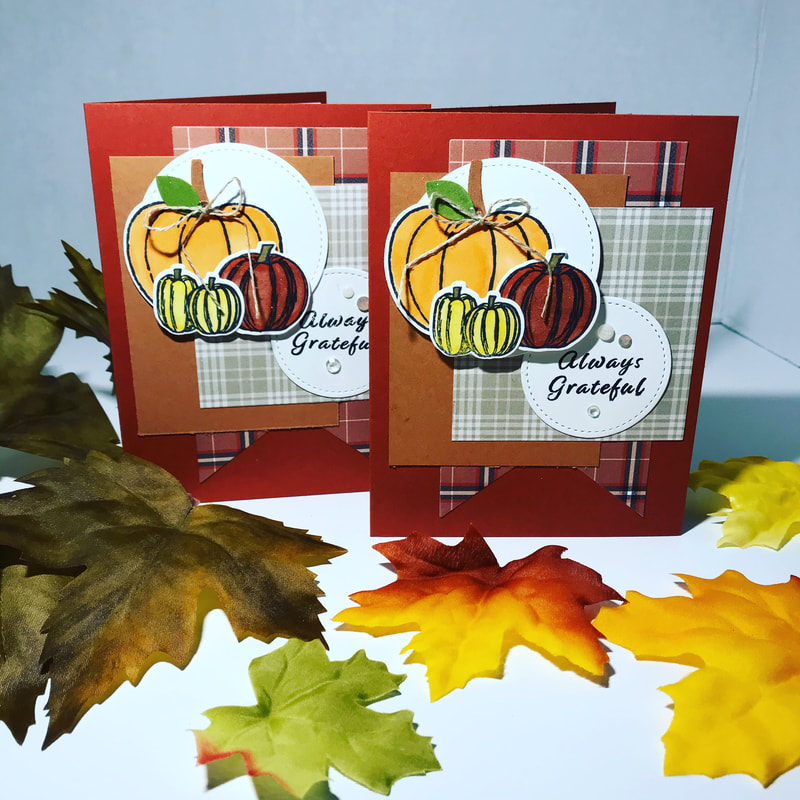 Although fall scents are not in the air yet......I can't wait for the fall smells and the crisp air. I look forward to apple and pumpkin picking and baking pies! The smells of cinnamon as soon as you walk in!! Another fall inspired card that’s a little bit spicy! Cajun Craze and Cinnamon Cider are perfect seasonal blend! There are so many color options with the Plaid Tidings DSP.....you will find for any fall/winter holiday. I know I will be reaching for this paper to create with over and over!!!! Make sure you add the pack to your Mini Catalog Wish List! #gatheredtogether #harvesthellos #plaidtidings #stampinup #stampinandscrappinwithsteph @stephjandrowstamps #msscardchallenge13
Share your favorite fall things to do!! Leave a comment and I will send you the complete card pictured above! Thanks for stopping by Happy Stampin Steph  Today I am sharing a little alternate card I used the same layout and stamp/dies as the card I shared in yesterday's blog post, but changed the patterned paper color!!! I can not get enough of the new Plaid Tidings paper. I combined Pumpkin Pie and Rich Razzleberry with the new Plaid Tidings DSP, Gathered Together Stamp set and coordinating Gathered Leaves dies (returning favorites). You will be able to get your hands on these fun fall products on August 4th when the new Stampin Up Mini Catalog is live for ordering! Be sure to let me know if you are in need of a catalog!!! Happy Stampin Steph #bringonfall #stampinup #gatheredtogether #stampinandscrappinwithsteph #msscardchallenge14 Cozy fall crafting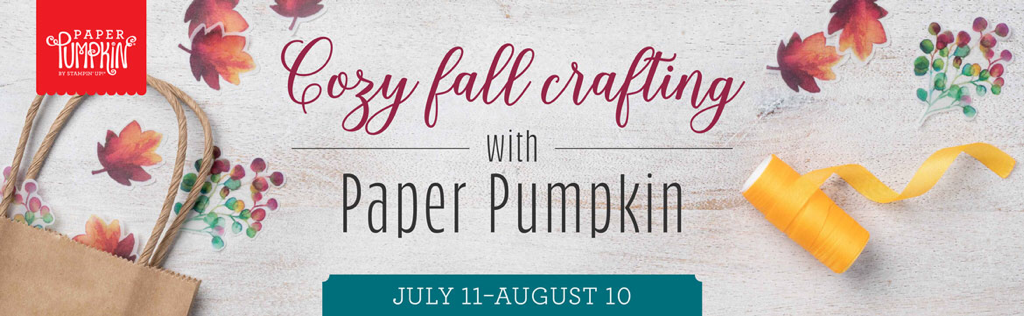 What’s the old saying? Variety is the spice of life? At Paper Pumpkin, we like to mix things up and keep your crafting experience fresh and fun. We plan each kit carefully, allowing you to check as many creative boxes as possible while keeping our projects simple—so you can explore the world of papercrafting with confidence. With this in mind, we are bringing an elegant fall gift packaging kit to Paper Pumpkin fans this August. Be sure to subscribe or have your subscription current before August 10th to receive this kit. And don’t forget about The Gift of Fall Add-On Bundle this a separate purchase for those who would like to convert their August Paper Pumpkin kit into cards. The price for the add-on bundle is $10.00 and is available for Paper Pumpkin subscribers only. This add-on is available beginning August 1, while supplies last! View the video below to see a sneak peak of the August kit and then click on this link to subscribe https://www.paperpumpkin.com/en-us/sign-up/?demoid=2127355 Please contact me if have any questions!! Happy Stampin Steph 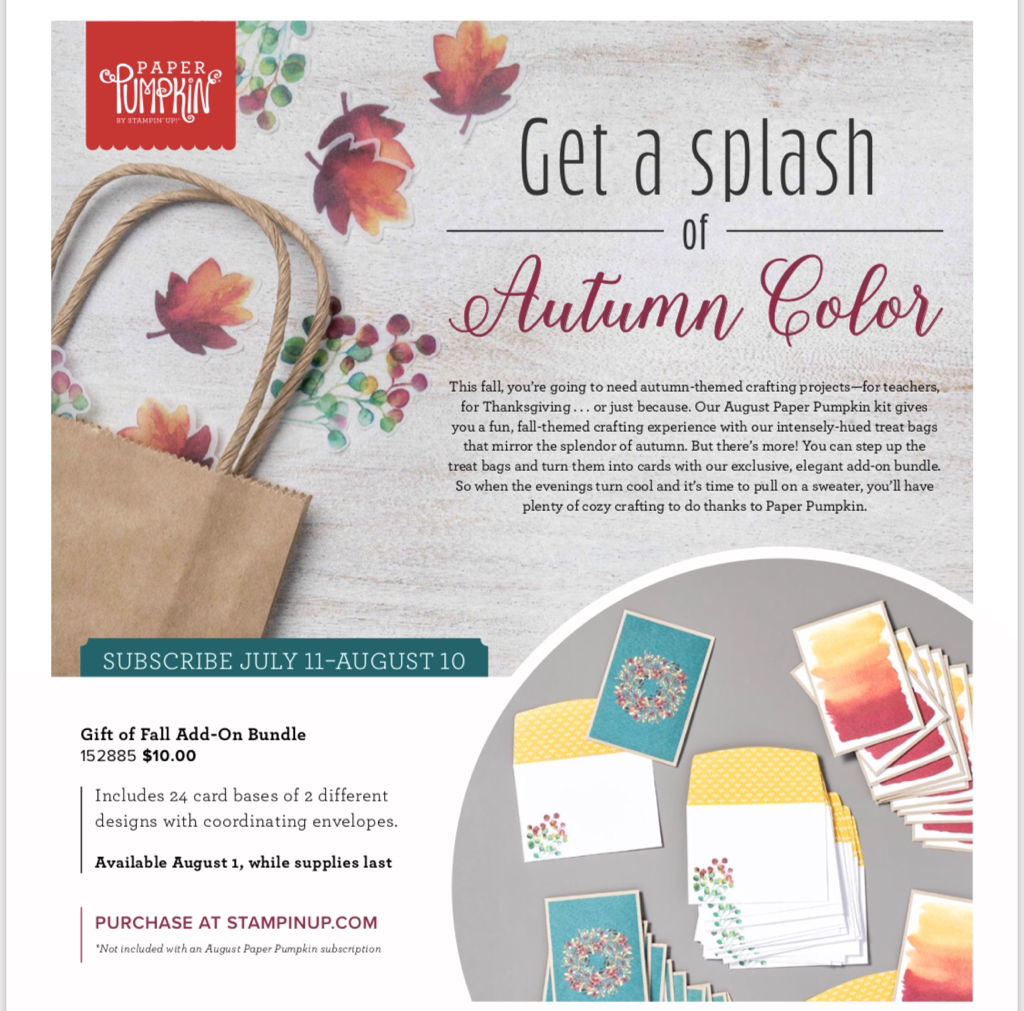  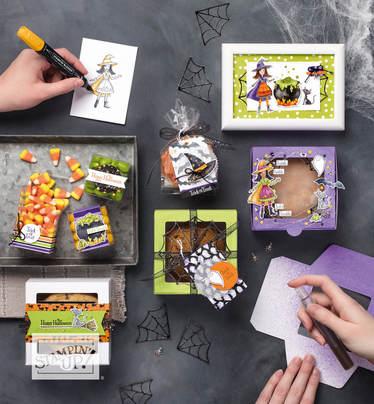 Stampin Up's Holiday Catalog is here! Do you have a copy yet? There is so many new products I am just so excited to share with you! You can enjoy endless hours of crafting as we enter each season! Halloween, to Christmas and New Year's and everything in between! The best part is Stampin Up remain true to their traditions....coordinating paper to stamps, inks and embellishments with Suites! There is 7 Suites in this catalog! And if you follow me on Facebook, I shared my favorite called Festive Farmhouse! Here are 3 more that I couldn't wait to get my hands on! Spooky ………...Toil & Trouble! I've been using this suite just about everytime I've crafted! See this suite on pages 48-49
The Country Lane Suite is on pages 42-44 combines some of my favorite Stampin Up colors, Blackberry Bliss, Cajun Craze, Crushed Crazy, Early Espresso, Mint Macaron and Old Olive. They are the perfect colors to create warm, cozy country projects. Santa's Workshop on pages 18-21 is such a fun Suite. Perfect for all ages to create! And just like the Suite says, Craft the perfect Christmas-just like Santa.
Check out my calendar of events on Facebook and Stampin Up. I have workshops coming up that feature several of these new products ….and more to come! Leave a comment for a chance to win a little blog candy! Thanks for stopping by Happy Stampin Steph 
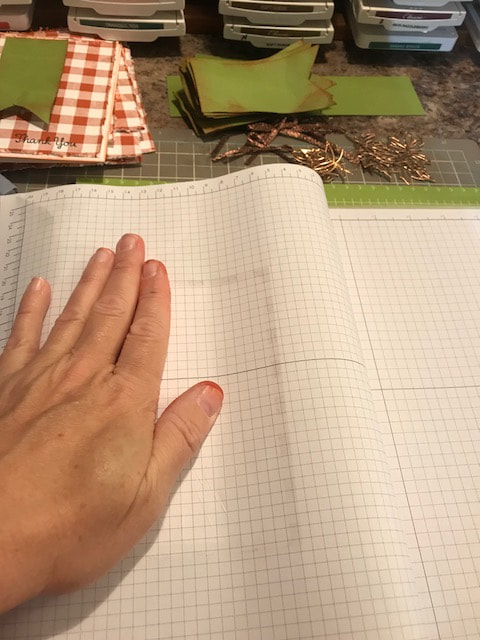
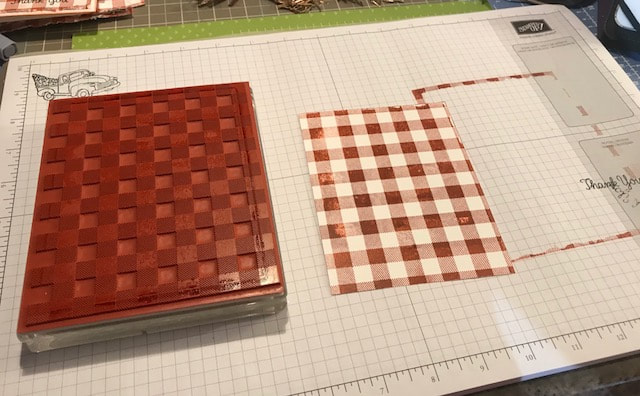
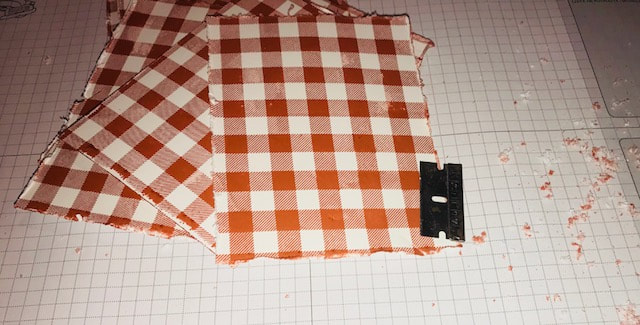
First I laid the stamp do...stamp side up and the I inked it up using Cajun Craze. Lay the cardstock on top, and then I folded over my grid paper and rub the top of it evenly, then gently lift of the cardstock! So much easier than trying to get an even stamped image the other way!!
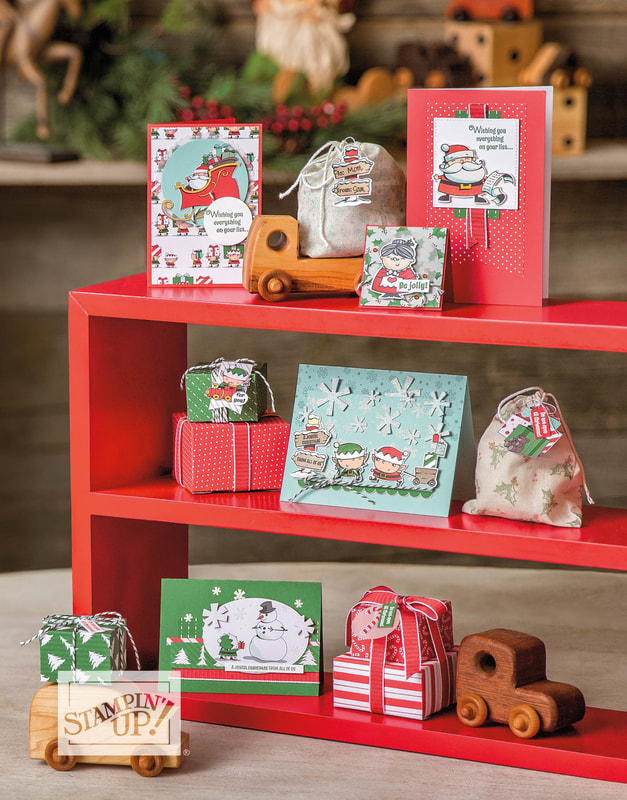
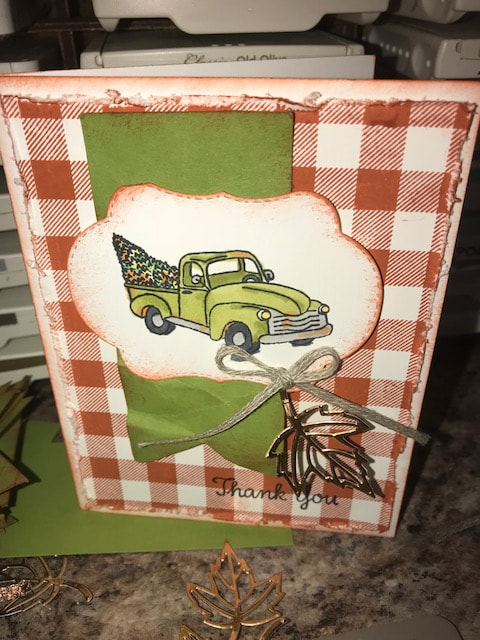
The truck image is from the new Farmhouse Christmas stamp set! I LOVE THIS SUITE. It was the first suite that made my list of must haves!! Even though this is a Christmas set, I think it works pretty well for Fall, just leave the sentiments out!
I stamped the image and then cut it out with the new limited Stitched Seasons Framelits. The leaf is also from this framelit set and I used Copper foil sheets I colored the truck in with the new blends. I used Old Olive, Cajun Craze, Basic Black, Shaded Spruce, Daffodil Delight and Smoky Slate. The banner is cut from Old Olive using the Triple Banner Punch. I crumbled it all up and then sponged the edges with Cajun Craze. I used the new Braided Linen Trim for the bow!! This can be found in the new Holiday Catalog in the Country Lane Suite! The bag is basically the same layout as the card. I used a white craft back I bought at AC Moore! I am filling it with fall soaps to give as a gift!!
I hope you liked my projects, be sure to leave a comment. I will be drawing 1 lucky winner to receive this completed project...minus the soaps (oops)
Be sure to continue with the blog hop Cindy Waldroff is next up and you can go to her blog by clicking on her name below! Thanks for stopping by Happy Stampin Steph 
Oh My Goodness! Wasn't Barbara Welch's projects amazing! Barbara is so talented! It's very exciting to follow after her in our Blog Hop!
This month, I am sharing a really fun, and super easy, gift giving project! For this month's hop, we have a Thanksgiving Theme. My project is more of a Fall/Winter Survival kit. As we head into the colder months, it's fun to give a little pick-me-up or someone who might be feeling a little down or under the weather. And well, there is just so many items you could add to this kit. So before I get started, we have 13 crafters this month (including myself) so be sure to check out everyone's blog. Leave a comment about what you LOVED about my projects and include #SFbloghop2017 on your comment! And we will choose 1 lucky winner at the end!! Scroll down to see the blog hop prize!!! Sue Lovejoy was the the winner of last months hop! Congratulations! If you get lost along the way or not sure whose blogs you may have missed, a full list of participants are at the end of my post. 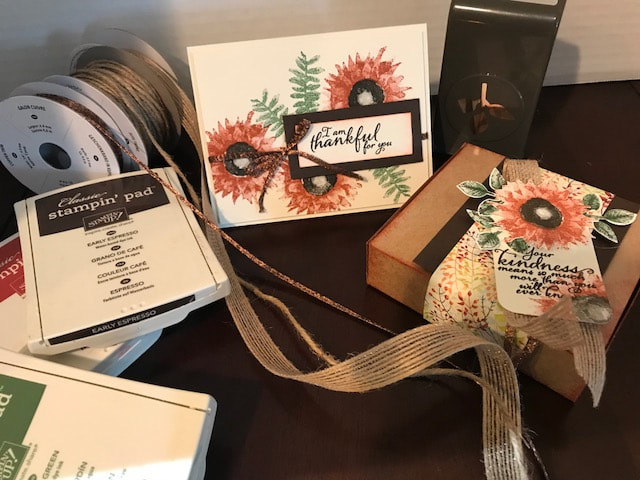
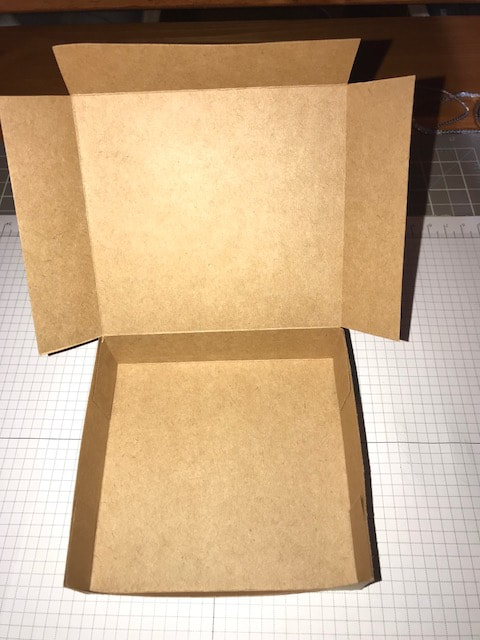
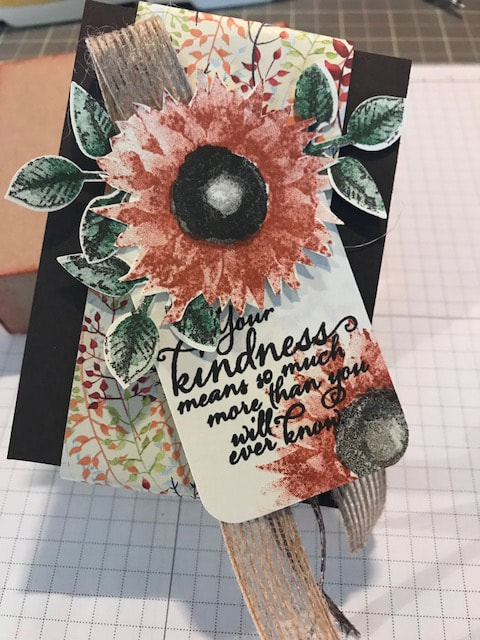
Stampin' Up's Painted Harvest Suite has been one of my favorite line of products in the Holiday Catalog!!! The images on the Painted Autumn DSP is just amazing! The designs just pop off the paper! My projects feature products from this suite! I used Very Vanilla and Early Espresso cardstock along with Early Espresso, Cajun Craze and Garden Green Ink pads. I knew I wanted to put together a little pick me up kit. I included a hand sanitizer, a couple packs of herbal tea, candy and a lip balm. I thought great I will use the new pizza boxes only to realize it was too small!! So I made my own box. 
I will admit, I typically can not come up with the measurements to make a box to save my life! But this time I was focused and figured it out! I am sure there are many boxes like mine...but I designed this size specifically for my contents.
So, what do you need? A piece of cardstock that measures 7x12. I used kraft paper because of the color and weight! With the 12" side horizontal, score at 1 1/4, 5 1/2, 6 3/4 and 11. Turn the paper so the 7" side is on top and score at 1 1/4 & 5 3/4. As you can see on the picture to the left, you will need to fold and burnish your score lines. You will notice there is one end that is a 1" fold and the other end isa 1 1/4". The 1" end will be your lid.
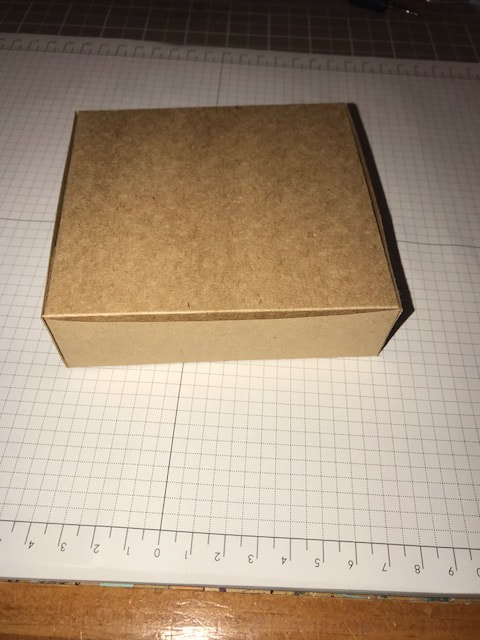
It will tuck in when the box is closed so it won't matter that it is 1/4 shorter. Remove the 2 outer edges from the 1" edge. Cut up on your score lines and add adhesive to the outside of your flaps. And assemble the bottom of your box. Tuck the lid closed. See pictures below.
I sponged the edges of the box in Cajun Craze just to add color. To keep the box closed, although it will stay closed without it, I made a simple belly band to go around.
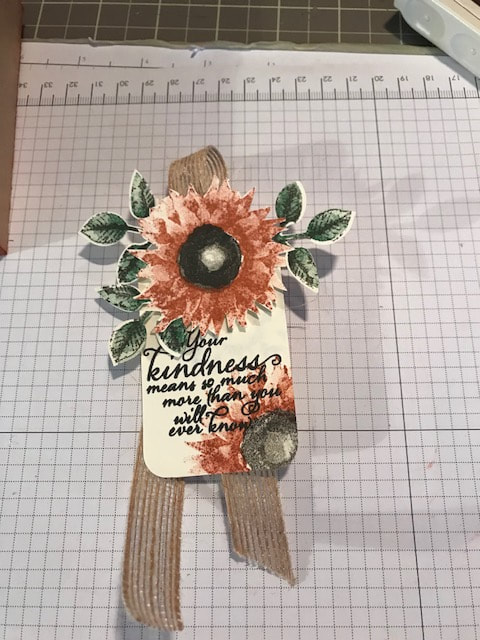
I cut a piece of DSP 2x12 and added a piece of cardstock that was 3x4 under it. I stamped the flower in Cajun Craze, I stamped of before stampin each layer of the image. I fussy-cut the flower out. Then I stamped 3 leaves in Garden Green and added the veins in Early Espresso, punched them out with the Leaf Punch. Cut a 2" strip of Very Vanilla for the tag. Trim it to the length you want. I repeated the flower at the end of the tag and rounded the corners. I used a piece of 5/8 Burlap Ribbon and Copper Trim to sit behind the tag before adhering to the belly band.
The thankful sentiment is stamped on a piece of Very Vanilla that measure 1x2 1/2, layered on a piece of Early Espresso that measures 1 1/2x3. Adhere to the card with dimensionals.
And there you have it. My projects for the Thanksgiving Blog Hop by Stampin Friends. I hope you Loved it. 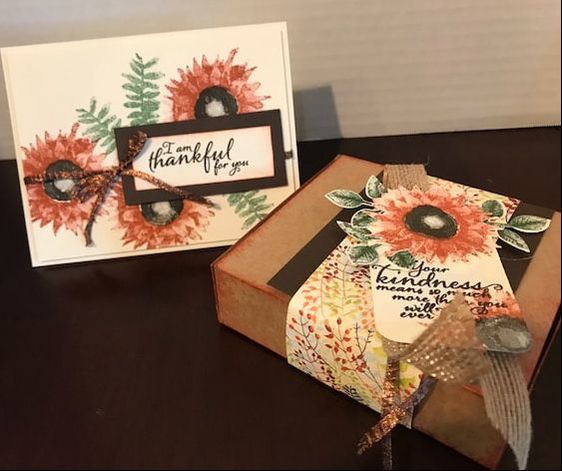
Be sure to leave a comment telling me what you LOVED about my projects and include #SFbloghop2017 and you will be entered for your chance to winner the Many Merry Star Simply Created Kit. WOW how amazing is that??
Thanks so much for joining us! I hope you had a great time! Happy Stampin Steph 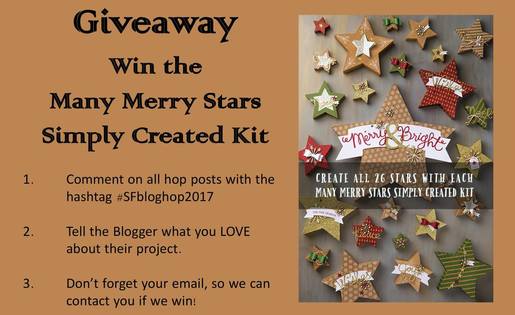
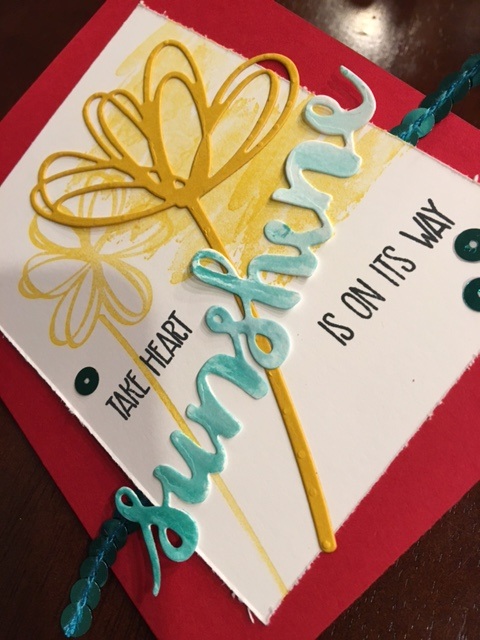
 Look at these amazing cards??? I often get asked where I come up with my ideas. Inspiration is everywhere. I rely alot on the catalogs for ideas as well as Pinterest. Sometimes I need to see something used. And then I create my own. Othertimes, I come across ideas that are awesome and well, why would I need to change anything. That was the case for this week's cards. I typically host my Card Club every other week. But this month I had 2 weeks back to back because of school starting, so I would continue with my bi-weekly schedule. The Sunshine Wishes cards, came right from page 97 in the Annual Catalog. Simple to make but full of detail! The Cookie Cutter Halloween cards (new set in the Holiday Catalog) were CASED from Pinterest and Splitcoaststampers by Diane Hughes. I just loved everything about this card and decided to not change a thing!!! Would you like to learn how to make them?? Make sure you come by my Card Club. I am offering 2 dates (one evening and one morning) for your convenience. September 13th at 7pm or September 14th at 9am. Pick whichever date works for you!!! Be sure to RSVP by Monday the 12th. Check out my Facebook page or my Stampin UP website for event details. Need a catalog? Please contact me and I'll be sure to send you one. Happy Stampin Steph 
Welcome to the Stampin Friends Thanksgiving Blog Hop! I'm really excited to be part of this Blog Hop. There are 12 amazing crafters involved. I was lucky enough to be a guest hopper this month, along with 2 other fabulous ladies.
So make sure you check everyone's blogs out. After reading the blog, scroll to the end of this post and you will be able to see all the Hoppers and Click Next to visit Wynne's Blog. This month's guest hoppers are: 1. Wynne Grob 2. Kim Smith 3. Steph Jandrow
What's blog without a little blog candy???? Do you like crafty supplies???? Everyone likes a free gift, right???? If so, make a comment on all 12 posts in this hop then, email Elizabeth everyone's favorite color at [email protected]. What do you get? In addition to enjoying all of this group's creations, you'll be entered to win a fun crafty present from every one of the bloggers! That's 12 crafty presents! Just a little thank you for your time! AMAZING!

Here's a quick picture of the products I used to make today's Blog Hop projects. I love the color green, all different shades of green. I'm naturally drawn to it, so I knew whatever I was planning on designing for the Blog Hop was going to have some sort of green in it. What could be more perfect to show green than a Thanksgiving project! So wala! My favorite color was included!
Oops I forgot to put the Winter Wonderland Vellum Stack in the picture. That's ok, you can scroll to the bottom to see the names of all the products. 
Here's the Thanksgiving notecard I decided to make. I wanted use the Winter Wonderland Vellum for this project. I was stumped at first. But, then the idea for this card came to me. I remembered awhile back during one of my card clubs, I put together a notecard for my guests to make. We used vellum to make the treat bag and a piece of cardstock for the notecard inside. It was perfect.
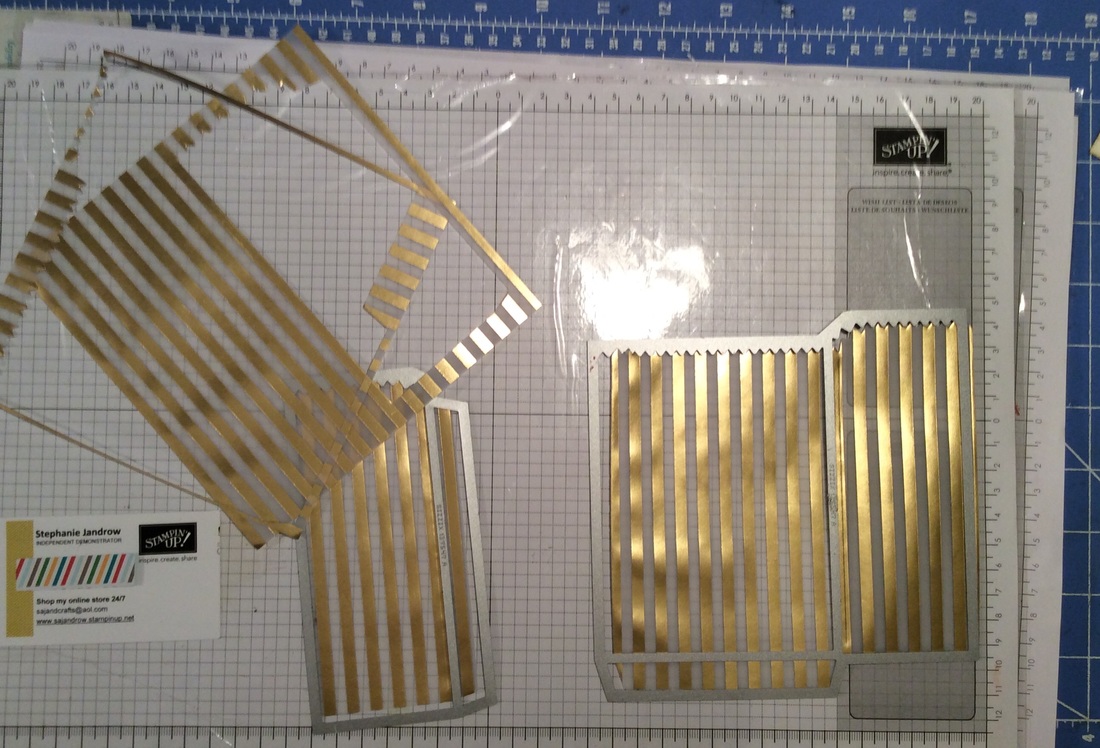
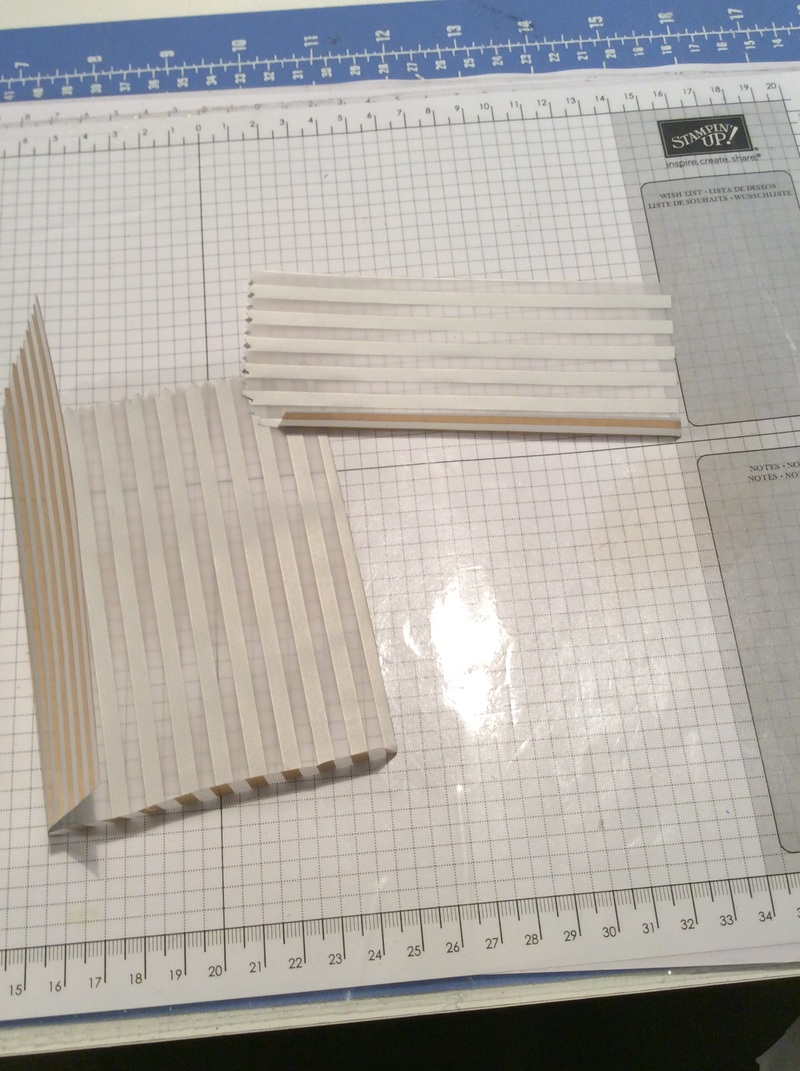
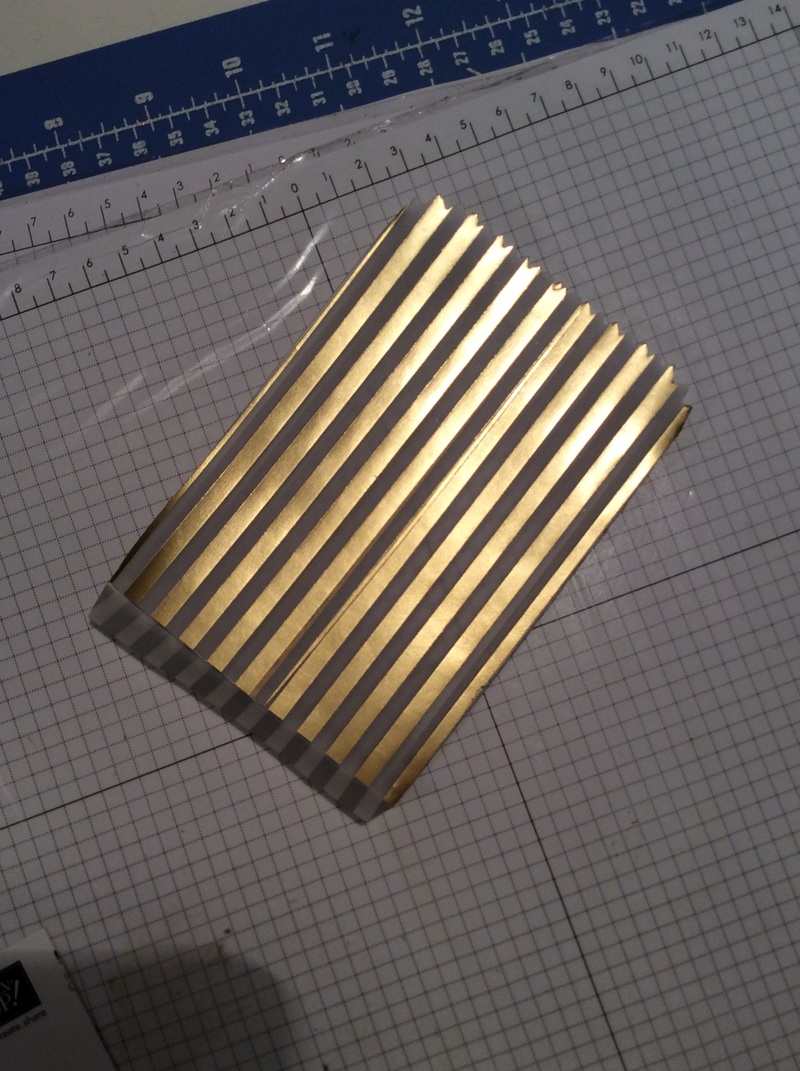
As shown in the first picture. (Top Left) You will need 2 sheets of 6x6 Vellum. Take one sheet and the Mini Treat Bag Thinlit and run it through the Big Shot. Take the 2nd sheet of vellum and use the side panel from the Mini Treat Bag Thinlit and run it through the Big Shot. Gently fold on the score lines. Then add adhesive (I used Fast Fuse) to the side panel tab and attach it to the treat bag. Add adhesive to the one of the back panels. Then add adhesive to the bottom tab and adhere. The Mini Treat bag is done.
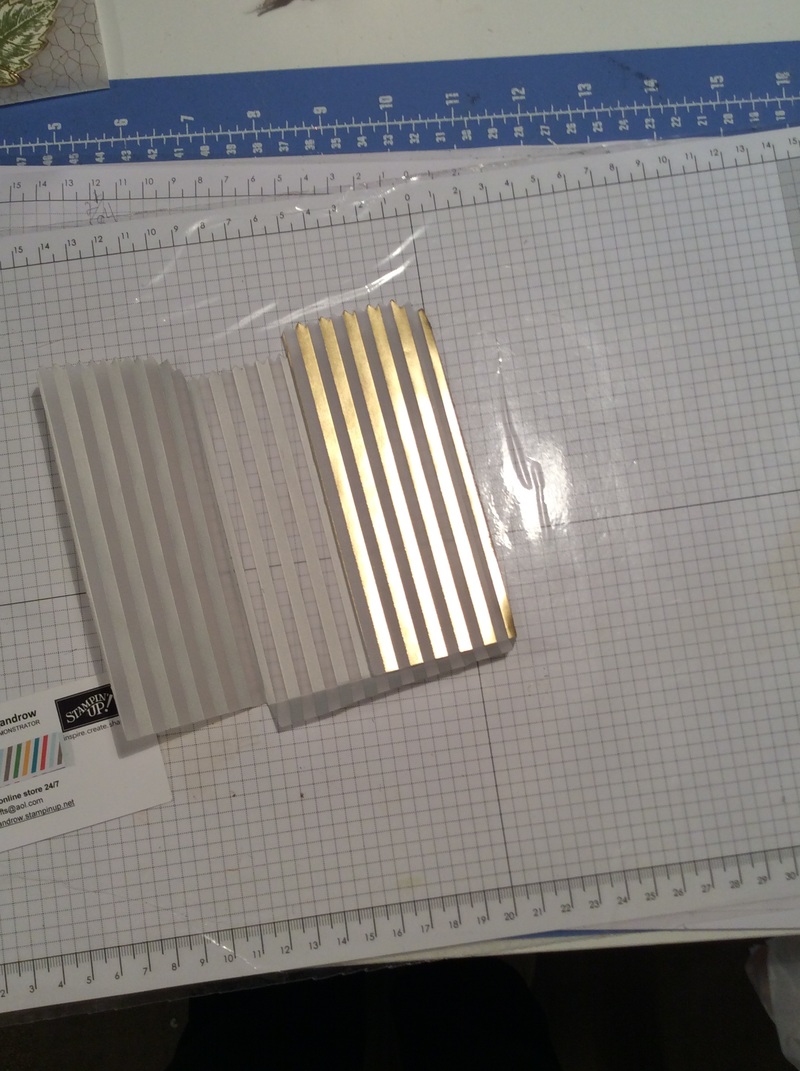
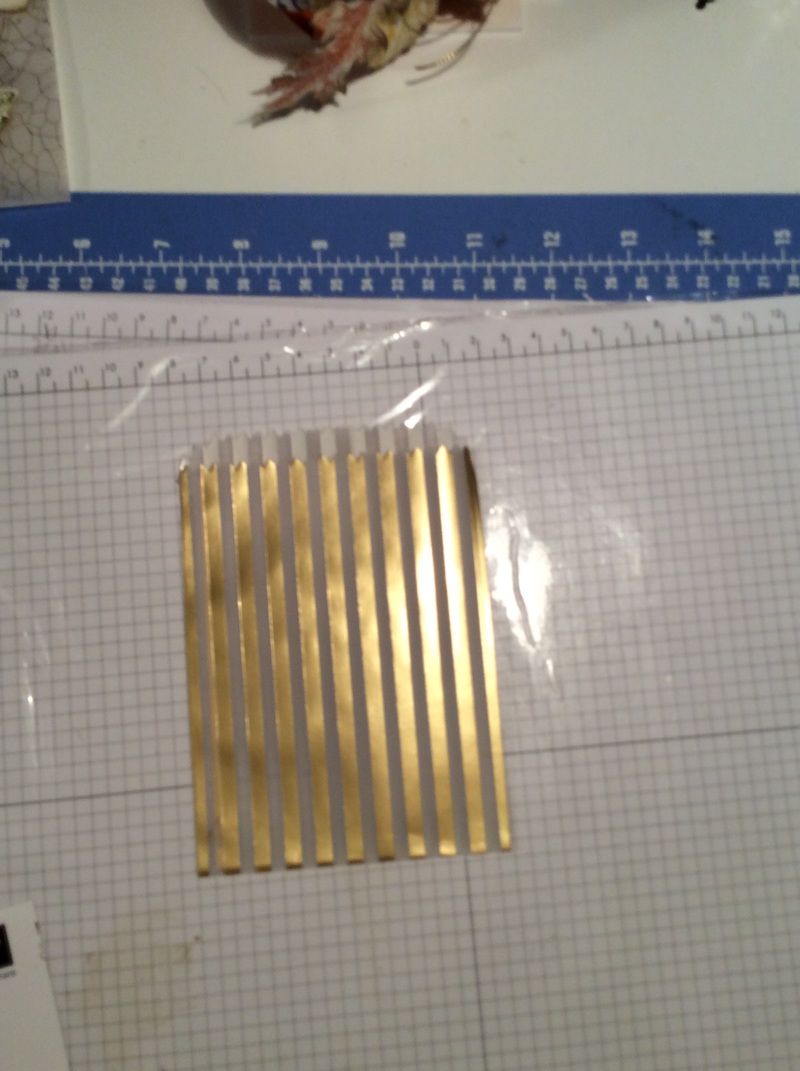
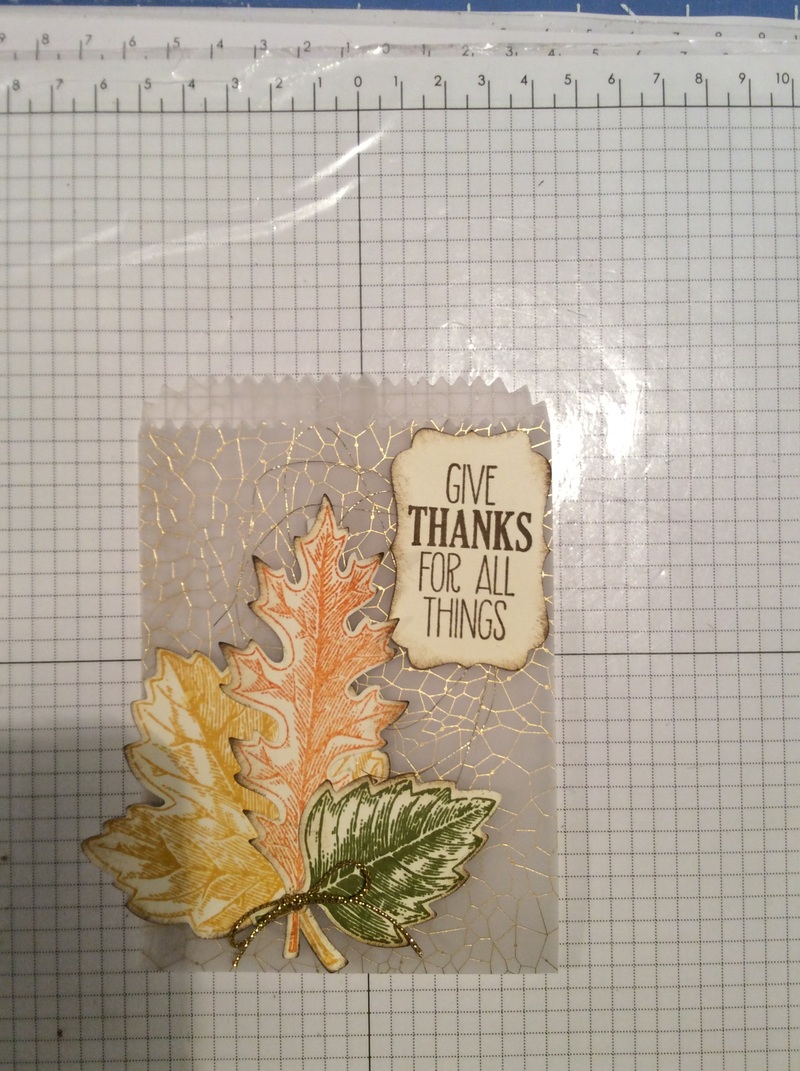
As I was playing around designing the project I decided I preferred the crackle print from the vellum stack and went with that for my finished project. I felt the gold stripes would work well for a Christmas project so I decided to put it aside for later. 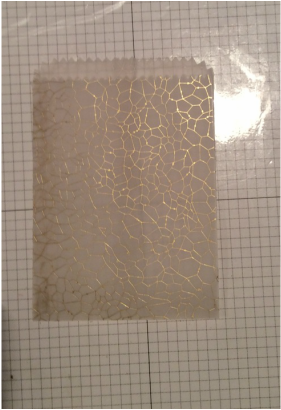
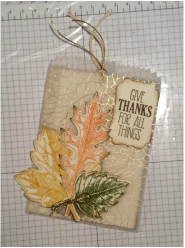
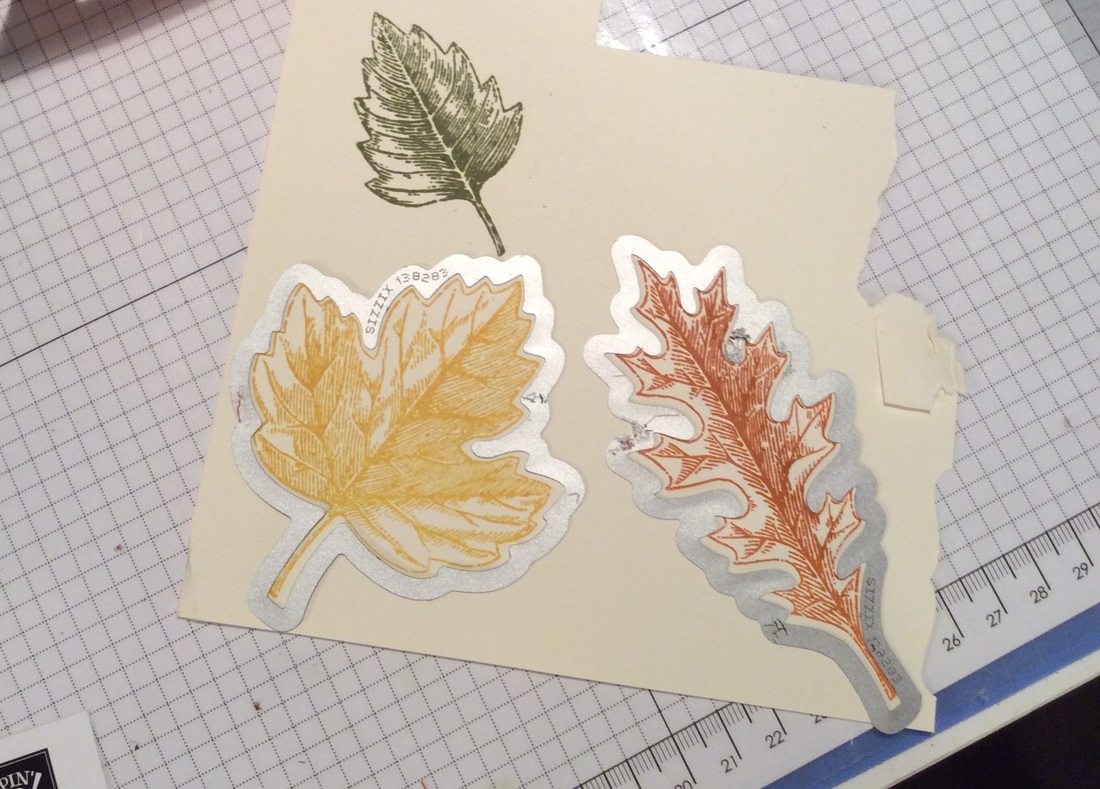
Take a piece of scrap Very Vanilla cardstock and stamp 3 leaves from the Vintage Leaves stamp set, using Crushed Curry, Old Olive and Tangelo Twist. Next, take the matching leaf shapes from the Leaflet Framelits and run them through the Big Shot. Stamp the Give Thanks For All Things saying from the For All Things stamp set, on a scrap of Very Vanilla with Soft Suede ink. Punch it out using the Decorative Label punch. Sponge the edges of the leaves and label with Soft Suede.
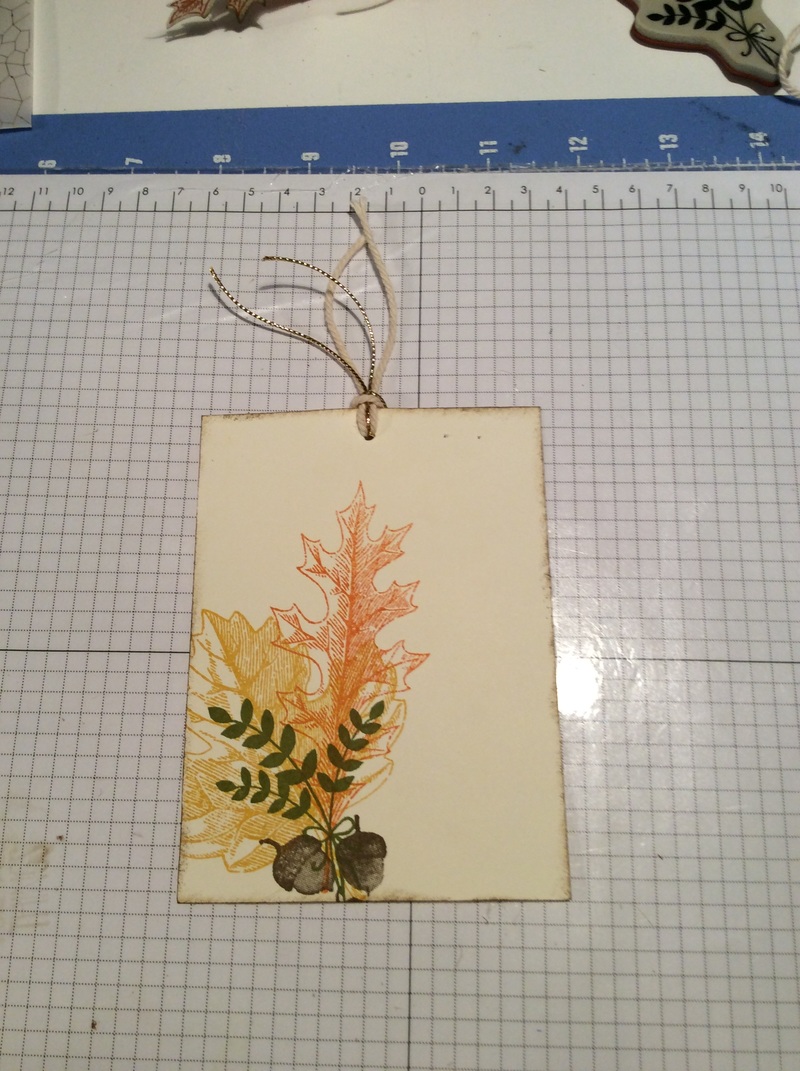
Next you need Very Vanilla cardstock. I cut a piece to 3 1/2 x 4 3/4 for the notecard to fit inside the treat bag. Stamp the same leaves onto the notecard. I also added the bunch of leaves from the For All Things set. Sponge the edges of the notecard with Soft Suede. Punch a hole at the top of the notecard using the 1/8' Circle Punch. I cut out the same length ( about 6") of Very Vanilla Think Baker's Twine and Gold Cording Trim. Tie onto notecard.
Before decorating the front of the mini treat bag, I took some Gold Metallic Thread and loosely created loops. I held them down when I layered the leaves onto to the front. I used glue to dots on the leaves and the label. Add your notecard inside and your project is done.
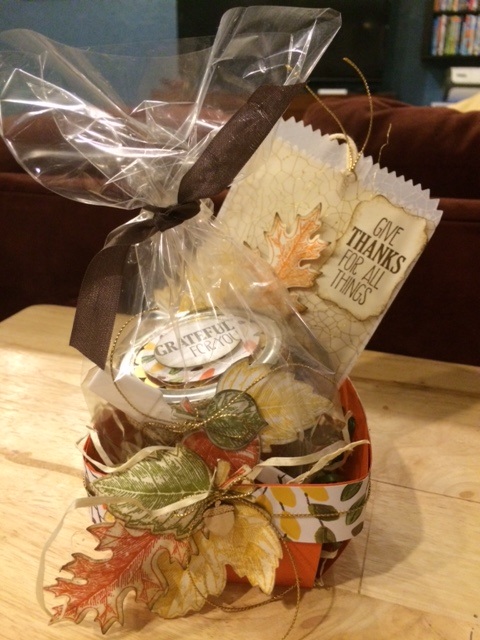
Here's a super easy Thanksgiving project I made to go along with the notecard.
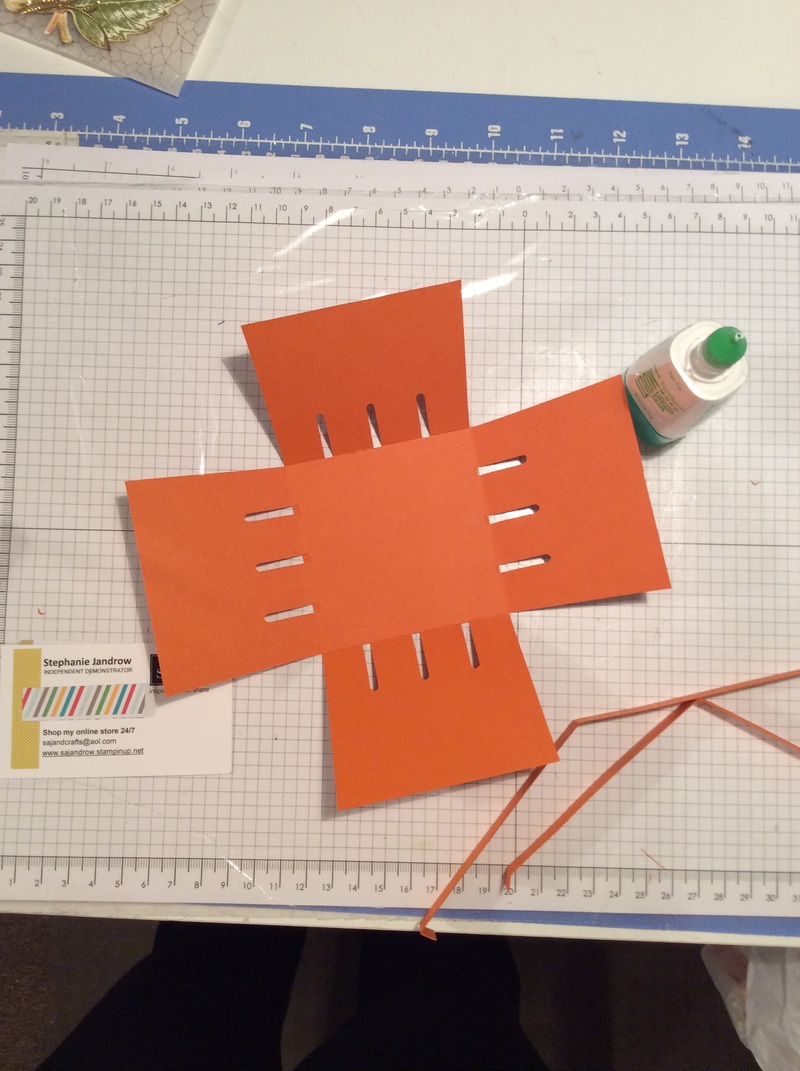
I made a berry basket using Tangelo Twist cardstock. Cut the cardstock in half so you have 2 pieces that measure 8 1/2x5 1/2. Take the Berry Basket die and cut out the basket using the Big Shot. You will need to cut this out twice. But remember to cut one piece of paper at a time.
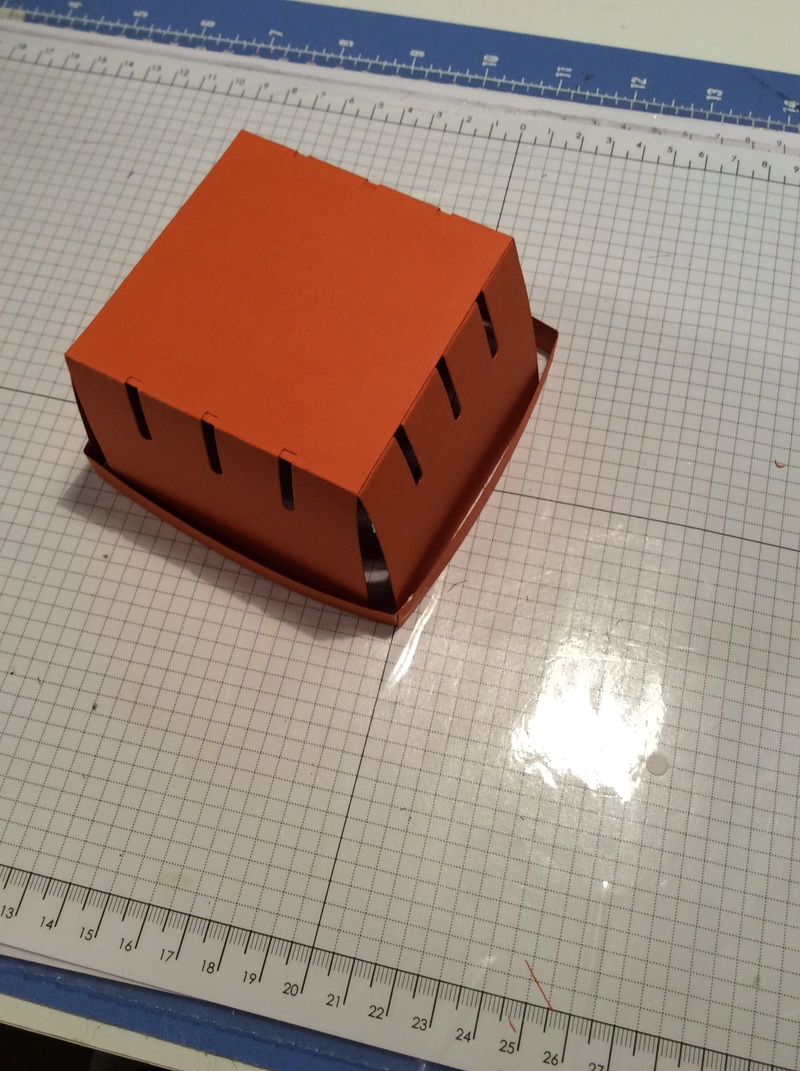
Fold on the score lines. Adhere the basket pieces together. I used the multipurpose liquid glue for this. I took the straight bands that are cut out and glued them together. I flipped the basket onto it's top and fed the bands onto it pushing it down to the top. Then holding the bands in place, flip it over and adhere. I used a stapler for this. I am not worried about the staples showing because I am going to cover them.
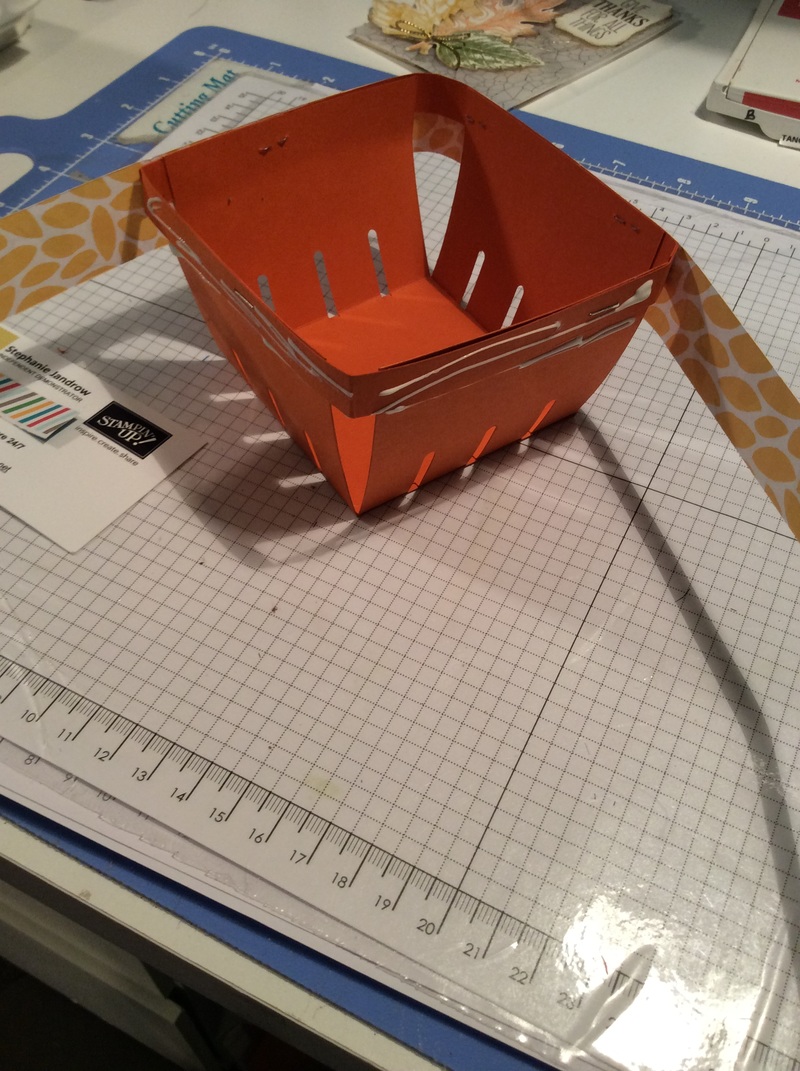
I chose the Into the Woods Designer Series Paper. It's a perfect compliment to the leaves. I cut 2 strips one measure 1x12 and the 2nd one measures 1 x 4 1/2. I added glue to the top of the basket band and wrapped the DSP around. I then took a piece of Gold Cording Trim and wrapped it around the basket and cut to size. I used glue dots to hold them in place.
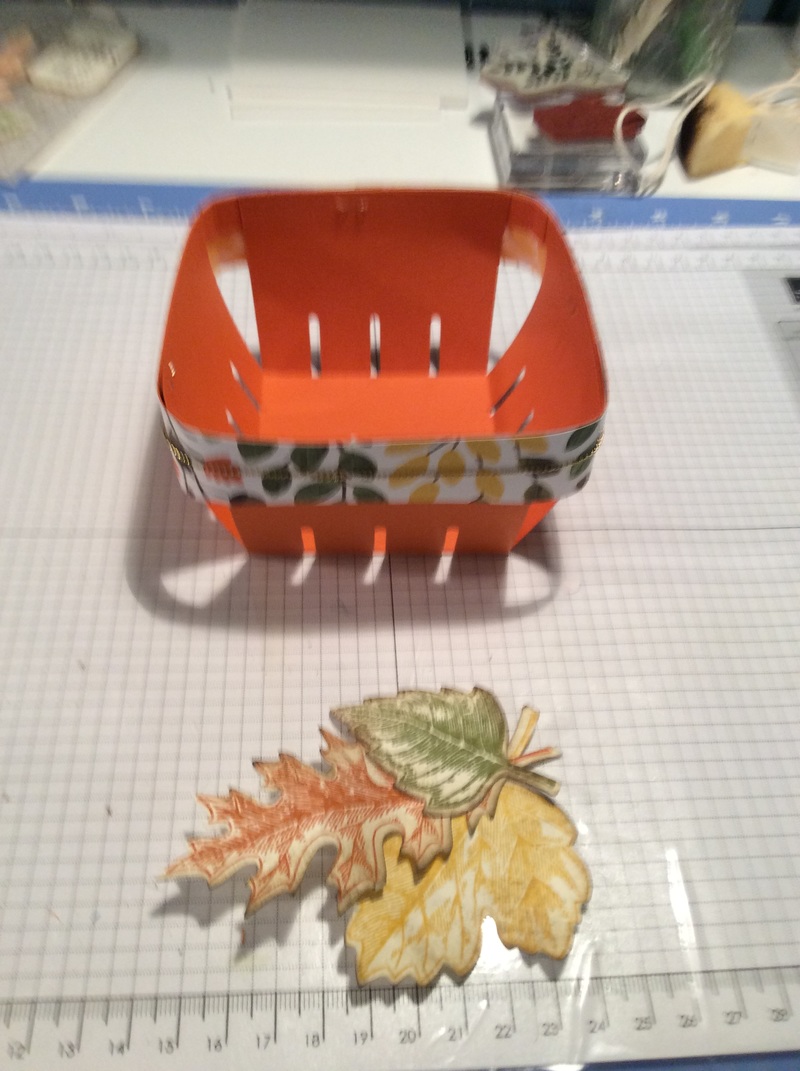
I layered the leaves on to cover where the trim meets to hide that seam. I also added a little wood acorn accent from Into the Woods Elements. And again finished it off with a bow made from the cording trim.
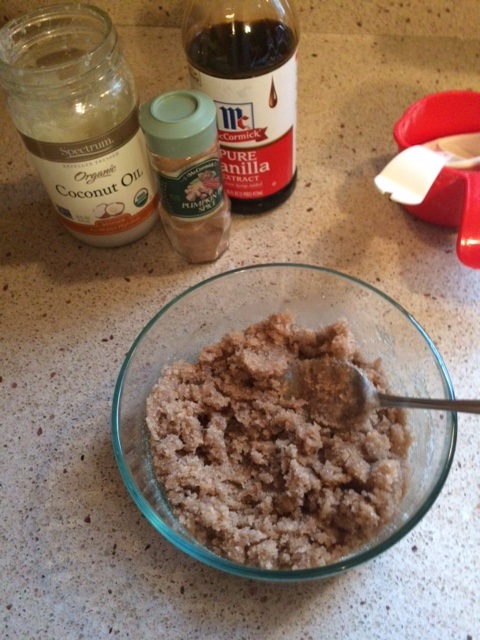
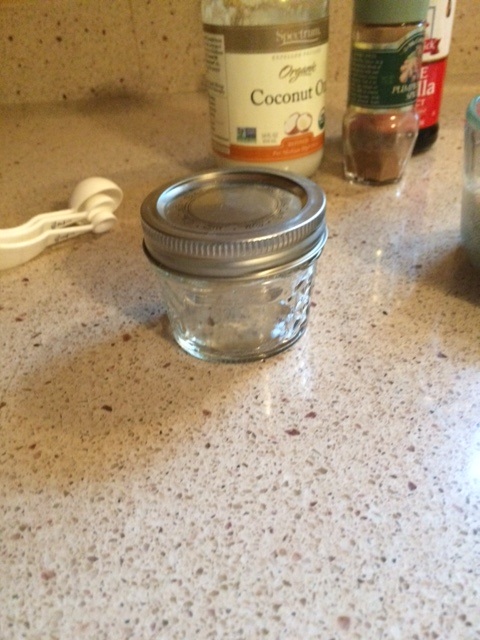
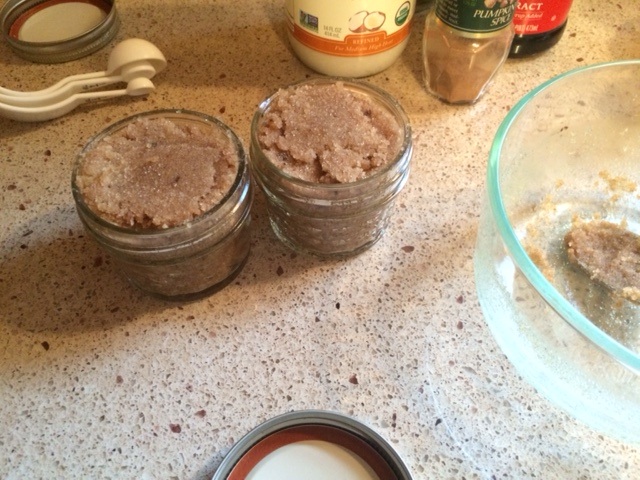
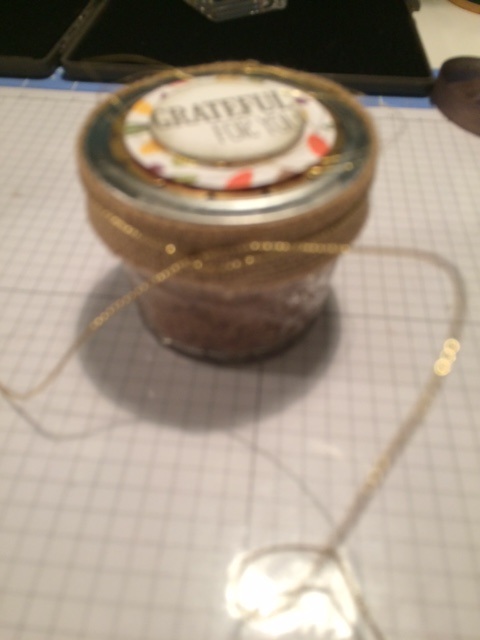
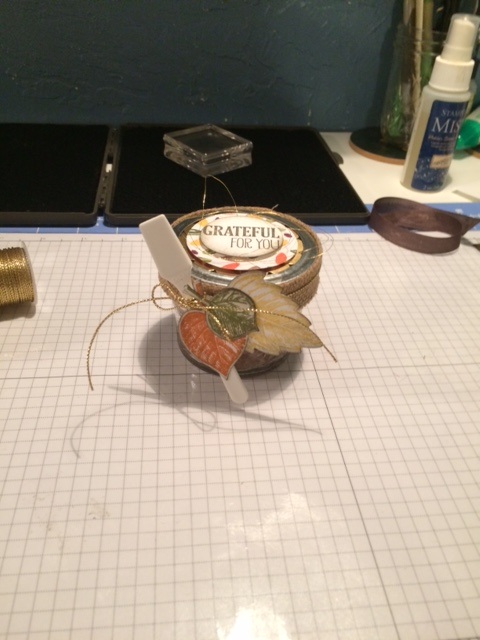
Since I was putting the scrub in the berry basket. I decided to decorate the jar as well.
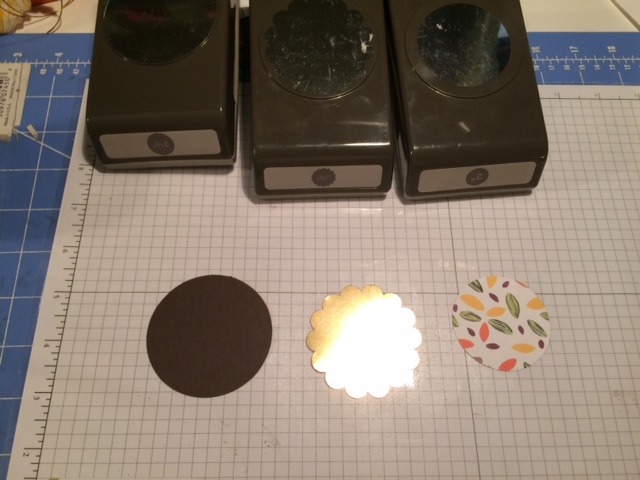
I punched out 3 different size circle to make the lid. Remove the band from the jelly jar, but leave the lid on. 2 1/2" Early Espresso, 2 3/8" Gold Foil and 2" Into the Woods DSP. Layer onto the lid. Use Fast Fuse for to put the Early Espresso and Gold Foil on then dimensionals to add the DSP. Put the jar band back on. Cut 9 1/2" of burlap ribbon. Cut in half to make two strips. Adhere onto band using Sticky Strip of Tear n Tape. The tie a piece of Gold Cording Trim around. Make it long enough to make a bow, leave in a knot for now. Don't cut ends just yet. Stamp 3 different size leaves and cut out. Also stamp the greeting in Early Espresso cut out with 1 1/2" circle punch. Sponge edges of leaves and greeting in Early Espresso. Attach the leaves onto the jar with glue dots, slide the spatula under the cording trim at an angle behind the leaves and then tie the cording trim in a bow. The spatulas were bought a while back from a friend. They were purchased through Amazon, I just don't have the exact order. But you can search for cosmetic spatula. Finally I put the jar in a Gusseted bag and tied it with a piece of Early Espresso Seam Binding ribbon. I used a bunch of basket grass in the berry basket, I found in the floral department at AC Moore.
I had a lot of fun planning my projects for the Stampin' Friends Thanksgiving Blog Hop. I hope you enjoyed your visit. Thank you so much for stopping by!!!
Don't forget to click Next button below, to see Wynne's blog!
Don't forget, make a comment on all 12 posts in this hop then, email Elizabeth everyone's favorite color at [email protected]. What do you get? In addition to enjoying all of this group's creations, you'll be entered to win a fun crafty present from every one of the bloggers! That's 12 crafty presents! Just a little thank you for your time! AMAZING!

1. Elizabeth Jeanne
2. Mandy Reedyk 3. Wynne Grob 4. Tina Riddle 5. Deana Benson 6. Siara Acdal 7. Kim Smith 8. Andrea Pancrazio 9. Kirsteen Gill 10. Cindy Waldroff 11. Lisa Altman 12. and me Steph Jandrow
Here are the products used to make the Mini Treat bag notecard
Built for Free Using: My Stampin Blog
Here are the products used for the Thanksgiving Berry Basket and Sugar Scrub jar. The stamp colors, Vintage Leaves/Leaflets Framelits, Into the Woods DSP, Very Vanilla cardstock, Gold Metallic Thread and Gold Cording Trim is also used, I just didn't relist them.
Built for Free Using: My Stampin Blog
|

New 2023-2024 Stampin Up Annual Catalog


Kits Collection


Join today

Categories
All
Archives
January 2024
|


 RSS Feed