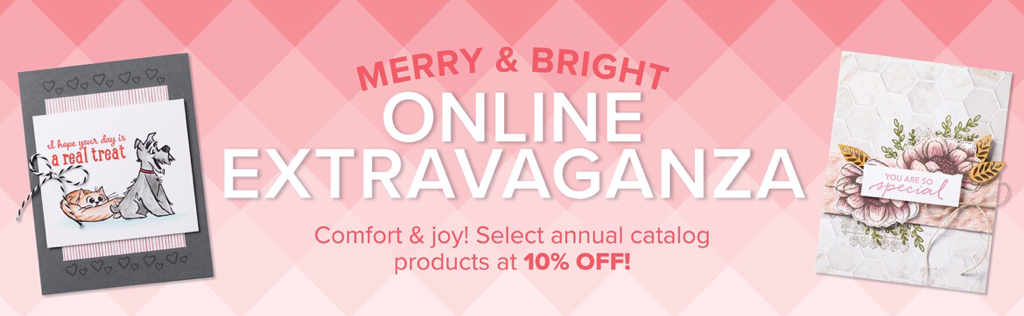
 Are you just about ready to start your Christmas countdown? The big day is only weeks away, which means you are starting to think about your holiday papercrafting plans. Perhaps you’d like to make an advent calendar, create some handmade décor, or prep some scrapbook pages. The possibilities are truly endless! And since the busiest shopping season is going on now, this is the perfect time to shop our Merry & Bright Online Extravaganza, with 10% off select annual catalog items. As a papercrafter, I know that adding a personal touch to the holidays can make the season even more meaningful and fun. So make sure you spread the word about this fabulous sale so everyone can make the world a more beautiful place this Christmas season!
Happy holidays & Happy Stampin Steph
0 Comments
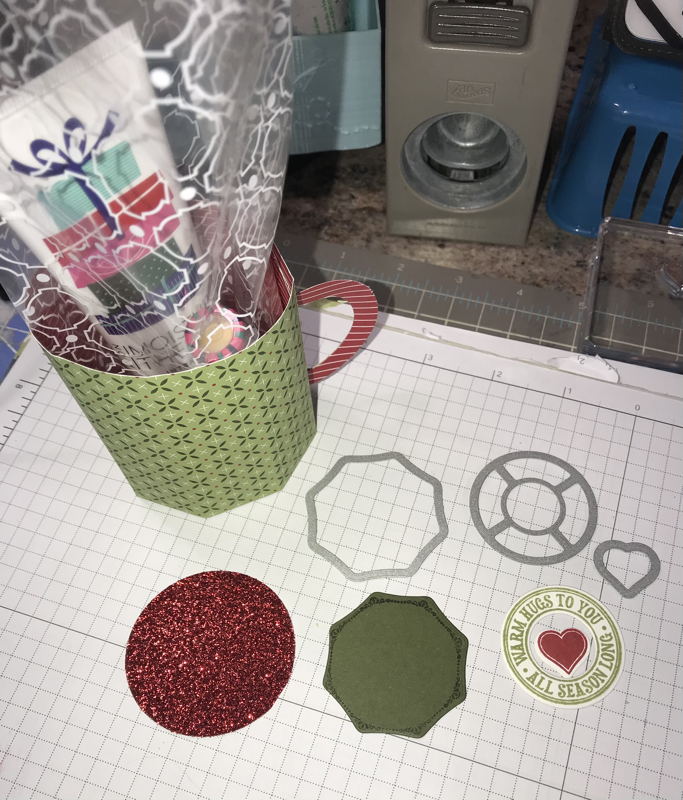
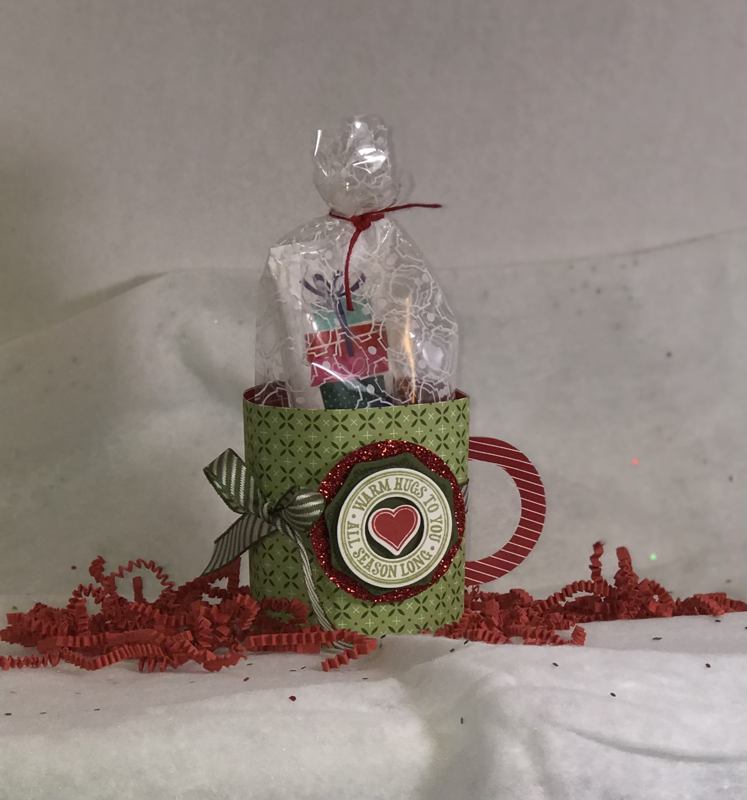
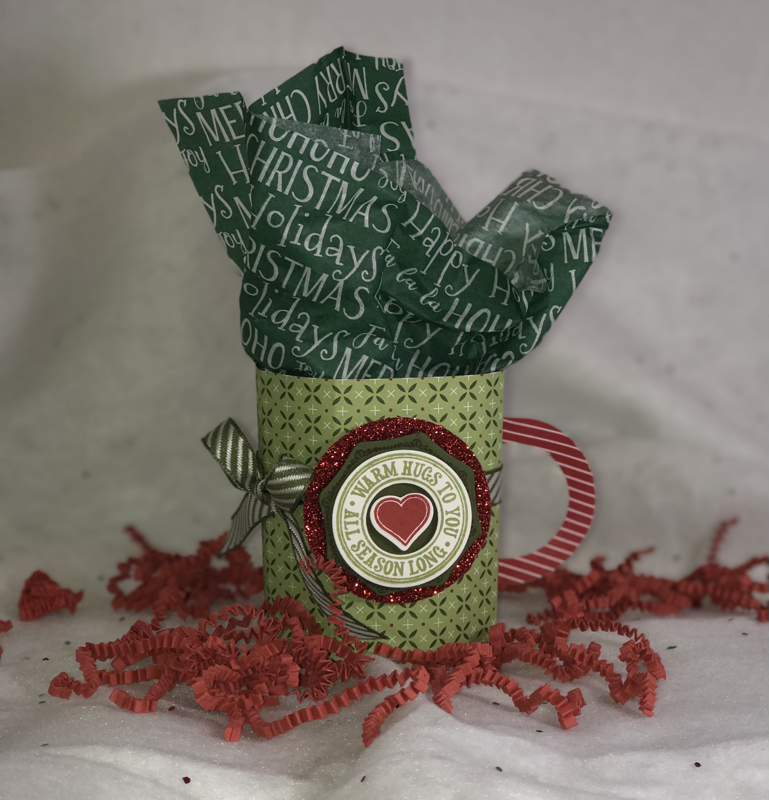
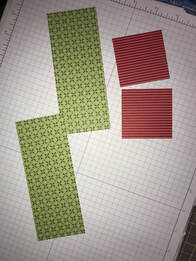
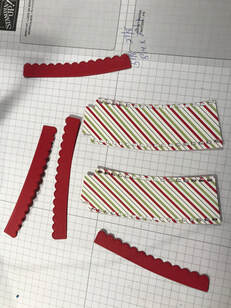
 Welcome to the Stampin Friends November Blog Hop! You will notice as you hop along our theme is Happy Holidays! Make sure to view all of this months hoppers! You’re guaranteed to be in the holiday spirit with some crafting inspiration!!!! This is our last hop of 2020, don’t worry we will be back in January 2021. With all the craziness this year has brought us, I am so happy to be a part of this blog hop! As I look back over the last several years, I love how my crafting has evolved and improved!! I truly feel honored to be a part of this group! It’s so fun each month to stay creating, to be inspired and to continue to be challenged! And for me the best of it all, is seeing all the beautiful projects that are shared!! I look forward to each month! It’s just so exciting to hop along aside these amazing and talented ladies from all over the US, UK, Australia and Germany! If you’re a paper-crafter, with a blog, and you’re interested in joining us, please contact me! I hope you are following along with our blog hop and you came from I just love her projects, or if you're just getting started with me, you can find the full list of hoppers at the end of this post. Once you finish with my blog, be sure to continue to Tiziana Milano's Blog and make sure to leave comments so we know you visited!! We love to hear from you!! 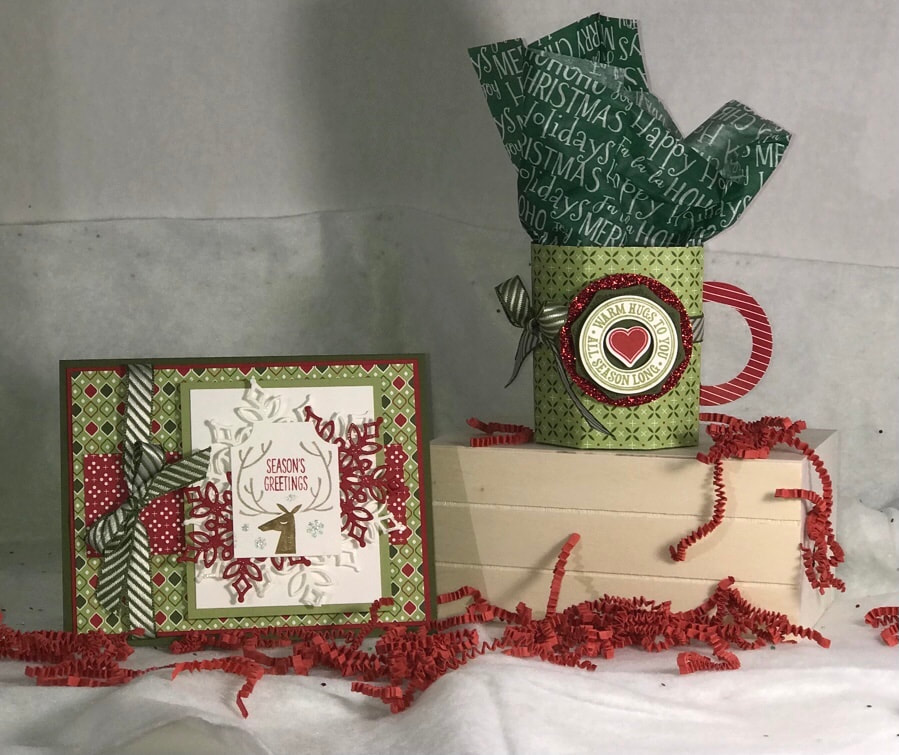 My project this month features a paper mug. I’ve been noticing these paper mugs all over Pinterest as I was searching for some packaging inspiration! I immediately shared this project with a friend who has been working endlessly on making Hot Chocolate Bombs!!! So fun and such a cute way to package a yummy treat! I used products from the Heartwarming Hugs Suite. I have also included a video showing you how to make the mug! To make the paper mug; you will need a piece of card stock or designer paper that measures 4 1/2” x 9” I used the Heartwarming Hug DSP. Now if you are using a piece of designer paper you want to have the side that is the inside of your mug face up on your Simply Scored Scoring Board. Start with the 9” side along the top and score every inch at 1”, 2”, 3”, 4”, 5”, 6”, 7”, & 8” Then turn the paper to the 4 1/4” side and score at 1 1/2” NOTE: before you score, make sure if your paper has a directional pattern that the pattern is facing the right way on the score board, the 1 1/2” line is the bottom of the mug! So when it's assembled that larger section should be facing correctly. Hope this makes sense!! Continue to have paper for the inside of the mug face up Cut the 1” score lines up to the 1 1/2” line. Then remove the bottom right corner section from the 8” score line up to the 1 1/2” line and then cut the top section at an angle....see the 3rd picture below! Add adhesive to the bottom tabs, flip over to the outside of the mug and then adhesive along that tab! Now lightly fold on the score lines as you roll the paper to adhere the sides! Attach the bottom piece overlapping each other to form the bottom! I punched out 2 - 2” circles one for the bottom and one for the inside, you don’t have to do this but it makes it look finished to me and adds a-little more support to the mug! For the handle I just layered 2 different sizes circle dies I cut out 2 glued them together and cut the almost in half! Bend the ends alittle and glue them to the mug! You could also use ovals, as well! Fill with some candy or whatever treats you like! I added some lotion and lip balm in a pretty bag! I used the Warm Hugs Stamp and coordinating Warm Wraps dies to make the greeting on the front and I also cut the Real Red Glimmer paper using a 2” punch! You can refer to the pictures below for more details! What do you think?? So fun!!! And so EASY. In order to accomodate the size of the Hot Chocolate Bombs, I had to adjust my measurements, but I will show that as another post when I make the final version! I can’t wait to make a bunch for my friend to package her goodies in! And now my card!!! Super easy layers! I used the same paper pack Heartwarming Hugs DSP and chose a couple different patterns. Start with a Mossy Meadow card base 4x5 1/4 piece of Cherry Cobbler DSP that measures 3 7/8”x 5 1/8” DSP that measures 1 1/2”x 4 3/4” 3”x3 1/2” piece of Pear Pizzazz 2 3/4”x3 1/4” of Whisper White Adhere the DSP onto the Cherry Cobbler add then add the DSP strip, wrap some Mossy Meadow Diaganol Striped Ribbon around the left side and tie in a bow, before adhering to the card base. I stamped using on a scrap piece of white using the Everything Essential stamp set. To get the different colors I used my Stamp n Write markers. I colored the stamp, the huffed on it to moisten and then stamp! So cool right? Then punched it out with the Tag Punch. I die cutted a few snowflakes from a retired set called Snowfall, I’m sorry I don’t have any news ones! And layered behind the tag before adhering to the card. 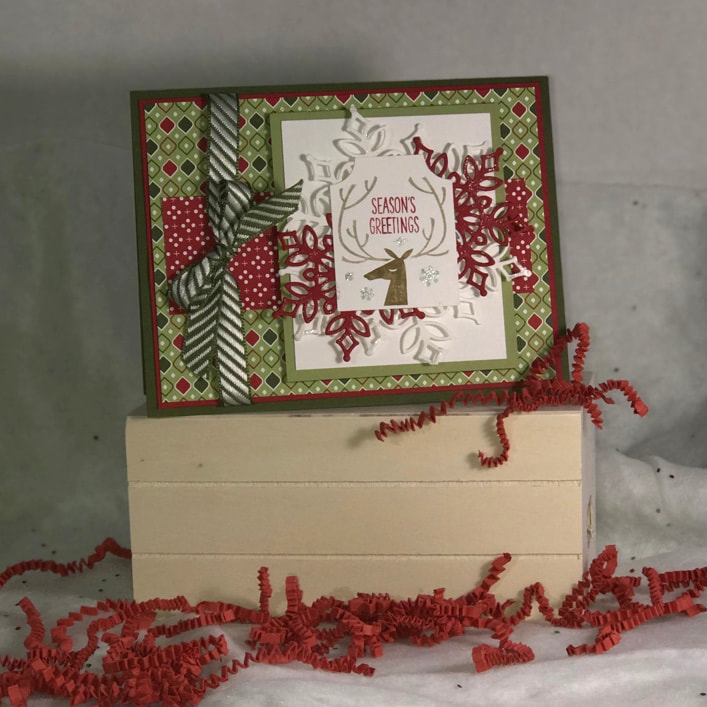 You can see below I have to cards, one with Real Red Braided Linen Thread and one with ribbon! Which one do you like better??? I can’t decide!!! 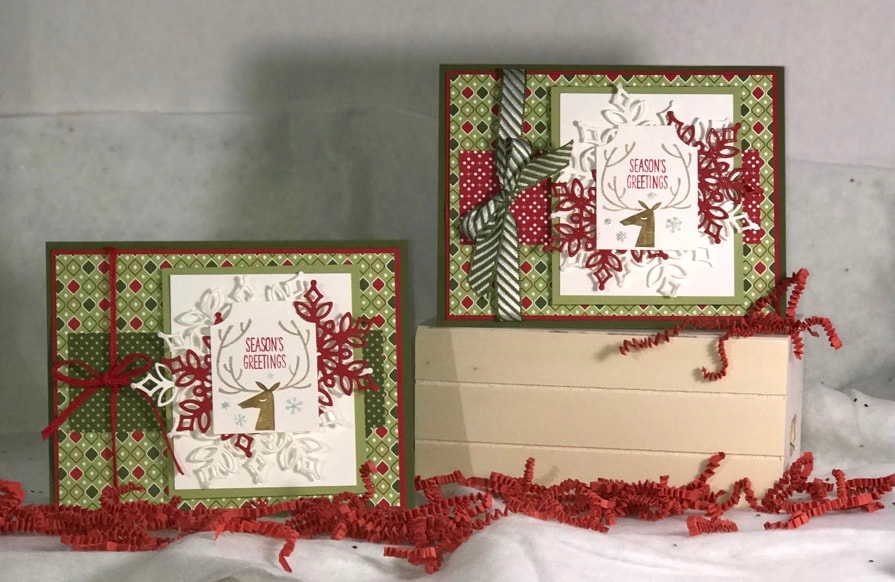 Thank you so much for joining me today!! I had so much fun creating my projects I hope you enjoyed them!!! Be sure to continue to Tiziana Milano’s blog for her awesome projects!!! Thank you again Happy Holidays & Happy Stampin Steph Below is a list of participants in this month’s Blog Hop. Be sure to visit everyone’s and leave a comment we love hearing from you!
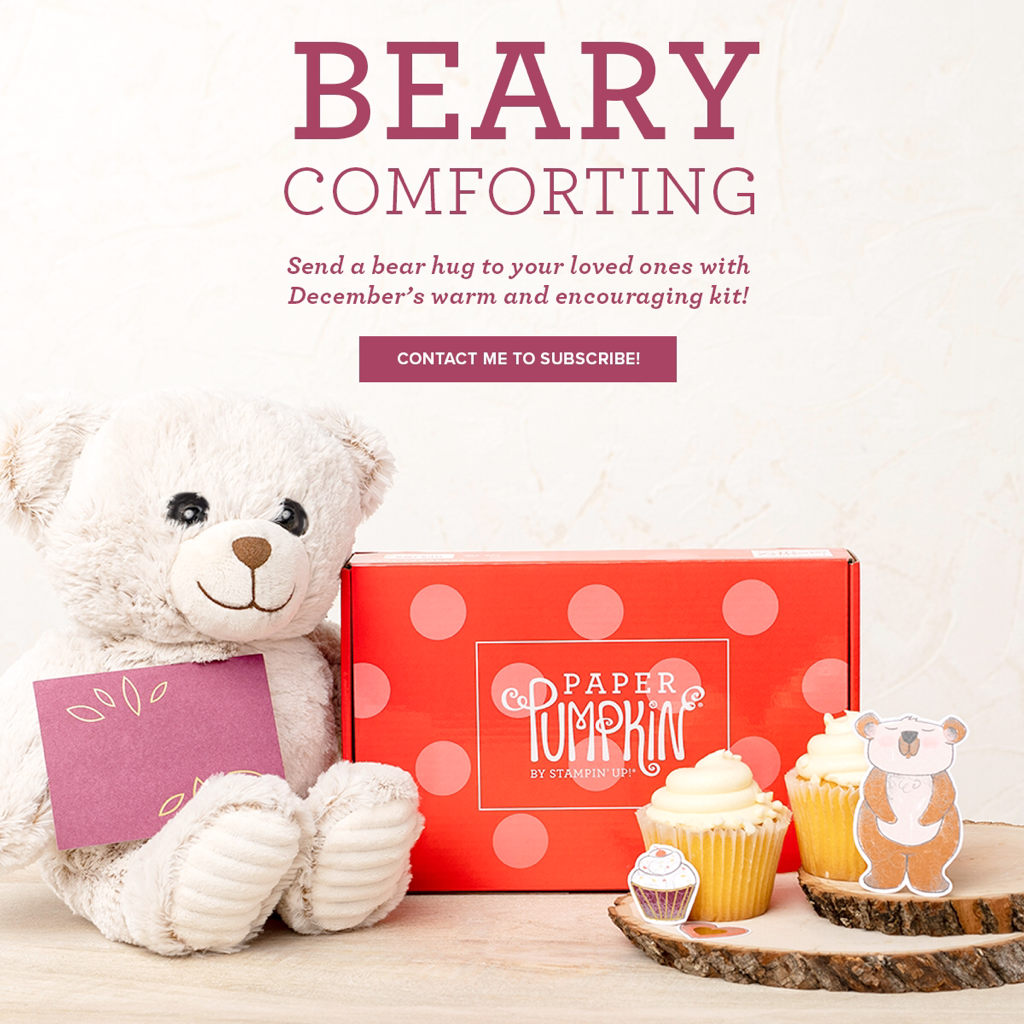 If you haven’t heard already, Paper Pumpkin is our monthly One-Stop Box™ that offers a wide variety of unique papercrafting projects for subscribers of any skill level! These themed, all-inclusive craft kits encourage customers to explore their creativity, try new techniques, and discover their potential in papercrafting.
December’s cute and cuddly Paper Pumpkin kit—called “Beary Comforting”—is designed to uplift your loved ones as this beary tough year finally comes to a close. After a year like 2020, we all could use a big bear hug! With the help of this bear-themed kit, you can create 12 unbearably cute cards featuring warm and fuzzy friends, sweet stamps, and meaningful messages. Near or far, send your friends and family the extra comfort, love, and encouragement they need with this month’s Paper Pumpkin kit! Subscribe to the December 2020 Paper Pumpkin Kit between 11 November and 10 December! Subscribe now Details
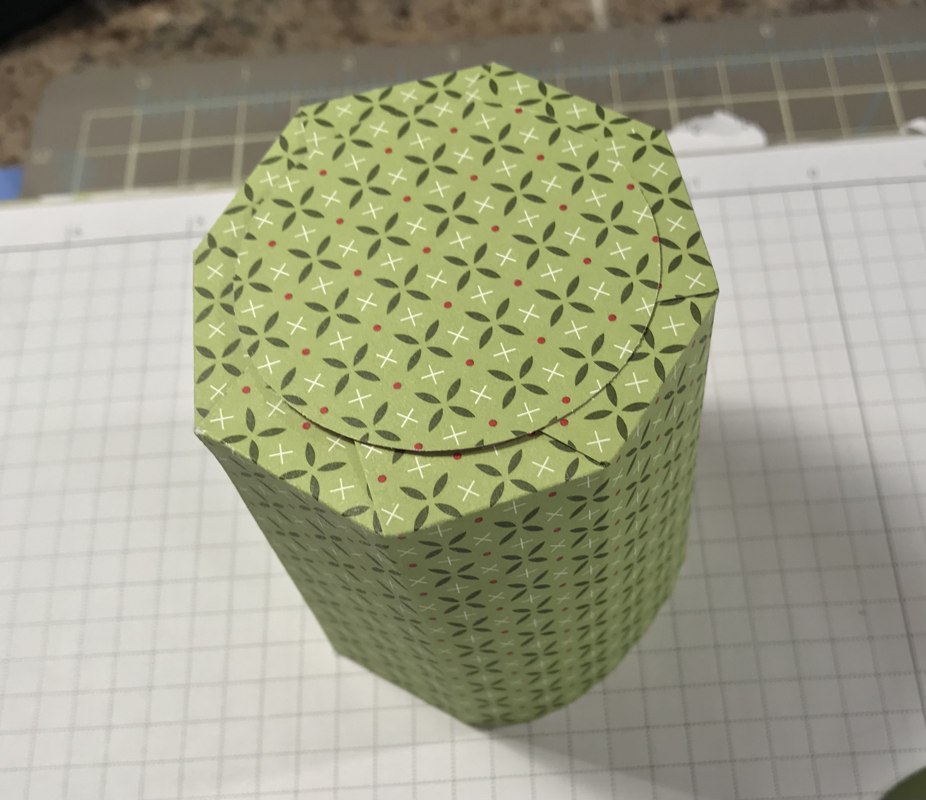
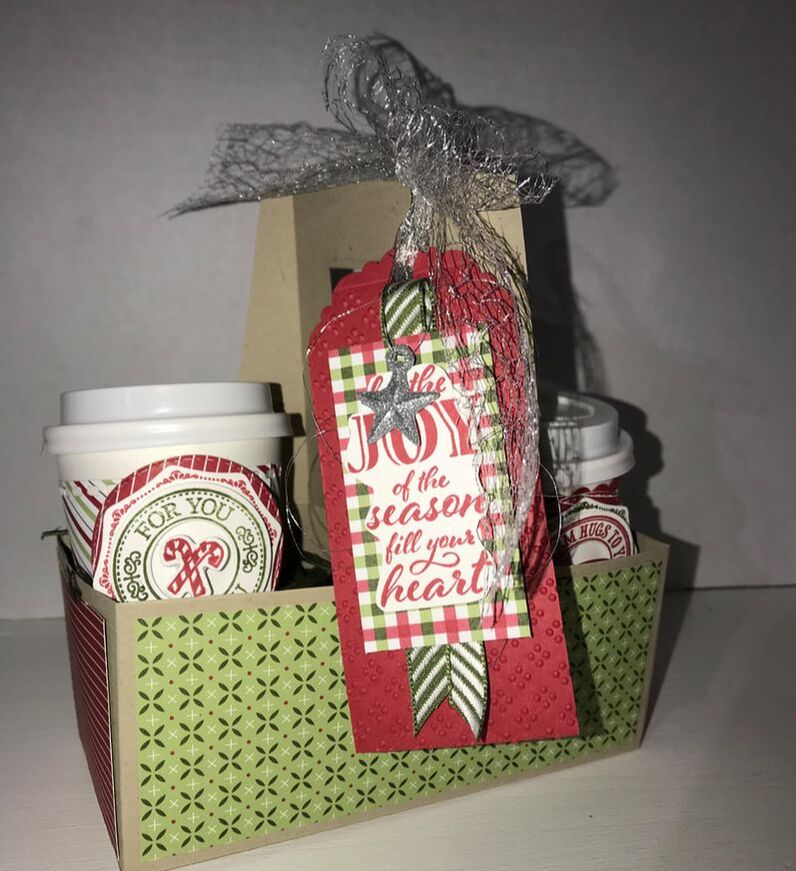
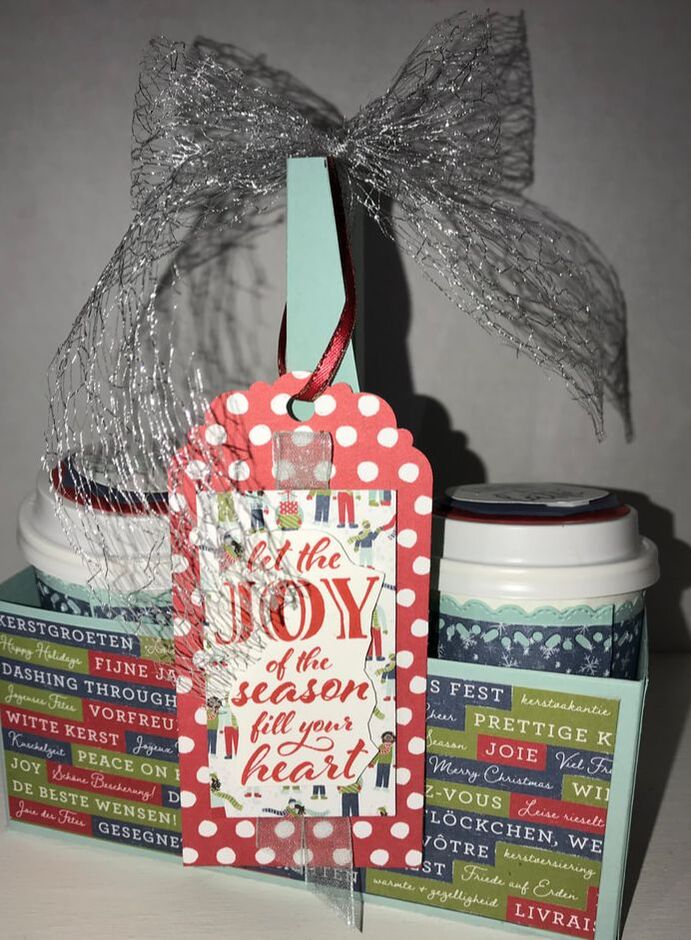
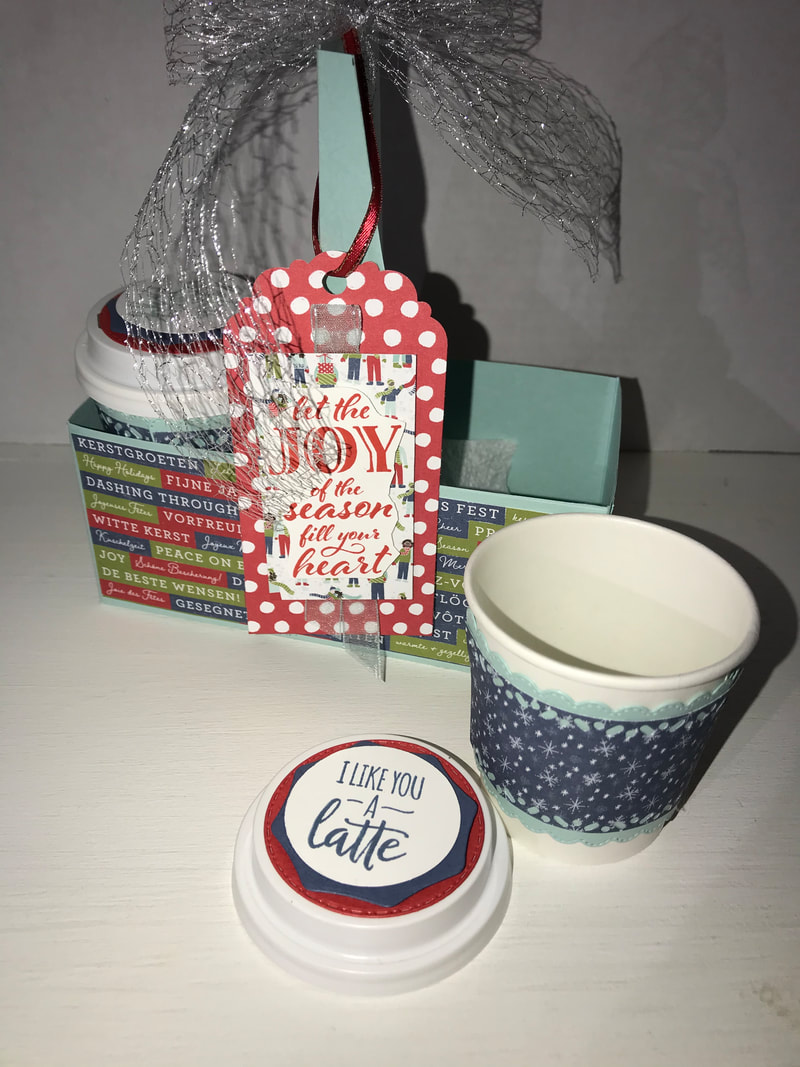
Steph  We’re all papercrafters, here. And that means visions of sugarplums (and Christmas crafting) start dancing in our heads as soon as October hits. I can help you get those visions translated into reality by planning now to create handmade packaging for your family and friend! Keep it simple or make it fancy. All that matters is that you add a bit of yourself to your giving this year by making it handmade and heartfelt. CASUAL The standout on this sweet Christmas packaging is our adorable, rustic tag. And trust us—once you make the first one, creating multiples is easy. Tip: Besides using the ripped paper technique, stamp off the solid trees to add depth. Once you finish stamping, tie the tag to the Mini Shipping Box with a bit of Linen Thread. So cute! AVID We fancied up our second tag by adding a variety of stamped embellishments. Just run the stamped images through the Stampin’ Cut & Emboss Machine with the Warm Wraps Dies, then adhere them with Stampin’ Dimensionals. We also added die-cut Real Red Cardstock trim along with open-weave ribbon and gold metallic trim from the Forever Greenery Trim Combo Pack for extra charm. ARTFULLY AVID We stepped up our final project by embossing the tag with the Wrapped in Texture Embossing Folder. We then adhered pretty wreath sprigs and finished with a bit of ink splattering using the Aqua Painter. This tag is so festive you could almost hang it on the Christmas tree! Regardless of the type of crafter you are, we have something for you!!! Contact me to get your gift packaging into a reality Happy Packaging Happy Stampin Steph 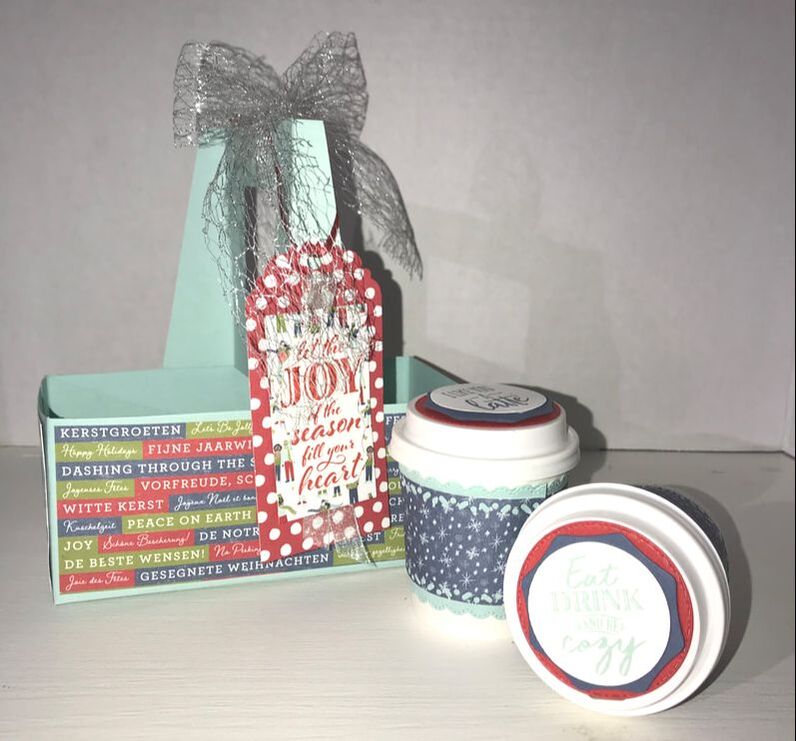 OH My Goodness! I had so much fun creating my own Coffee Carrier! I just love love love it! It's so stickin cute! If you follow me on my Facebook Page Stampin and Scrapping with Steph, you would have seen Facebook Live where I shared with you how I made the carrier. Stampin Up has a pack of 8 Coffee Carriers in the Holiday Mini Catalog and I just LOVE them, but, I wanted to figure out how to make my own, so if, Stampin Up retires them in January, I can keep making them in any color I want! I just can't get enough of making them! I love the versatility! Decorate them anyway you want and fill them from anything from cards to makeup to candy...the skies the limit!
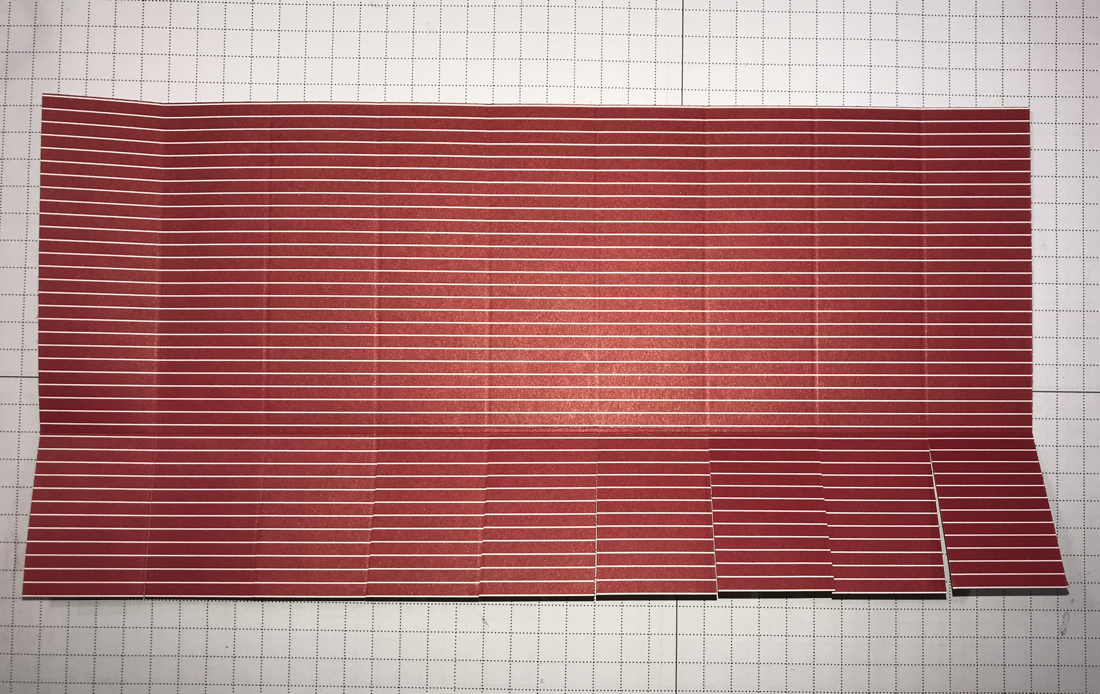
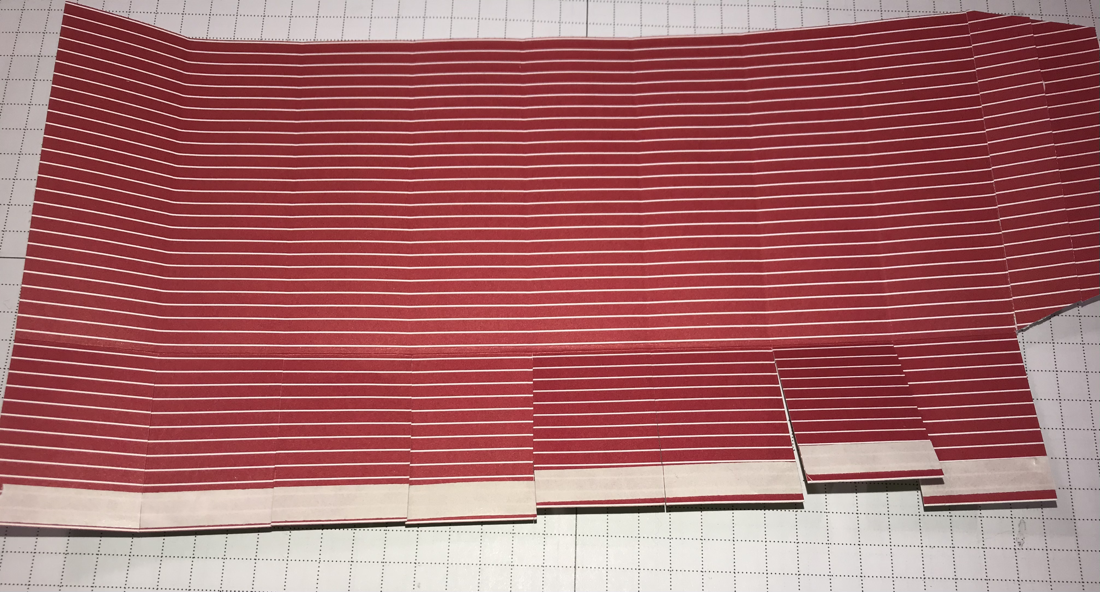
For the Tag, I used a piece of DSP that measures 2x 4 1/4" and then I used the Delightful Tag Topper Punch. I also used a piece of Pool Party Sheer Ribbon and another piece of DSP that measures 1 3/4" x 2 3/4". I will suggest, practicing on paper you don't care about and do a dry run before you start cutting your good cardstock :-) To make the carrier, use the Simply Scored Scoring Board or Stampin Trimmer to score your cardstock. Remember that you need to score and cut both pieces of the cardstock the same. With the 8 1/2" side at the top of you trimmer, score at 2 1/4" and 4 3/4" Turn the paper and place the 9 1/2" side at the top and score at 2 7/8" and 8 3/4" Line up the 2 7/8" score line onto 3" and add a score line from the top of the paper to the 4 3/4" score line. (refer to template) 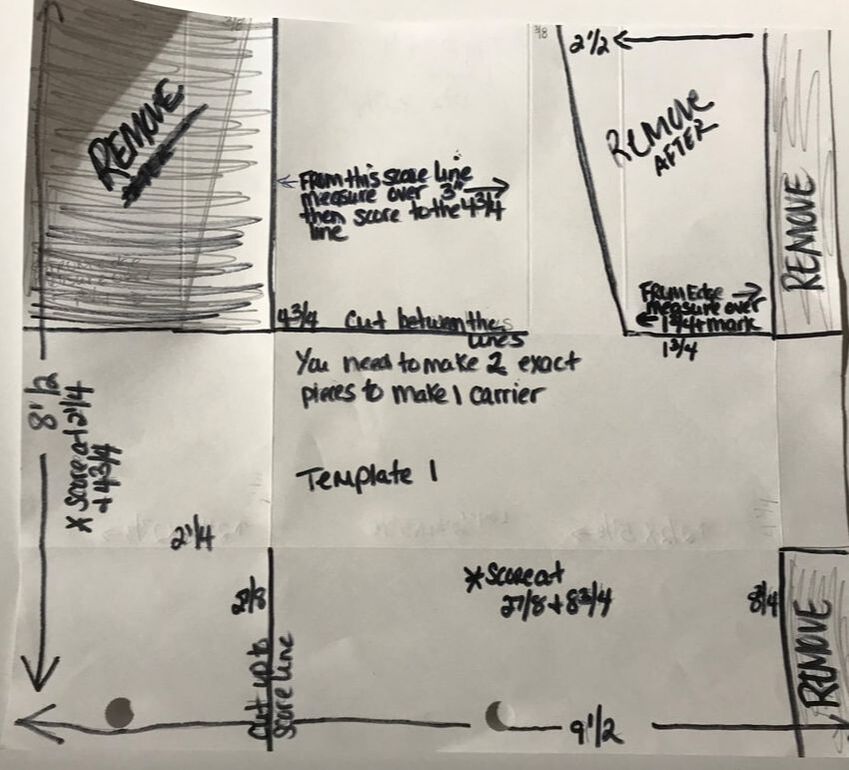 For the next step, I made sure the paper sits with the widest scored section is on the left, and the 1/2 section is on the right. Starting at the bottom, cut up on the score line at the first section then remove the 1/2 section up to the score line. Next, remove that 1/2 section at the top right. Measure 1 3/4 from the paper edge in, along the score line and make a mark. In that same section, move to the top and measure in from the paper edge, 2 1/2 and make a mark. Then draw a line that connects the 2 points. Remove that section up to the diagagnol line we just drew. Now, from the left side. Remove that section at the top-left going from that 4 3/4 and then up along that 2 7/8 line. 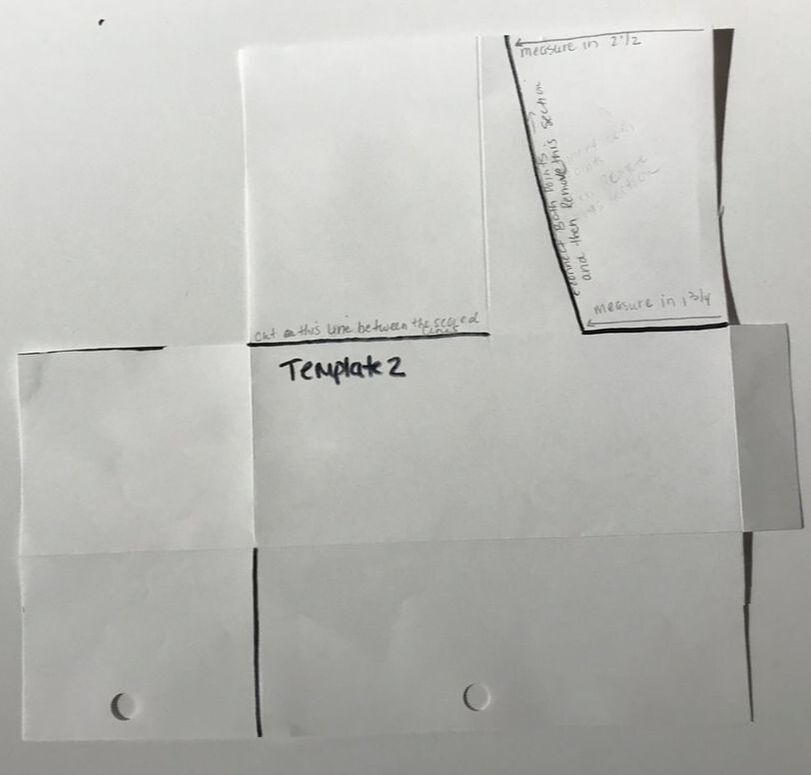 Please ignore the wholes at the bottom of my template above. I used 3-whole punch paper! Ok, so after following the steps above, you should have a piece that resembles the template above. The black lines represent the areas that were cut. I left on the section at the top right just to show again how that section was measured and then cut. You should have 2 pieces that look like the template below. Now from the edges of the paper, cut along that score line up to that triangle section. See below. 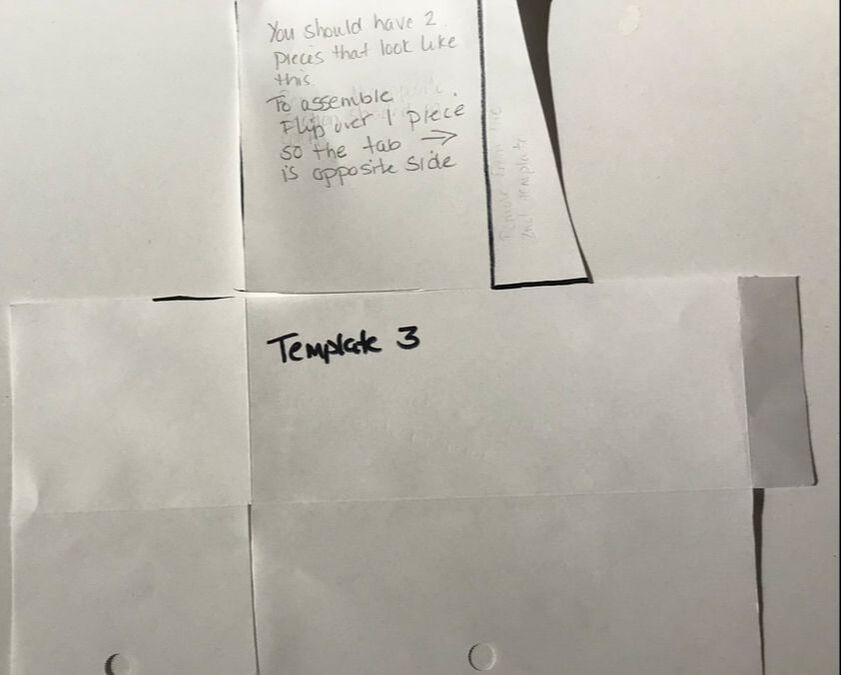 The section you just cut the score line on, measure 3/4 down and make a mark. Center a punch or die over that area and cut out a shape for the handle. I used a Square from the Layering Square Dies. Make sure for the second piece of cardstock, you turn the paper over so that 1/2 tab and that triangle section is on the left. Adhere the sections you just cut out the shape in. Decorate your carrier sides before attaching the carrier together. I found it easier to do that while that carrier is flat. Attach the sides to either sides of your carrier. And then fold the bottom flaps in and adhere to create the carrier bottom.
I hope my directions make sense, so feel to contact me with any questions!!!! I had fun sharing with you. If you have a chance to watch my Facebook Live, I demonstrate the steps I shared. Be nice, I am still a novice and learning, well surving the facebook Live challenges!!!!
I am hoping to share the video onto YouTube as well....so stay tuned I will share when I get that all set too!!!!! Thanks so much for stopping by! I'd love to hear what you think. Happy Stampin Steph 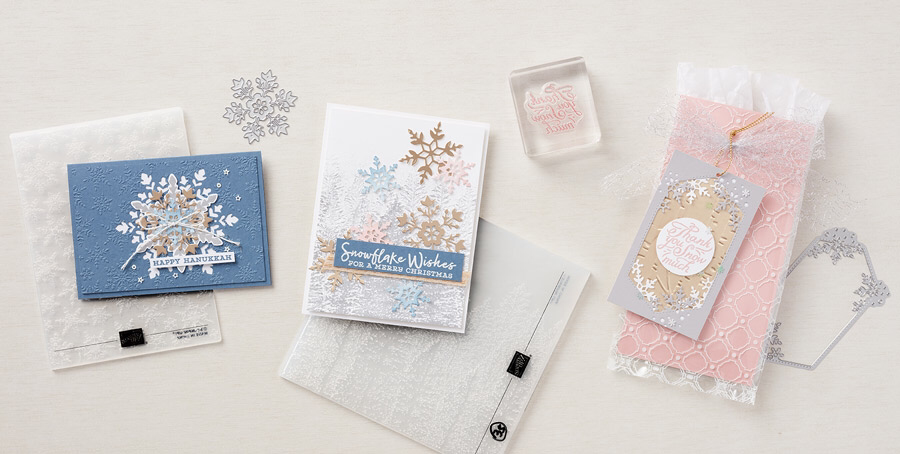 Nature has many ways of showing off her genius, and one of the most notable examples is found in the delicate patterns of snowflakes. Stampin UP’s concept artist decided to highlight the whimsical beauty of these fabulous ice crystals using the So Many Snowflakes Dies (item 153560), a variety of embossing folders, and subtle, pastel color combinations to create truly breathtaking cards—which can be easily adapted to suit any winter occasion.
To make the watercolor snowflake accents featured on the Happy Hanukkah and Snowflake Wishes cards, we simply applied Blushing Bride and Misty Moonlight ink to the die-cut snowflakes using Sponge Daubers (item 133773)—replicating the soft hues of a wintry, twilight sky. Our artist enhanced the texture and beauty of these cards using the Winter Snow (item 153577) and Evergreen Forest 3D (item 153576) Embossing Folders, respectively. To create our Thank You Snow Much gift bag, we embossed Brushed Metallic Cardstock (item 153524) using the Woodland Embossing Folder (item 152881) and added peek-through snowflake die-cut pieces for extra charm. Who wouldn’t love to receive this darling gift bag, tied with a 1-1/2" (3.8 cm) Metallic Mesh Ribbon (item 153550)? This project would also make the perfect host or booking gift! How many ways can you showcase the beauty of snowflakes with your cards and 3D projects? Remember to share them in the comments or on Facebook Page Stampin and Scrappin with Steph, so we can all enjoy them! Happy Stampin Steph |


Categories
All
Archives
May 2024
|


 RSS Feed