0 Comments
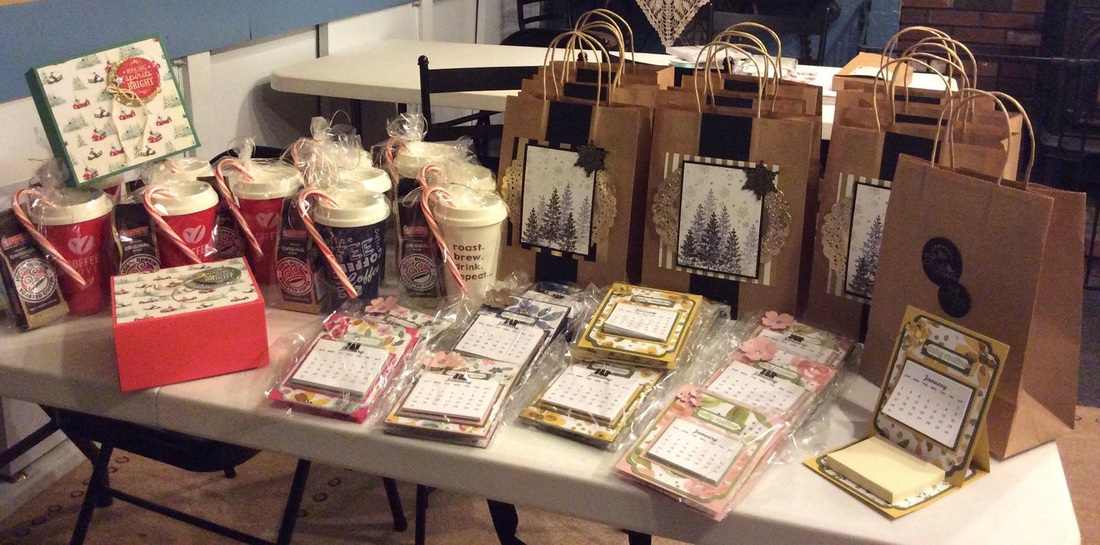
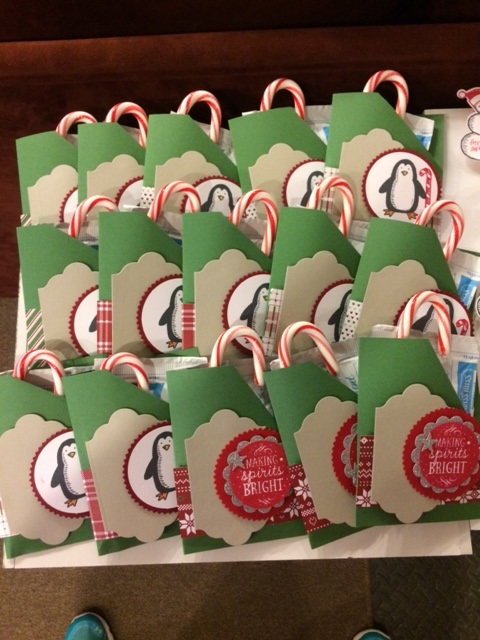
And the crafting continues. The picture above shows all the paper crafts I've completed in the last 48 hours with a few more minor details left. I typically give gift cards to our teachers. I feel they appreciate that the most, they can purchase whatever they want for themselves or their classrooms. But I like to give them a little something to open.
I found the BPA free travel mugs at Walmart. They were sold in a 5-pack for under $5 I believe. That was a great find. I then found mini size coffee packs at Dunkin Donuts. Boom! Little treat packed in a cellophane bag with a candy cane! I recently held a Calendar Workshop at my house. After making them the group, I thought hmmm, these might be a great gift for teachers. I used the English Gardens Designer Series Paper and coordinating cardstock in Blushing Bride, Hello Honey, Melon Mambo, Mossy Meadow, Night of Navy and Soft Suede. I love the colors!! 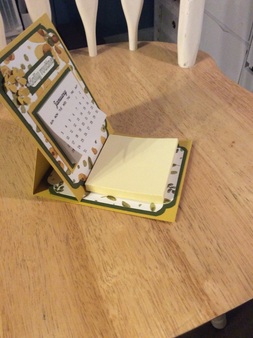
The base of the easel is super easy to make. Cut a piece of 8 1/2 x 11 piece of cardstock to 4 1/4 x 11. Use your Simply Scored Scoring Tool and with the 11" side at the top, score at 5 1/2 and 2 3/4.
Fold in half at the 5 1/2" score line, the fold the in the opposite direction at the 2 3/4 score line. (like an accordion fold). Cut another piece of the same color cardstock to 4 1/4 x 5 1/2. Attach this piece to only the 2 3/4 section of the base. Now you can decorate the top and bottom of your base. I added a post it note to the bottom to hold the easel up. Perfect!!! How easy. I added some flowers to give a little dimension. On some I used 3 flowers punch from the Itty Bitty punch pack and others I used the Pansy punch.
The gift bag was super easy to make. I will admit, there is contraband on the bag...oops my bad. I realized to late I needed to order the metallic doilies and black ribbon I wanted. Oh well. But I found some at AC Moore, definitely not as pretty as the Stampin Up ones, but they do the trick. Bottom line, I have no idea who will keep and/or reuse the bags so I wasn't going nuts. I found the kraft bags at Walmart in a 13-pack for $7.97. Not to bad. I wanted white and they were out, so this will do!
But again bag was quick and since I needed to make 12, I made an assembly line. I used the Winter Wonderland Designer Series paper. This paper is so smooth and shiny! I love it. You can decorate 4 bags from 1 12x12 sheet. Cut the DSP to 4 - 6x6 squares For the size bag I used, you will need black cardstock, cut one strip to 2 1/2 by 5 1/4 and another at 4 1/4 x 5 1/2. Also cut a piece of whisper white to 4 x 5 1/4. I stamped in Basic Black the tree from Lovely as a Tree and stamped off to give layers. I stamped the snowflakes from the Perpetual Calendar set using a gold metallic ink. Finally I stamped a snowflake from the Festive Flurries stamp set, which is now retired. And cut it out with the, also retired, framelits. Cut the doilies in half and attach to the back of the 5 1/4x4 black cardstock. Assemble your layers onto the gift bag. I wasn't thinking to take pictures individually I so I didn't take a close up of the bag. OOps, but you can zoom in.
And last but not least, the gift box. While this one not a project that I was originally planning on making, but I saw a YouTube video by Sam Donaldson Pootles in the UK for her gift box tutorial so I decided I wanted to give it a whirl. It was quick and sooo easy to make I made 3 in a flash. Love it. You can see the videohere.
Ok well I think that's it for now, have a few more easel calendars to finish and gift tags for the bags and I'll be good to go! Thanks for stopping by my blog! I hope you enjoyed! Happy Holidays and Happy Stampin
Built for Free Using: My Stampin Blog
It's been quite a busy week in my craft space. I've been working on finishing Christmas cards and gifts for co-workers, teachers and family members. I've had ideas for a while but never quite got around to making them. I soon realized better get cracking. But it's always a race against the clock. First was working on my husband's co-worker gifts. Each year we brainstorm what to get the men and woman my husband works with. Trying to figure out what to get always takes for ever! I always have Mason jars on hand so we decided to make some sort of jar gifts. I came across layering hot cocoa/marshmallow/peppermints in a jar. And well since we are giving these to adults not children, we decided to go with a mug jar and add some fun nips to make it an "adult" gift. Normally I would try to use all Stampin' Up products to create the gifts. But I just didn't have the extra time to hand punch and assemble bows and ribbon. I found the mesh ribbon, glitter bows, button embellishments and snowman hats at AC Moore. I layered the jars and measured enough cocoa to make 2 servings of hot cocoa. Maybe next time, I'd put the crushed candy canes and marshmallow in baggies so they can just scoop out the cocoa. But this time it can be dumped out in a bowl, mix it up and divided into 2 mugs. 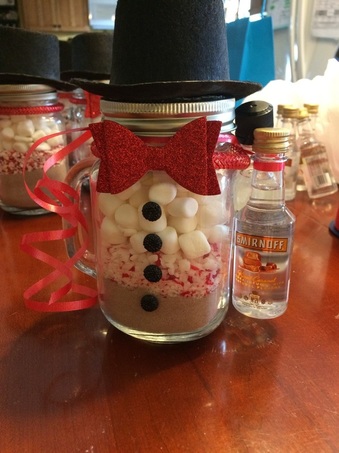 Now for the woman, it gets tricky, I never know what they like/dislike. So, I try to keep their gifts pretty general. Not always easy though. I was invited to a Thirty-One party and decided to grab the Littles Carry-all Caddy. Now, what to put in it?? To stick with the jar gifts, I chose to fill a Mason jar with a Christmas cookie mix. I layered and Oatmeal, Chocolate chip cookie. Very simple! But so yummy. Instead of decorating a jar and getting a gift bag. I tied a bow, added a wooden spoon and a tag with baking directions. 1 1/3 cup flour 1 tsp baking soda 1 tsp baking powder 1/4 tsp salt 1 cup oats 3/4 cup m&ms 3/4 cup nestle toll house semi sweet morsels 1/2 cup brown sugar packed 1/2 cup sugar I mixed the baking powder, baking soda, salt and flour together then added to jar. Layer in that order make sure to press down in jar to pack it tight. I used a wide mouth quart size jar. Tag reads: Mix: with 1 egg, 1/2 cup melted butter 1 tsp. vanilla extract Combine with the jar ingredients roll into balls Bake for 7-10 mins at 350 I forgot to take a picture of the jar once I packaged it in the Littles carry-all caddy. I Hope you enjoy. Happy Holidays and Happy Stampin 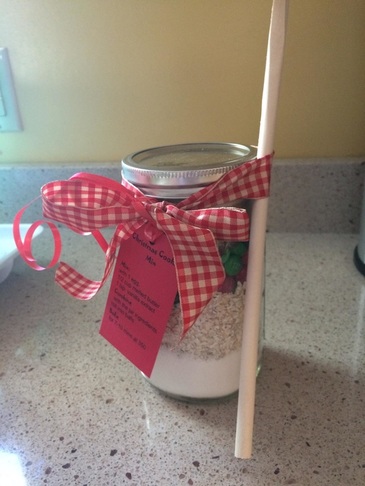
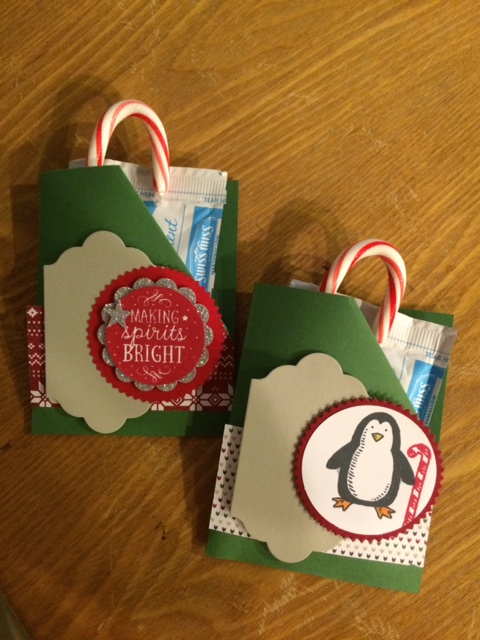
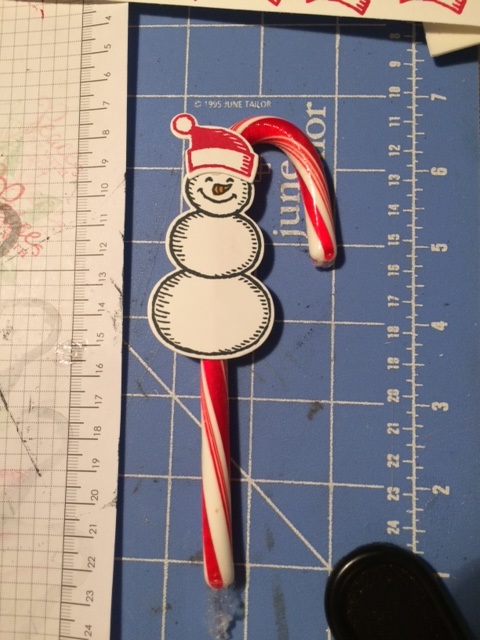
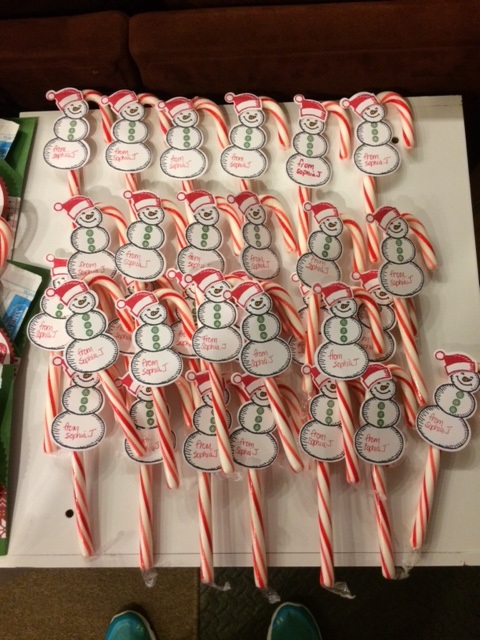
It's that time of year with the hustle of trying to find the right gifts for everybody. Unfortunately, there never seems to be that perfect gift for the right price. Especially with all the parties, secret santa's, swaps etc. It can get pretty darn expensive. Tonight is my daughters' dance studios holiday party. I'd love to be able to buy something for everyone in their classes but just can't do it. I didn't want them to go empty handed as they are typically given something from their teachers and peers. So I came up with 2 simple treats, one a hot chocolate packet for my oldest daughter's classes and a little candy cane treat for my youngest daughters classes. Each take 2 classes, but my youngest daughter's classes each have about 15 kids. WOW so I thought this was simple yet still shows we thought of everyone. Each took very little product to make, and the DSP used on the hot chocolate packs was the Trim the Tree stack paper that retired last year. I grabbed the hot chocolate (10 per box) & candy canes (12 per box) at Walmart. I think I spent somewhere are $10 for the goodies.
So here you have it 15 hot chocolate packets and 30 candy cane treats. 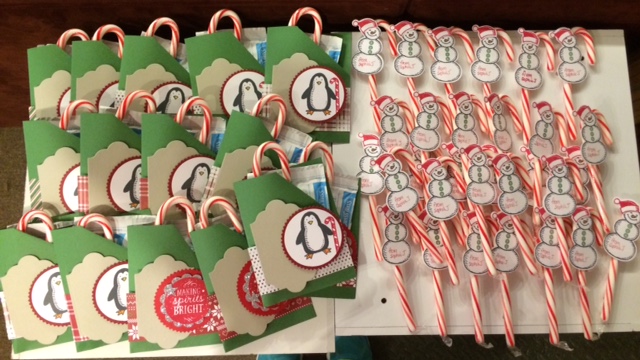
I hope you enjoyed!
Happy Holidays & Happy Stamping Steph
Built for Free Using: My Stampin Blog
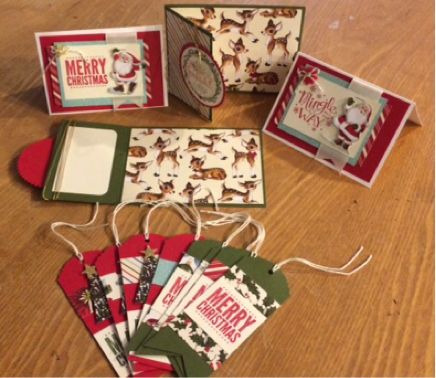
For this week card club I decided to get in the holiday spirit. Normally my card club consist of 4 cards, 2 each design. But instead I've included 2 notecards, 2 gift card holders and 8 coordinating tags all projects use the DSP Home for Christmas
Built for Free Using: My Stampin Blog
Today was all about scrambling to prep for my card club and figure out quick, easy and inexpensive gifts that my daughters can give their friends at their dance holiday party on Tuesday. One daughter's class only has a handful of students, while the other daughter is in two classes, which each has around 12-15 students. I'd love to shop and get a gift for all but that's simply not in our budget! I came up with two easy gift ideas. You'll have to back tomorrow to see the completed projects. I have to shop and grab the goodies to go with the gifts. 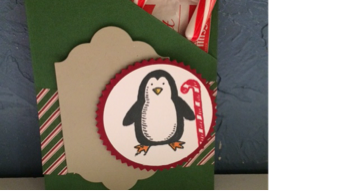 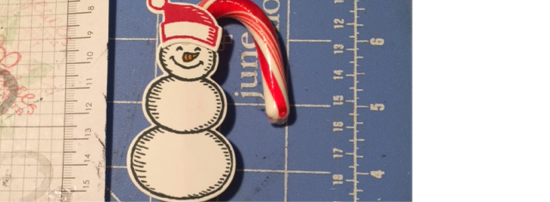
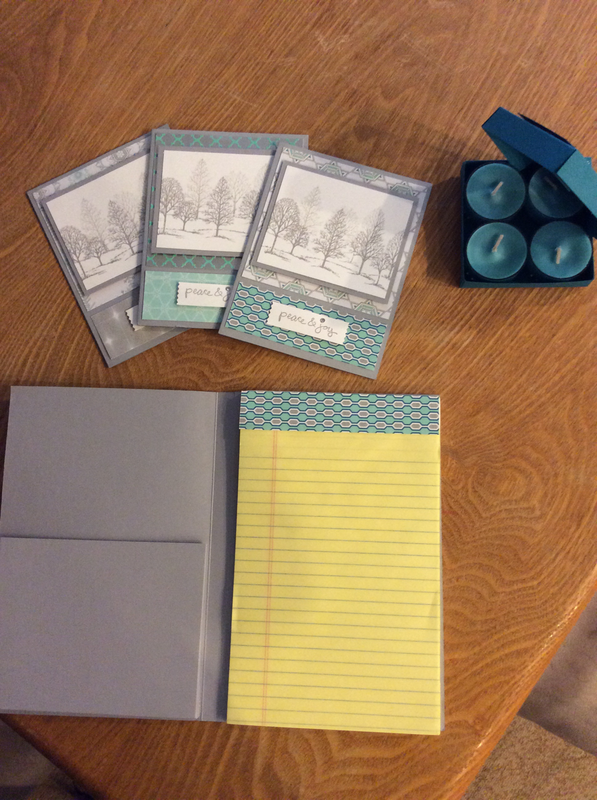
So I've had several requests to post the instructions for the notebook set I posted a few days back.
So here you go, it's very simple: Notebook: You will need 1 sheet of card stock 8 1/2 x 11. With the 11" side on the top score at 5 1/4" and 5 3/4". Fold on the score lines. To create the pocket on the inside, cut a piece of card stock to 6 1/2 x 4 3/4. Score at 1/2" & 3/4" on 3 sides. Fold on the score lines, you will need to cut up to the 3/4" score lines at the bottom of you pocket. Use a strong adhesive to glue to inside left of the cover. The pocket will measure 5 x 4 when done. On the inside right you can glue the 5x8 notepad. Depending on how you choose to decorate the front cover is up to you. Tealight box: You will need to cut 2 pieces of card stock for base 4 3/8" x 4 3/8" & for the lid 4 7/16" x 4 7/16" Using the Simply Scored scoring tool, Score st 5/8" on all 4 sides of the base and lid. To create the hinge on the lid. Take the lid piece and score at 2" down to the 5/8" mark. Turn it over and make sure the 2" scored line you made, lines up to the 2" mark on the left side of your simply scored tool. Now on the top measurements score at 2" again down to the 5/8" mark. Fold on all score lines on base and lid. You do not need to fold the 2" scored lines. Before you assemble, cut the circle opening with the Circle Framelits on the lid. I then too a pieces of the window sheet and cut the next size up with the frame,it and glued it on the inside. I took a piece of DSP cut it to 3x3. Cut a circle (slighter bigger than the size on the lid) and adhere on top. Take lid and a ruler and line up the edge to the 2" marks and using a stylus or bone folder score a diagonal line. Cut up on score lines to create the box. Also cut up the 2" lines and fold the diagonal opposite this will hinge the box. Assemble the lid and base. You then want to glue that corner piece onto the card base. I punched the bow using the Bow maker punch with same card stock and used reverse side.
Built for Free Using: My Stampin Blog
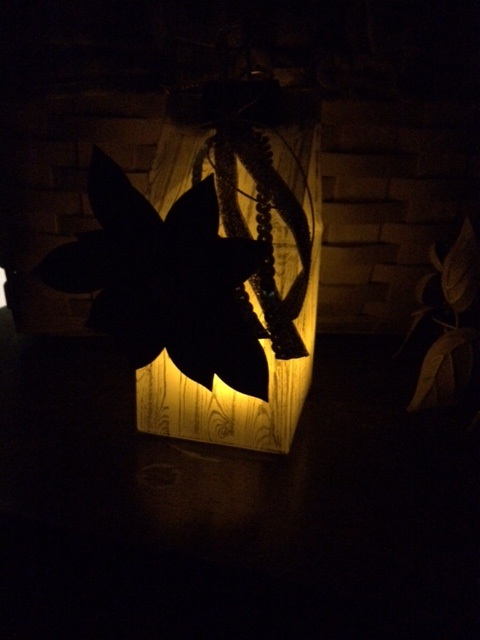
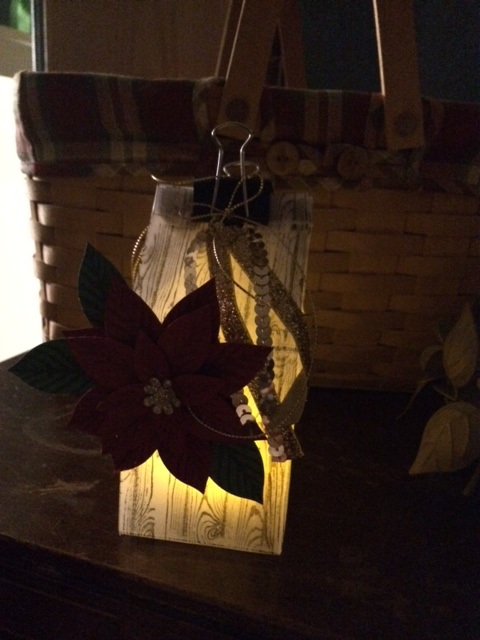
I love decorating for the holidays. But sometimes when life gets crazy with all the running around, I don't get much of a chance to enjoy all the decorating. And, well sometimes it feels more like another chore I have to get done. But I created this holiday lantern. It's been sitting on my shelf waiting for the perfect time to be "blogged". I was inspired from a few lanterns I had seen on Pinterest. I love Pinterest, have I said that yet?

I will admit this was my first attempt at using our new Festive Flower Builder Punch. It was so easy to do! For the Poinsettia, I stamped then punched out the petals and layered them to create the flower. It was the perfect adornment to my lantern.
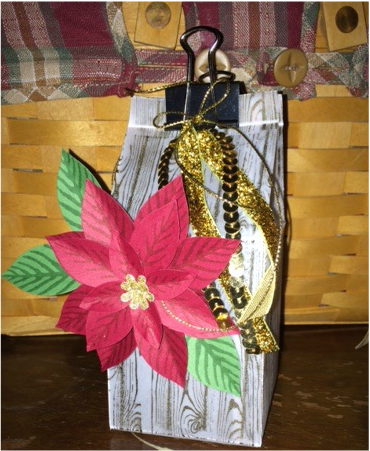
I used our Vellum paper to make the milk carton shape of the lantern. I stamped the Hardwood background stamp in Early Espresso and really waited for the ink to dry before scoring and folding. I will say after making this once, I would definitely use a stayzon ink for the fast drying.
I added a binder clip to hold the lantern closed. I wanted the inside to be accessible pretty easily. The Gold Sequins, new Gold Glitter Ribbon and New Gold Cording Trim are adhered to the lantern with glue dots so the won't fall off when you take of the clip. And what's a lantern without a little light? Right?
Inside the lantern is a little battery operated tealight. How cute! I am really excited to put this on display during the holidays. I can even be hung on a tree!
I hope I inspired some of your holiday decorating too! Happy Stamping! Steph
Built for Free Using: My Stampin Blog
Today I finalized my Christmas card design. I'm so happy! Once I figured out what I wanted to do I was on a roll. I'll give a sneak peak, but you'll have to wait for Christmas to see the cards. I will share that I used the Home for Christmas DSP. Love this paper!! I prepped as much as I could and stamped enough for 100 cards. But I had to place an order for supplies. I can't wait for the order to come in so I can keep going. Just need to print out our family picture. And when it's all prepped, assembled! Wah-la!!! Definitely feeling accomplished today!
Built for Free Using: My Stampin Blog
|

New 2023-2024 Stampin Up Annual Catalog


Kits Collection


Join today

Categories
All
Archives
January 2024
|


 RSS Feed