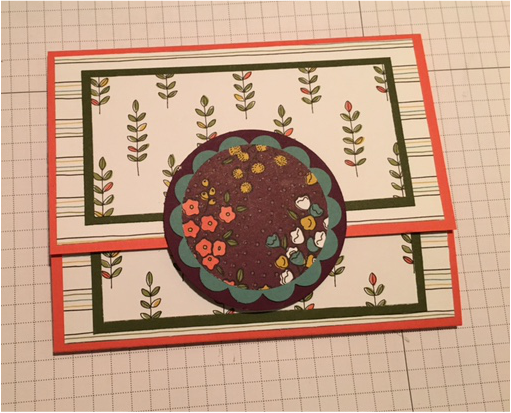
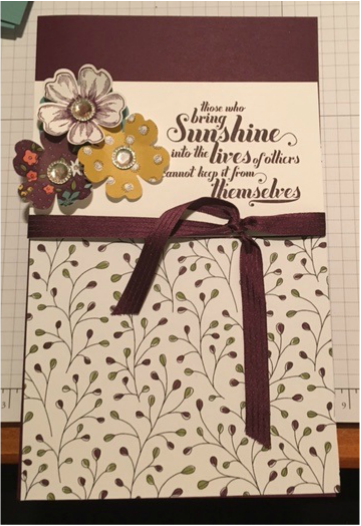
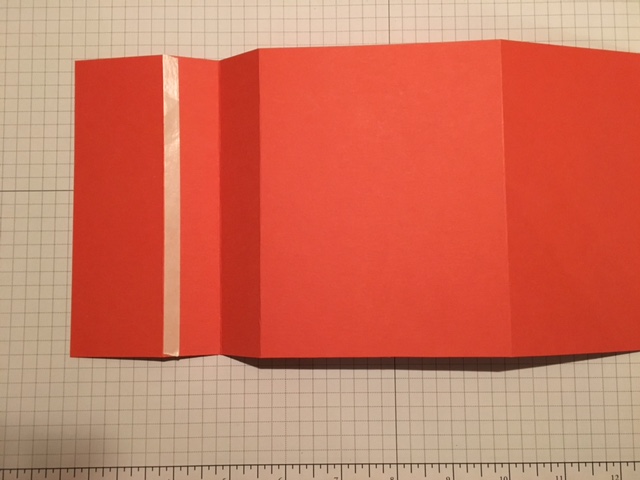
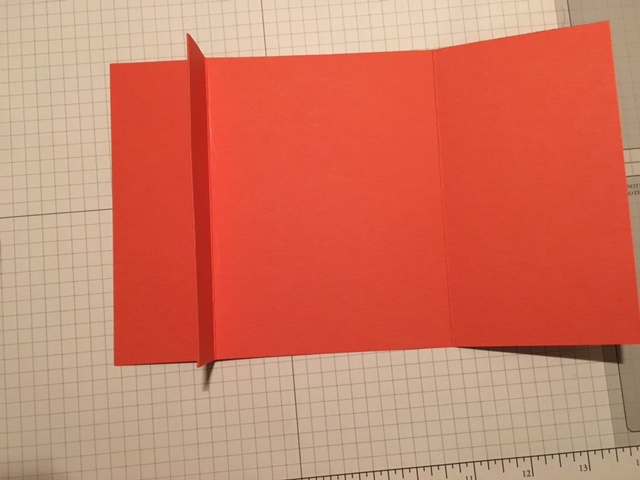
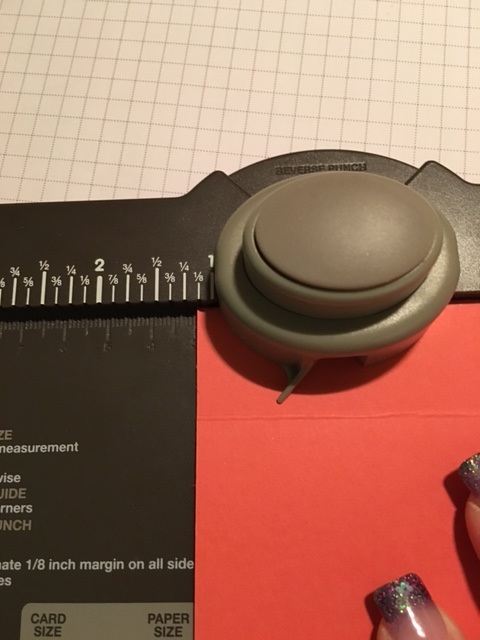
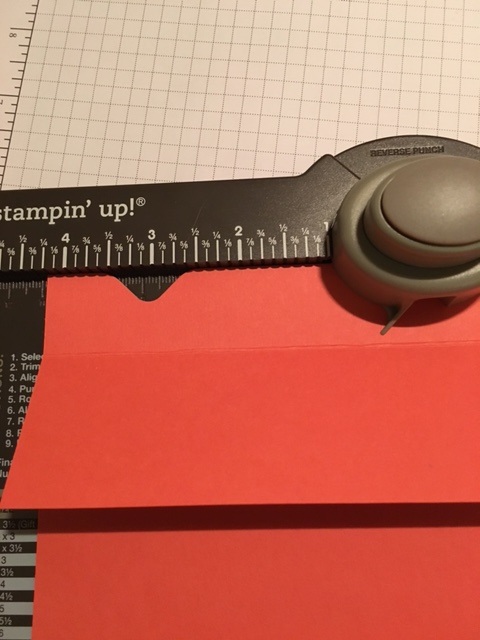
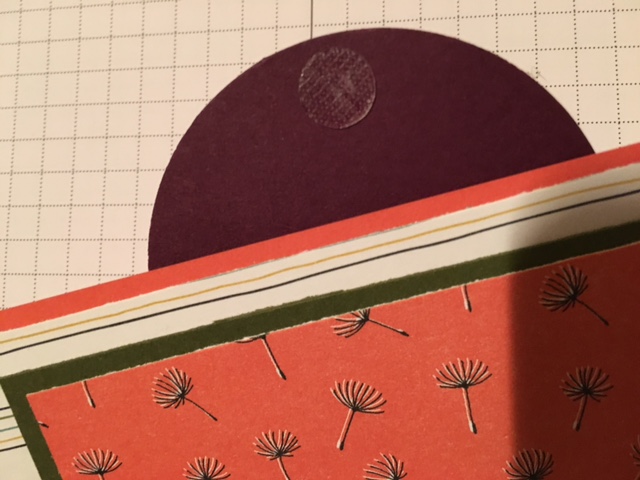
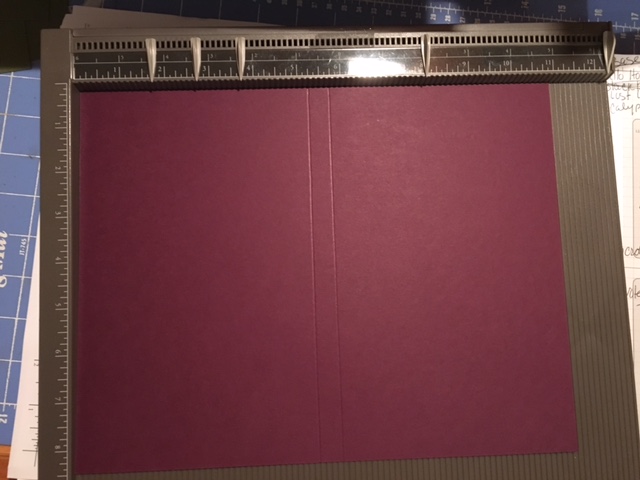
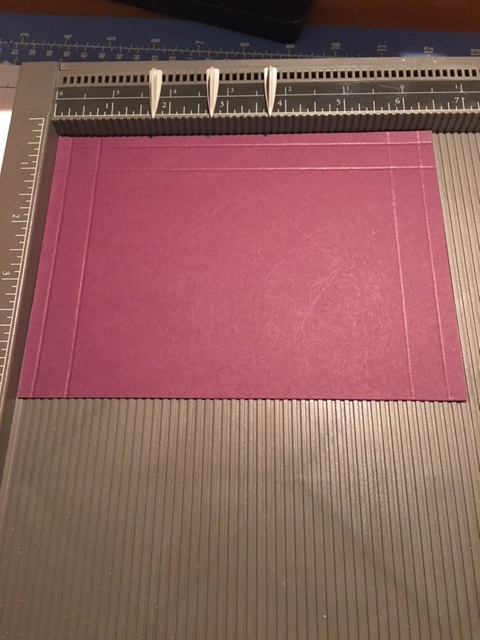
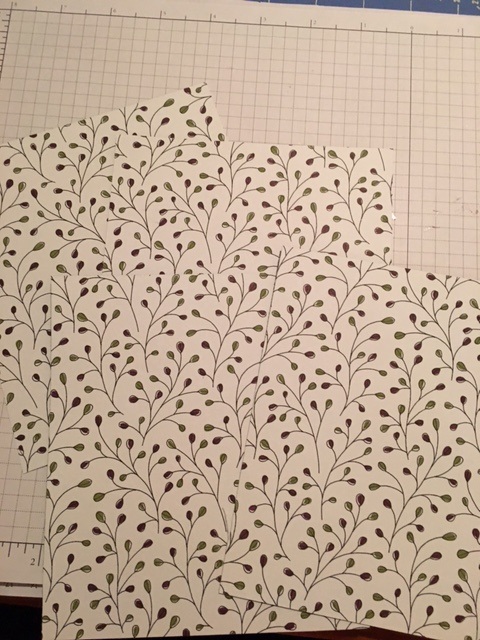
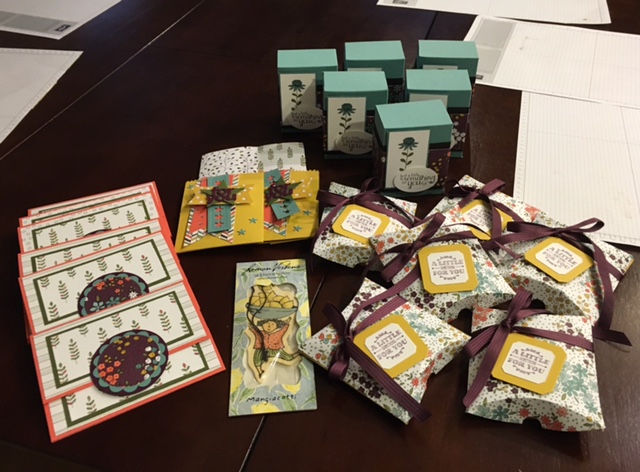
 Day 5 - Last but not least. To end Teacher Week I decided to stick with a gift card. Perfect, the teachers can use the card for themselves. I came across this Giftcard Card while I was scrolling through Pinterest. The original design was from Lea Denton of The Crafty Spark. Her design uses measurements for a sheet of A4 paper. I modified it to work for a standard sheet of 8 1/2x11 cardstock in the US. You could use a sheet of 12x12 and use Lea's measurements if you preferred. You can view Lea's design here. So I started with a sheet of Calypso Coral 8 1/2x11 cardstock and cut it to 5 1/2x11. I used my Simply Scored Scoring tool. Place the 11" side at the top and score at 1 3/4, 2 3/4, 3 3/4 and 8. 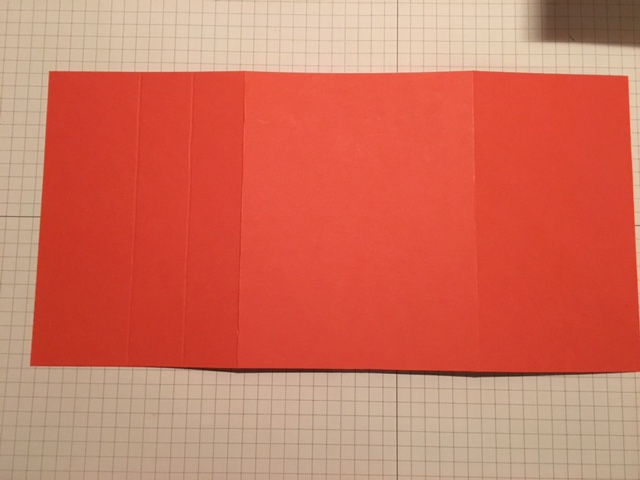 Fold on the score lines. Except on the 2 3/4 score line you are going to fold it in the opposite direction. 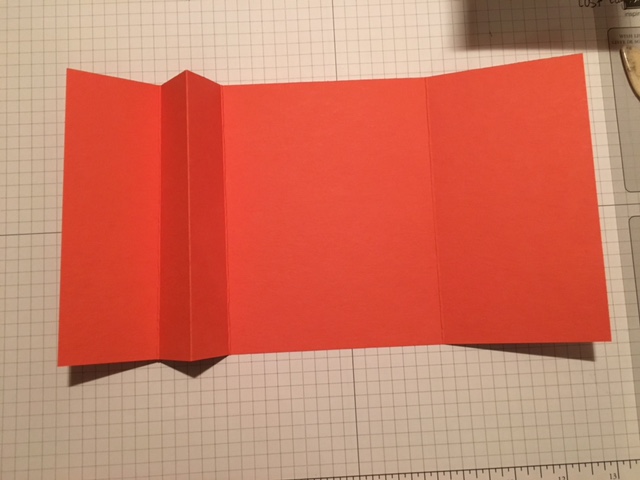 Then you will need to turn over you paper and add a strip of adhesive at the 1 3/4 score line. Make sure to add adhesive as close to the score line as possible. You will seal this together at the 3 3/4 score. Turn it over, this section will become the pocket to hold the giftcard. To make the giftcard pocket, you will need to use the Envelope Punch Board. You will not be scoring, just creating the 2 notches. Take the section you just glued (folded side up) and line up the left side at 1 1/8" and punch. Move it over to 4 1/4" and punch again. Boom that's done. Next, with your trimmer, line up the edge of the pocket (the side that's folded) and trim off just a smidge to open the pocket. Don't go too far down. You want to make sure there is enough to hold the gift card in. 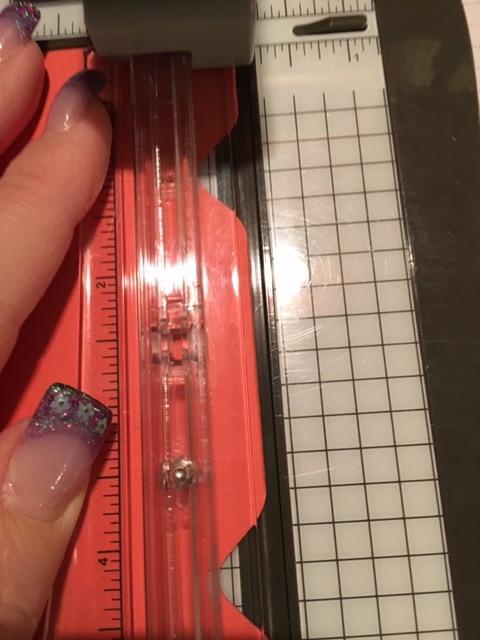 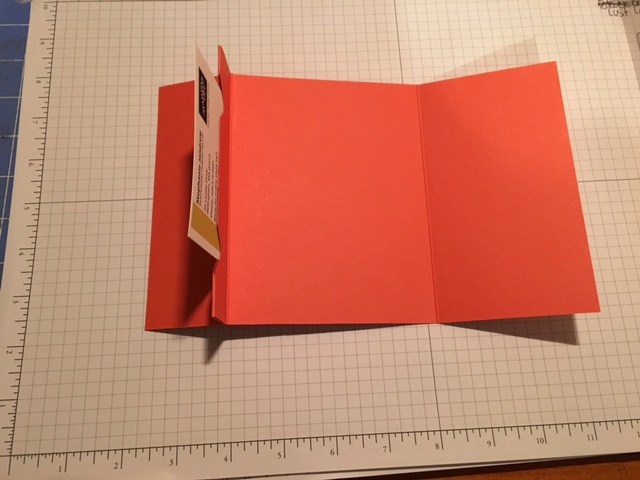 Ok, lets decorate. I had enough of the Wildflower Fields DSP to finish up the week. Yeah I like when that happens. Now I am no longer sitting on retired paper I am wondering what I'll do with it. Starting with the inside. I layered the DSP Inside top flap DSP: 5 1/4 x 2 3/4 CS: 4 1/2x 2 1/4 DSP: 4 1/4x2 Inside: DSP: 5 1/4 x 4 CS: 3 1/8x3 1/8 WW: 3x3 Inside Bottom Flap DSP: 5 1/4 x 1 1/2 CS: 4 1/2x1 1/4 DSP: 4 1/4x 1 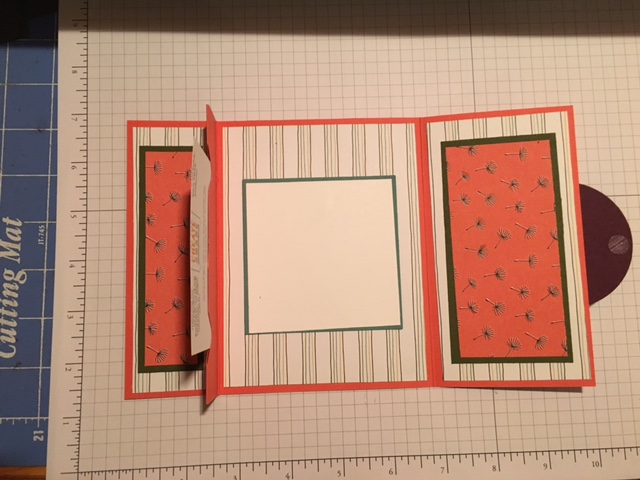 Now for the outside of the card: Same process except you do not need to decorate the middle section since this becomes the back of the card Outside top flap DSP: 5 1/4 x 2 3/4 CS: 4 1/2x 2 1/4 DSP: 4 1/4x2 Outside Bottom Flap DSP: 5 1/4 x 1 1/2 CS: 4 1/2x1 1/4 DSP: 4 1/4x 1 The I used contrasting colors from the DSP pack to make the closure. Punch a 2 1/2 circle in Blackberry Bliss Punch a 2 3/8 scallop circle in Lost Lagoon Punch a 2" circle with the DSP in a different pattern. Adhere on the front only at the top half. We will add Velcro to keep the card shut. So what I did was added both the top and bottom pieces of Velcro onto the back of the circle. Then close the card, and press, the bottom part of the Velcro will stick to the card. Just add giftcard and it's all done. Love it!!
Hope you enjoy this week's projects. Feel free to contact me with any questions! Happy Stampin Steph
0 Comments
 Day 4 - Notepad Holder I decided to make a notebook holder for day 4. It's my go to quick gift. Super easy! I feel like you can never have enough notebooks around. I used Blackberry Bliss Cardstock as the base of the holder. You can make 1 notebook holder out of a sheet of cardstock. I'm this particular one, I added a pocket on the inside. You can choose to skip to save paper too. The holder is sooo easy. Take a piece a 8 1/2x11, Take your Simply Scored Scoring tool, with the 11" side at the top score at 5 1/4 & 5 3/4 Boom folder is done. Fold on the score lines and add the notepad to inside right. I used little legal pads I found at Wal-Mart. I think they are like 5x8. To make the pocket, you will need a piece of cardstock that measures 4 3/4 x 6 1/2. Easy - score at 1/2" & 3/4" on three of the sides. You will need to fold on all the score lines. Then cut out the corners you don't need that section. The 1/2 section when folded, will be the section that adheres to holder and the 1/4" will be your sides. Hope this makes sense. Tear n Tape to adhere the pocket down.  To decorate the holder. I cut a strip of DSP that measure 1x5. I glued this onto the top of the notebook to hide that binding. Plus it gives the inside a little extra touch. 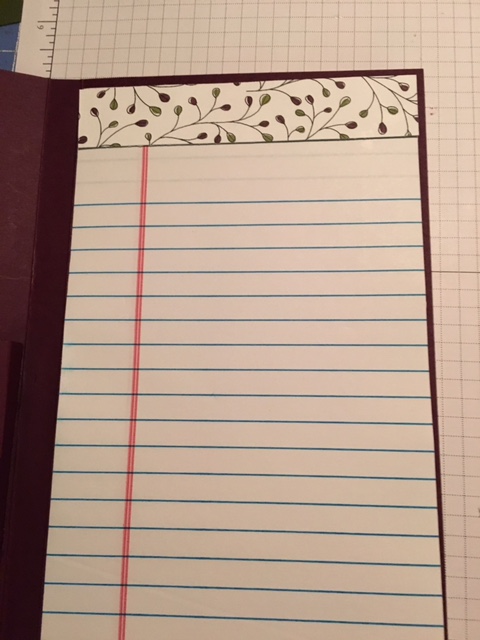 I cut a piece of DSP to 5 1/4x6 and glued it onto the front of the holder. I then cut a piece of Whisper White to 2 7/8x5 1/4.I stamped the saying from the Feel Goods stamp set in Blackberry Bliss. Then I tied a knot around the white in the Blackbery Bliss Stitched Satin ribbon. I then glued it onto the front of the holder overlapping the DSP allowing the Blackberry Bliss cardstock to still show at the top. I stamped a flower from Flower Shop in Blackberry Bliss and punched it with the Pansy Punch. I then punched 3 more flowers with the Pansy Punch using scraps of DSP and Lost Lagoon Cardstock . I added a Iced Rhinestone to the center of the flowers and then layered them onto the front of the holder. 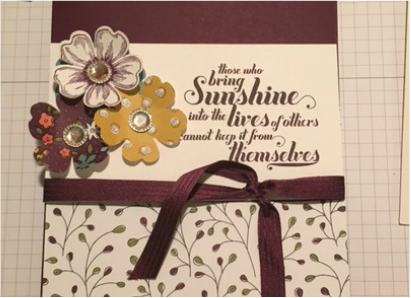 Just love it. I love that no matter how many times I make this notebook holder, it comes out looking so different!!!! Perfect for teachers right!!! Like I said in the beginning I was 100% on the Wildflower Fields DSP but, have truly come to love the colors as I worked to create these gifts. I enjoy working to coordinate as well. It makes me happy when the guess work is taking out of the equation and I can create at ease. Got to love Stampin Up!!!! 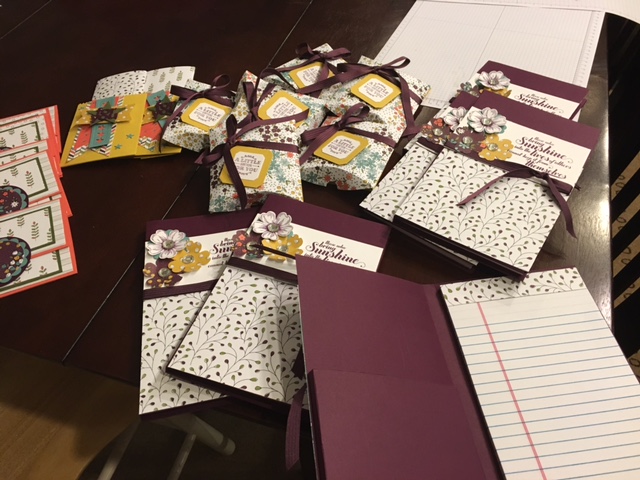 Check in tomorrow and see what I made for the 5th a final day of Teacher Appreciation week.
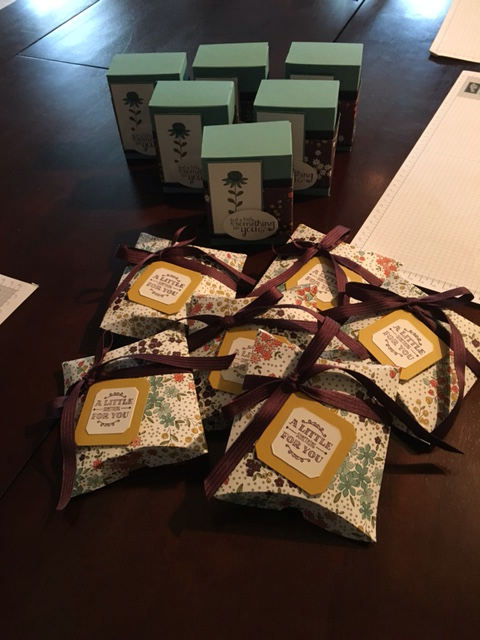
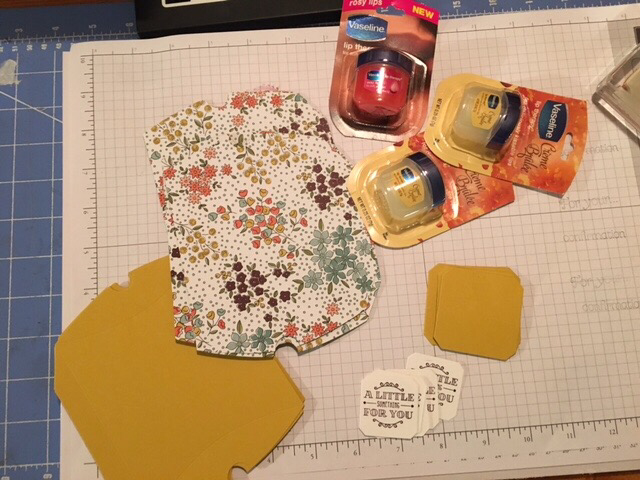
I am so happy with the results. Thanks for taking a look Happy Stampin Steph 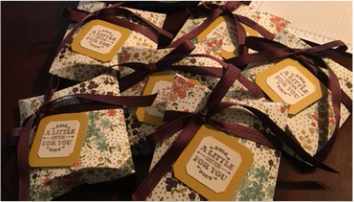 Day 3 of Teacher Appreciation Week. Today's project is a little lip balm packaged in a pillow box. As mentioned in Day 1, I did use a little bit of retired product to use things up. This project was fairly simple. I cut a piece of Hello Honey cardstock out using the Square Pillow Box Framelits (retired from Stampin Up).I repeated the step and cut out a second piece using the Wildflower Fields DSP. I stamped the A Little Something for You in Blackberry Bliss and cut it out using the framelits provided in the Square Pillow Box. I cut the larger one in Hello Honey and layered together. I assembled the box and tied a bow using a piece of Blackberry Bliss striped satin ribbon (retired) around. I attached the saying just under the bow. Like a said EASY. I found this little Vaseline Lip Balms at Walmart in Health and Beauty where the rest of the Vaseline is sold. The idea of this project came from a similar gift given to me by my Upline's, Upline Barbara Lash. She gave me a pillow box with the Vaseline Lip Balm in it. I thought it was sooo adorable. I couldn't wait to make it to give out too. Come back tomorrow to see Day 4 Happy Stampin Steph  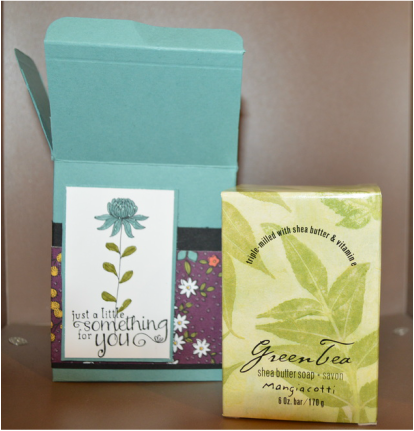 Day 2 - Soap Box You can read about the Soap Box by referencing my original blog post here. As mentioned, in my original blog post, I found a box tutorial by Pootles Papercraft. You can watch her video here to see how to make the box. I used Lost Lagoon Cardstock as the base of the box and the belly band is basic black and the Wildflower Fields Designer Series Paper. I stamp the flower from Flowering Fields (which was from Sale-a-bration and is now retired) with Archival Black ink and colored it using Lost Lagoon and Old Olive. I stamped the verse from the Num Num stamp set. I finished the flowers by adding a touch of Wink of Stella glitter. In the photos below, left photo shows Days 1, 2 & 3 and the right photo shows Days 1, 2, 3 & 4. I am still working on Day 4 So my delay in a little planning may result in me not having a photo of everything together. But I'll try to it at least post 1 of each as a group. I have to say I am really enjoying putting these projects together. I love how everything ties together!!!! Have a great week? Happy Stampin  This week is Teacher Appreciation. Each day this week, the kids can bring in a little treat for their teacher. Our PTO supplied a quick suggestion of flowers, wear favorite color, bring a favorite snack, write a note or poem and a gift card. Plus we have a big luncheon on Friday and take over recess duties. Well, I had been working on year end gifts for the teachers, trying to get a jumpstart. I realized the gifts I was putting together for end of year could possibly work for each day this week. I quickly switched gears and made sure I had enough for each teacher. Although they aren't the suggestions, I feel that the teachers will be ok without receiving 20 of the same things. My kids can still right a little note to go along with the gifts too. When I originally started the projects, I had decided that I wanted to use the soon-to-be retiring 2014-2016 In Colors. And well, the Wildflower Fields I had from Sale-A-Bration matches perfectly. Now keep in mind I did use some retired products. These type of gifts are perfect to use up anything I have sitting on hand and clear some space for new stuff, right???? Since, I was originally going to put this items altogether in a gift bag, to hand at once, I wanted them to match. But since I separated them out...you may not mind using different papers. Day 1 - We brought in a Lemon Verbena Air Freshener - smells so fresh YUM. Like the soap, featured in Day 2, the air freshener is also from Mangiacotti, which is made in Attleboro, MA. I blogged about the soap back in March so Day 2 will reference that post again. MAN these gifts smell so delicious, too!! This was super easy to make, so I'm not going to make a tutorial. I used the Mini Treatbag Framelits from Stampin Up. Don't have the framelits? You can use another type of bag, like these Kraft Bags (these have a low inventory status) or these Sketched Dots Bags and just added the decorations, Really anytype of bag will do! The colors I used in this project was Hello Honey for the treatbag, the star strip is in Lost Lagoon, Star in Mossy Meadow and 'for you' in Blackberry Bliss are cut from dies included the Mini Treatbag Framelits. I wrapped the air freshener with a piece of the DSP to coordinate it. Wala Day 1 project done. Stop by tomorrow to see Day 2. Happy Stampin Steph 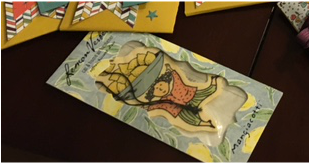 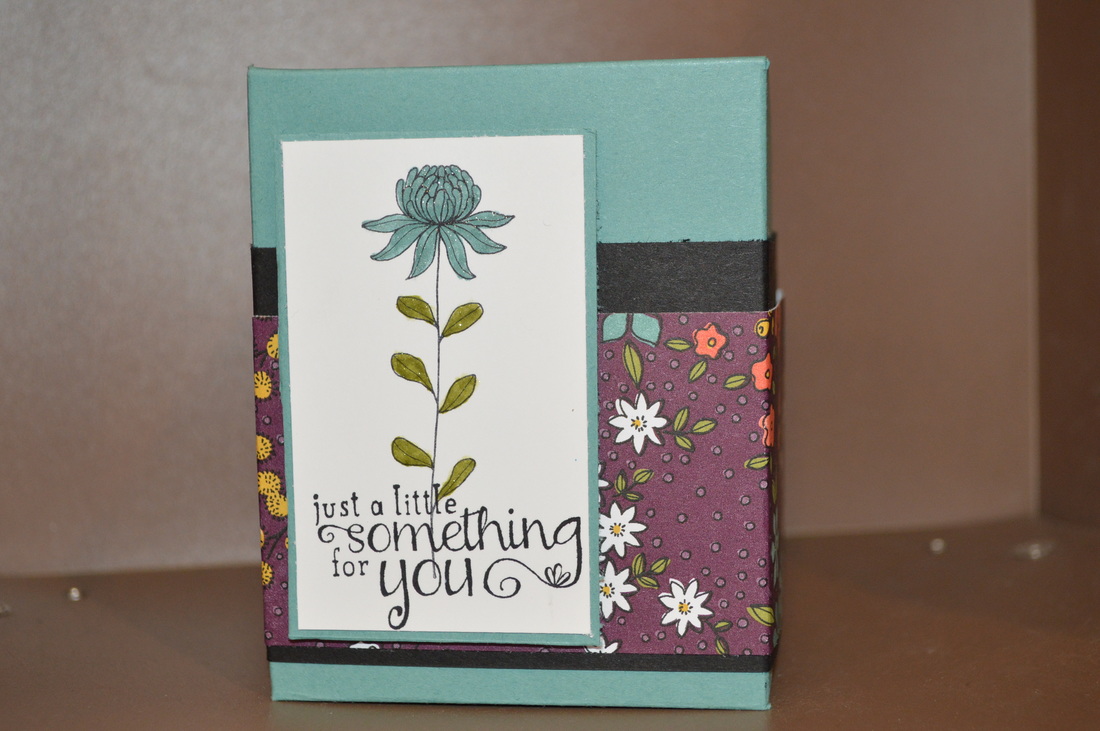
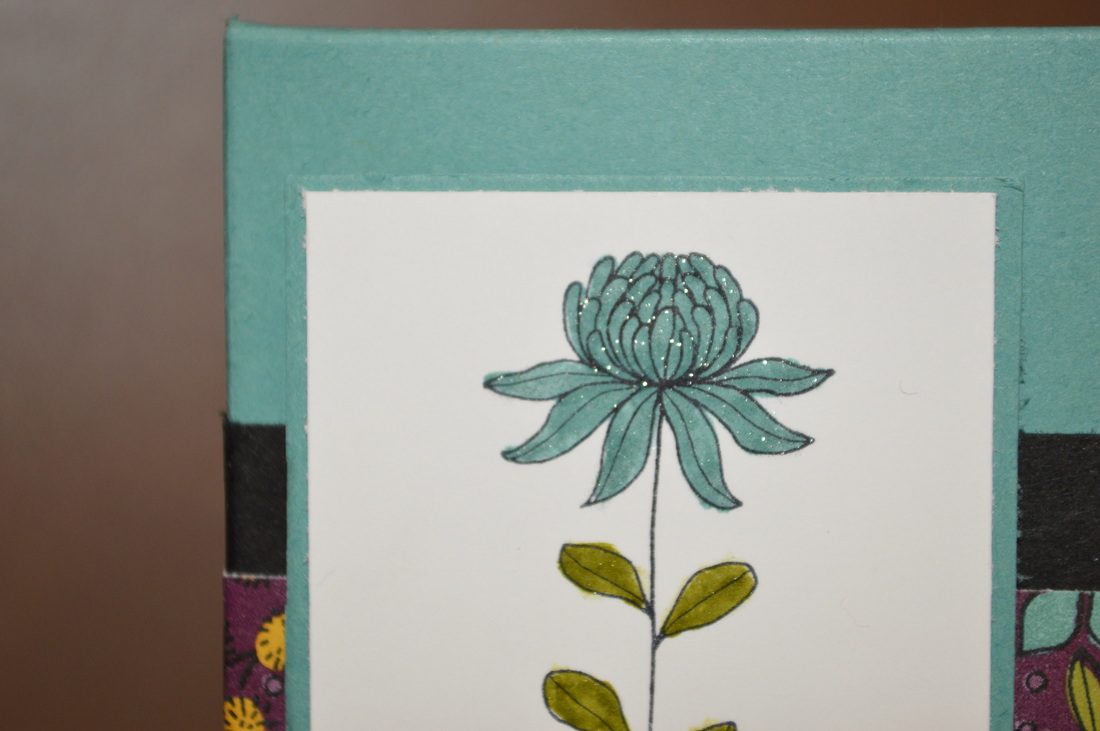
The soap is from Mangiacotti, which is made in Attleboro, MA. They smell so delicious!! At first I thought I would wrap them or put them in a gift bag with tissue paper. But hand palm to the forehead....UM what do I do??? I sell Stampin Up! I papercraft!!!!! Why wouldn't I make something to put the soap in!!! YES YES Hence, the reason I am starting early!!!! See what happens if I'd waited to long. So, I searched on pinterest for a box idea. I wanted something easy that didn't waste alot of paper. And low and behold, I came across this soapbox design by who??? Of course Sam Donaldson at Pootles Papercraft. She's amazing and I am not ashamed to CASE her box and bags designs! This box was absolutely perfect for this soap. I am truly happy how it all came together. It's easy and I can make 8 of these very easily! 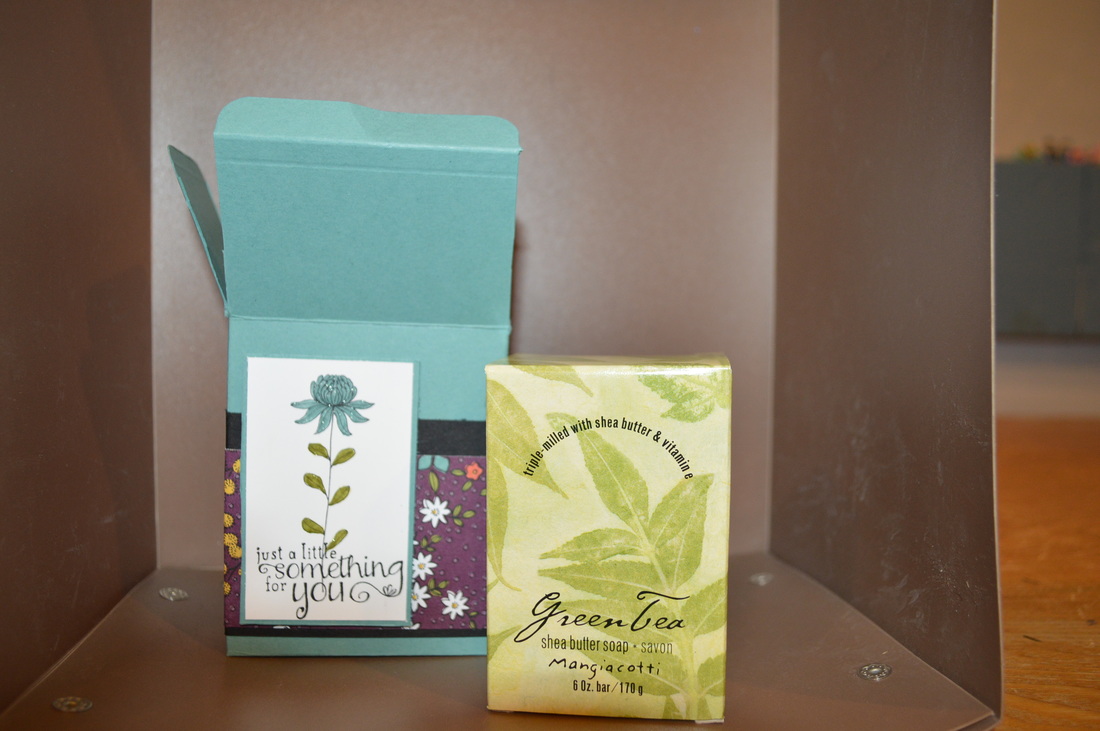 I used Lost Lagoon Cardstock as the base of the box and the belly band is basic black and the Wildflower Fields Designer Series Paper. I stamp the flower from Flowering Fields with Archival Black ink and colored it using Lost Lagoon and Old Olive. I stamped the verse from the Num Num stamp set.
Click here for Sam's tutorial. Hope you enjoy Happy Stampin Steph 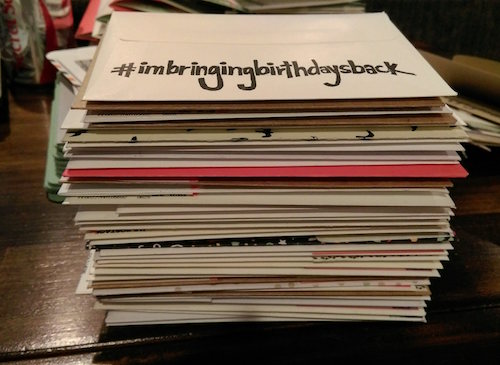 Back in January, Shannon West, Demonstrator Training Manager at Stampin Up, was kicking herself that she did not send Christmas cards out. She felt that there was more people posted a photo card on social media than mailing. I read her post, obviously awhile back, put this on my list and well out of sight out of mind. Story of my life lately. But as the old saying goes BETTER LATE THAN NEVER!!! Here is a quote from Shannon " For years I’ve complained about Facebook ruining birthday cards and now it would seem the same was happening to Christmas cards. A handmade, handwritten card in the mailbox seemed to be nearly extinct—and I was contributing to the problem!" I too must admit, here is the card making business, I put together cards to make at my card clubs or even cards from Paper Pumpkin, where do they go??? In my file drawer in their appropriate categories, where else?? But, I rarely remember to send cards anymore. The hustle and bustle of life and well the ease of simply saying "Happy Birthday" to a friend via Facebook or text has well, made it almost to easy to not have to mail a card. Thinking about this....I do, even at 42 years old, get excited to see a handwritten envelope in my mailbox from a friend or family member. I do mail Christmas Cards and have to say I really enjoy seeing everyone's cards in the mail. AND...well those handful of friends that did make handmade cards really made my holidays. Something as simple as, a personal piece of mail, can really make someones day. Sometimes it's truly the little things. So event though I am a little late jumping on this bandwagon....I challenge you to mail birthday cards out to those that you know the dates on. AND...comment on my blog with the #imbringingbirthdaysback and I will mail you a birthday card, handmade from me. After commenting, I will need to ask that you email me your full name and address so I can mail you the card. My email is [email protected] Below is a few cards I made in preparation to getting cards out. But I assure, I have many, many birthday cards sitting in my drawer. So although, I will be continuing to make new ones as needed...I do promise I have alot to send. You can click HERE to read the full article Shannon West wrote. 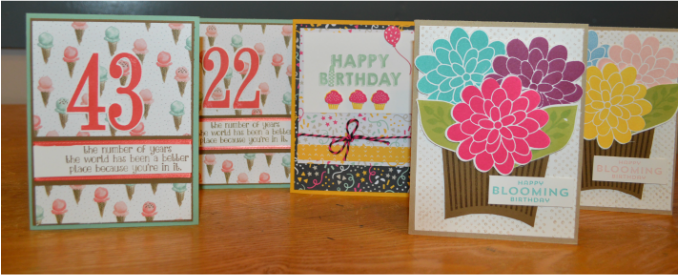 I really excited that Sara reached out to Shannon to find out what she could do to involve Stampin' Up and well...they decided to market the #imbringbirthdaysback stamp that Shannon had made. So the stamp is available as a wood block stamp only for $12. It's really cool and I can't wait to get may hands on it. I've included a picture below so you can see how the image will stamp. If you click on the picture it will direct you to my Stampin Up store where you can order your very own. How COOL!!! NOW PLEASE REMEMBER TO COMMENT ON MY BLOG WITH #imbringingbirthdaysback and email me at [email protected] with your name and address and I will send you a birthday card you can use for someone. I really hope your up to this challenge with me, there's no purchase need...well maybe a stamp to mail your card to someone else!!! Happy #IMBRINGINGBIRTHDAYSBACK Steph  It's been quite a busy week in my craft space. I've been working on finishing Christmas cards and gifts for co-workers, teachers and family members. I've had ideas for a while but never quite got around to making them. I soon realized better get cracking. But it's always a race against the clock. First was working on my husband's co-worker gifts. Each year we brainstorm what to get the men and woman my husband works with. Trying to figure out what to get always takes for ever! I always have Mason jars on hand so we decided to make some sort of jar gifts. I came across layering hot cocoa/marshmallow/peppermints in a jar. And well since we are giving these to adults not children, we decided to go with a mug jar and add some fun nips to make it an "adult" gift. Normally I would try to use all Stampin' Up products to create the gifts. But I just didn't have the extra time to hand punch and assemble bows and ribbon. I found the mesh ribbon, glitter bows, button embellishments and snowman hats at AC Moore. I layered the jars and measured enough cocoa to make 2 servings of hot cocoa. Maybe next time, I'd put the crushed candy canes and marshmallow in baggies so they can just scoop out the cocoa. But this time it can be dumped out in a bowl, mix it up and divided into 2 mugs. 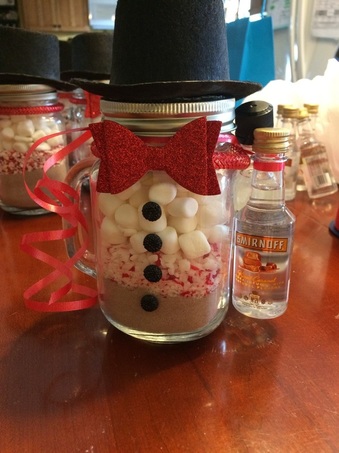 Now for the woman, it gets tricky, I never know what they like/dislike. So, I try to keep their gifts pretty general. Not always easy though. I was invited to a Thirty-One party and decided to grab the Littles Carry-all Caddy. Now, what to put in it?? To stick with the jar gifts, I chose to fill a Mason jar with a Christmas cookie mix. I layered and Oatmeal, Chocolate chip cookie. Very simple! But so yummy. Instead of decorating a jar and getting a gift bag. I tied a bow, added a wooden spoon and a tag with baking directions. 1 1/3 cup flour 1 tsp baking soda 1 tsp baking powder 1/4 tsp salt 1 cup oats 3/4 cup m&ms 3/4 cup nestle toll house semi sweet morsels 1/2 cup brown sugar packed 1/2 cup sugar I mixed the baking powder, baking soda, salt and flour together then added to jar. Layer in that order make sure to press down in jar to pack it tight. I used a wide mouth quart size jar. Tag reads: Mix: with 1 egg, 1/2 cup melted butter 1 tsp. vanilla extract Combine with the jar ingredients roll into balls Bake for 7-10 mins at 350 I forgot to take a picture of the jar once I packaged it in the Littles carry-all caddy. I Hope you enjoy. Happy Holidays and Happy Stampin 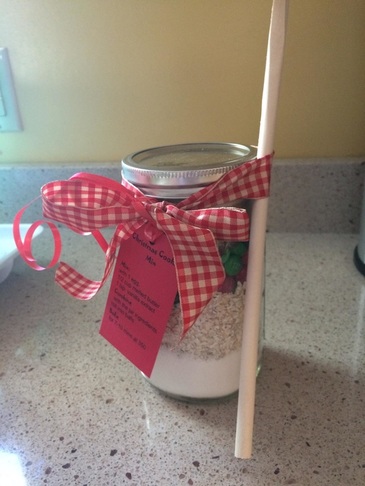
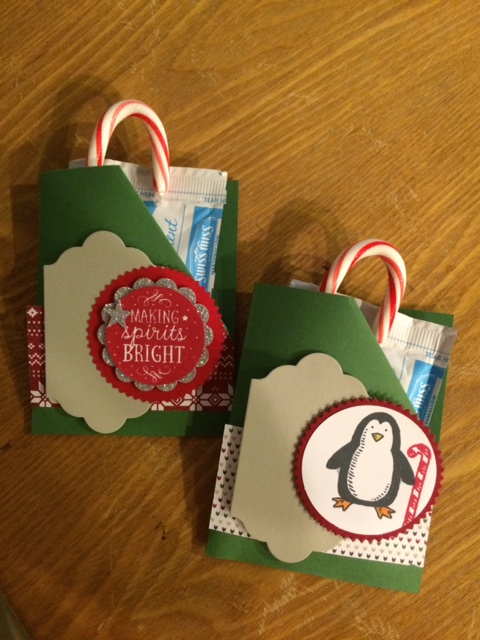
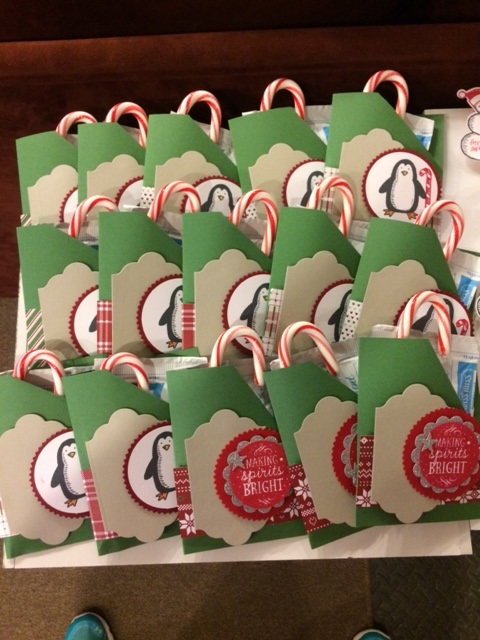
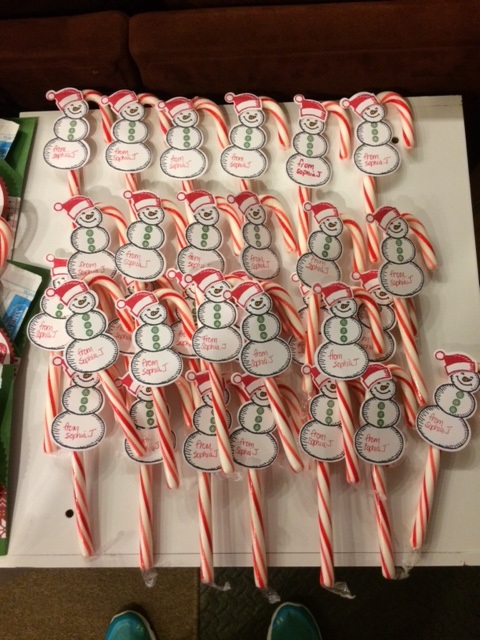
It's that time of year with the hustle of trying to find the right gifts for everybody. Unfortunately, there never seems to be that perfect gift for the right price. Especially with all the parties, secret santa's, swaps etc. It can get pretty darn expensive. Tonight is my daughters' dance studios holiday party. I'd love to be able to buy something for everyone in their classes but just can't do it. I didn't want them to go empty handed as they are typically given something from their teachers and peers. So I came up with 2 simple treats, one a hot chocolate packet for my oldest daughter's classes and a little candy cane treat for my youngest daughters classes. Each take 2 classes, but my youngest daughter's classes each have about 15 kids. WOW so I thought this was simple yet still shows we thought of everyone. Each took very little product to make, and the DSP used on the hot chocolate packs was the Trim the Tree stack paper that retired last year. I grabbed the hot chocolate (10 per box) & candy canes (12 per box) at Walmart. I think I spent somewhere are $10 for the goodies.
So here you have it 15 hot chocolate packets and 30 candy cane treats. 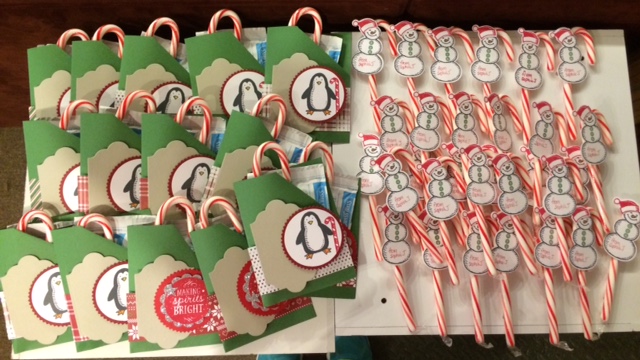
I hope you enjoyed!
Happy Holidays & Happy Stamping Steph
Built for Free Using: My Stampin Blog
|


Categories
All
Archives
May 2024
|


 RSS Feed