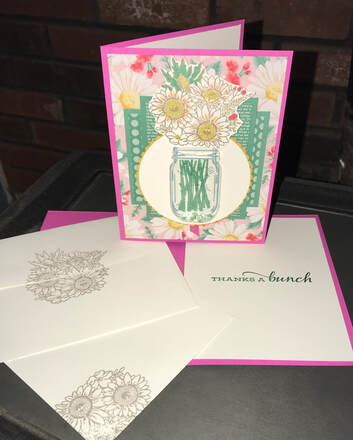
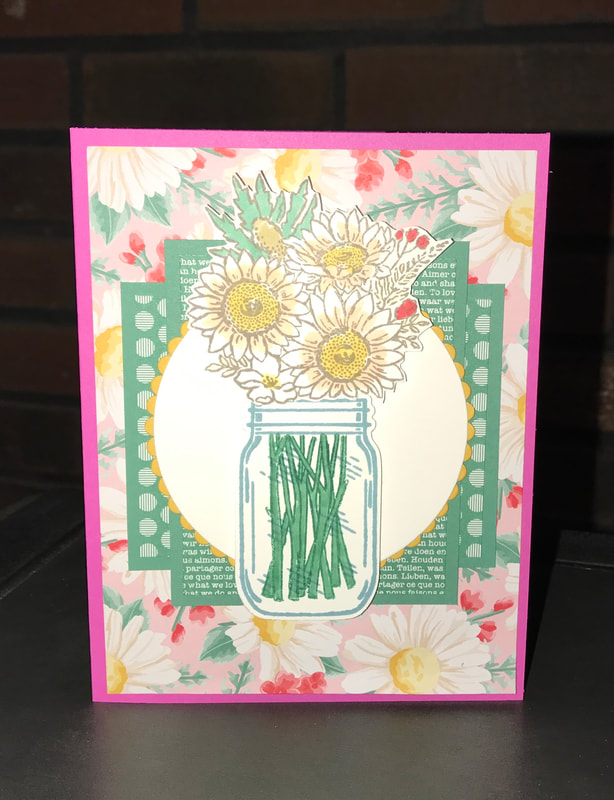
 The Flowers for Every Season has quickly become a favorite from the new catalog. It is the biggest suite we offer. But that just means you have what feels like an endless supply of creativity at your fingertips!!! This card features Jar of Flowers stamp set and Jar Punch from the Suite. The cardbase is the new In Color Magenta Madness 5 1/2x8 1/2 scored at 4 1/4 fold in half. Add a layer of Flowers for Every Season DSP 4x5 1/4, The next layers are the new In Color Just Jade 2 at 2 3/4x3 1/2 with the matching new DSP 2 at 2 1/2x3 1/4. I cut out the large Layering Circle in Whisper White and then added the Largest Scallop Layering Circle in the New In Color Bumblebee. Stamped the flowers in Gray Granite and colored the images. I used the ink color Shaded Spruce and add the stems and greeting on the inside (Celebrate Sunflowers) the jar was stamped in Balmy Blue. As you can see one card uses the new Mason Jar Shaker Dome. I filled the dome with a few of the new Flowers for Every Season Gems. For a complete list of products, see the shopping list. Thank you #msscardchallenge9 Happy Stampin Steph
0 Comments
 Have you received your new Stampin' Up annual catalog??? I hope so! If not, be sure to let me know!
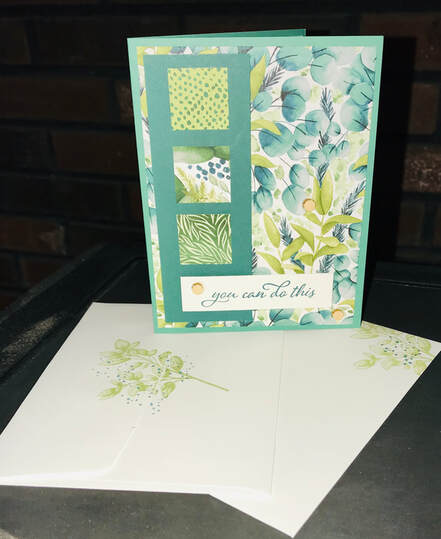
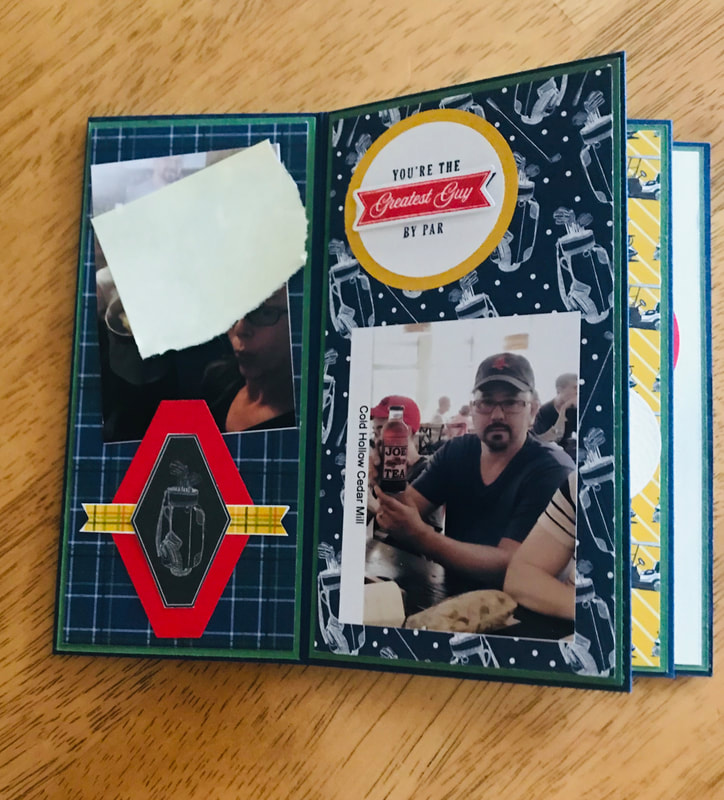
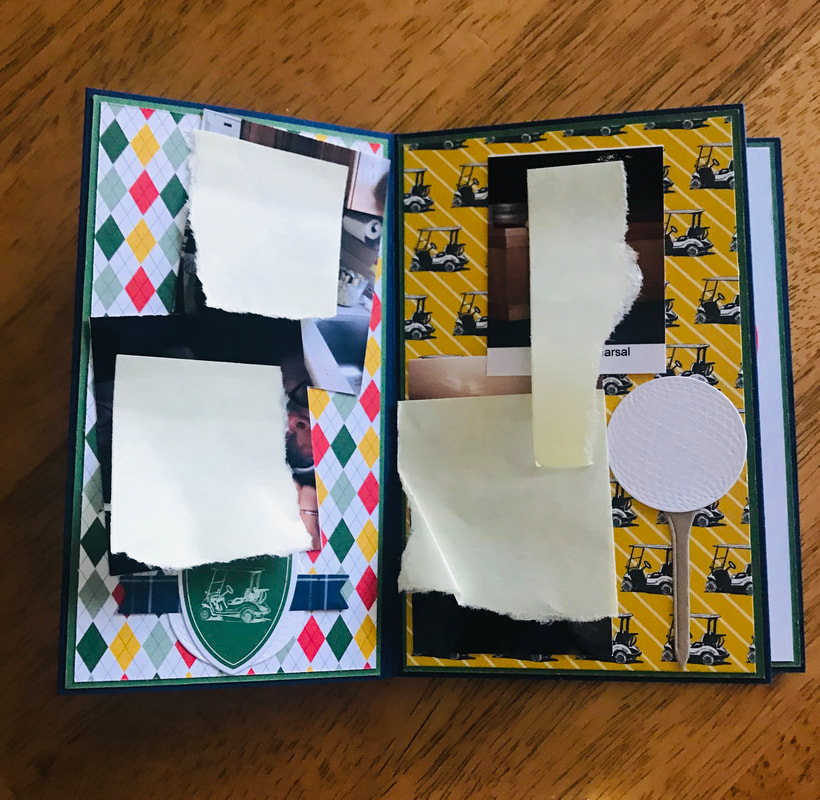
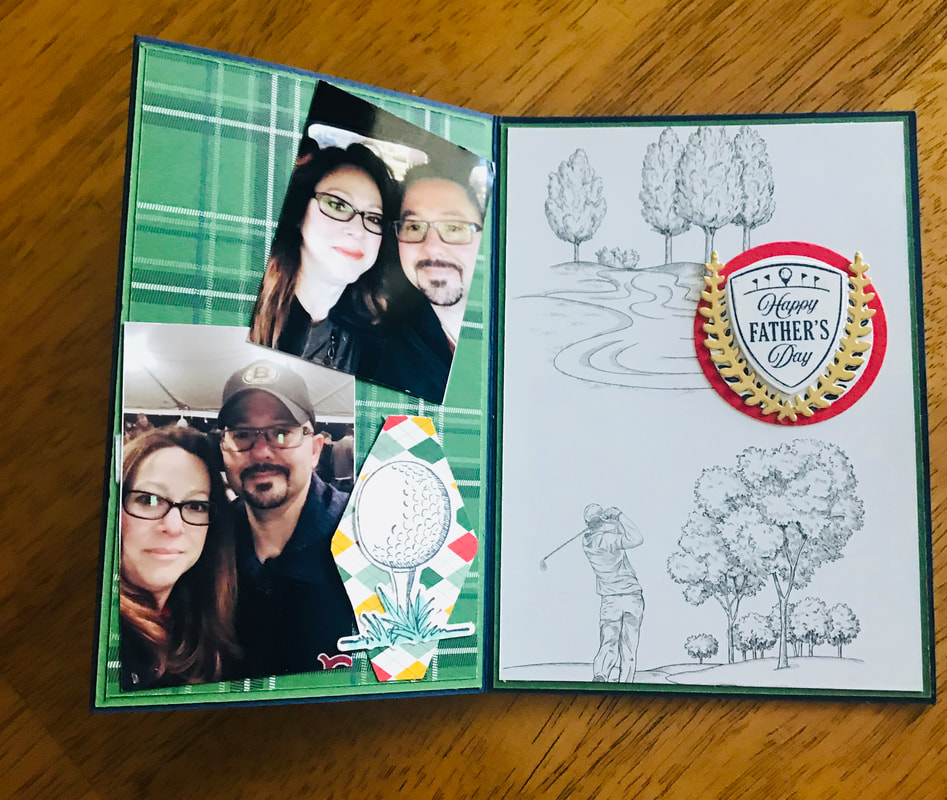
Working with new products is always so fun! When I saw this suite in the catalog...I knew I just had to have it. Why? Not only is it beautiful! But it features all the green colors Stampin Up offers. And, green is my favorite color!! I used the new In Color Just Jade as the cardbase 5 1/2x8 1/2 scored at 4 1/4 and folded in half. Then I added a layer of Forever Greenery DSP 4 x 5 1/4 and the greeting 3/4 x 3 is from the Forever Fern stamp set. I added a layer Pretty Peacock 1 3/4x5 under the 3 cut 1" squares. I finished the card off using a few wooden dots from the In Good Taste Elements. This is just one of the many new products I'll be sharing. For a list of products used you click here for more details or visit my website! #msscardchallenge8 Thanks for stopping by Happy Stampin Steph  Welcome to the May Stampin Friends Blog Hop!! We are featuring Masculine Style projects in this month's hop. Be sure to hop along and visit everyone's blogs, if you get lost, scroll down to the end of each blog to find a list of hoppers. I hope you came from Jean Bolen Beaulieu's blog, didn't you just love her projects?? So great! After you view my blog, be sure to leave a comment!!! And then continue to Tiziana Milano's blog. If you are not sure whose blogs you have visited, you can find a list of hoppers at the bottom of each blog! 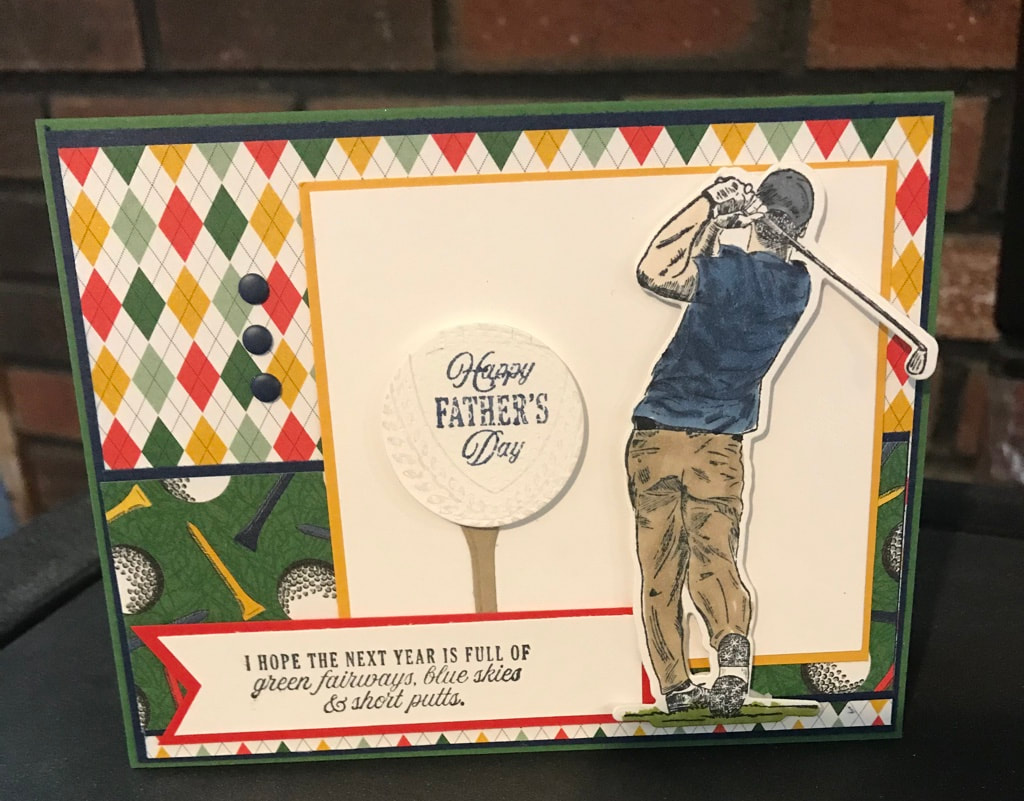 My projects were designed with my husband in-mind. He loves to golf and with Father's Day in June here in the USA, the Stampin Up Country Club suite was perfect!! I am sad this suite will be retiring once the new Annual Catalog comes out. For the card, I used Garden Green for the card base and layers of Night of Navy, Crushed Curry and Poppy Parade. I added the DSP for the top layers card. I stamped, colored and diecut out the golfer! I also made this card to go along with 2 challenges, one was for a card sketch challegne we do weekly with my group you can join the challenge by checking it out here. The other is to Stampin Up Demonstrators by Donna Jean Griffith, to keep stampin, if your a demonstrator you can find it on our Demonstrator Planning Facebook Page. #msscardchallenge7 #keepstamping For my project I made a mini accordion album! I found my inspiration from Jan B she offered a tutorial and it was so easy to follow. Click here to see her tuturiol. I used 1 sheet of 12x12 Night Of Navy to make the accordion base. Cut 1 piece to 5 1/2"x11" and the other 5 1/2"x12". Score the 5 1/2"x11" across the 11" side at 3", 6" & 8 1/2" Score the 5 1/2"x12" across the 12" side at 4", 7 1/2" & 11" I do recommen referign to Jan's video to see how to attach the 2 pieced together. I used Garden Green for the cardstock layers and cut them, 2 each of the following sizes: 2 3/8" x 5 3/8" 2 7/8" x 5 3/8" 3 3/8" x 5 3/8" 3 7/8" x 5 3/8" and then the DSP cut 2 each of the following sizes: 2 1/4" x 5 1/4" 2 3/4" x 5 1/4" 3 1/4" x 5 1/4" 3 3/4" x 5 1/4" I decided to only decorate 1 side of the accordion album with pictures. My kids might be adding to the blankside.....maybe!?! Rather than tying a ribbon to keep it closed, I created a belly band, I used the strip of cardstock that was leftover from the 12x12. I made sure to keep it loose so it slides off easily with all the layers! 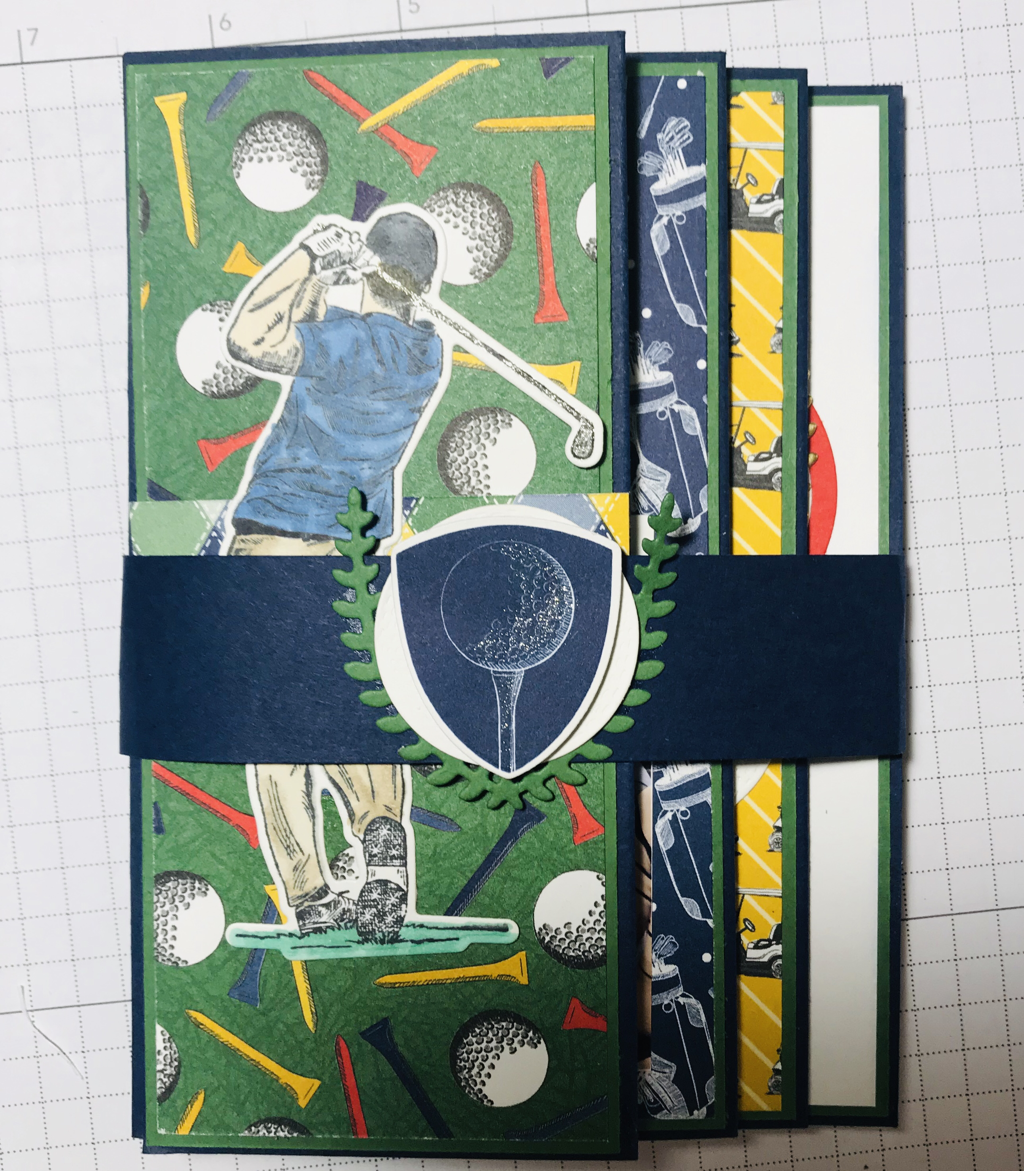 Below you can see the album opened. I have blocked the faces on a few pictures but you can get a sense on how my embellishments look!!! 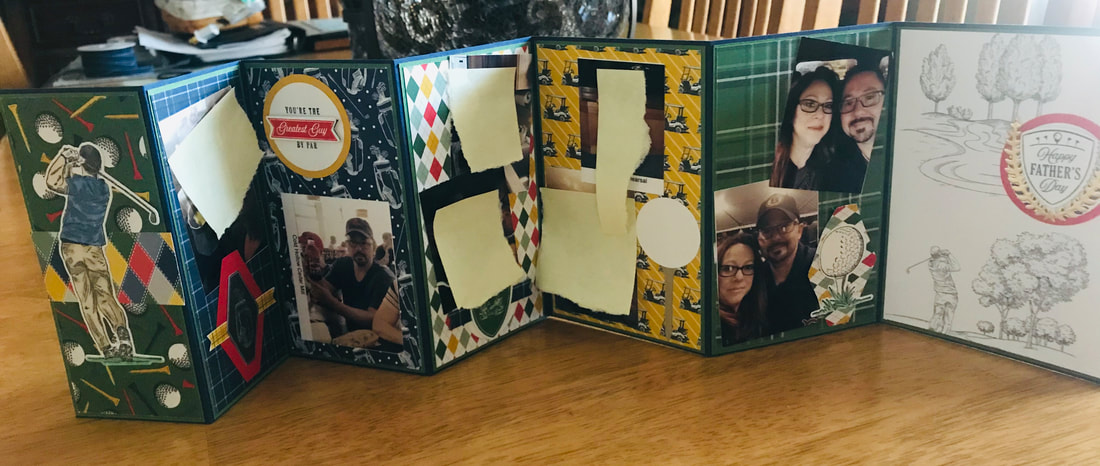 I hope you liked my projects. Leave a comment and then on over to Tiziana Milano blog!
Thanks for stopping by Happy Stampin Steph  Card Challenge #6 Is more of a stepped up card that's a little fancier! Post your designs by Sunday. Please post your card on this blog post or my facebook page. Remember when posting you use #msscardchallenge6 as part of your description. Also be sure to post on your personal page or blogs and mine if you’d like! My facebook page is: https://www.facebook.com/stephjandrowstamps/
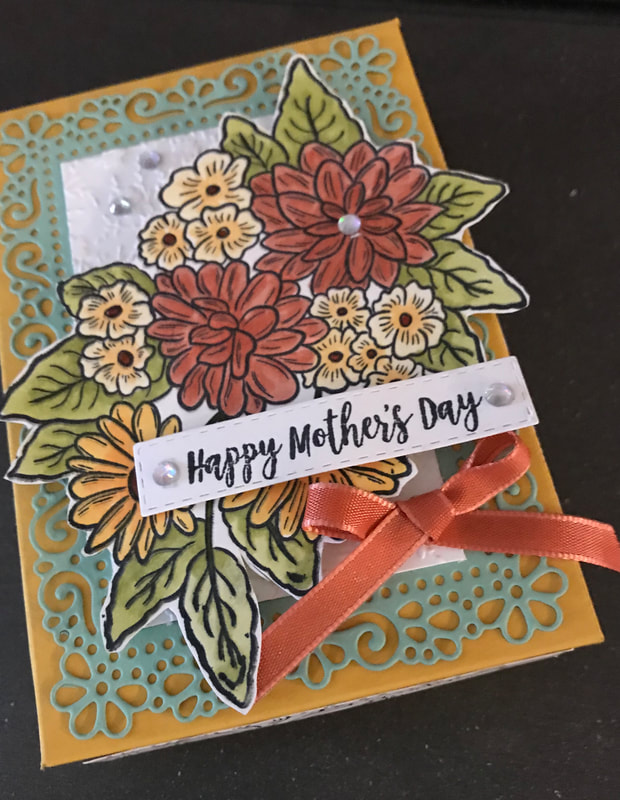
As mentioned above, the most important thing is to please use the following hashtag when and wherever you share your card so that it will be easily identified as part of this challenge. #msscardchallenge6 And, mail the card to someone...anyone...and spread the joy You can view the previous card challenges by using #msscardchallenge and add any number 1-5 or visiting my previous posts under the Category, Challenge. Happy Stampin Steph 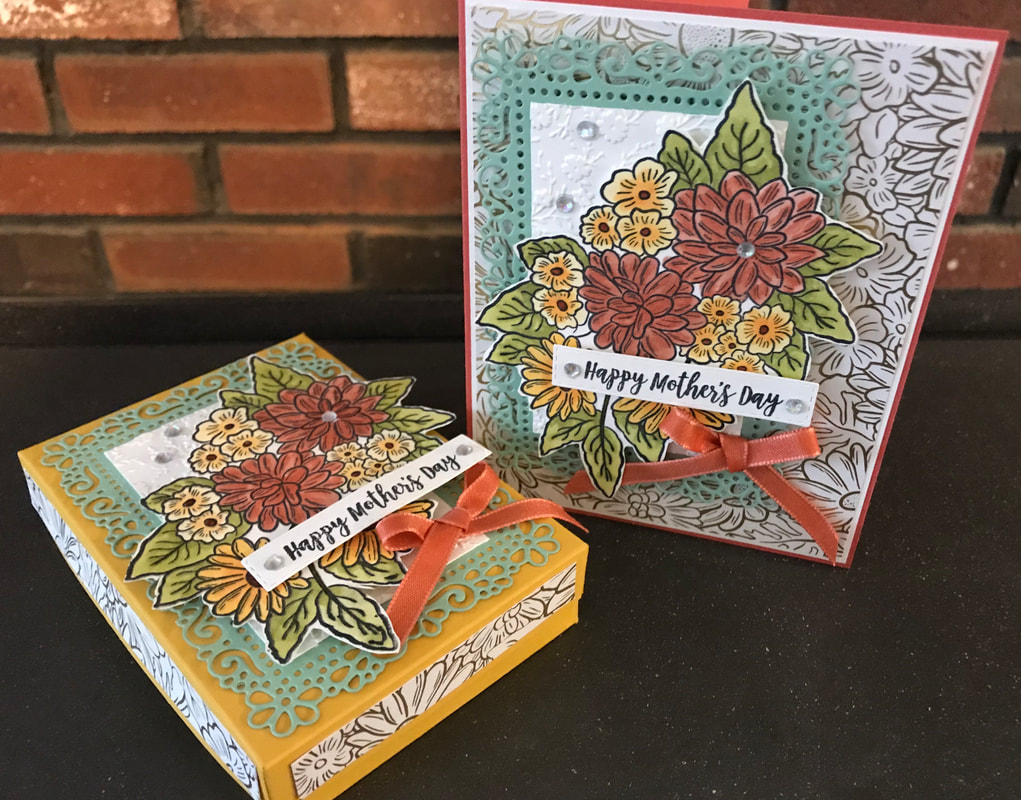 Welcome to the April Stampin Friends Blog Hop!! We are featuring Flowers and Mom's in this month's hop. Be sure to hop along and visit everyone's blogs, if you get lost, be sure to scroll down to the end of each blog to find a list of hoppers. I hope you came from Melissa Thomas, didn't you just love her projects?? So great! After you view my blog, be sure to leave a comment!!! And then continue to Jo Blackman If you are not sure whose blogs you have visited, you can find a list of hoppers at the bottom of each blog! Mother's Day is May 10, 2020 here in the USA. So I decided to not only feature flowers, but to also make my projects for Mother's Day! At this point, not sure if my projects will be hand delivered or mailed. We will just have to wait and see! I've been loving the new Stampin Up Ornate Garden Suite. I chose this suite this month because it has so many flowers in this suite. And the big flower arrangement stamp was perfect! I made this easy adorable lidded box and matching card for you! SO let's dive right in!
I cut the frame using the die from the Ornate Layers Dies. It is the second largest. Then I cut a piece of Whisper White to layer on top and embossed it using the Ornate Floral 3D Embossing Folder. I stamped the Flower image from the Ornate Style Stamp set in Black and colored with coordinating Stampin' Blends Markers; Calypso Coral, So Saffron, Daffodil Delight and Old Olive. Finished with some pearls and the Calypso Coral ribbon from the Ornate Garden Ribbon Combo Pack. Now I did all of this twice since I used the same design on the card. 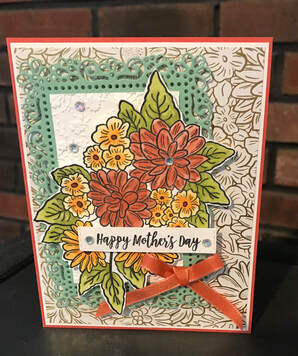 The box is a good size as you can see from the picture above, I included a travel tissue pack the and the lid goes on perfectly fine! You can tealights to this box too, so you can see just how much you can fit.
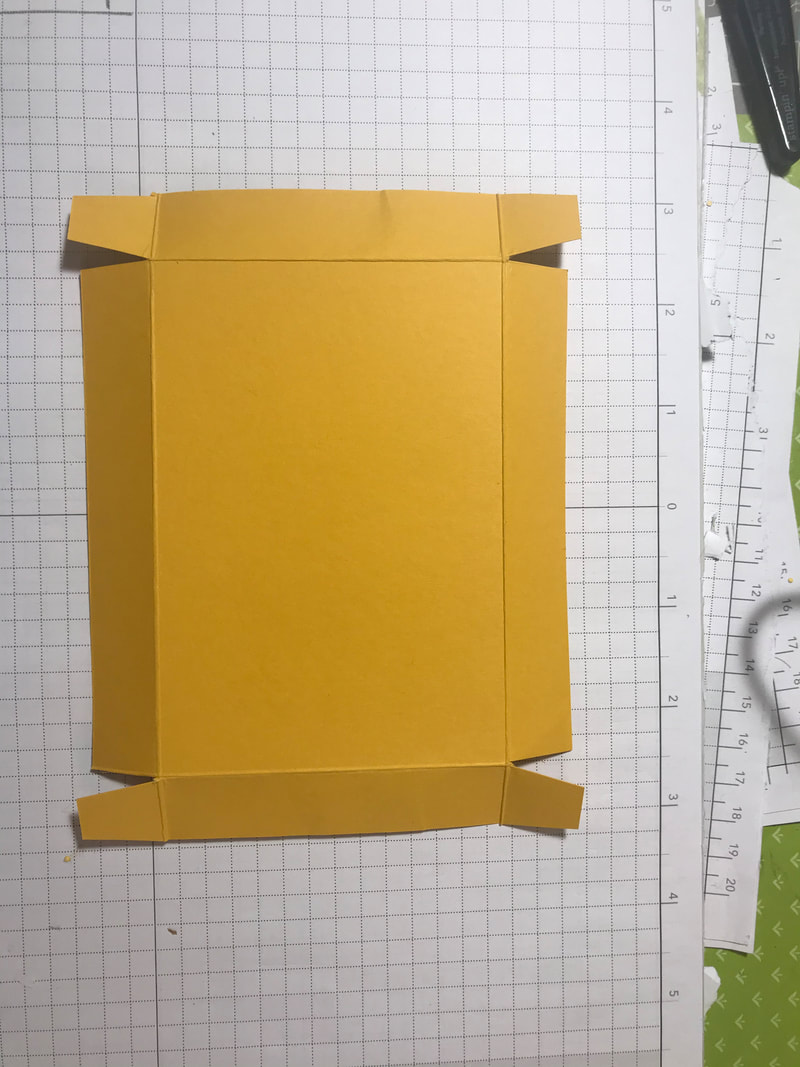
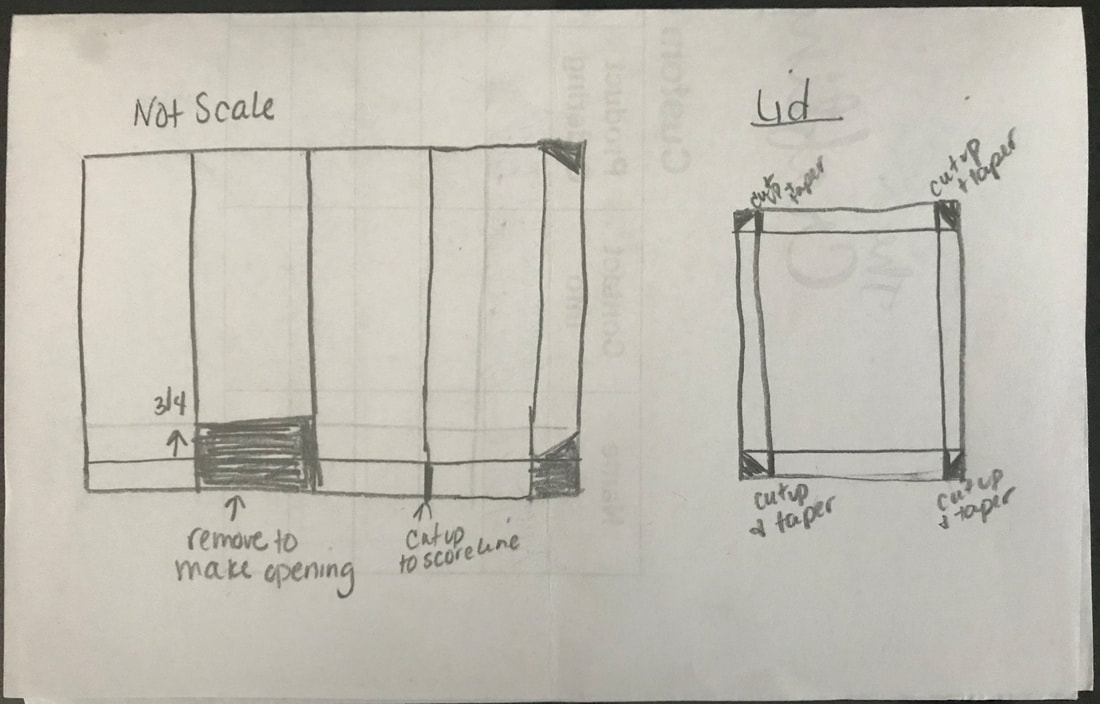
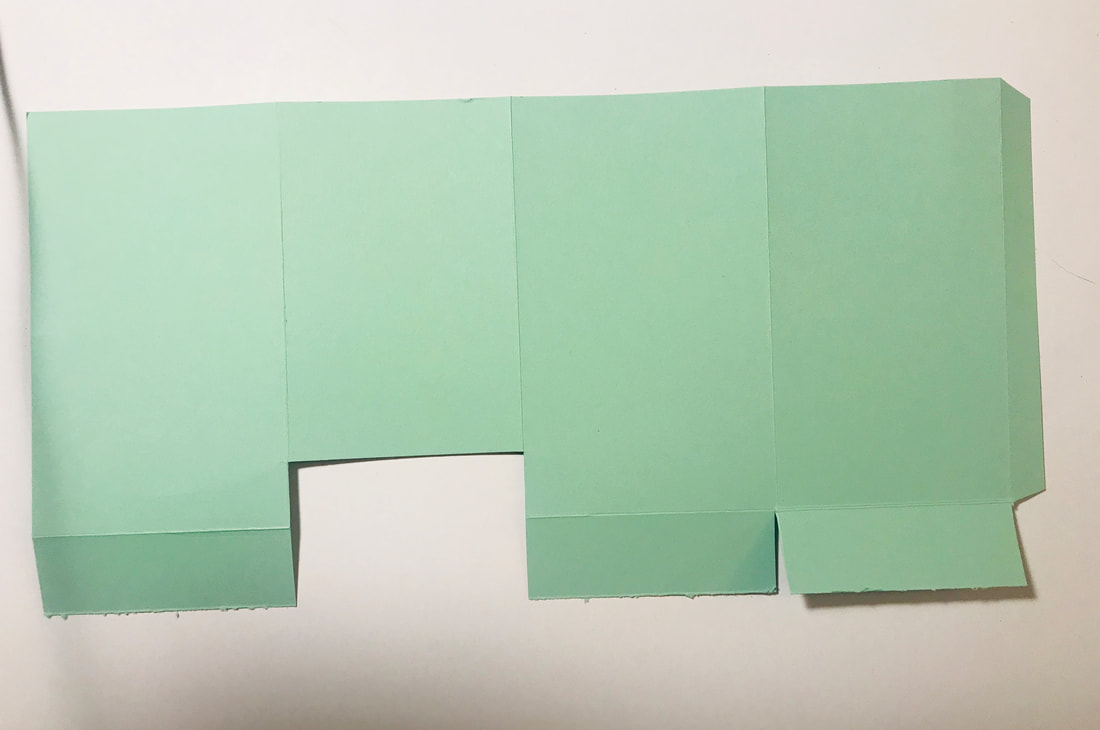
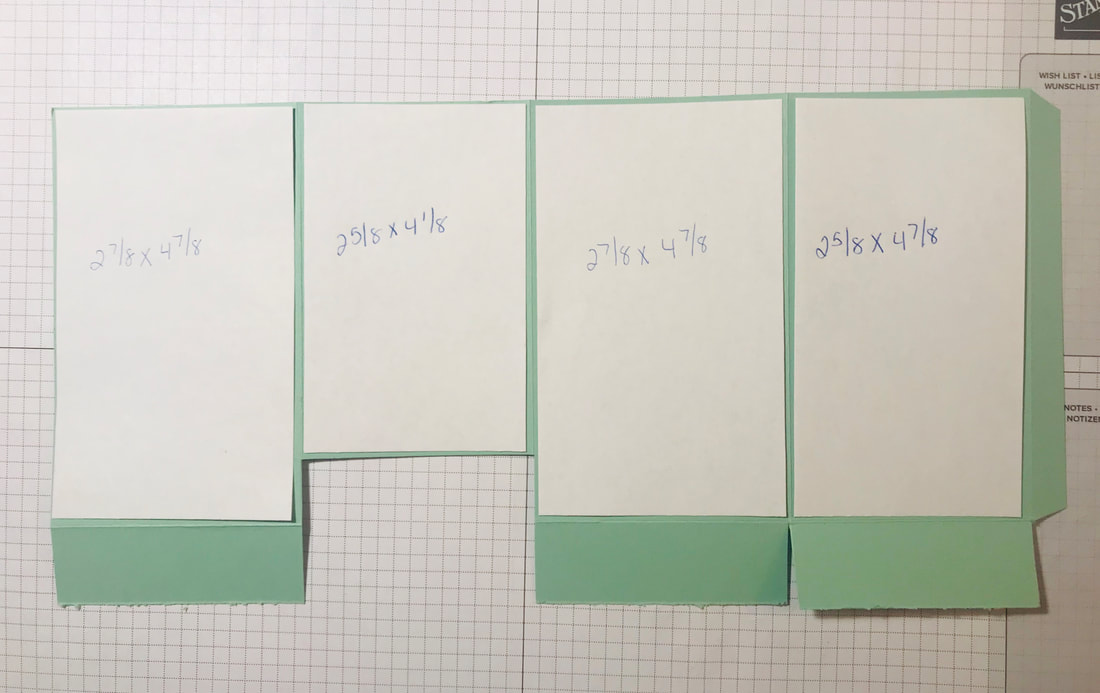
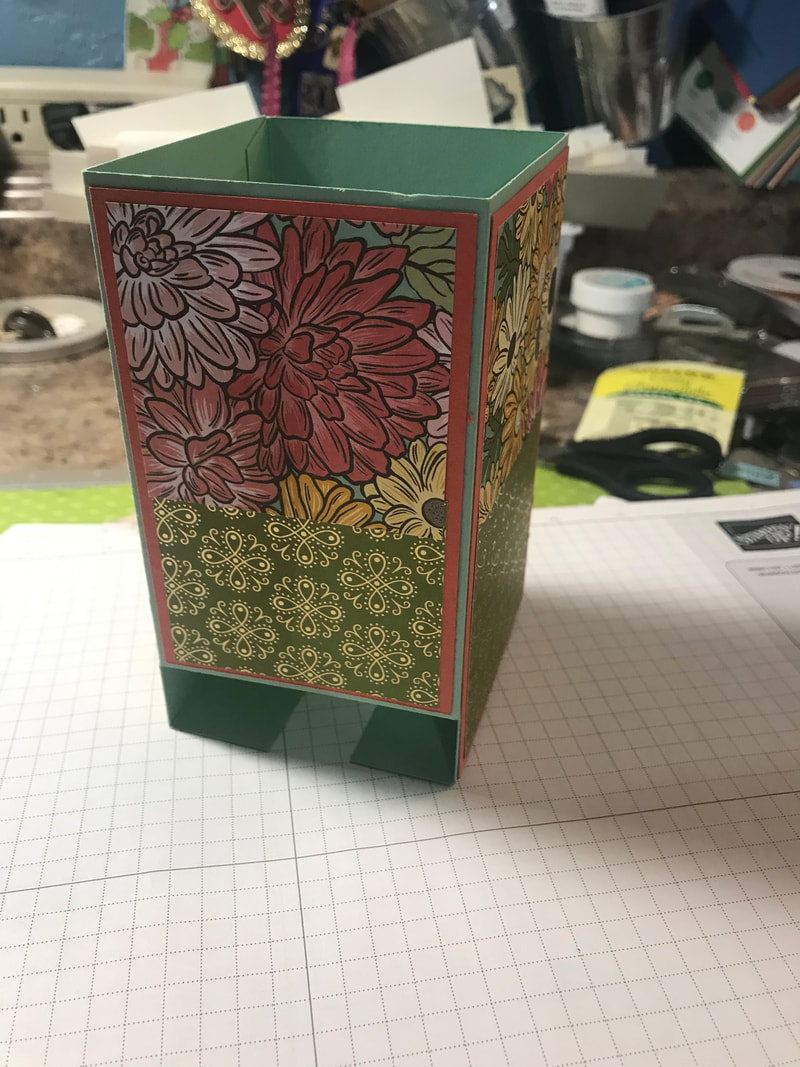
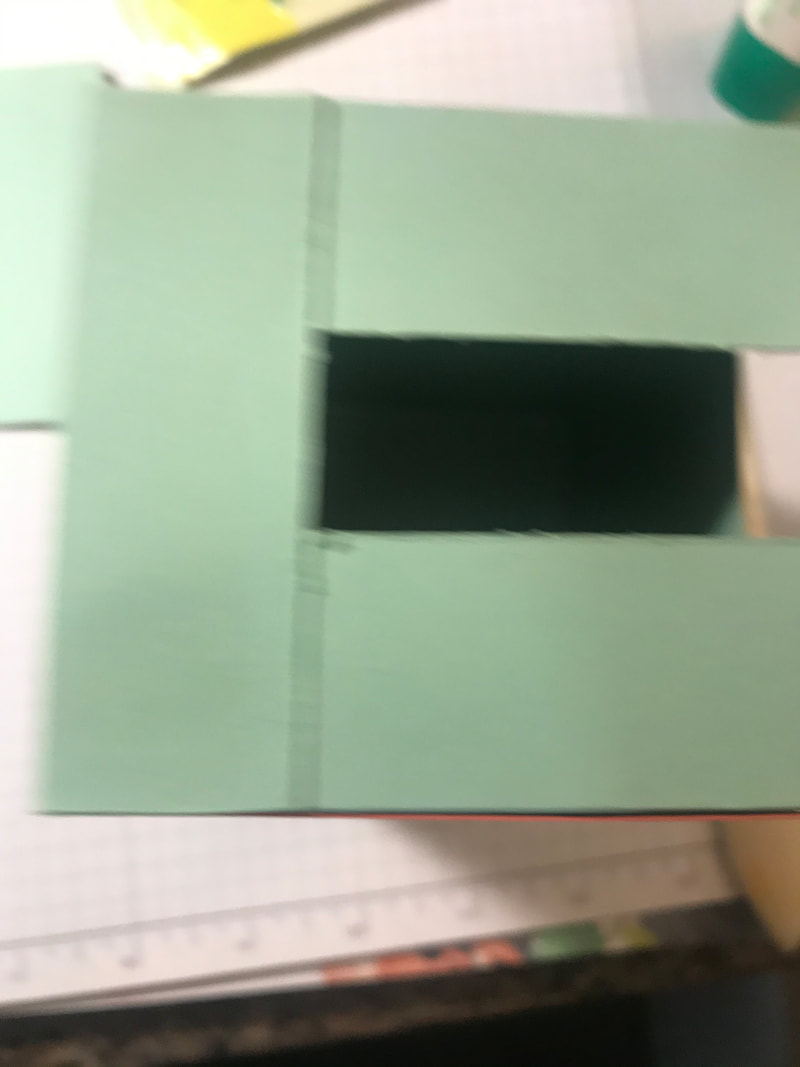
I made my card to match the box, so as I mentioned above, I stamped and cut the images twice so when I got the card, it was basically assembly. The card base is Calypso Coral. I added a layer of DSP first that measures 4 1/8'x 5 3/8". The DSP is from the Ornate Garden Specialty Designer Series Paper. I hope you enjoyed my projects today and I have inspired you to make one on your own! Please feel free to contact me with any questions!!! Be sure to check out the next blog during this month's blog hop, Jo Blackman! I'd love to hear what you think, so feel free to leave a comment!!! Take care Happy Stampin Steph 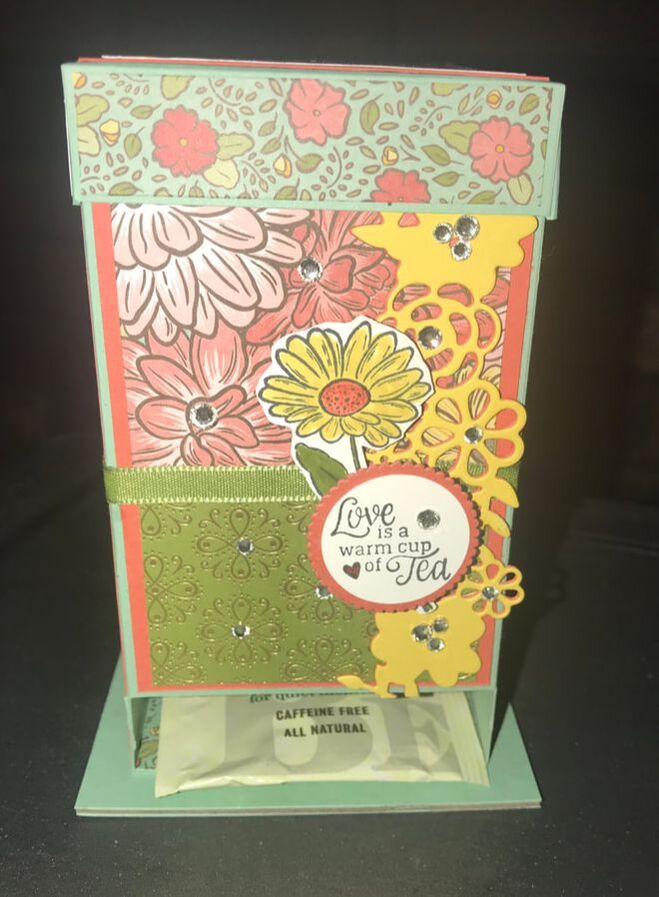 Today's project is this beautiful tea bag holder that doubles as a dispenser. It's a project that is perfect for all those tea drinkers in your life! You can fit a whole box of tea and totally customizable to match anyones decor! To make this tea holder, I used the new Stampin Up suite called Ornate Garden. You get a sneak peak of what is to come in the new Annual Catalog in June. I have made this project in the past and I would like to say it always went without a hitch, but sadly i seemed to get hung up on some the measurements that were out there. This time I worked on modifying to simplify the process. So here goes. You will need 6"x12" cardstock Designer paper for layers Cardstock for layer and lid Ribbon Embellishments To make the dispenser:
To make the lid:
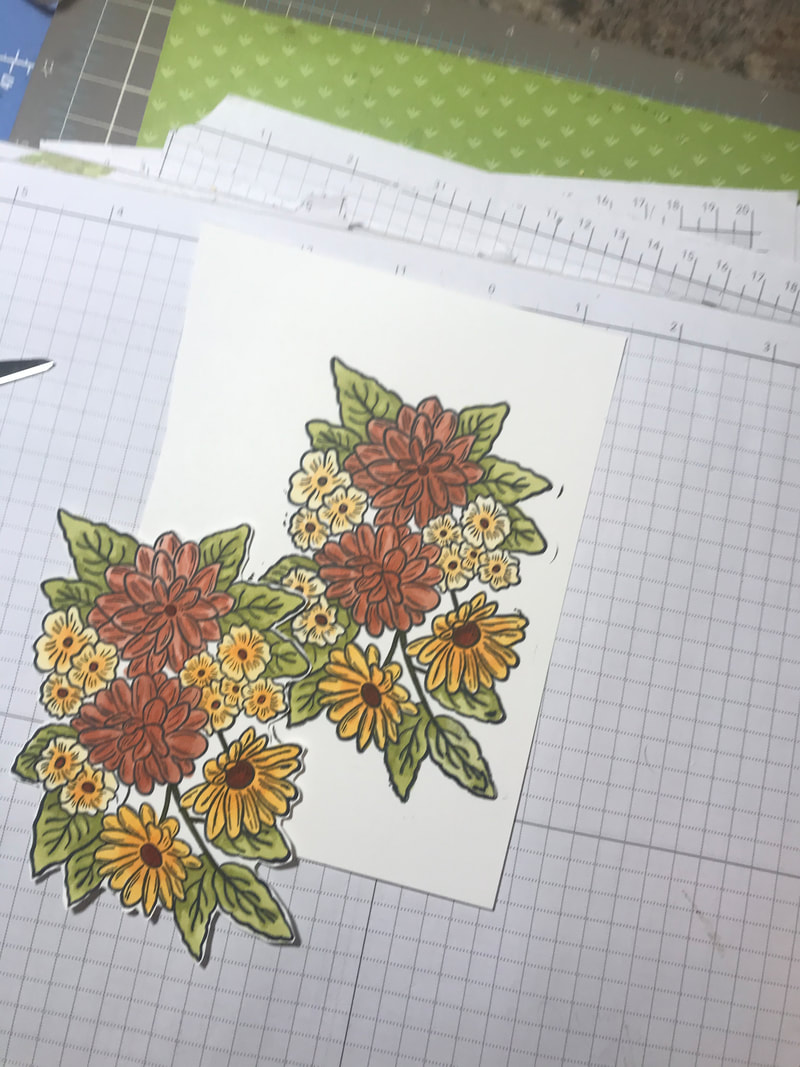
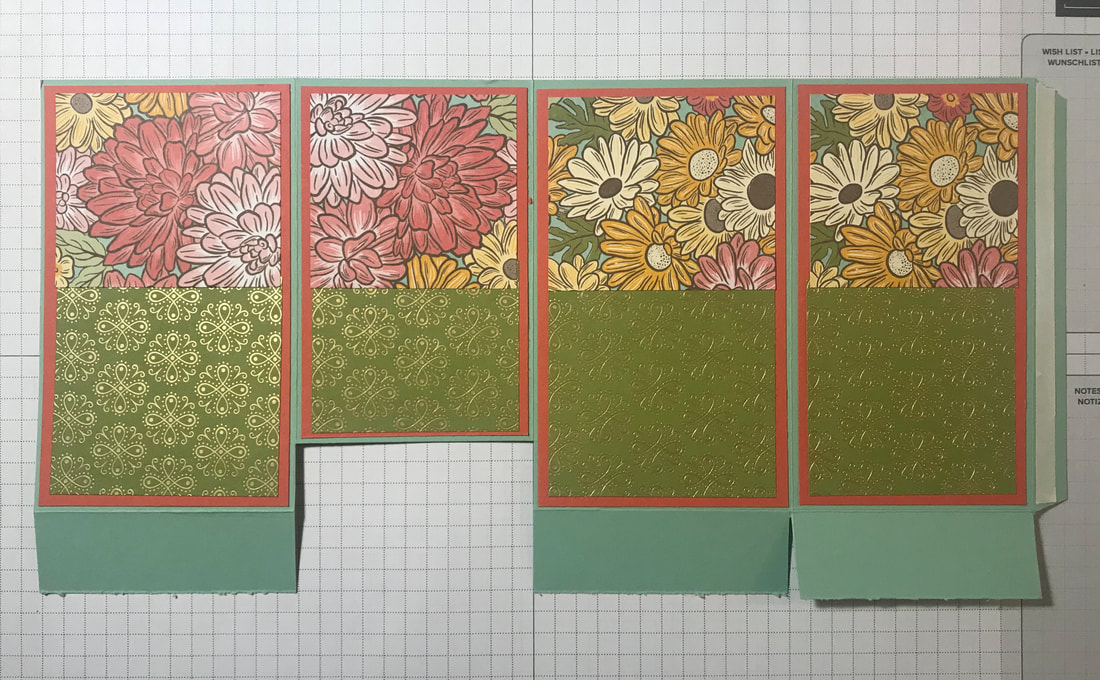
To decorate the outside of the box, I decided to use a layer of cardstock first, then 2 different patterned designer paper from the Ornate Garden DSP. The colors I used are Mint Macaron and Terracotta Tile. To add the cardstock layer you need:
To add the DSP layers for the top portion of the box:
To add the DSP layers for the bottom portion of the box:
To add the cardstock and DSP for the lid:
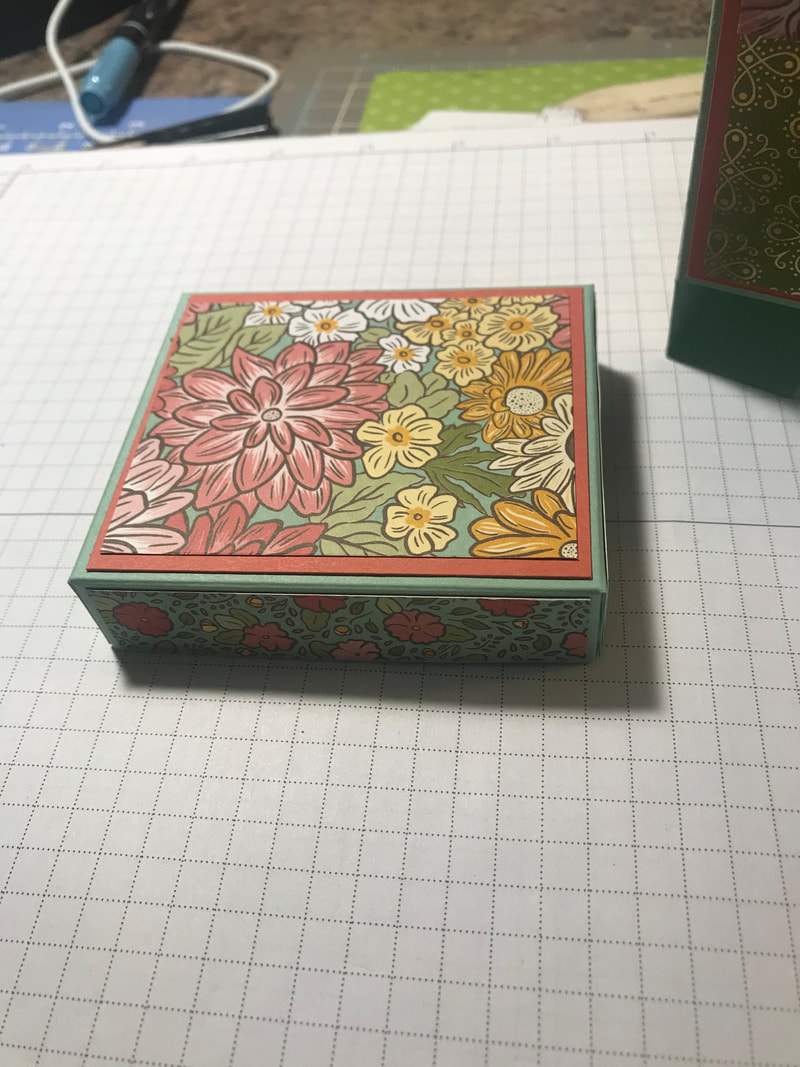
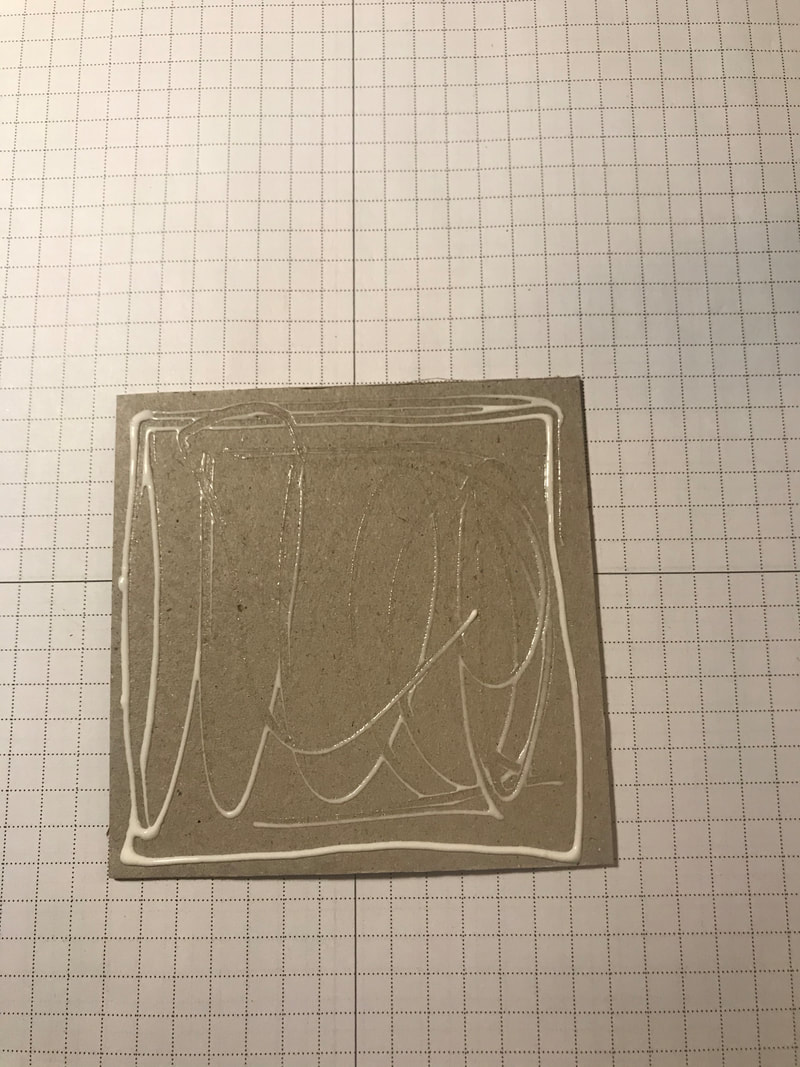
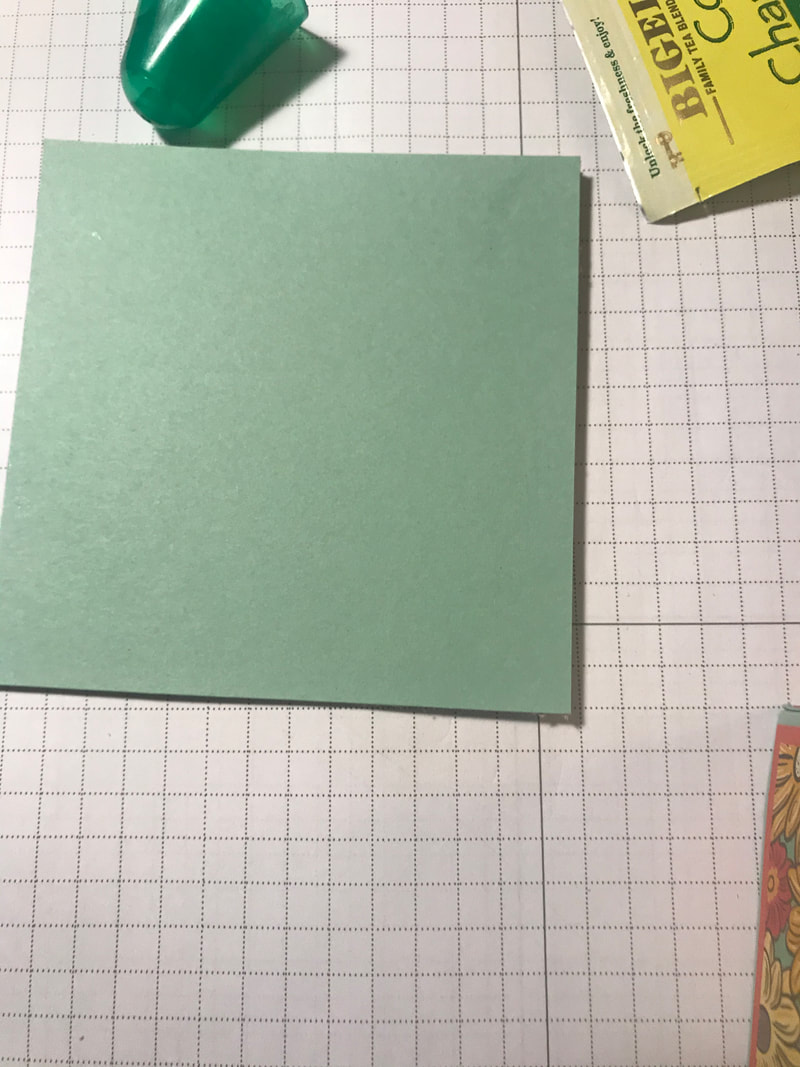
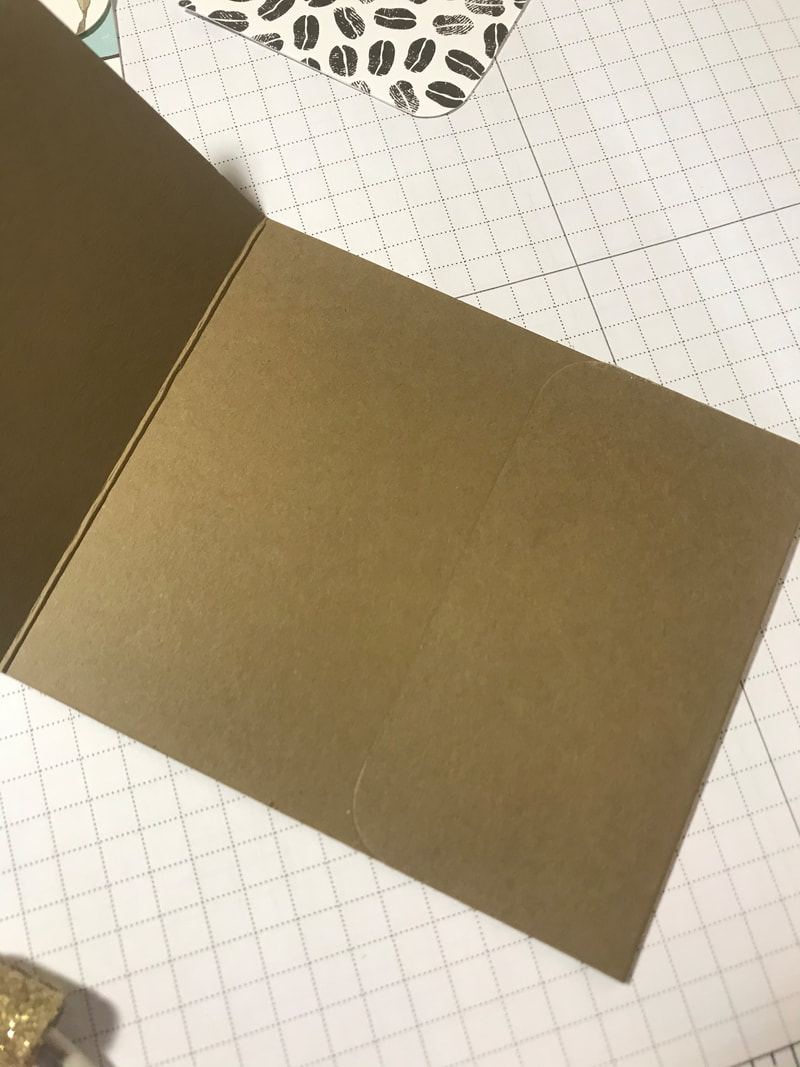
To create the base of the box, you will need a piece of chipboard that measures 3 1/2"x3 1/2" you will also need 2 pieces of cardstock that measure 3 1/2"x3 1/2". Glue them onto the top and bottom of the chipboard, you can also sponge the sides of the chipboard, I just left it as it. To adhere the box to the base, you will need to carefully glue the tabs onto the chipboard. Make sure to center as best as you can. The take a piece of DSP that measure 3 1/8"x2 3/4" and glue it on the inside to cover the tabs. To decorate the box, I took a piece of ribbon and wrapped it around, covering the seams from the 2 DSPs I used. I added some diecut flowers from the Ornate Garden Suite and the greeting is from the Tea Together stamp set. I finished it off with some rhinestones and it's ready to fill with some favorite teas.
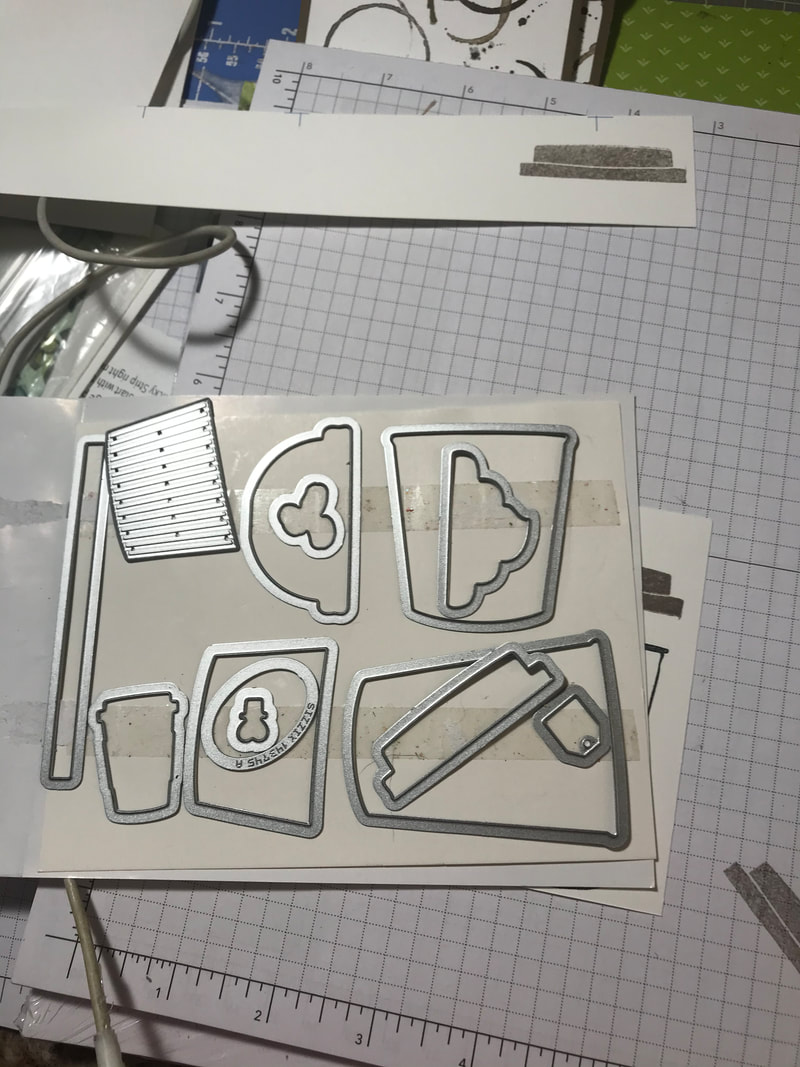
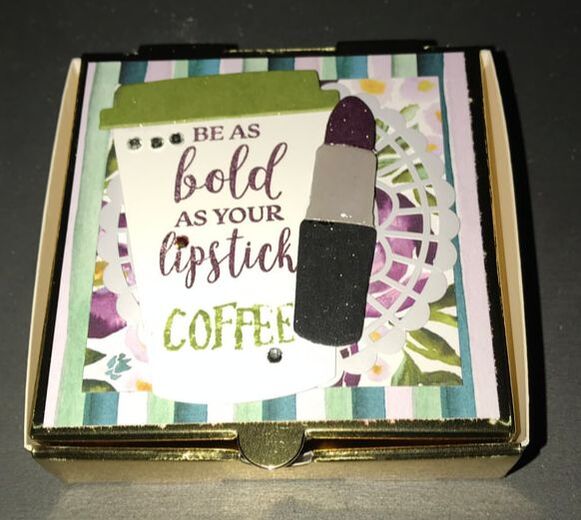
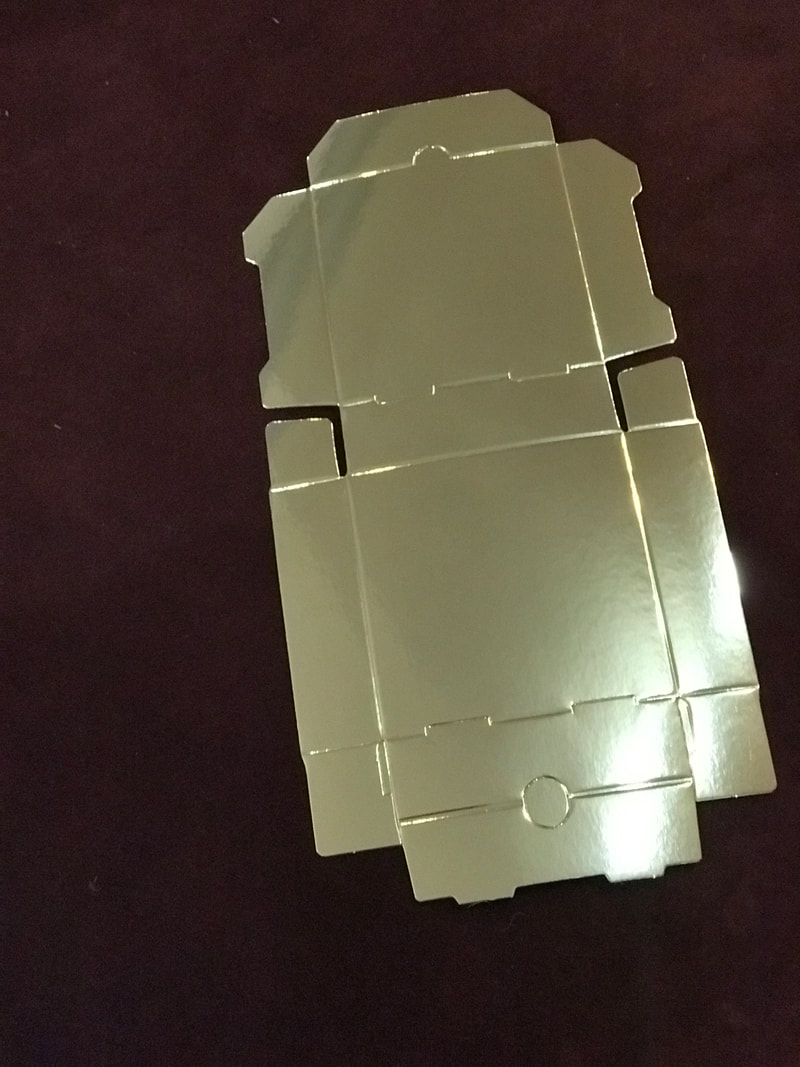
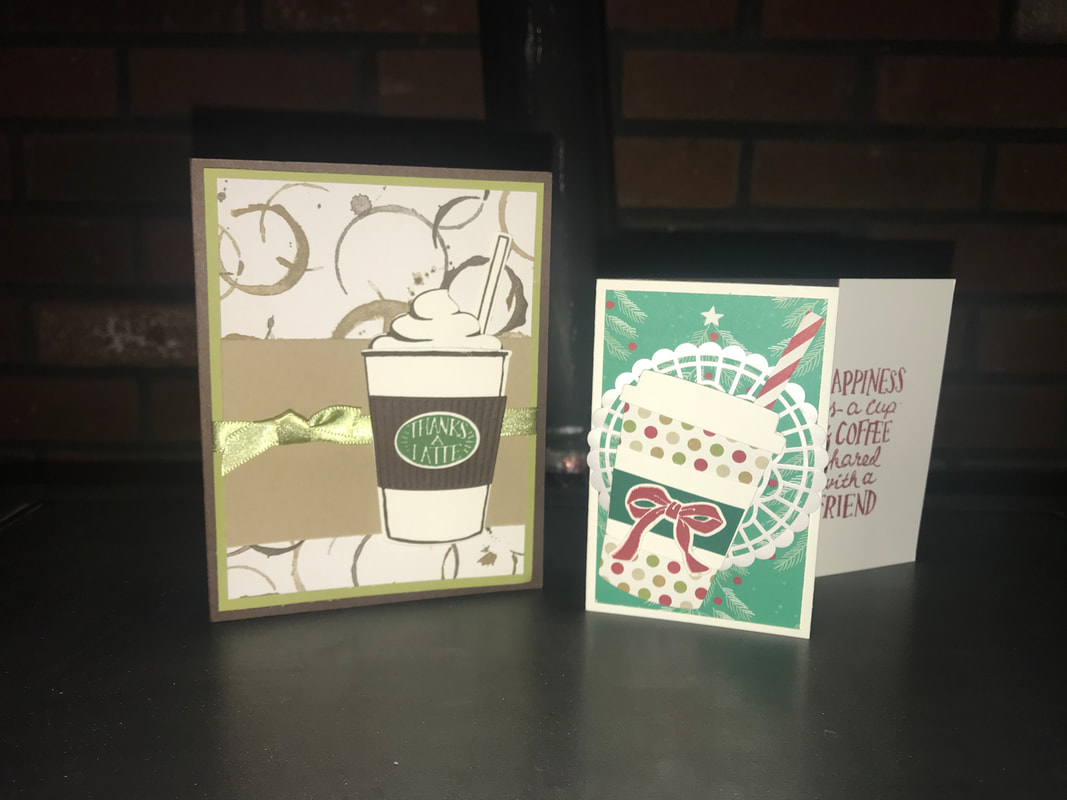
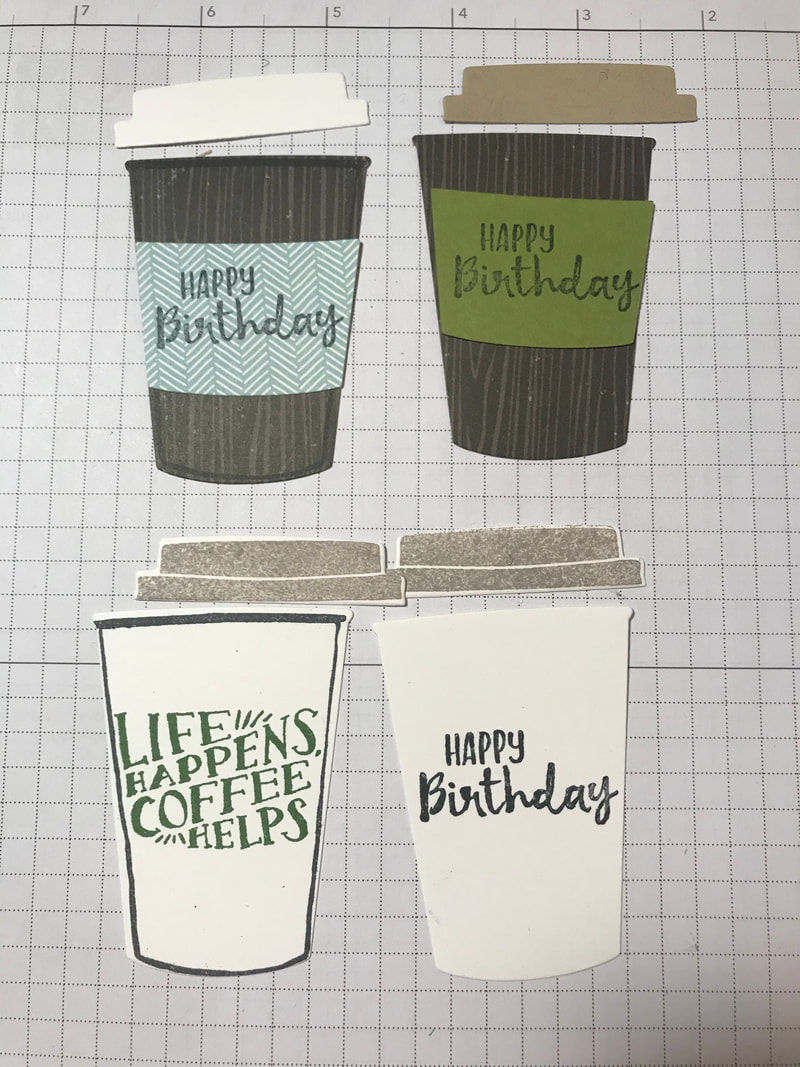
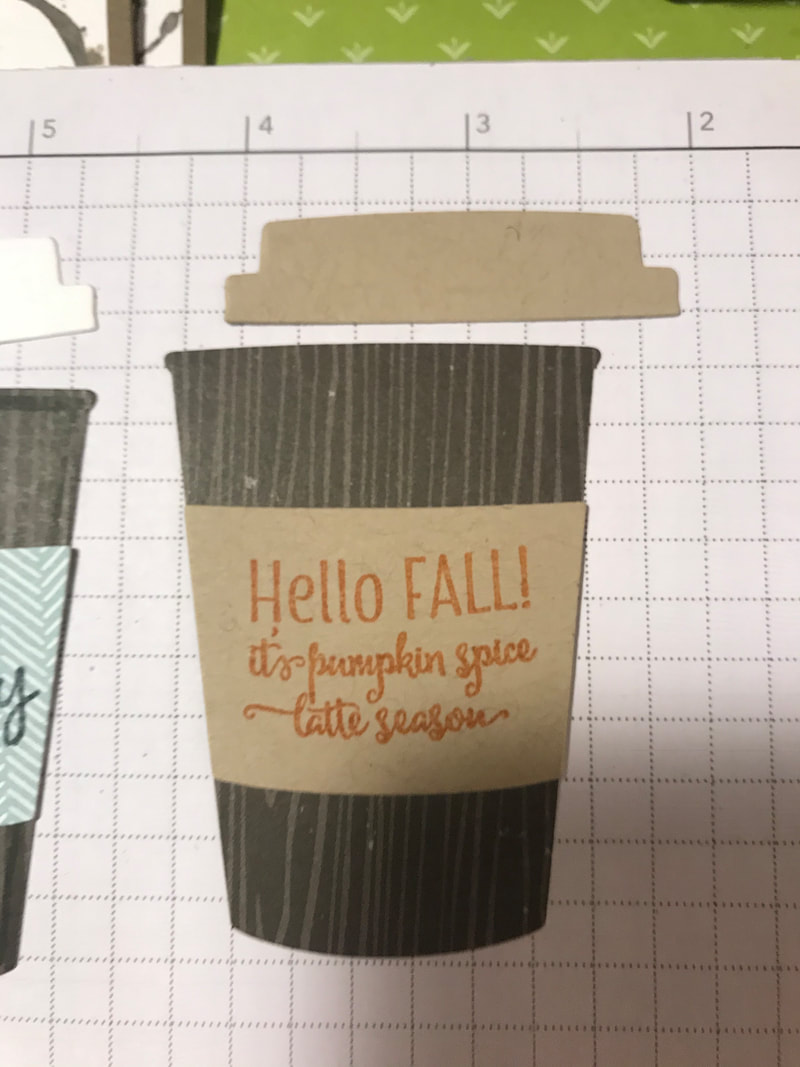
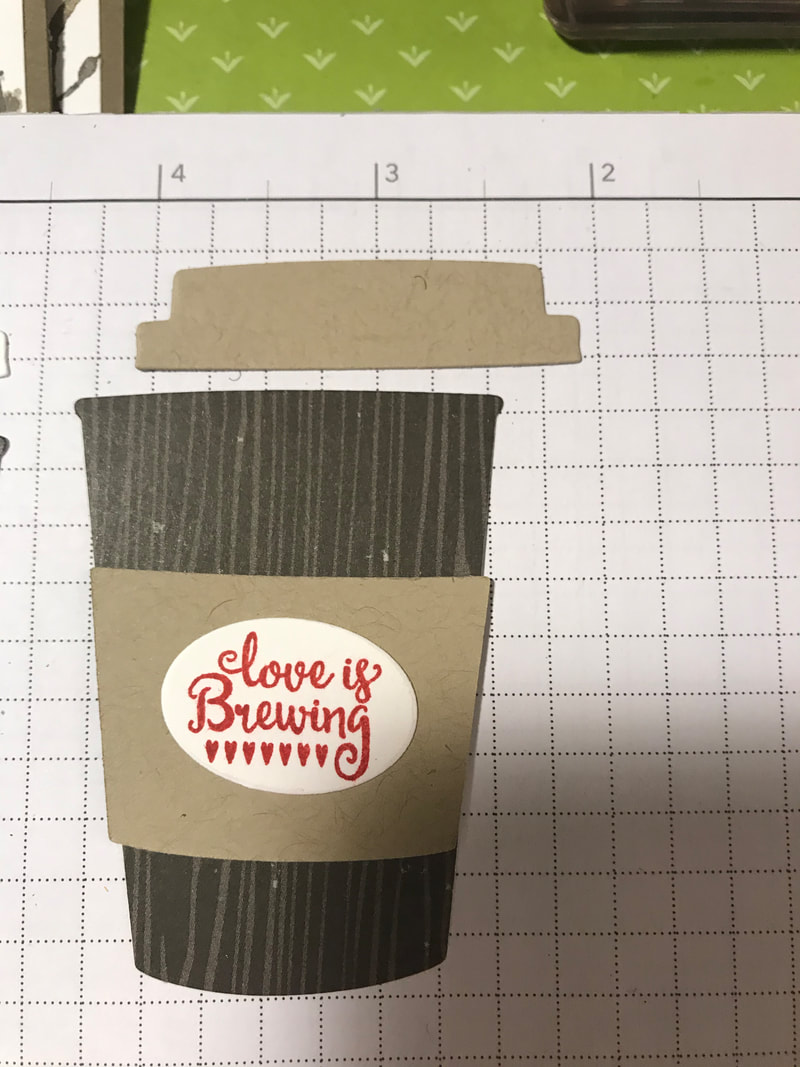
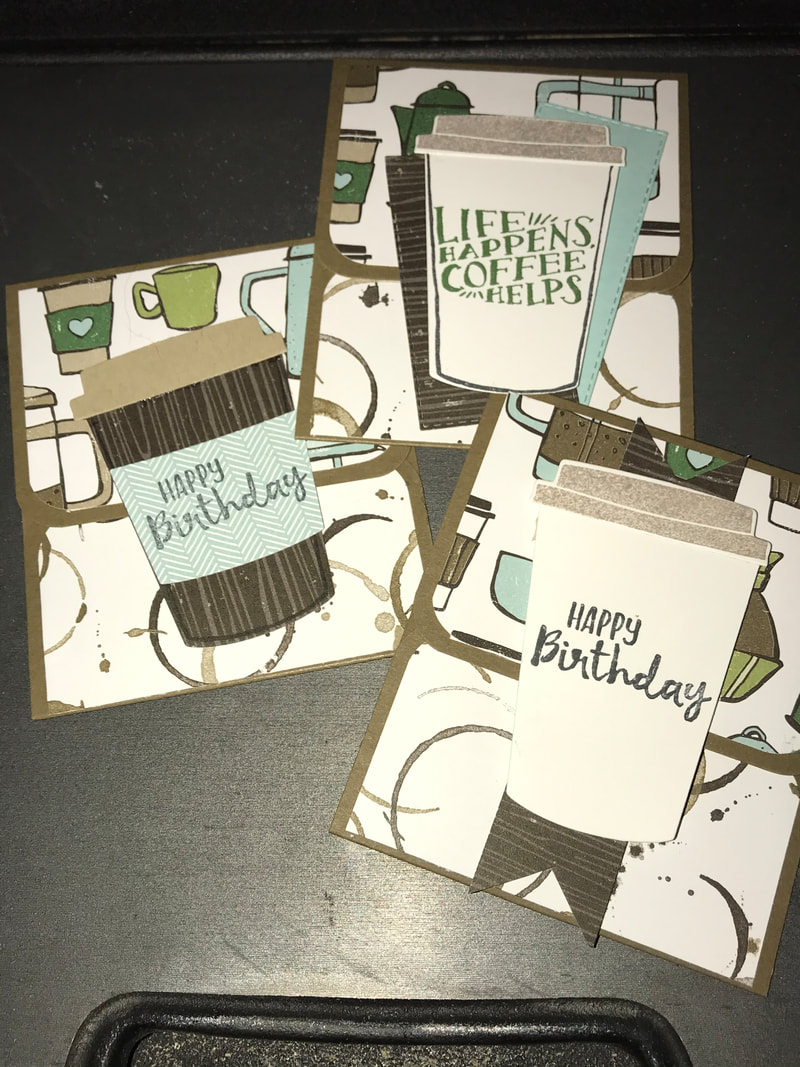
What do you think? I love it too! I can't wait to make more and have these ready for gifts to give to some special people. Thanks for stoppin by Happy Stampin Steph  Hello Crafters! Welcome to the February Stampin Friends Blog Hop!! I' so excited to share this month's hop with you! This hop is literally jammed with so many awesome projects by so many amazing hoppers. I just love this theme, I feel like I have my tried and true supplies and projects I just love to make over and over and it never gets old. Can you guess that our theme is Favorites. Be sure to hop along and visit everyone's blogs, if you get lost, be sure to scroll down to the end of each blog to find a list of hoppers. I hope you came from Jean Bolen Beaulieu, her projects were just awesome. After you view my blog, be sure to leave a comment!!! And then continue to Katja Ettig's blog. If you are not sure whose blogs you have visited, you can find a list of hoppers at the bottom of each blog! At first, I thought, how am I going to figure out my favorite crafting project or product? I was like there is way too many. But then I thought, what do I make the most, Gift Card holders!!! And the Coffee Cafe stamp set and matching dies is my go-to. I choose this set over and over and over for gift giving. It's the perfect set to use for coffee gift cards. I decided to combine Coffee Cafe with the new Best Dressed Suite. 2 of my favorite things, coffee and lipstick!!! 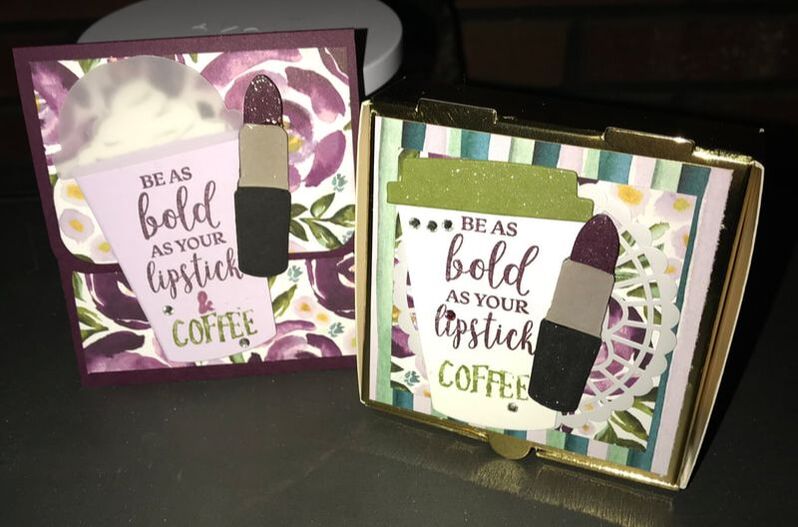
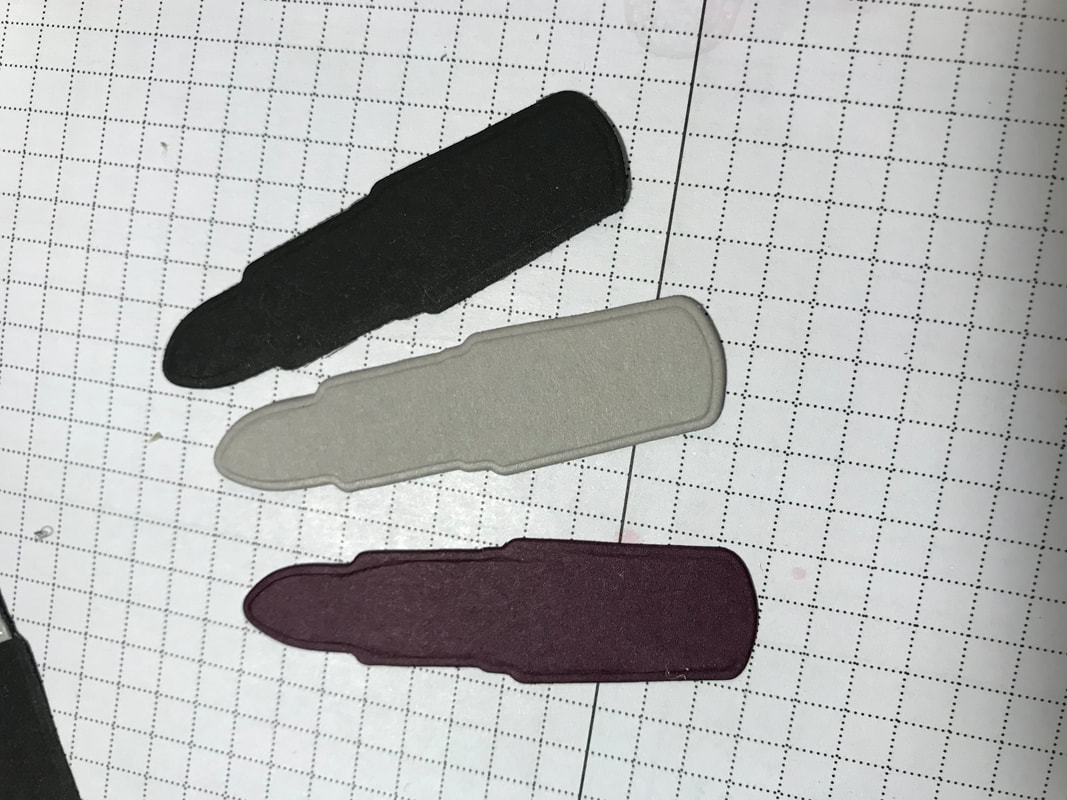
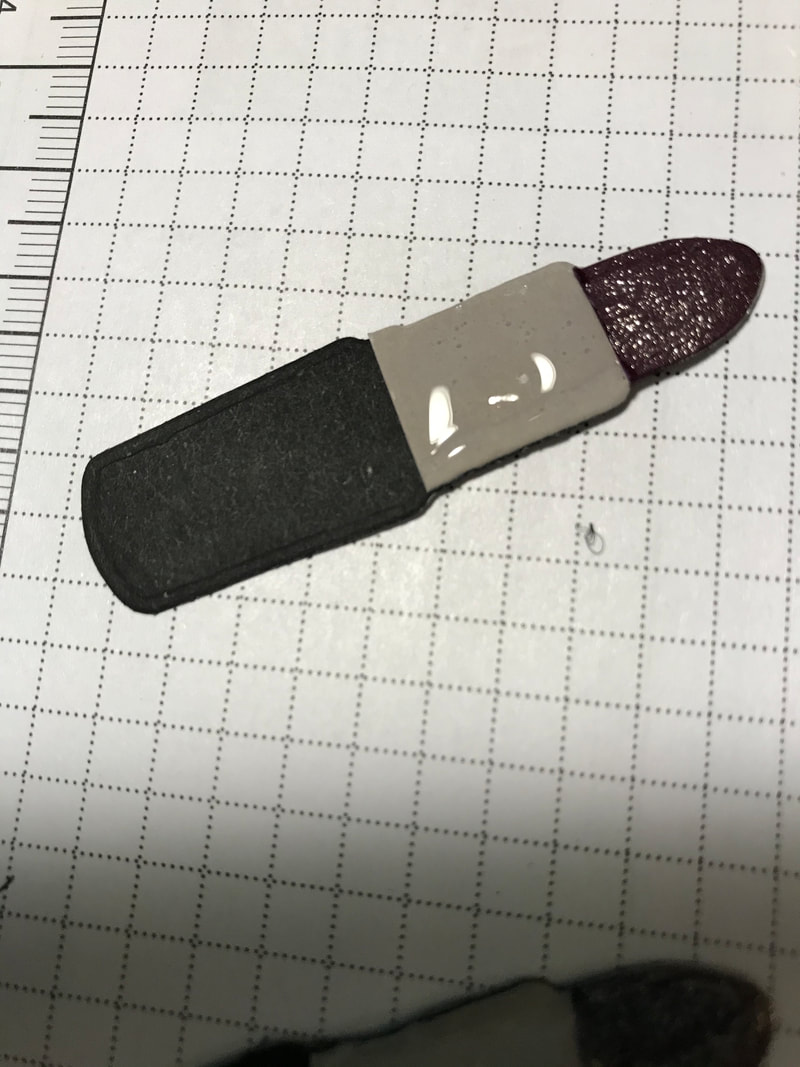
Be sure to keep the adhesive close to the edge so you can still add the gift card or folding money in the pocket. The DSP I used is from the Best Dressed Suite. I cut 1 piece at 3 1/4"x 2 1/4" and 1 piece at 3 1/4"x1 3/4". Adhere to the cardstock. You could create a belly band to keep the holder closed. But I used a little velcro dot and adhered it to the top flap. Use the lipstick die, from the All Dressed Up framelit set, to cut 3 lipstick tubes, I used Basic Black, Smoky Slate and Blackberry Bliss. Cut off the tip in Blackberry Bliss and cut the bottom off the Smoky Slate, and then layer them together. I added Wink of Stella and Glossy Accents to give a little more dimension. See photos below. I used Purple Posy for the cup base, I cut out the dome lid in vellum so it looks more like the clear lids, and then Whisper White for the whipped cream. I added a little whisps of Smoky Slate so it looks real. The greet was so fun, I stamped the Be as bold as your Lipstick from the Dressed to Impress stamp set in Blackberry Bliss, then I took the greeting 'Happiness is a cup of coffee shared with a friend' from Coffee Cafe and just used my marker, colored, just the word "COFFEE" in Old Olive and stamped it at the bottom, I wrote in the &. Now my greeting says Be as Bold as your Lipstick & Coffee! I Love it! So much fun to make and so easy. I know my girls will be grabbing these for any upcoming parties for friends.
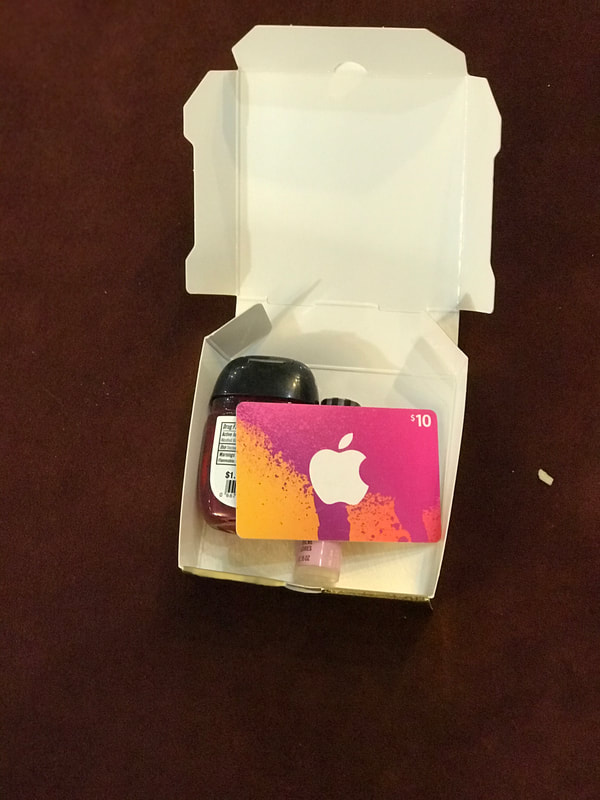
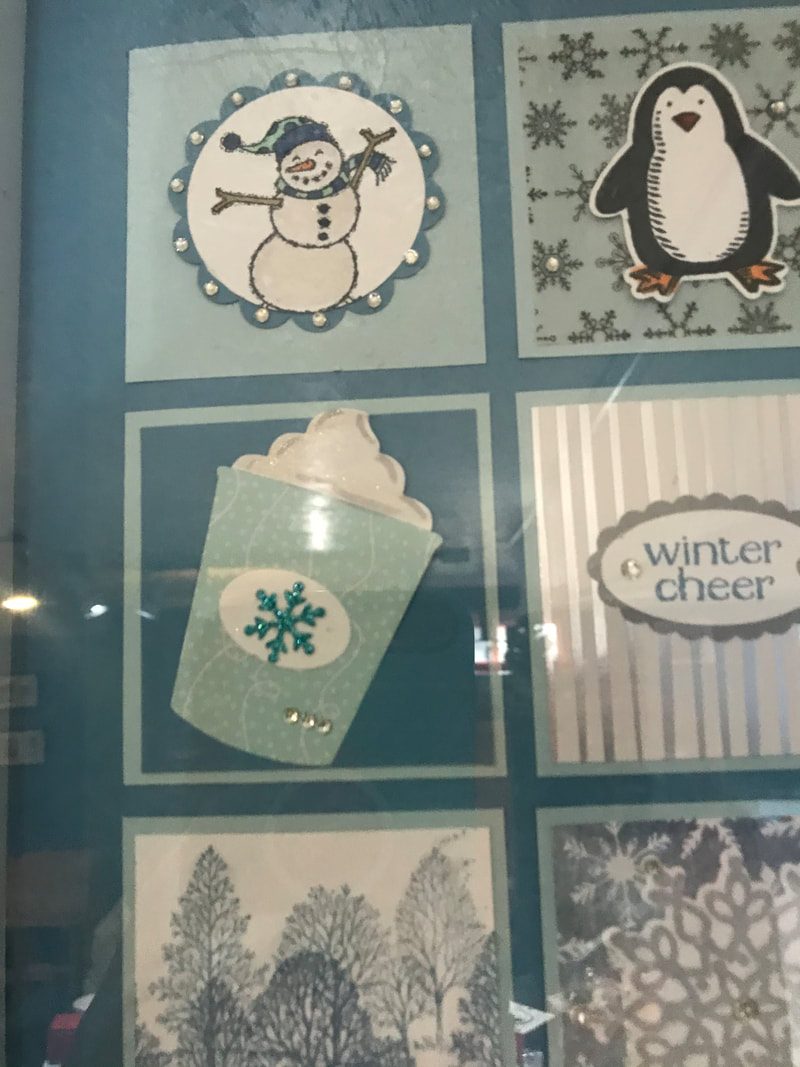
The DSP was cut at 3 1/4"x3 1/4" and 3"x3". I created the lipstick the same way as before. The coffee cup is in Whisper White, but I did the greeting the same and the is in Old Olive. I added a Doily I had on hand and there you have it, done...Super easy. Now, if you needed a white pizza box only had gold, you can fold the score lines opposite and have the white inside, become the outside. 2 in 1. As you can see from the picture below, you can fit a good amount of stuff inside and a gift card fits too!!! Below is just a few projects I used with Coffee Cafe, there's just so many. And if you have this set and need ideas, feel free to use these and there is tons more on Pinterest. I hope you enjoyed my "Favorites" be sure to leave a comment, I'd love to hear what you think.
Continue along the hop to Katja Ettig's blog. She is amazing and you won't want to miss her projects! 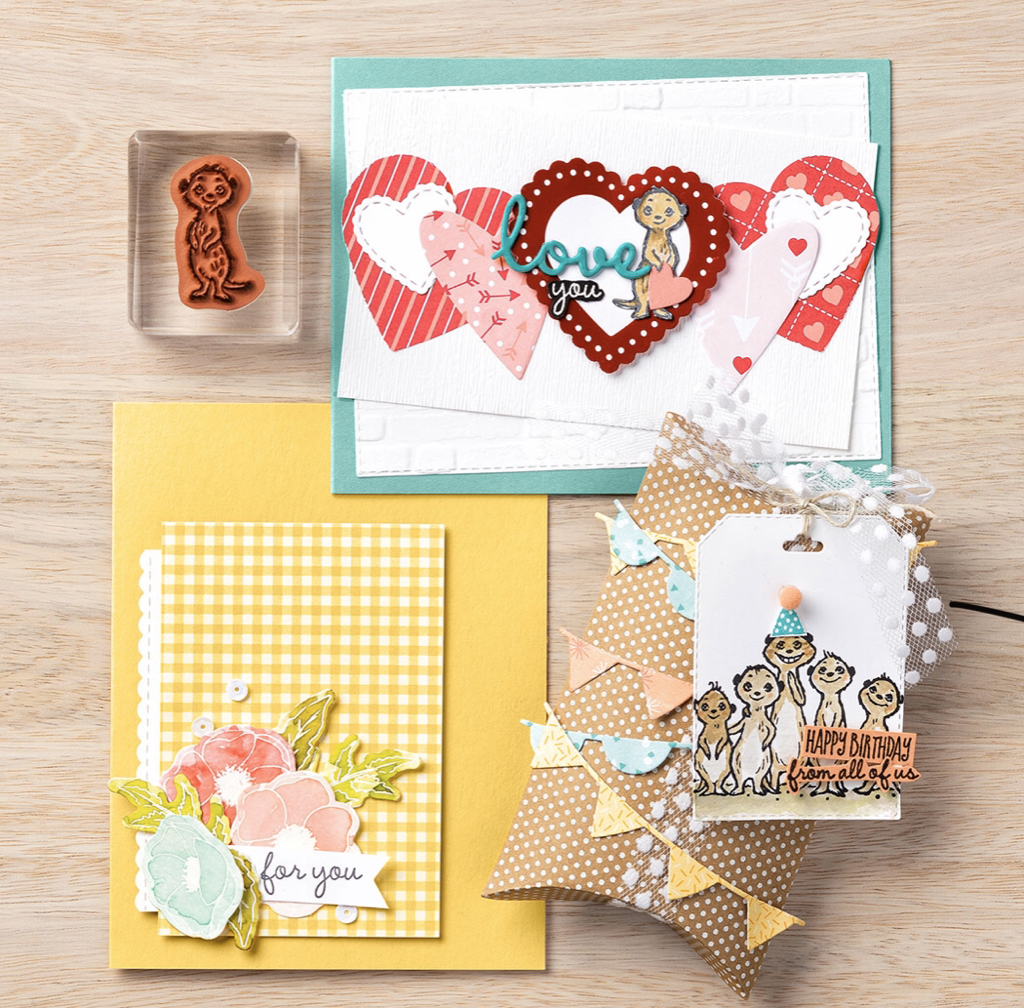 The Gang’s All Meer Stamp Set is a fun one to bring out the smiles and you can see its versatility with our projects here. To create a darling valentine, we paired the set with From My Heart Specialty Designer Series Paper, the Heart Punch Pack, and the Stitched Be Mine Dies. The beautiful For You card shows how to pair sentiments with embellishments, in this case, the Peaceful Poppies Elements. And on our cute birthday box, we combined the stamp set with the Bonanza Dies. There are so many ways to share creativity—and Sale-A-Bration!
Be sure to contact me for your new catalogs Happy Stampin Steph 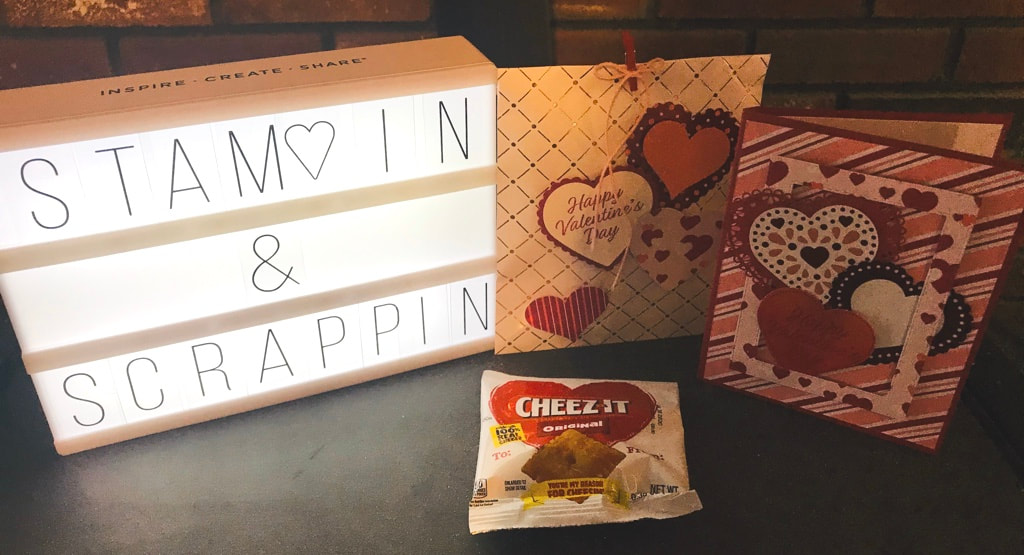 Today I created two fun projects for an upcoming card club! Since Valentine’s Day is a few weeks away, I wanted to focus and get a little head start. My projects feature Stampin Ups new From the Heart Suite! This gorgeous suite can be found in the new 2020 Mini Catalog! The DSP is beautiful and several of the sheets have a foiled appearance! And best of all you can use the Heart Punch Pack to punch out several of the hearts on the paper!  The card was created using a sheet of Real Red cardstock cut to 5.5x8.5 and scored on the 8.5 side at 4 1/4. I added a layer of DSP on top that measures 4x5 1/4 next I took another piece of DSP and cut a frame using 2 different sizes of the Rectangle Stitched Framelits. I cut out several hearts using the Heart Punch Pack. On one of the red hearts, I stamped the dotted outline from the Heartfelt Stamp set in Real Red, the punches it out nd 2 of the hearts are punched out right from the DSP! So easy! The Happy Valentines Day greeting is from the Meant to Be stamp set, which is in the current annual catalog! This card was so simple to make and so quick that I was Able to create multiples fast.  Have you tried the Copper Dotted Treat bags?? They are such pretty bags! I don’t know why I waited to use them! Similar to the card, I punched out a bunch of different hearts from the DSP and cardstock and I used the same greeting! I added a little Valentine Cheez-it snack that I found at Target. They are mini bags but so cute!!! Depending on who I give the bags to I might fill with candy or cookies too!! These bags are a great size at 4 3/4x 6 1/2 and are food safe!! I used a retired twine to make the bow and I came across these mini clothes pins I had on hand! I either purchased these at Walmart or A.C. Moore.
What do you think? Really cute and easy to make right?? Thanks for stopping by Happy Stampin Steph Have you been loving the new catalog? It's jammed packed with amazing products. And the best time of year to order. Sale-A-Bration, receive free exclusive with a catalog. By the Dock is a stamp set and dies available in the new Mini Catalog. The By the Dock stamp set and Dockside dies can be purchased separately or as a bundle with a 10% savings. The design definitely has a masculine feel but at the same time is a versatile in what you an create! The sentiments range from thank you's to birthdays with a beautiful outdoor feel! Check out the video below to see all this bundle has to offer. Contact me to get yours today! Need a catalog? Let me know and I'd be happy to send you one!! Happy Stampin Steph |

New 2023-2024 Stampin Up Annual Catalog


Kits Collection


Join today

Categories
All
Archives
January 2024
|


 RSS Feed