
Here's to the last Stampin Friends blog hop of 2021. This month we are sharing all projects just in time for the holidays. We all need tags, boxes and bags! So hop along with us and see all the wonderful projects in out Stampin Friends November Tags, Boxes and Bags Blog Hop. I hope you are visiting me from Teri Pocock's blog. Teri's projects are always so beautifully done! Be sure to leave a comment and tell us what you think, and visit Jo Blackman's blog. For a list of hoppers, just scroll down to then end.

I have a fun project set to share with you this month. I used Stampin Up's Santa Express DSP and Santa Express Memories & More Cards (M&M) along with Bermuda Bay, Shaded Spruce Cardstocks, Mint Macaron, Real Red, Petal Pink and Sahara Sand.
Let's talk cards! These cards are the fastest and easiest I ever made, the Memories & More packs include 2 different sizes of predesigned images and greetings, along with a few stickers and embellishments. They are designed for pocket-style scrapbooking but they are perfect to make quick cards. I CASE'd designs from Pinterest, as I stated in my quick video below, this week is a busy week especially with Thanksgiving, that I had a time crunch to be creative. For the cards, I used the Shaded Spruce Cardstock as a base. I made a sample of 4 cards to share, but will include 2 of each design, for a total of 8 cards to put inside the box. The Santa card includes a layer of DSP that measures 4x5 1/4. Santa was fussy-cut out placed over a stitched circle, I added a layer of Mint Macaron, just 1/8" wider than the striped M&M card. I also cut a strip of Mint Macaron 1x4 and added on top, added the greeting which is a sticker included in the pack. Most Wonderful Time of the Year includes a layer of DSP that measures 4x5 1/4, wrap ribbon around the DSP, as if you were wrapping a package, and tie off with a bow. If you want to save on the ribbon, you can just cut strips to just wrap the edges of the paper. Either way works! Add the M&M card on top with dimensionals. Add a few rhinestones to embellish. C is for Christmas, trim the Pink Snowflake Memories & More card to 4x5 1/4, wrap some ribbon around a 3 1/4x4 1/4 Real Red, and tie in a bow, Adhere the M&M card ontop and pop up with dimensionals onto the cardbase. And for the last card, Merry Christmas, trim trees M&M card to 4x5 1/4, wrap ribbon around, tie with a bow and adhere to the cardbase. Cut a piece Petal Pink, adhere the M&M card ontop and pop up with dimensionals onto the cardbase. Add a few rhinestones to embellish. How adorable! How easy!!! 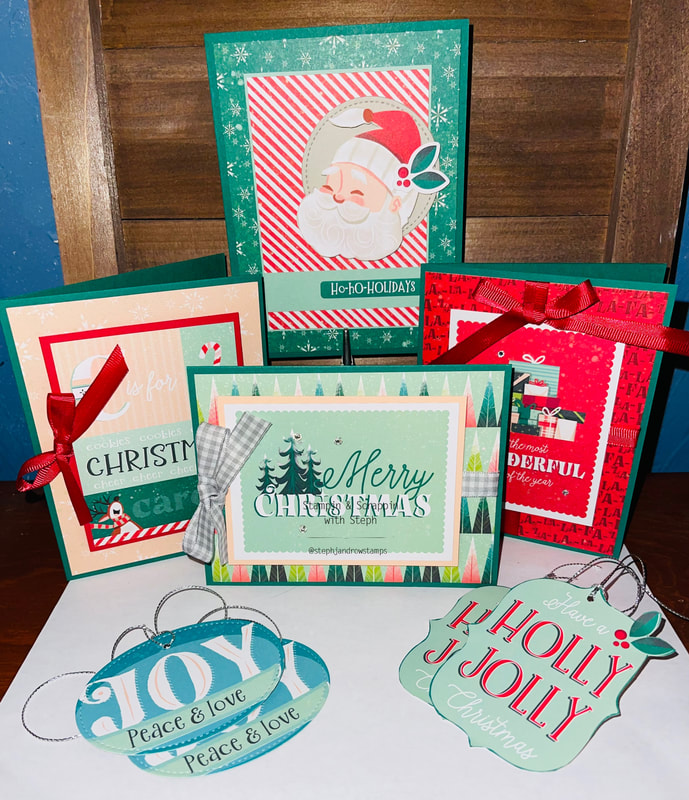
I made a Explosion Stationary Box to hold the cards and some tags. I had so much fun making this box. I LOVE how it came out. I will admit, I have been intimidated on this for a while, and it is not nearly as difficult as I thought it would be.
First, the tags. The tags are quick and simple. Holly Jolly is simply fussy cut from the Memories & More card pack. Joy, is cut out with a Stitched Oval die. I added the holes and some silver cording! Add a small piece of Basic White to the backside for addresses the tags. And there you have 4 easy tags that took a matter of minutes to make. 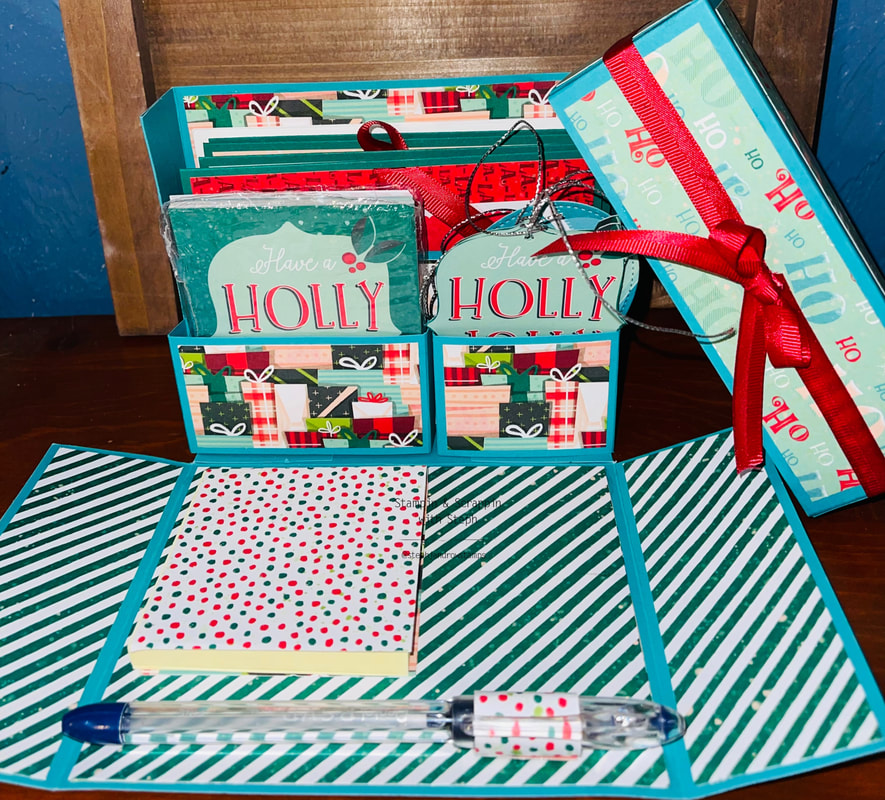
There are a few steps to designing the box. I had hope to get my video done, but I will have it by the weekend. I will say it is easier to assemble watching it made then just following the directions. SO I promise a tutorial is coming.
You will need A few pieces of cardstock, I used Bermuda Bay - 10x12, 6 1/8 x 10 1/8, 8 1/2x4 1/4, 2x5 1/2 and 2x4 1/2 Box 10x12 Score the 10" side at 2 & 8 turn and score the 12" side at 5 & 7 Turn back to the 10" side and score 3/4 just down to the horizontal score line, Do the same at 9 1/4 Lid 6 1/8x10 1/8 Score the 6 1/8 x 10 1/8 with the 6 1/8' side at the top score at 2 & 4 1/8 turn to the 10 1/8' side and score at 2 & 8 1/8 Card Divider 8 1/2x4 1/4 Score the 8 1/2x4 1/4 with the 4' side at the top score at 3", turn score at 1/4 and 7 1/4 Pocket 2x5 1/2 Score the 5 1/2' side at 1/2, 1, 4 1/2 & 5 Pocket 2x4 1/2 Scote the 4 1/2 side at 1/2, 1, 3 1/2 & 4 Holding the box paper horizontally, with the 12" side at the top, you need to trim out the little box that is formed between the lines. Repeat on the other side. Now fold on all the score lines. The side that has score lines at 3/4 is the box side and the part the has no 3/4 score lines is that part that pops down when the lid is removed. Before gluing the box, you will want to add you DSP - it's easier to adhere to the box before it's assembled. Just match up the layers to each side and make the paper is going in the right direction. Stand up the side that has the 3/4 and glue down the 3/4 strip gets to create support for the sides. Take the card divider add line it up to the score line (section where we cut the tabs off) and adhere to the sides of the box, do the same with each pocket - Assemble the lid, as if you were creating a box. DSP Layers Inside Outside Mat Lid 2 at 5 3/4 x 4 3/4 2 at 5 3/4x4 3/4 3 at 1 3/4x5 3/4 1 at 5 3/4x2 3/4 2 at 1 3/4x4 3/4 2 at 1 3/4x 1 3/4 1 at 1 3/4x2 1/4 2 at 1 3/4x4 3/4 1 at 1 3/4x3 1/4 Be sure to view the tutorial, it will make these directions make more sense. I have included a quick video explaining the cards and box below, and a full tutorial video!
Below is a full tutorial on how to put together the Stationary Box!
Thank you so much for joining me today and following along in our blog hop! I hope you enjoyed the projects we have created for you!
Join us 2023 for a brand new year of hops! If you're a paper crafter and have a blog, and are interested in joining our monthly hops, please contact me, we are always looking for creative people to share with us! Be sure to visit everyone's below and leave a comment! Happy Thanksgiving and Happy Stampin Steph
4 Comments
Barb
11/25/2022 08:09:40 am
I haven't made one of these in a long time! This is great!
Jean H Beaulieu
11/25/2022 09:21:29 pm
Love the explosion box!
Tiziana
12/1/2022 09:41:44 pm
I keep purchasing the memory and more cards and have never thought of making cards with them...they turned out great! I especially love the organizer you made. Leave a Reply. |


Categories
All
Archives
May 2024
|
 RSS Feed