
Welcome 2019 and welcome to the first Stampin Friends Blog Hop of the new year. I am so excited to be continuing as a regular hopper for the year. We have some great theme's planned so make sure to check us out each month!! This month's Stampin Friends theme is Love! So relax and enjoy all these amazing projects!! You are really going to love the projects shared this month!
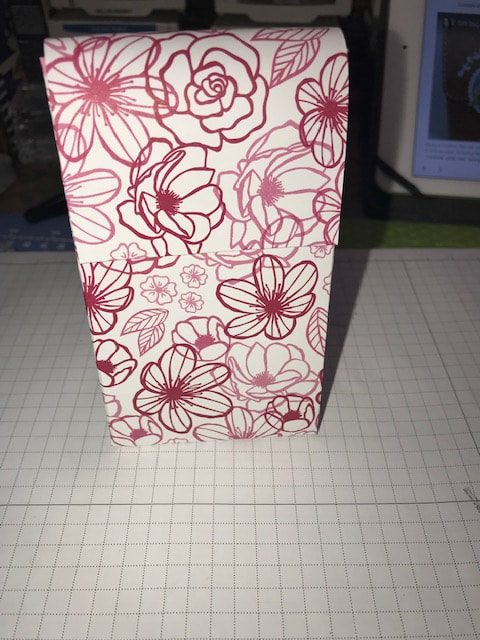
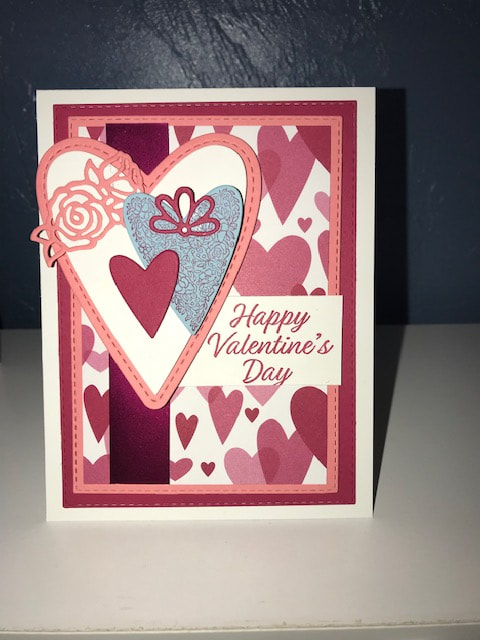
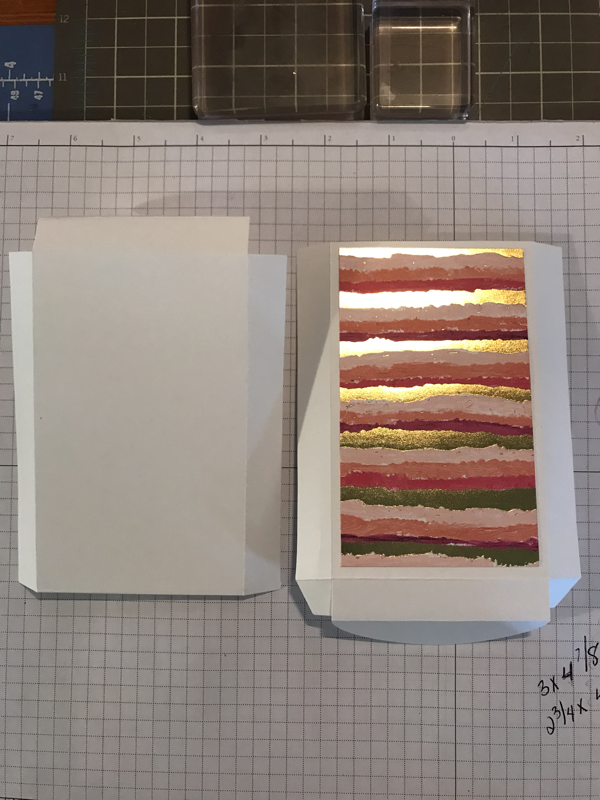
We have 11 amazingly talented crafters participating in this month's hop, so be sure to follow along and check out everyone's blogs and fabulous projects. Wasn't Maureen's projects just wonderful???? Be sure to leave a comment on my blog post and I will enter you in to my personal raffle to make this project yourself!!!! Today I wanted to share with you 2 really fun projects made with new products from the Stampin Up Occasions catalog! My projects use the All About Love Designer Series Paper, the Meant to Be stamp set and the colors Lovely Lipstick, Flirty Flamingo, Whisper White and a pop of Balmy Blue.
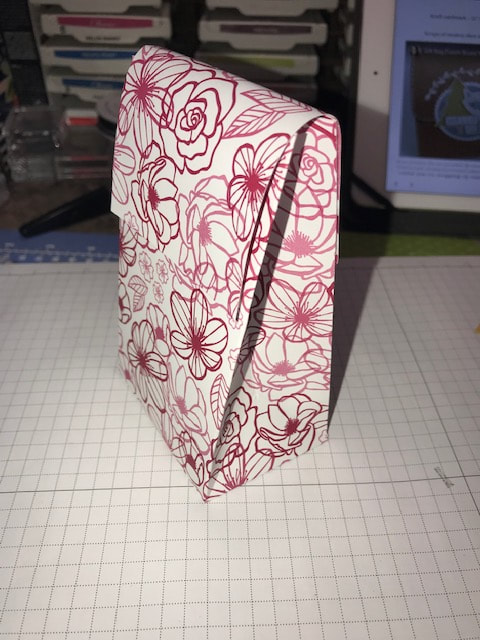
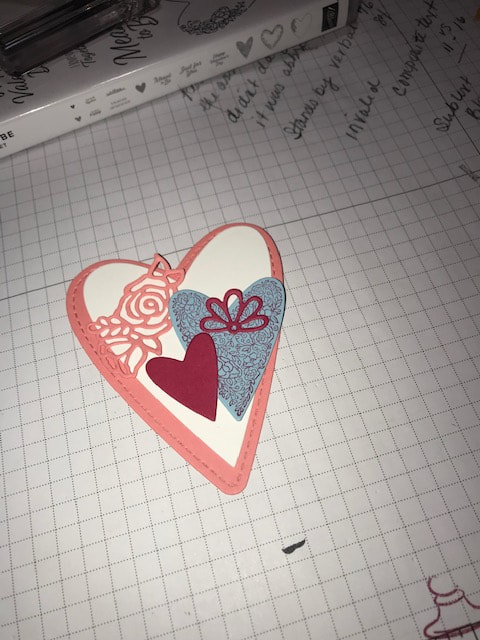
To decorate the front of the bag, I used the new Be Mine Framelits in the new Occasions catalog. I layered the colors of Flirty Flamingo, Lovely Lipstick, Balmy Blue and Whisper White. I cut 2 of each out as I will used the second set when making the coordinating card.
What do you think??? I hope you like my projects!
Be sure to follow along to Melissa Thomas's blog, you can click on her name below and check out her projects!!! Thanks for stopping by Happy Stampin Steph 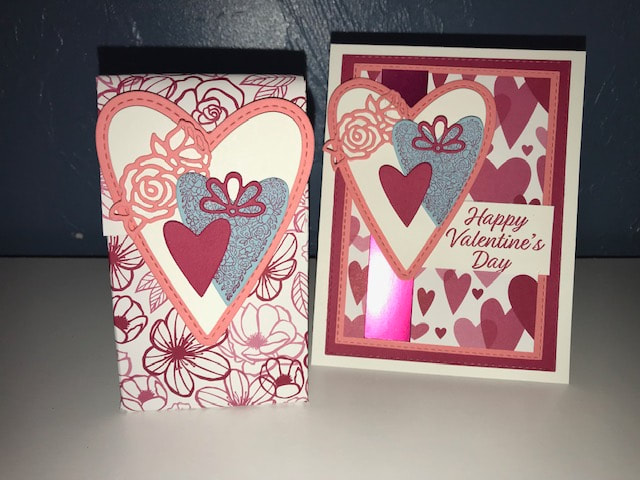
6 Comments

Thank you for joining us on our Stampin Friends Happy Holidays Blog Hop! Holidays? Wasn't it just summer??? For us here in New England we've had our roller coaster of temperatures and rain! I'm done with the rain....lets ask Mother Nature to send the rain to California and help end these horrigic fires! If you've been following along with the hop, you can from Barbara Welch's blog!! Weren't here projects awesome!!!!
During this time of year I begin my teacher gifts. I try to stay ahead of the game on this because, and I am sure you know, you blink and Christmas is here! I've been toying with this project now for over a month ........and I have finally started it! It's going to be one of things that will take some time to get done. My son's classes switch between 2 classrooms so there is 4 teachers total! I am working on a Monthly Calendar!!! So...ya I have to come up with a theme for each month and then X 4. I am also a vendor at our High School fair soooo I am debating making some for there too!! 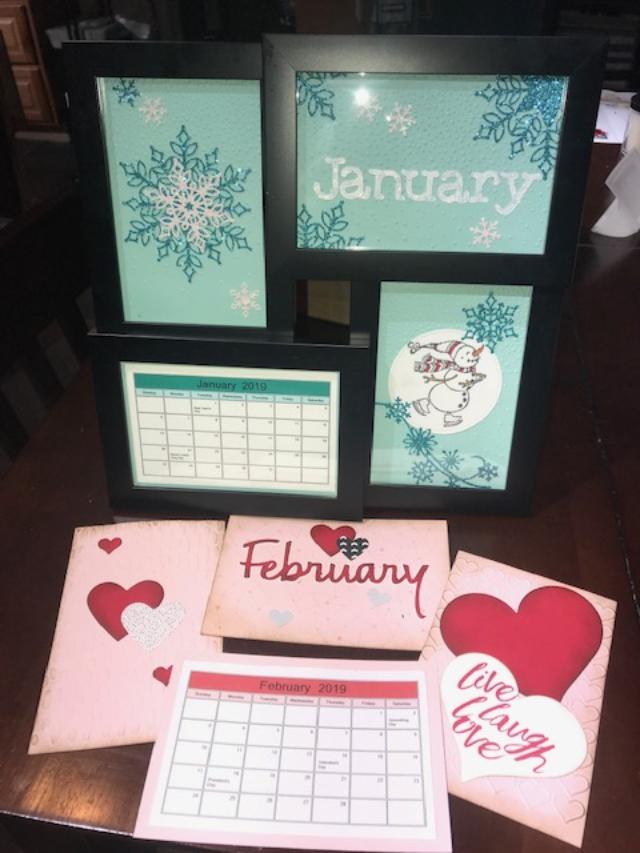
After several attempts at different layouts I am happy with what I've done so far. AND THANK THE LORD FOR MY CRICUT....It's makes doing multiples so much easier!!! Well all except the snowflakes! This is a new die set from Stampin UP called Snowfall Framelits! I ordered the frames on Amazon, yeah Prime!! I ordered them Monday .....and they arrived today...perfect timing. So for the paper, I have used glitter paper I found at AC Moore, Pool Party, Whisper White and Blushing Bride Cardstock. The project keeps evolving as I continue to work on it. But I so happy with the results.
Ok first of all I want to apologize for my photos they aren't the best. I do have a designated area to take pictures so sometimes there's just a lot going when I need to photograph
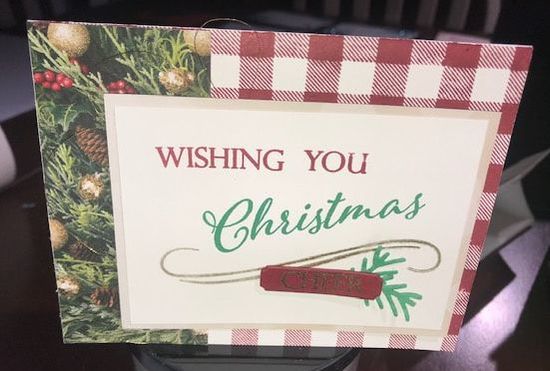
My card is from the All is Bright Suite featured in the Stampin Up Holiday Catalog. I got the idea right out of the catalog itself! The Designer Series Paper is absolutely beautiful and this card/photo does not do it justice at all! The photographic images in the DSP really makes the card pop! The Buffalo plaid is a new background stamp also in the Holiday Catalog. I hope you enjoyed my projects and our Happy Holidays Hop If you haven't visited everyone's blog be sure to check them out. You can find all the participants listed below. Thank you for stopping by Happy Stampin and Happy Holidays Steph 
WOW September is rolling right along! And here in Massachusetts it doesn't feel like fall is ready to make it's appearance yet! We've had record breaking temperatures with nasty humidity! I am hoping it cools done soon! I look forward to the cool crisp air, changing leaves...except when I have to rake them, and smells of fall like baked apple pies and pumpkin spices! I love to decorate and get into the spirit of Halloween for the kids! So, I am so excited to share my projects with you!
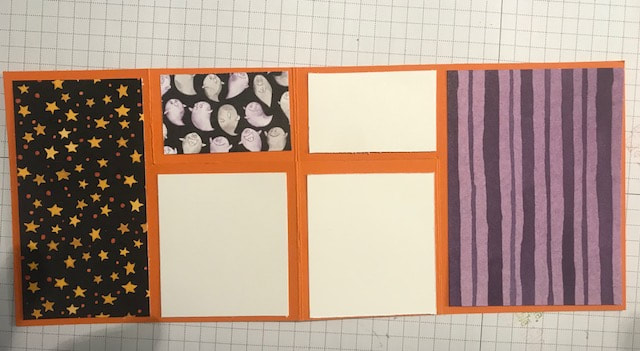
I want to welcome you and thank you for stopping by the Stampin Friends Blog Hop for September. My blog hop winner, from the August hop, is Barbara Welch! Congratulations! Barbara will receive 1 set of the completed projects I made in August. So be sure to comment on my blog for this month and I will send you a little prize from me! Did you hop over from Kim Jolley's blog! Weren't her projects just amazing?? Let's jump into the projects!!! If you haven't notice, this month's theme is Halloween! I decided to redo a project I made before. It's a Halloween Countdown Calendar! OMG It's adorable! I first, came across the idea either from Facebook post or something on Pinterest. But the information is all on Splitcoaststampers website. The project and directions are from Melissa Stout and you can find all the directions by clicking here. 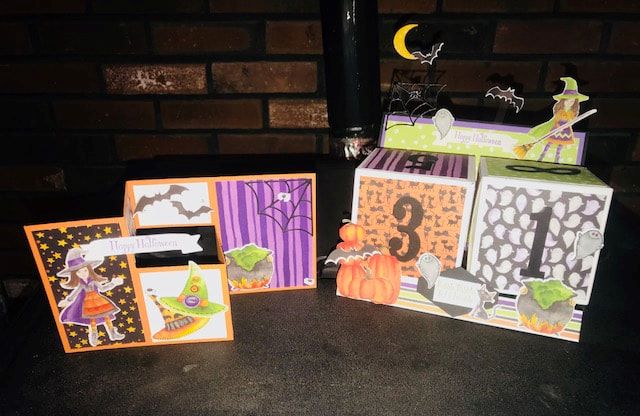
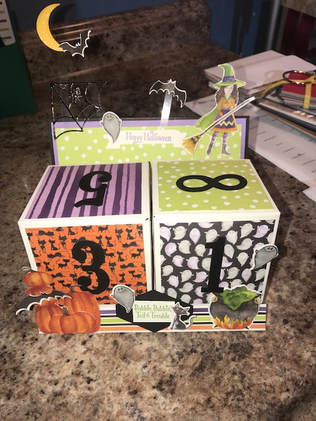
I won't go in to much detail about the directions. I made a couple modifications in mine, I will share those. My first modifications are the supplies used. From the original project, the boxes, DSP and tools were discontinued and I wanted to make sure I used current supplies. Of course, you can use whatever supplies you have!
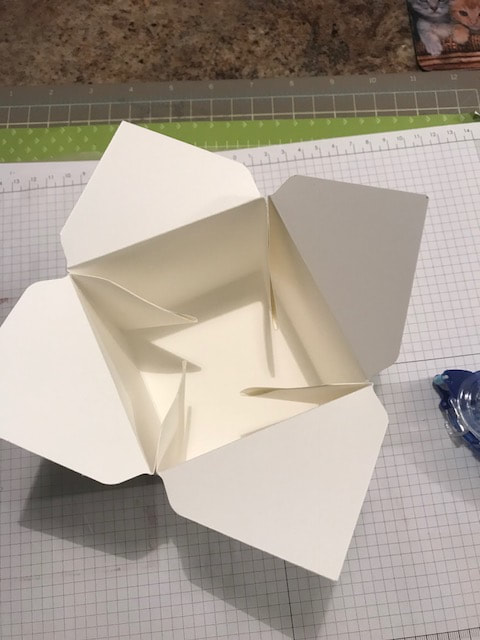
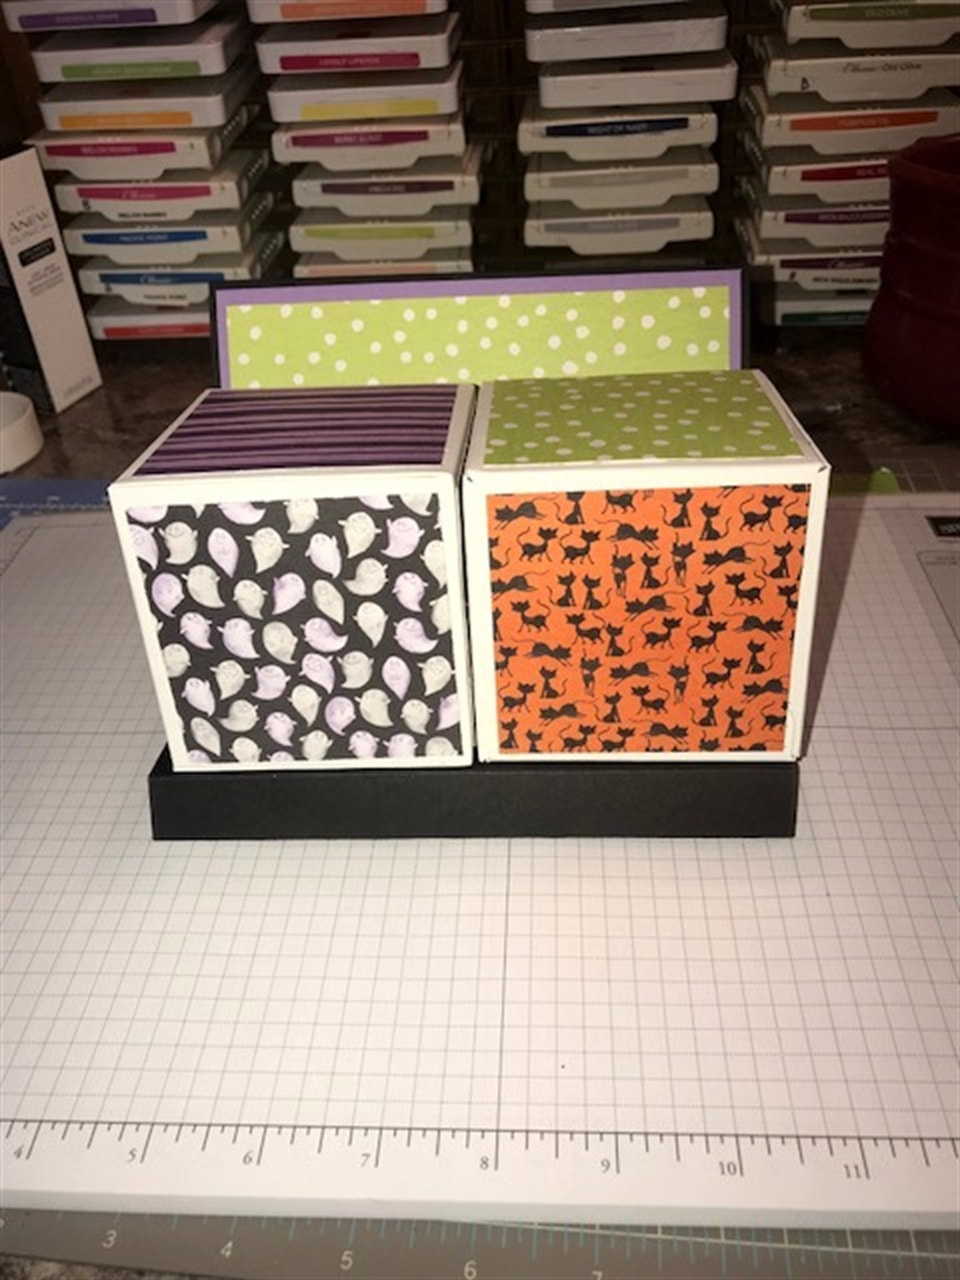
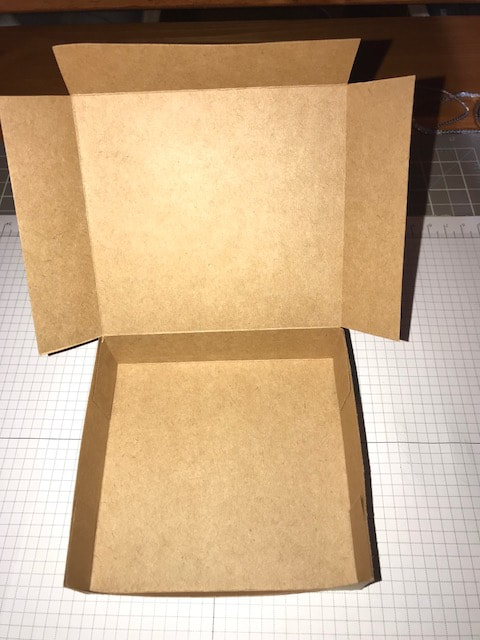
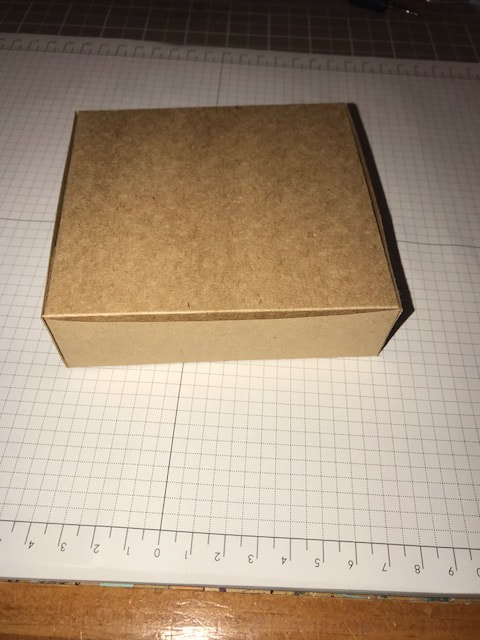
So..what I did was use the Giftbox punchboard and made a 3.25' box. I used 2 pieces of 12x12 cardstock and cut them to 10x10. I followed the scoring instructions on the punchboard. Now, if you are familiar with our punchboard, then you know it's going to allow you to have a box that will open out. Since I knew I wasn't use the box to put anything in, I just sealed it all up.
I put adhesive in each of the corners and then sealed the lid. Normally, if I wanted the box to be used but to stay square, I would have adhered the inside tabs to the sides so they don't get in the way of the contents. You can see in the pictures below regarding the tabs.
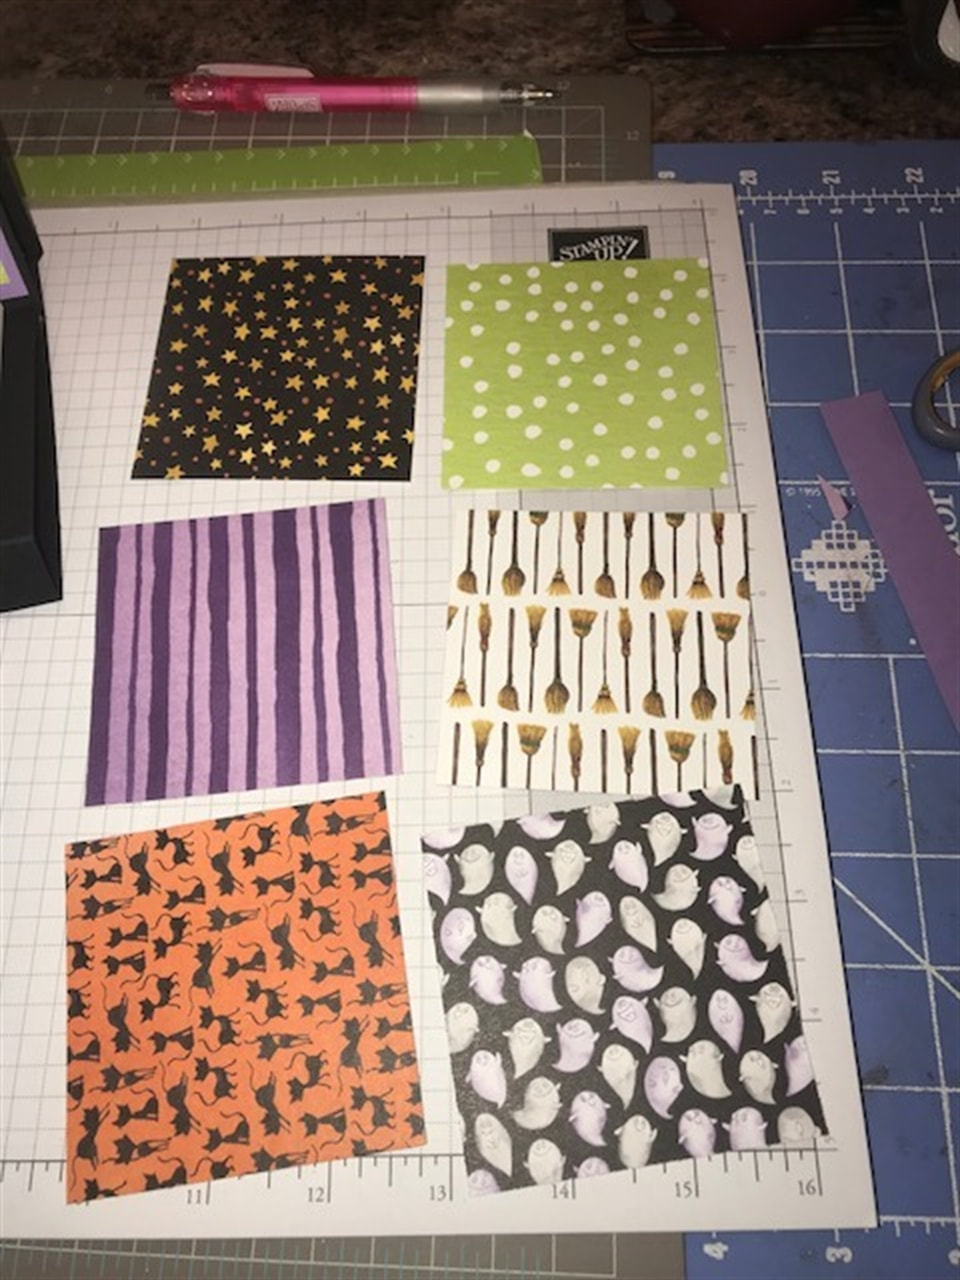
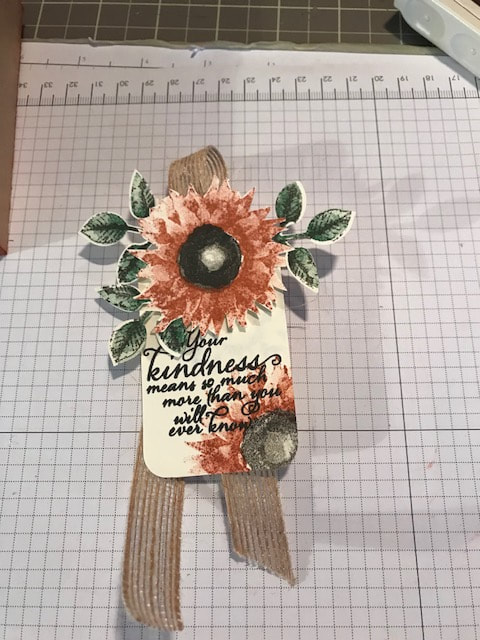
Because my box is 3.25' and the original project was 3'. I adjusted the paper size to accommodate. Melissa's directions was for 2 pieces of cardstock to measure 6 1/2x 8 1/2 and 6 1/2x10. I changed mine to 7x8 1/2 and 7x10. I changed the score lines on 7x8 1/2 paper to 3/8, 3 3/4, 4 1/2 and 8 1/8 and this work fine. I did not need to change the score measurements on the 7x10 paper. I picked out 6 patterns of the Toil & Trouble DSP. I cut 2 of each pattern to 3x3. I adhered this to the sides of my box. I followed Melissa's instruction on what numbers to cut out.
I didn't have to do too much stampin with this project. I used the Cauldron Framelits and matched up the shapes on the DSP and cut them out. I did use the greetings and ghost from the Cauldron Bubble stamp set and the moon from the Spooky Treats stamp set.
To get the look that the moon and bats are floating and flying in the air, I attached them to thin strips of transparencies. I know I have window sheets somewhere, but I can't find them. But good ole transparency sheets worked perfectly. I love this project. It is super easy and really fun to make. Melissa's directions show a Christmas version, which I think I am going to have to add to my list!!!
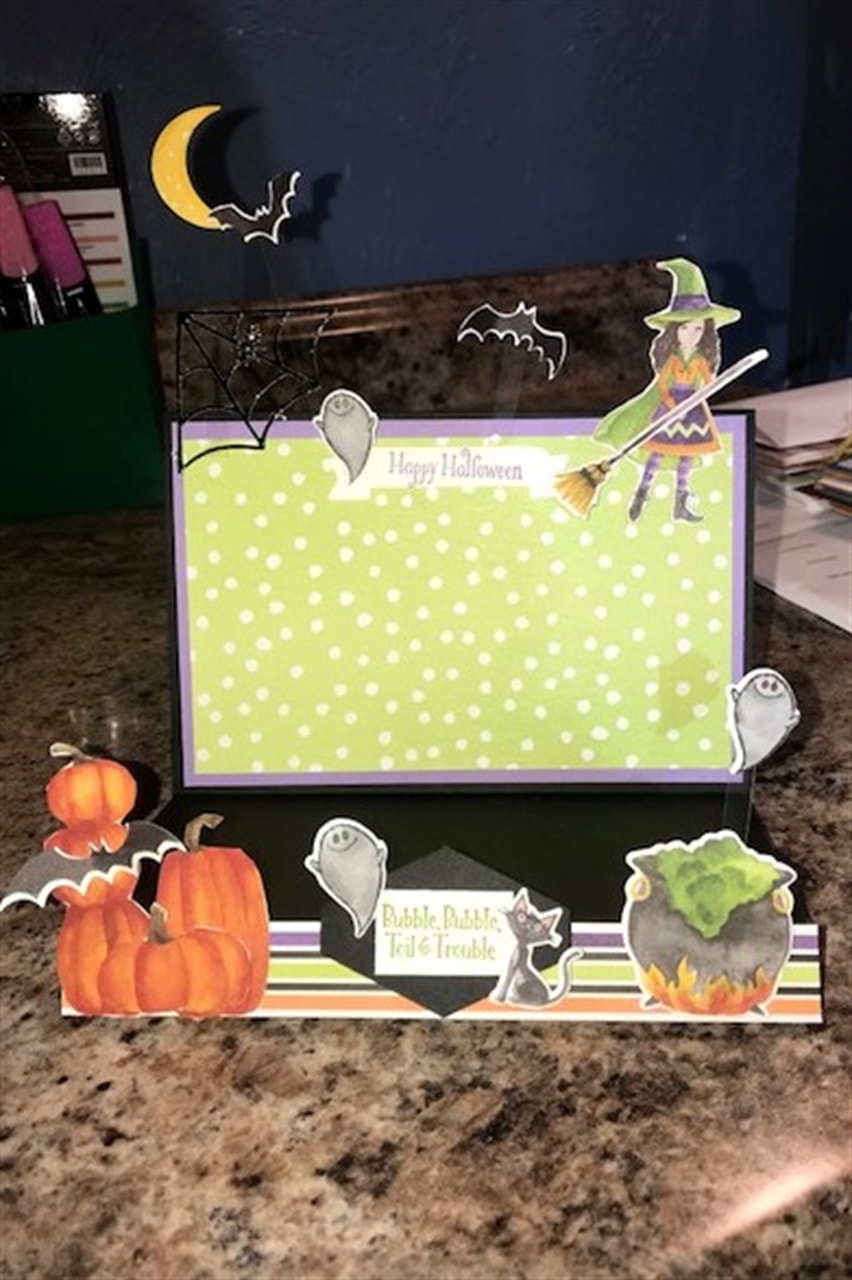
For my card, I made a Simple Step-Out Fancy Fold. I love this fold. You can get 2 cards from one piece of cardstock which is perfect. I was also able to use some of the DSP bits leftover from my project. It was super easy to make and I found the directions from the website Song of My Heart. Lisa Griffin Zwolanek shared her tutorial on how to make the card here.
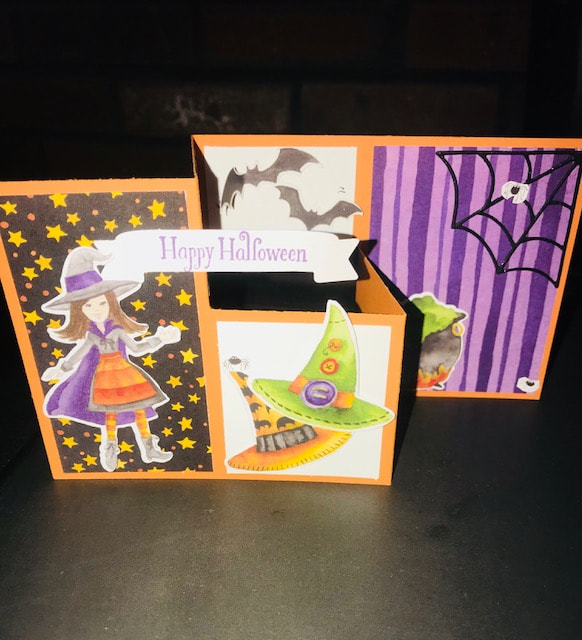
I used Pumpkin Pie CS as my card base. It gives nice pop to the Highland Heather and Granny Apple Green in the DSP. Lisa provides the measurements for the layers as well! I chose my layers first, then decided what I was going to use for images. I said this earlier, I did very little stamping with both the card and the project. I love that the framelits match up to the images on the DSP! When you're in a rush or time is limited this really helps complete projects quickly!! Love how Stampin Up thinks of everything!
I hope you enjoyed my projects, be sure to continue along to Melissa Thomas's blog you can fine her name below and continue from there.
Before you go, be sure to comment, and I will draw one lucky winner of a little blog candy by October's blog hop! Thank you again for joining us Happy Halloween and Happy Stampin Steph 
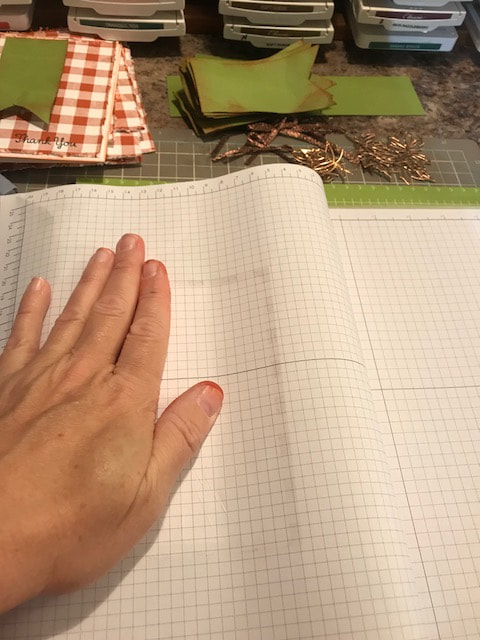
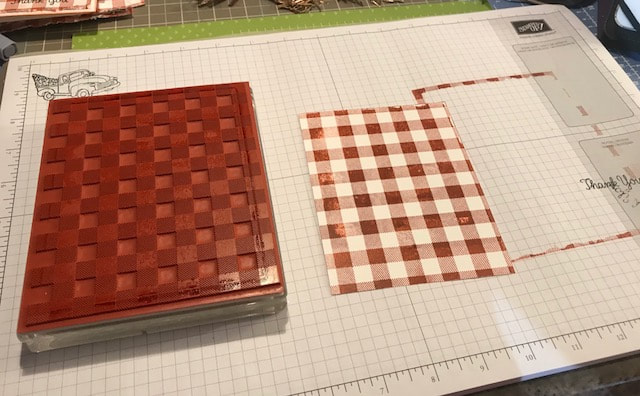
First I laid the stamp do...stamp side up and the I inked it up using Cajun Craze. Lay the cardstock on top, and then I folded over my grid paper and rub the top of it evenly, then gently lift of the cardstock! So much easier than trying to get an even stamped image the other way!!
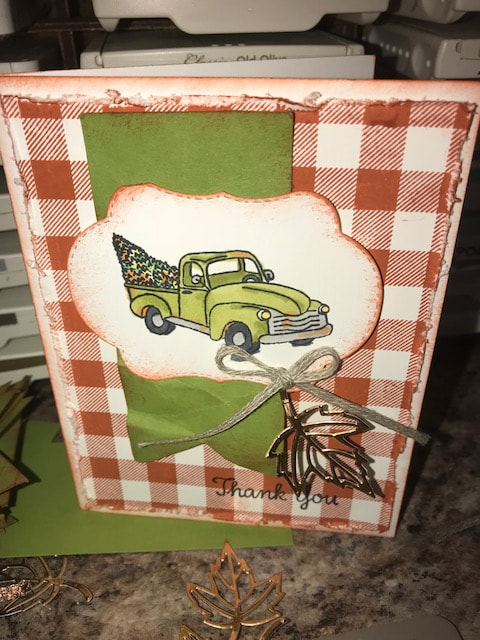
The truck image is from the new Farmhouse Christmas stamp set! I LOVE THIS SUITE. It was the first suite that made my list of must haves!! Even though this is a Christmas set, I think it works pretty well for Fall, just leave the sentiments out!
I stamped the image and then cut it out with the new limited Stitched Seasons Framelits. The leaf is also from this framelit set and I used Copper foil sheets I colored the truck in with the new blends. I used Old Olive, Cajun Craze, Basic Black, Shaded Spruce, Daffodil Delight and Smoky Slate. The banner is cut from Old Olive using the Triple Banner Punch. I crumbled it all up and then sponged the edges with Cajun Craze. I used the new Braided Linen Trim for the bow!! This can be found in the new Holiday Catalog in the Country Lane Suite! The bag is basically the same layout as the card. I used a white craft back I bought at AC Moore! I am filling it with fall soaps to give as a gift!!
I hope you liked my projects, be sure to leave a comment. I will be drawing 1 lucky winner to receive this completed project...minus the soaps (oops)
Be sure to continue with the blog hop Cindy Waldroff is next up and you can go to her blog by clicking on her name below! Thanks for stopping by Happy Stampin Steph 
Thank your for joining the June Stampin Friends BLOG HOP, where we are celebrating the first day of summer! We have an amazing Hop for you this month!!!
Be sure to follow each blogger to see all 12 of the awesome projects that have been created and shared for you! If you get lost a long the way, there is a list of participants at the bottom of each of the blogs! Since today is the first day of summer and school is almost over, I decided to make some teacher gifts! All of my projects use current Stampin Up products! I hope you enjoy what I have planned for you!
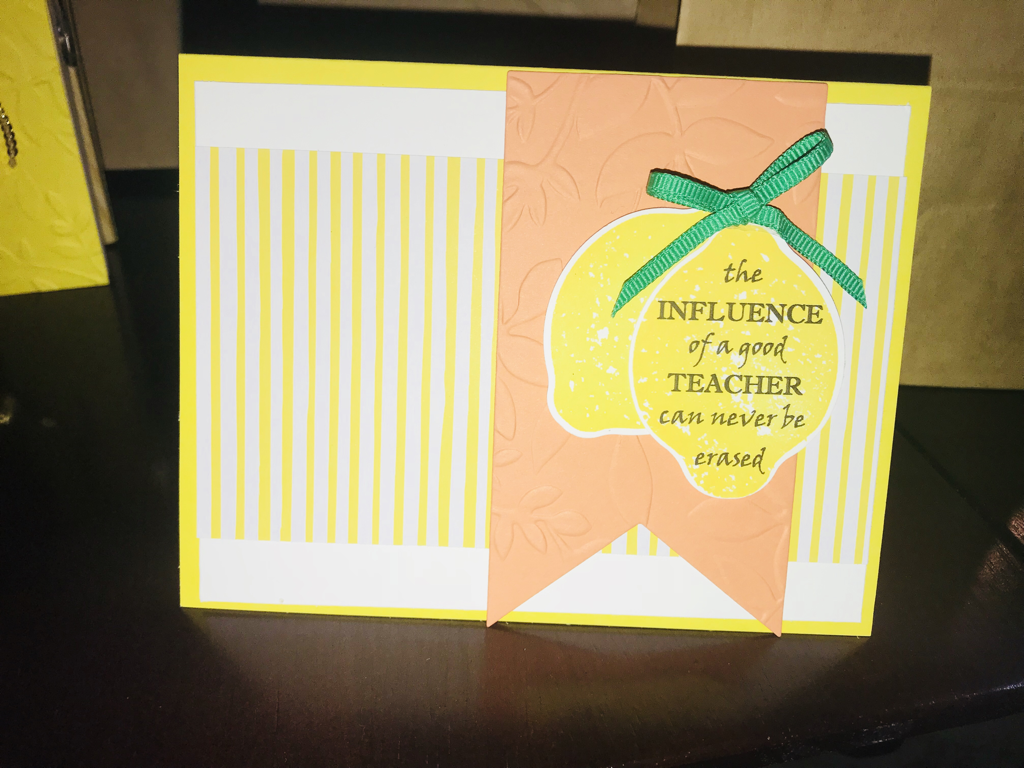
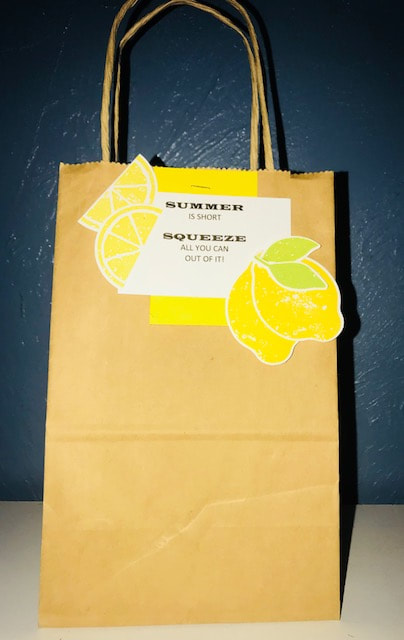
My projects theme was from a Lemon Verbena car air freshener I came across from a local store. I was very excited to see the Lemon Zest was carried over to the new annual catalog. So it was a perfect fit for this month's hop.
The projects use some new and returning products. My color choice was the New In Colors Pineapple Punch, Grapefruit Grove and Call Me Clover; 2017-2018 In Color Lemon Lime Twist. Stamp sets are returning Lemon Zest and Daisy Delight. My First project is a large clothespin. I found them at AC Moore, pretty inexpensive. I cut the cardstock to 1 1x2 x 6 1/8, embossed with the Layered Leaves Dynamic Embossing Folder. I stamped, punched and layered 3 daisies and finished the center with a Faceted Gem. I added a few strands of the Gold Mini Sequins Trim. The books mark is 2x4 1/2. I found the sentiment online and printed it out on Whisper White. They can use the bookmark or keep it display in the clothespin. Finished with the Pineapple Punch Grossgrain ribbon and a bow made from Linen Thread. 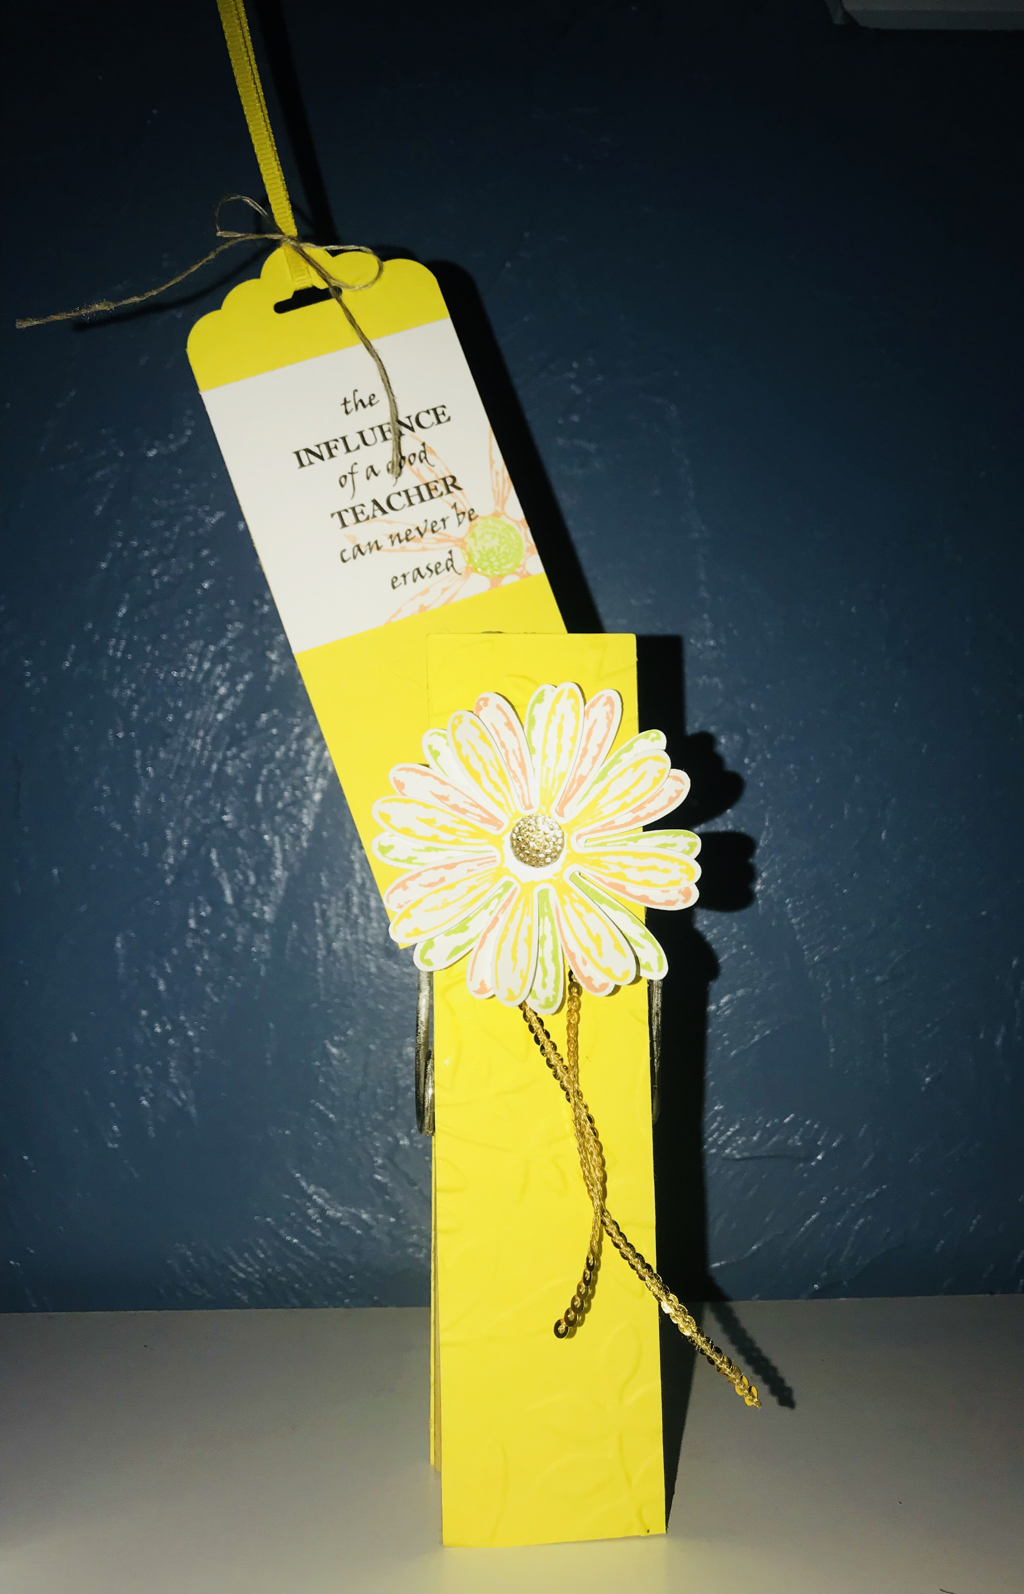
My card was super easy. Pineapple Punch base layers are Whisper White and the coordinating new In Colors DSP 6x6 Stack. Then a banner cut from the Grapefruit Grove paper that was embossed with the Layered Leaves Dynamic Embossing Folder. The sentiment was printed on Whisper White then stamped over with the Lemon. Finished off with the Call Me Clover Grossgrain ribbon.

I hope you enjoyed my projects, be sure to leave a comment. I'd love to hear your thoughts. I appear to be the end of the hop, but incase you missed someone along the way, you can find all the hoppers listed below!
Hope you have a wonderful summer Thanks for stopping by and Happy Stampin Steph 
Thank your for joining the April Stampin Friends BLOG HOP, where Spring Has Sprung! We have an amazing Hop for you this month!!!
Be sure to follow each blogger to see all the awesome projects that have been created and shared for you! If you get lost a long the way, there is a list of participants at the bottom of each of the blogs! This month’s theme is Spring Has Sprung! 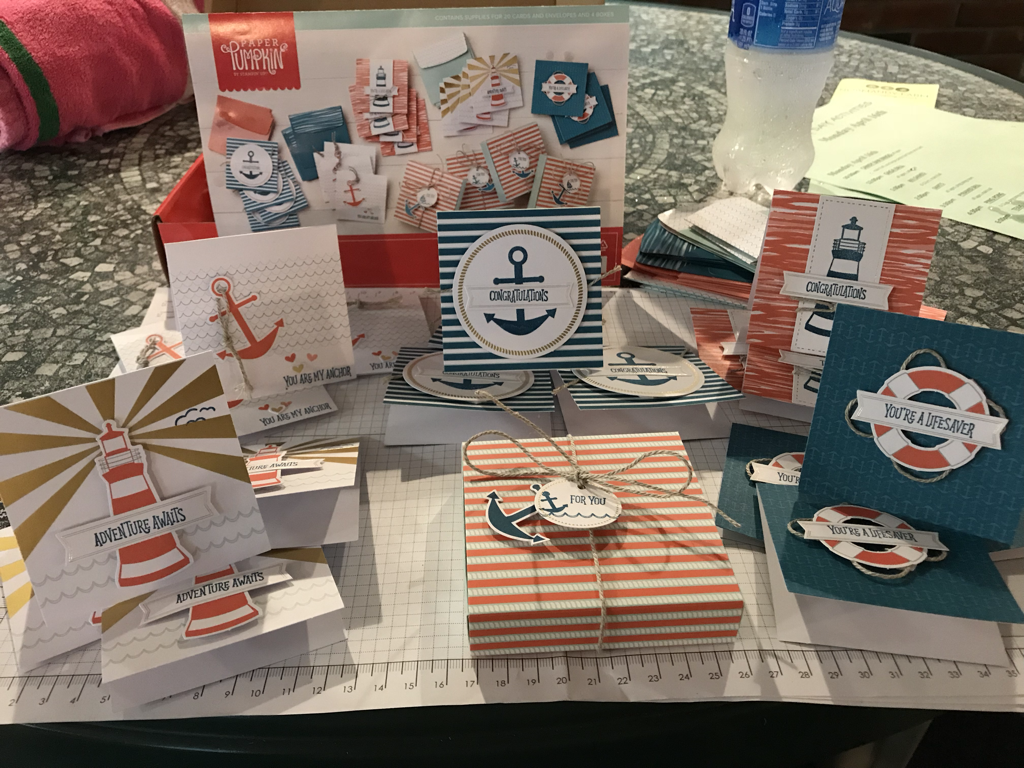
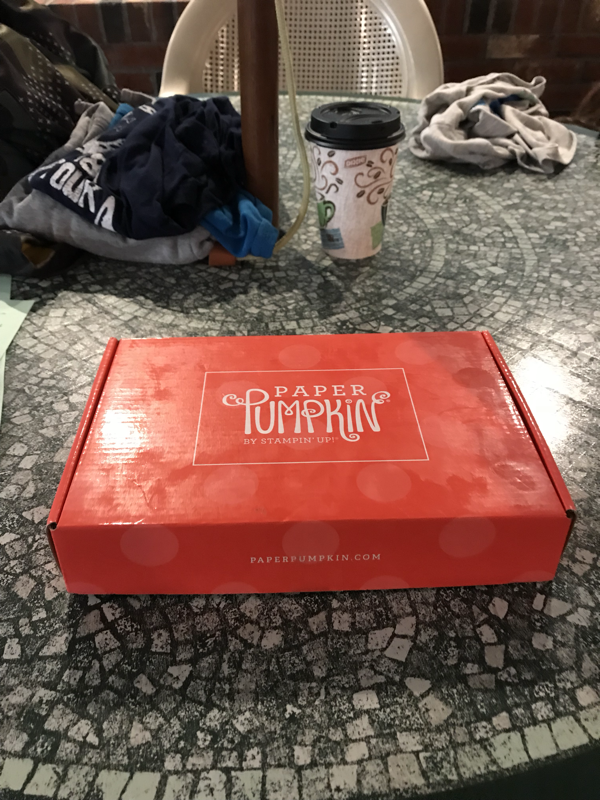
It is April Vacation from school this week! I knew I needed to create so I wouldn’t miss this hip. But we camp, so space and time is limited!! Unfortunately, the weather has been cold and rainy which has caused us to dramatically shift gears on how to keep everyone entertained! Well Papar Pumpkin is perfect for situations like this!!! It was great that this month I decided to work on Paper Pumpkin.
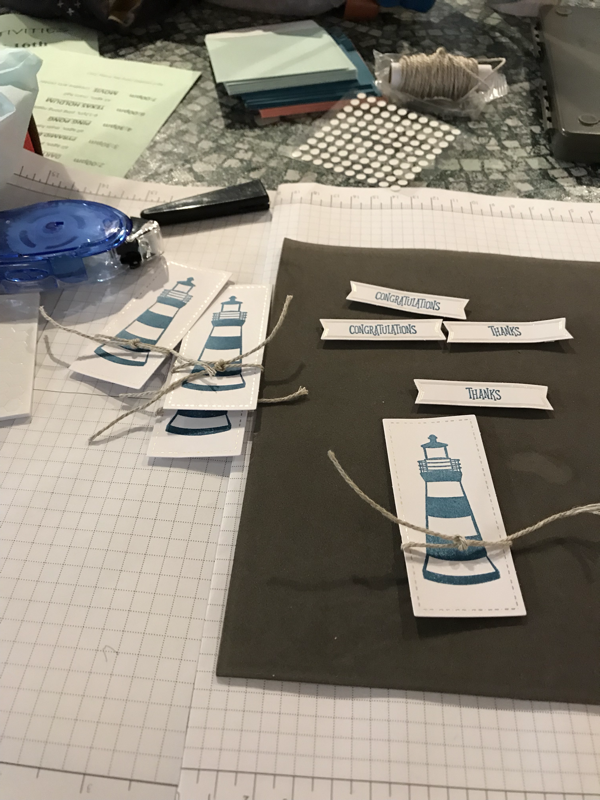
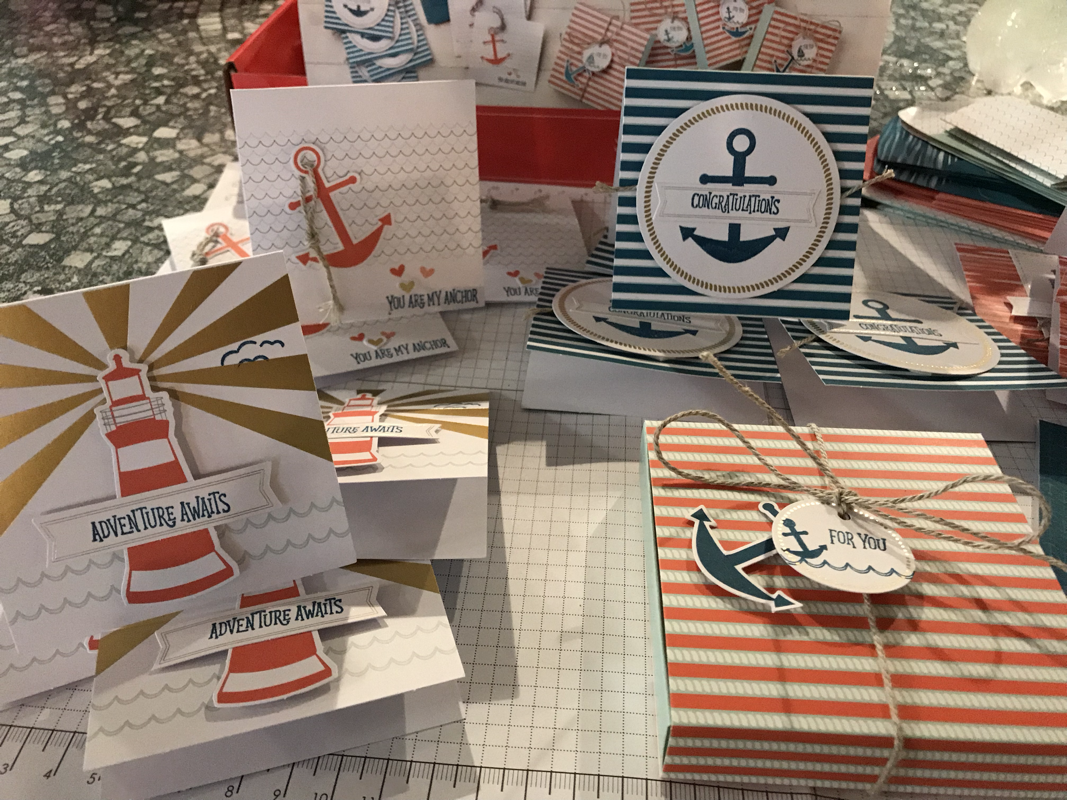
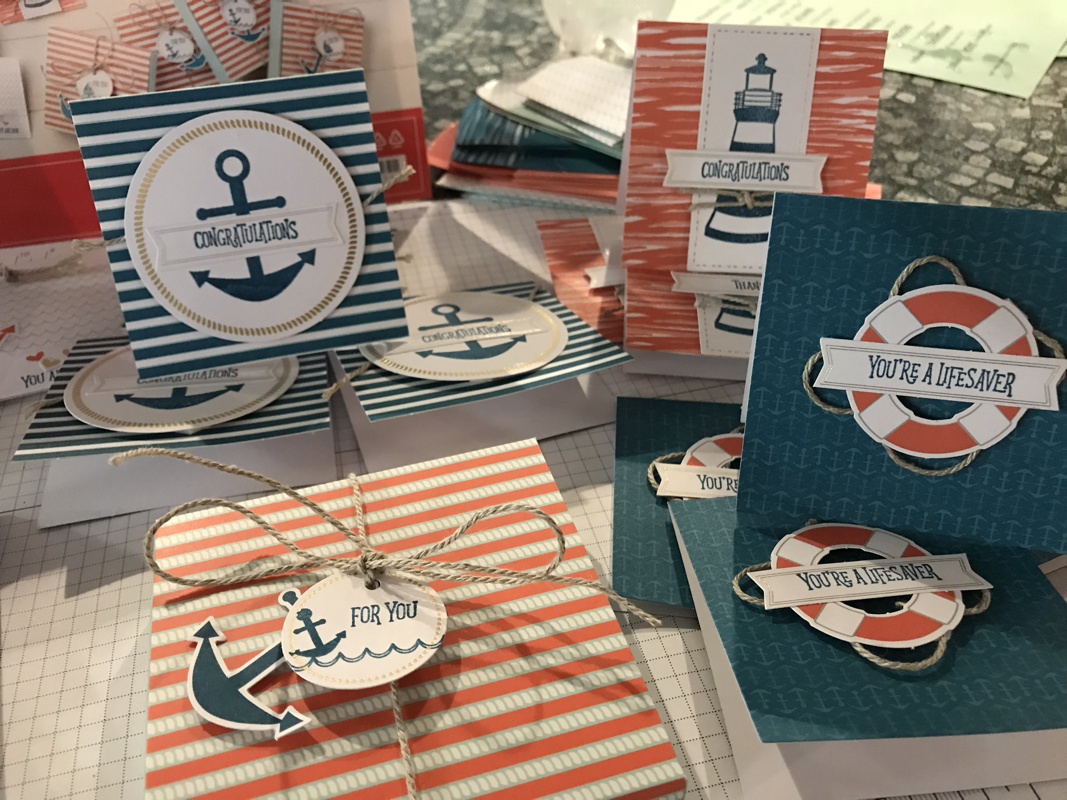
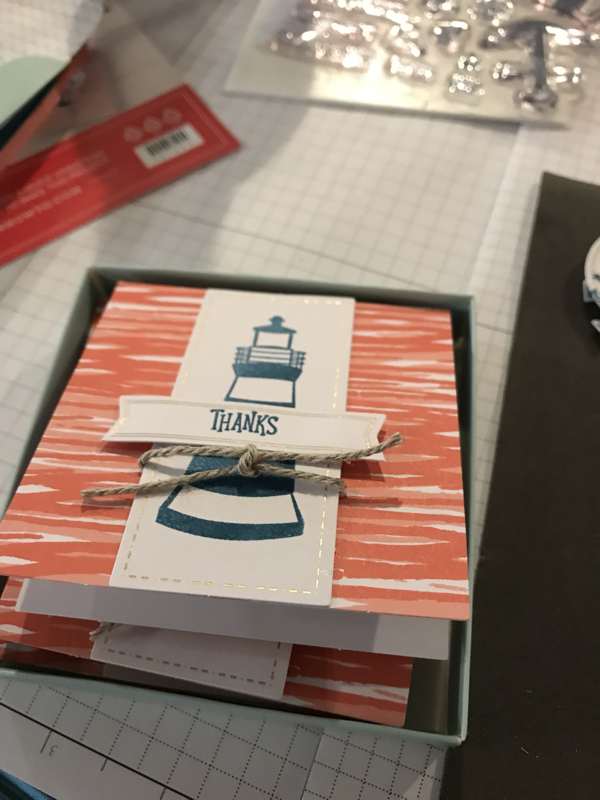
What is Paper Pumpkin?? It’s an all inclusive project kit from Stampin Up!! Each month you receive a different kit with everything you need to create amazing projects!! April is called You’re My Anchor! It’s a really fun nautical theme!!! While the kiddos swam, I pulled out 1 box and completed the 20 cards and 4 boxes that were included in the kit. I brought my own snips, acrylic block and adhesive! Just makes it easier!!! But it’s all packed up easy peasy!
And there’s even supplies leftover to make a few more cards or embellishments for more boxes!
and if you join Paper Pumpkin no later than May 10 you get 2 months free Wow So while I can’t take full credit for my projects, I hope you enjoyed them nonetheless!!!!! be sure to continue through the hop by clicking on our Awesome Bloggers below!!!!!! Thanks for stopping by Happy Stampin Steph 
Welcome and thank you joining the MARCH Stampin Friends BLOG HOP, where anything goes We have an amazing Hop for you this month!!!
Be sure to follow each blogger to see all the awesome projects that have been created and shared for you! If you get lost a long the way, there is a list of participants at the bottom of each of the blogs! This month’s theme is ANYTHING GOES! Be sure to leave a comment on everyone’s blogs with #SFMARCHBLOGHOP for your chance to win a Stampin Up NEW Stamparartus!!! 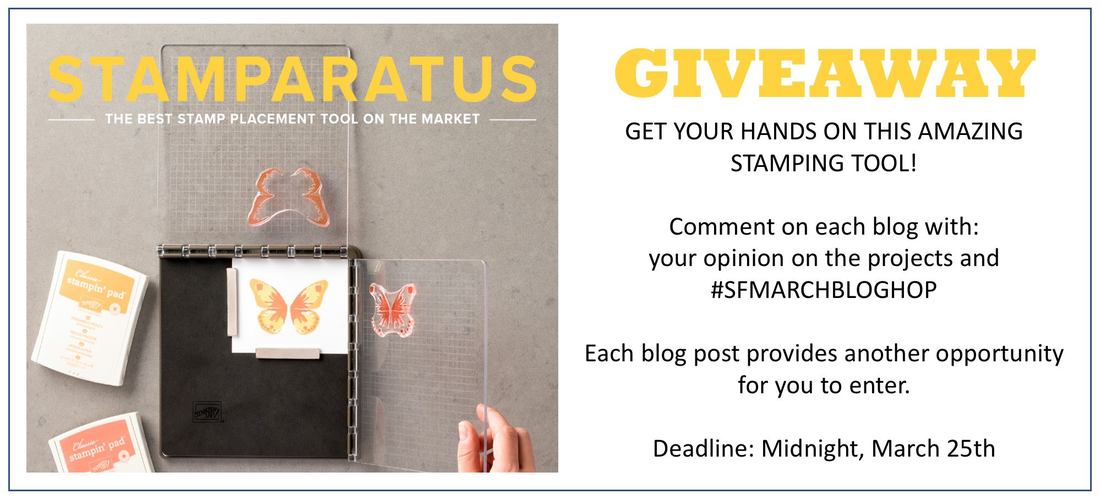
My projects are super easy and use all Stampin Up products!
I am working on products and giftable items for a vendor fair I will be at in April! 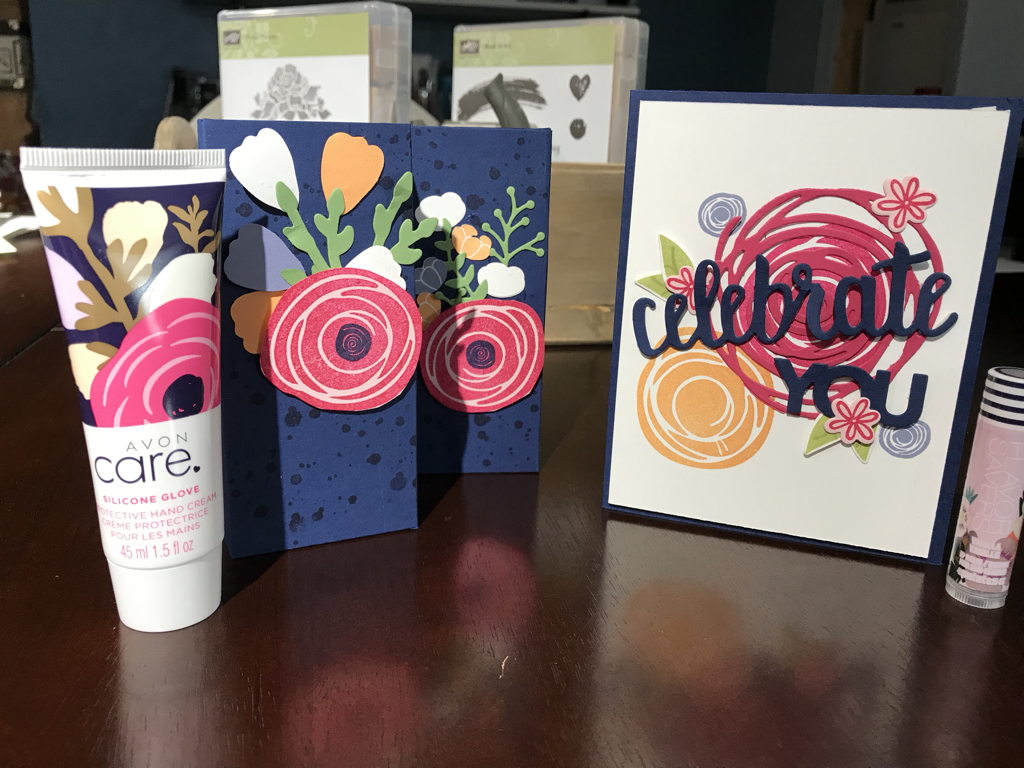
I came across these adorable hand creams and I thought wow looks like Stampin Up to me!! I immediately thought Swirly Bird!
I used colors from the hand cream, Night of Navy, Wisteria Wonder, Peekaboo Peach, Melon Mambo, and PinkPiourete! The box/bag was easy, you can make 2 boxes from one sheet of card stock. 1 sheet of 8 1/2x11 cut in half 4 1/4x11 score on the 11” side at 5 & 6 the turn to the 4 1/4 side and score at 1” on both sides (I turn paper over and score the other side) The first one I did I used the Cake Soirée stamps and matching Framelits I wasn’t crazy about it, so I tried the second box using the Flower Flower Builder punch and Everyday Jar of love Framelits and oops I forget to put the binder clip to hold it close! I happy with the outcome -just not sure if it needs something else maybe different leaves? 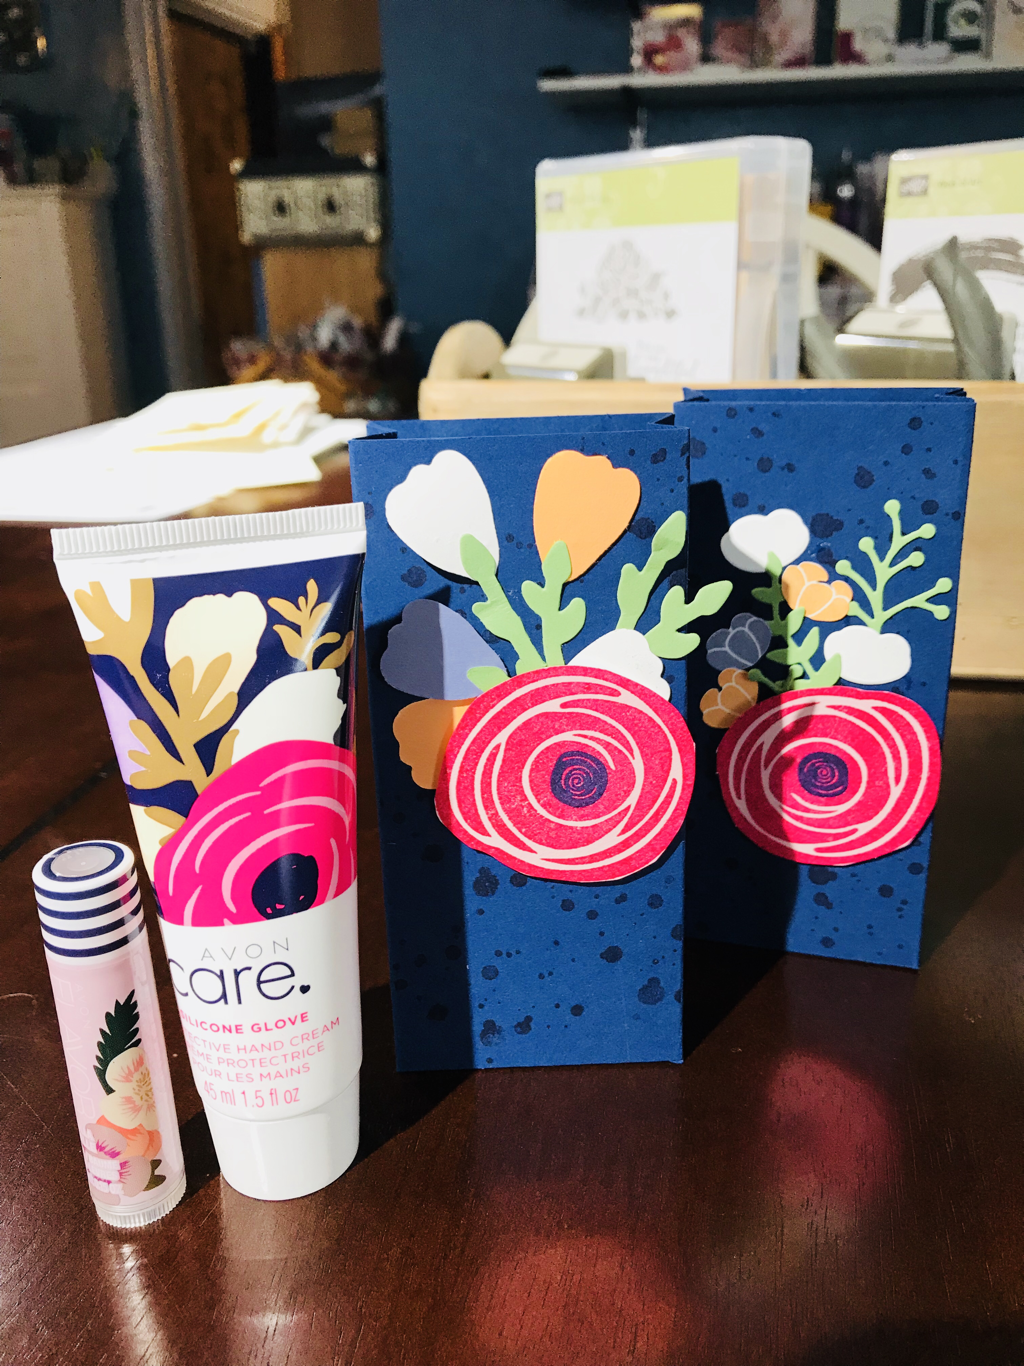
the card again same colors and all made with Swirly Bird stamp step and Swirly Scribbles Framelits and from
Sal-a-Braylon, the Celebrate You thinlits!! I love the card I’m so happy how it came out!!! It’s been a long time since I used the Swirly Bird and almost forgot how much fun it is!! I hope you enjoyed my blog! Be sure to leave a comment and continue to the next blogger, Kathie Rotti! Happy Stampin. Steph 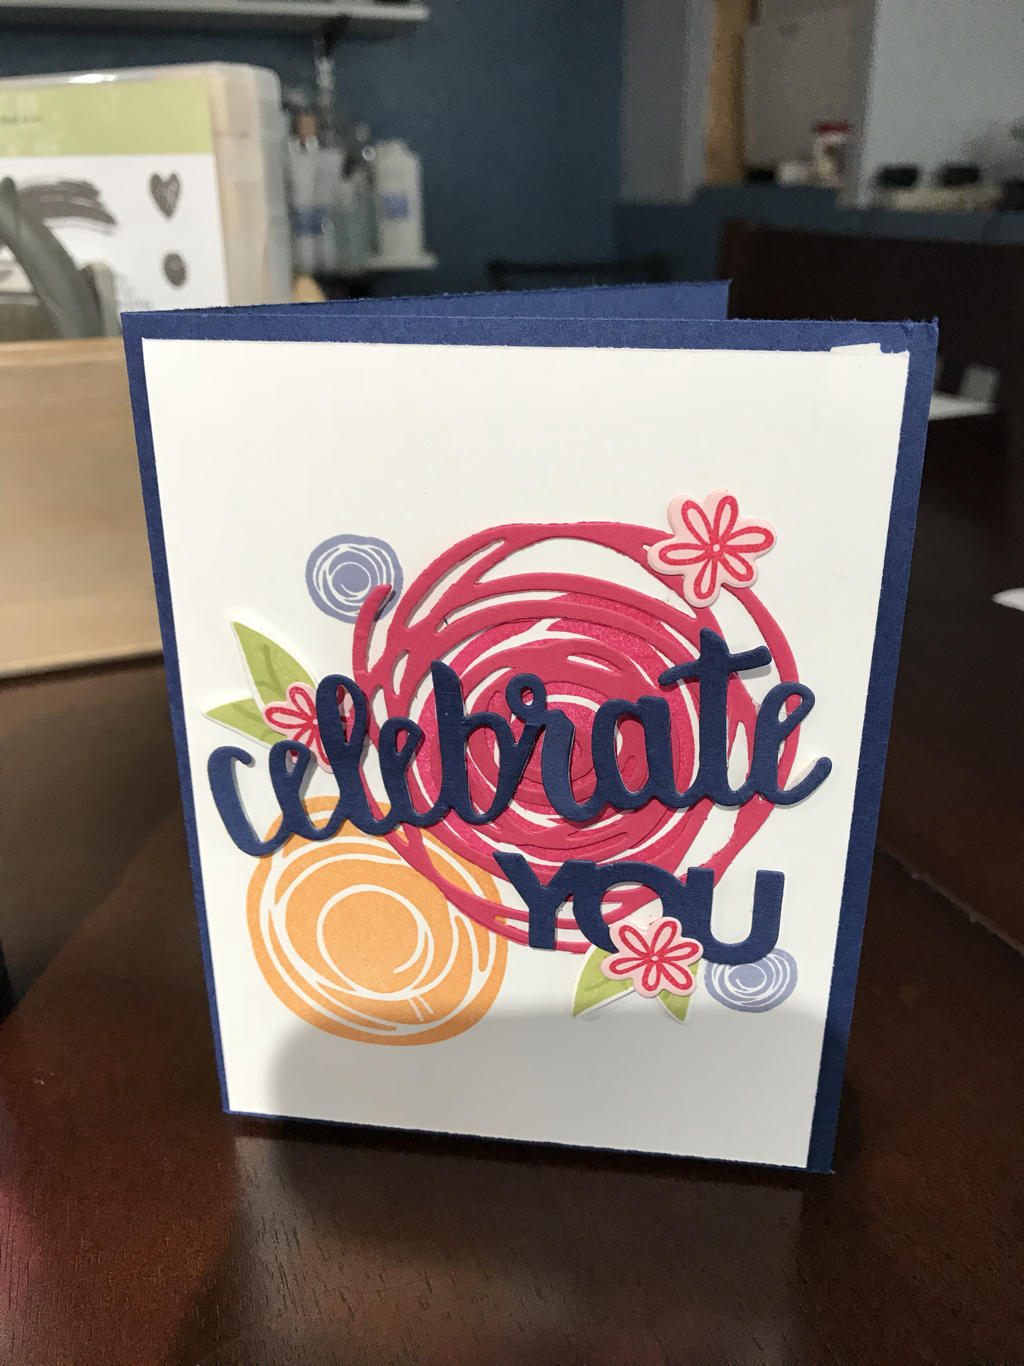
Welcome and thank you joining the first Blog Hop of 2018 by Stampin Friends! We have an amazing Hop for you this month!!! We have many new crafters that have joined the Stampin Friends Blog Hop for the 2018 year! YOU WILL NOT BE DISAPPOINTED!
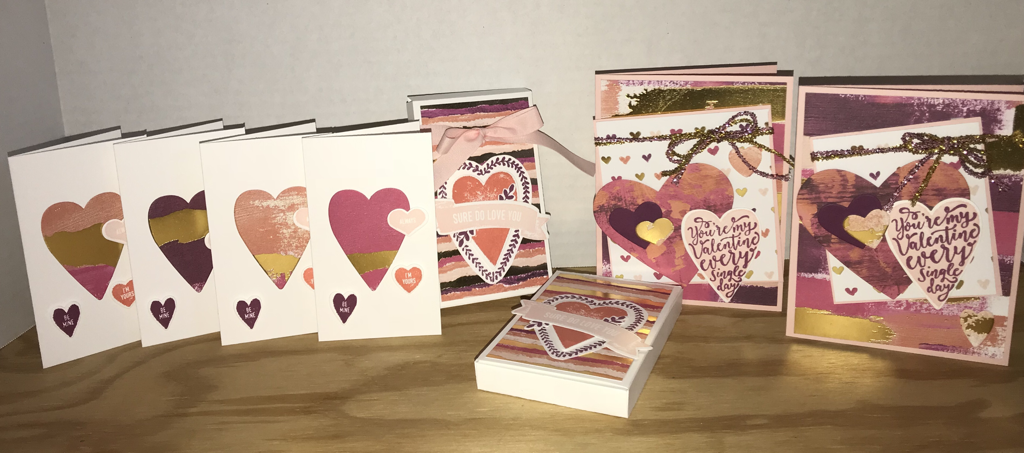
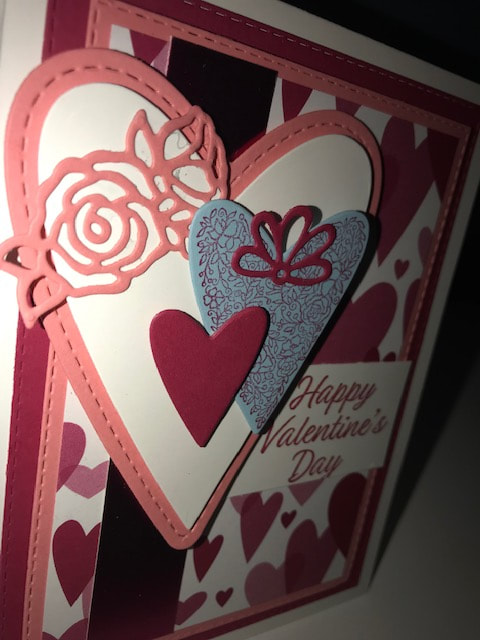
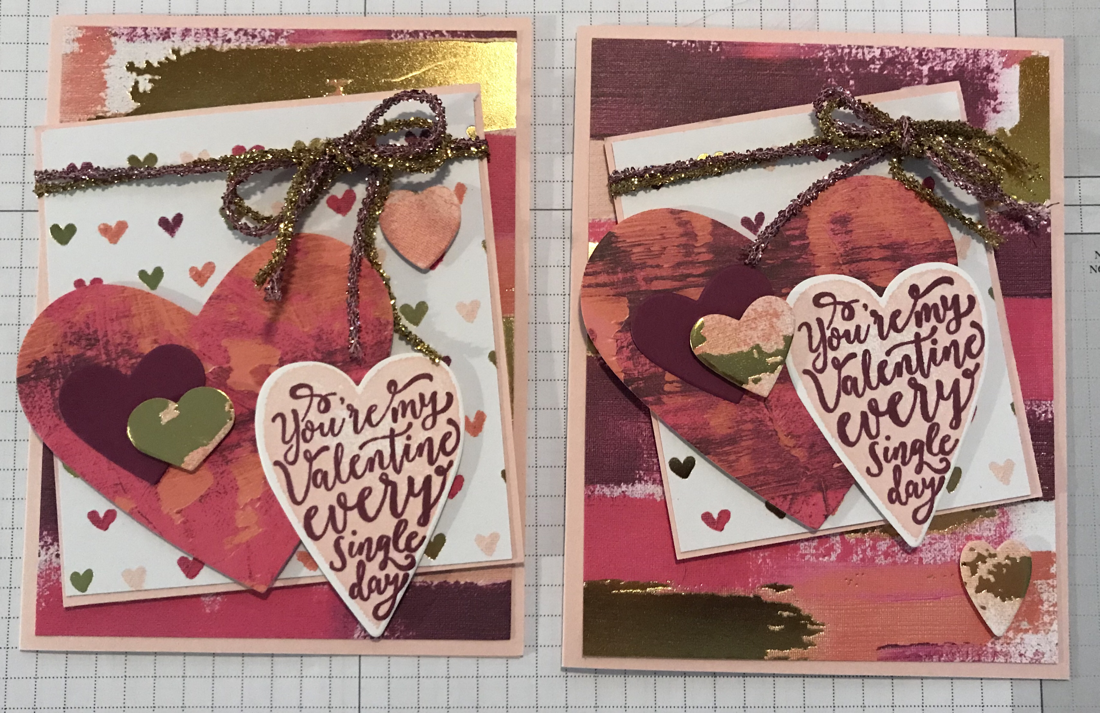
Be sure to follow each blogger to see all the awesome projects that have been created and shared for you! If you get lost a long the way, there is a list of participants at the bottom of each of the blogs! I am #2 Stephanie Jandrow! Be sure to leave a comment ON MY BLOG for ,your chance at winning Blog candy! This month’s theme is All About Love! And what better products to use? The brand new Painted with Love by Stampin Up! 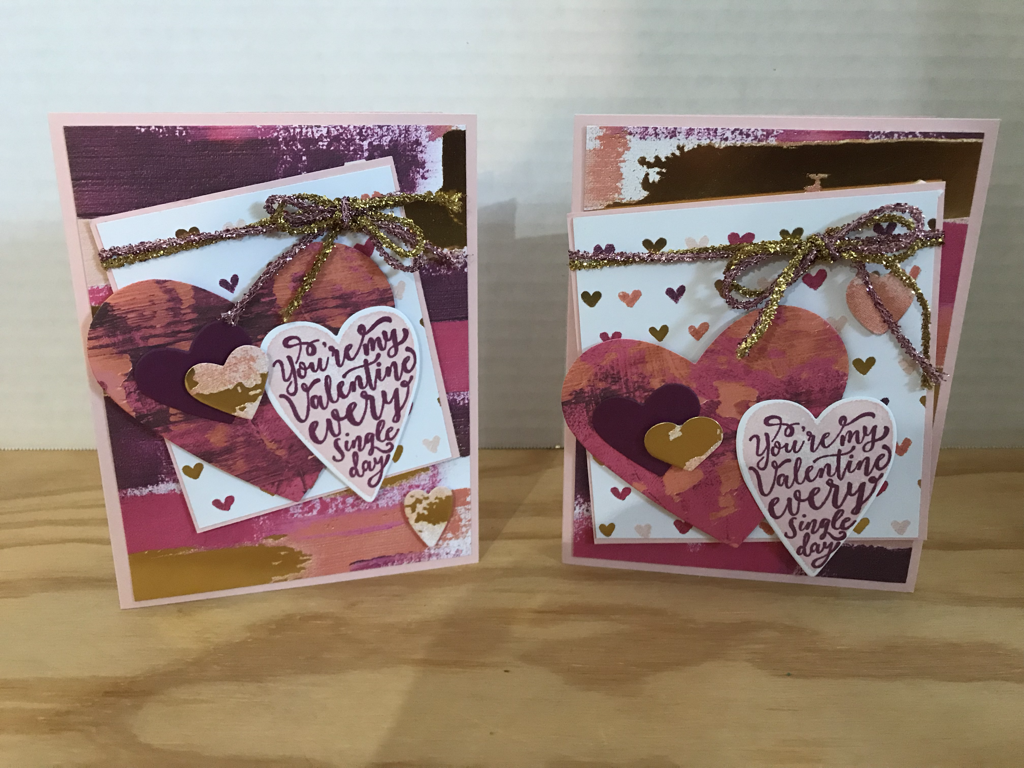
As I was designing my cards, I made each slightly different, using the same products! The Painted with Love Specialty DSP is gorgeous in person I don’t think picture do it justice!!! I used Rich Razzleberry and Powder Pink inks and cardstock.
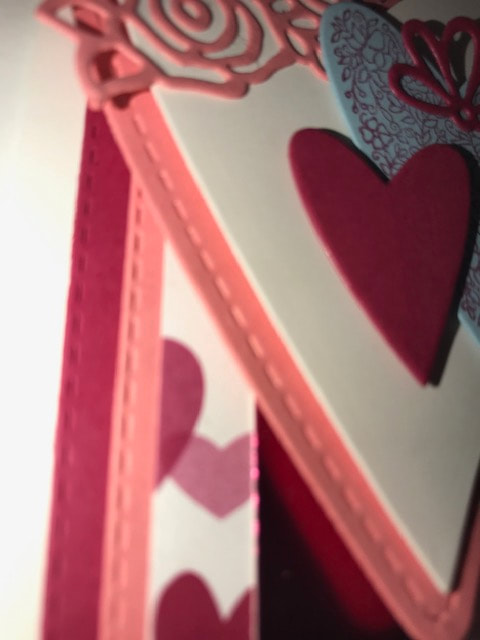
The cardbase is Powder Pink. I used the Lots to Love Box Framelits and Sure Do Love You stamp set. I chose 2 different patterns of the DSP for my layers and a 3rd for the larger heart, cut out with the Sweet & Sassy Framelits.. I added the Love Mini Tinsel Trim in a pretty bow at the top of each card! I think I’m more partial to the card on the left but I love both. This set is so much fun to use!
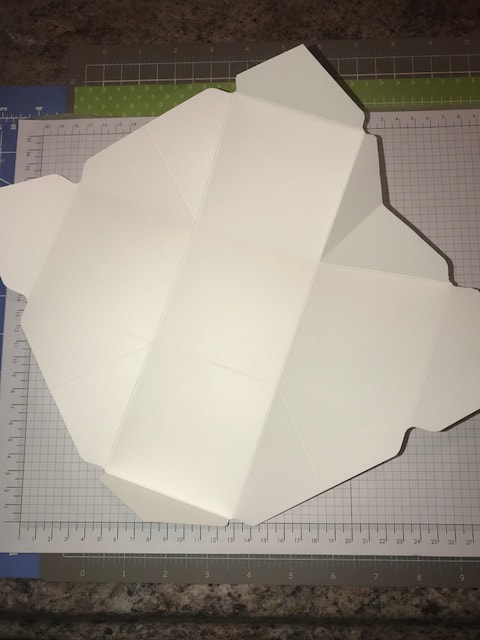
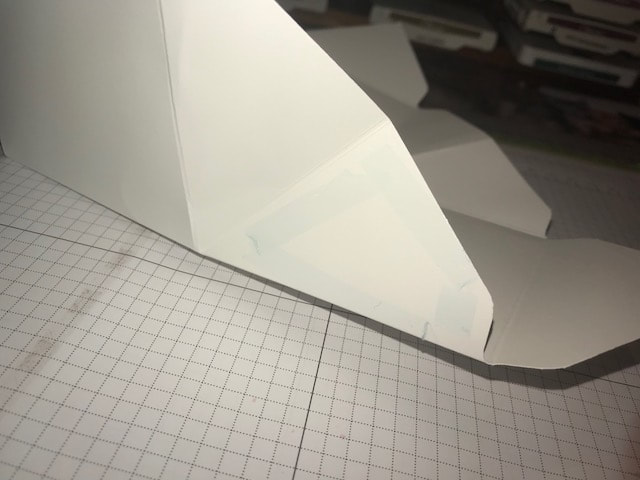
For my project, I used the Lots to Love Box Famelits. I created 2 boxes and decorated the front! I wasn’t sure what to put in them. At first I thought candy, but then decided to make some notecards!
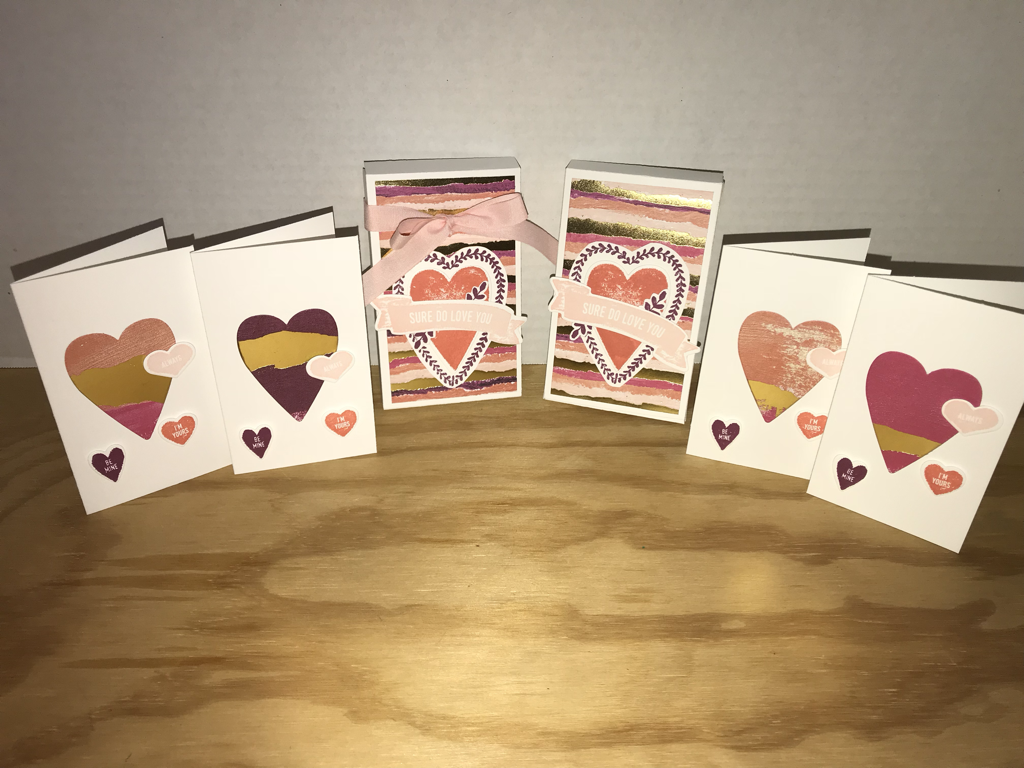
The notecards are simple and super easy to make! 4 5/8 x 5 1/2 and on the 5 1/2 side score at 2 3/4. Walla! I kept them simple and not over-decorated as I wanted the box to be the focal point! I stamped the "candy" heart images in Rich Razzleberry, Powder Pink and Calypso Coral. Then I chose the DSP pattern and used the Heart dies in the Lots to Love Box framelits to cut them out. Simple, right! But I think the cards have a big look!
As I was prepping the decoration for the box, I couldn’t decide if I wanted the ribbon or not so I made one with and one without! I used Powder Pink, Calypso Coral and Rich Razzleberry for ink colors. The heart with the vine image does not have a matching framelits so I fussy cut it out. I also stamped the leaves to the inside of the heart to save paper, the cut outs won’t be seen as the Calypso Coral heart sticks over it! What do you think??!
I hope you like my projects for this Blog Hop.
Be sure to leave a comment, as I will drawing my own Blog Candy for this Hop! Then click on Katja Ettig name at the #3 on the list to follow along! Thanks for stopping by Happy Stampin Steph 
Welcome to this month's Stampin Friends Blog Hop!
It's been a while since I had a chance to blog about Stampin Up. I was busy crafting and preparing for my first Vendor Fair. I really wish I could say it was a huge success. We had lots of people stop by the table in awe that everything was handmade, but sadly the purchase were very minimum and no contacts! Well now that is over I can get back to the norm! This month, I am sharing a really fun, and super easy, gift giving project! I made a handful of these for my table! I planned on giving what I didn't sell, to my family members that I do not see until after the Christmas holiday. So sit back and relax, grab a cup of a your favorite beverage, and prepare to be wow'd by all the amazing projects shared during the blog hop! Leave a comment about what you LOVED about my projects and on your comment! And i will choose 1 lucky winner at the end for some Blog candy! 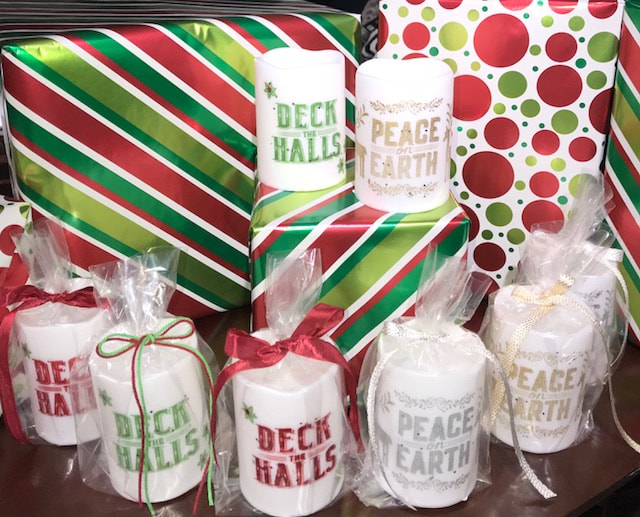
My project this month was a bit challenging! Stamping on candles!!! WOW, I have to say all you crafters that have done this, make it look so simple. But by trial and error, I came up with a design that I loved! While, the Deck the Halls version, is design with Christmas in mind, the gold and silver Peace on Earth is a style they can stay on display throughout New Years! And the best part is no matter how long the candle is glowing, the flame will never ruin the stamped image! Why? Glad you asked, because the candles I used are battery operated!!!
The process is simple, but you definitely need to take you time and practice on a few before you get it just right! You will need a few things, tissue paper, wax paper and a heat tool. First stamp your design on the tissue paper, cut the image out leaving a very small border. Place the tissue paper on the candle. Take a piece of wax paper and cut to the width of the candle, but leave it long so you can wrap the wax paper and hold everything tight! Gently heat the stamped area. You will see the wax begin to melt and look wet and shining, keep moving the heat tool around until you see the tissue paper dissolve. Make to not heat in one area to long! The wax will melt to much and the image will look blotchy. When using the battery candles, see if they are all wax, or wax over plastic, this makes a difference too. If the candle is wax over plastic, and you heat too long in one spot, the plastic will be exposed. 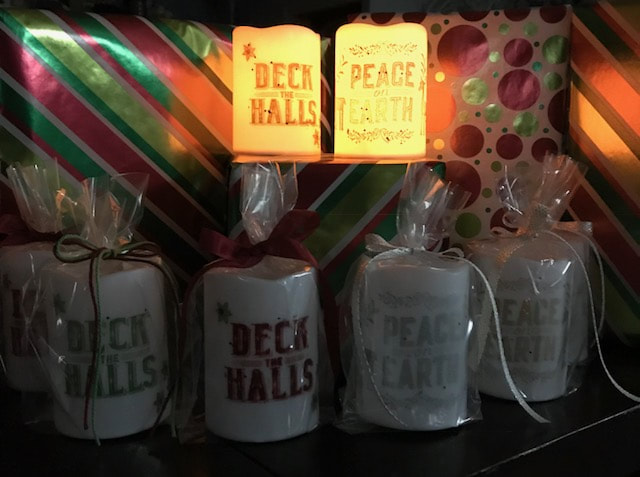
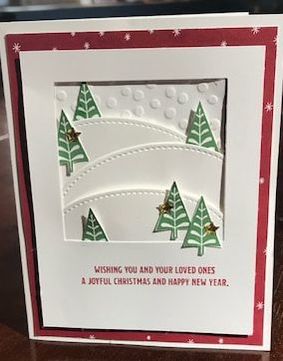
My card was fun to make!
I layered stitched ovals and used the layering square framelits to cut out the opening on the card. I cut out the trees from the Merry Mistletoe stamp set and the paper is from the Be Merry DSP. I hope you liked my projects and card! Be sure to leave a comment! Merry Christmas, Happy New Year and Happy Stampin Steph 
Oh My Goodness! Wasn't Barbara Welch's projects amazing! Barbara is so talented! It's very exciting to follow after her in our Blog Hop!
This month, I am sharing a really fun, and super easy, gift giving project! For this month's hop, we have a Thanksgiving Theme. My project is more of a Fall/Winter Survival kit. As we head into the colder months, it's fun to give a little pick-me-up or someone who might be feeling a little down or under the weather. And well, there is just so many items you could add to this kit. So before I get started, we have 13 crafters this month (including myself) so be sure to check out everyone's blog. Leave a comment about what you LOVED about my projects and include #SFbloghop2017 on your comment! And we will choose 1 lucky winner at the end!! Scroll down to see the blog hop prize!!! Sue Lovejoy was the the winner of last months hop! Congratulations! If you get lost along the way or not sure whose blogs you may have missed, a full list of participants are at the end of my post. 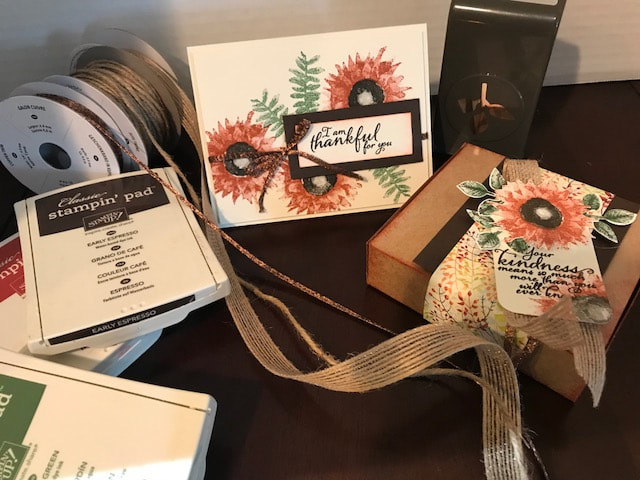
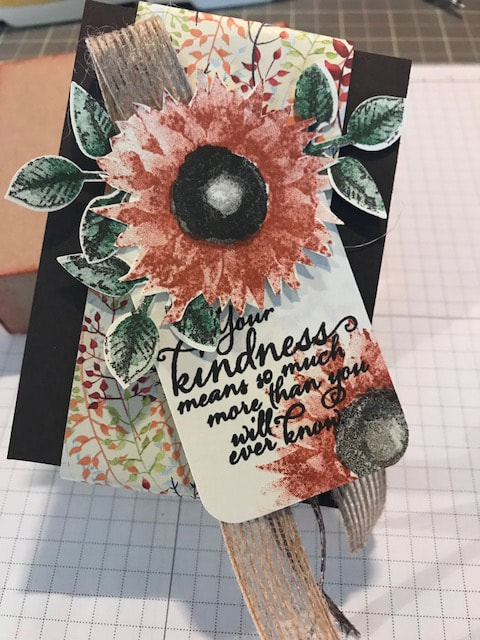
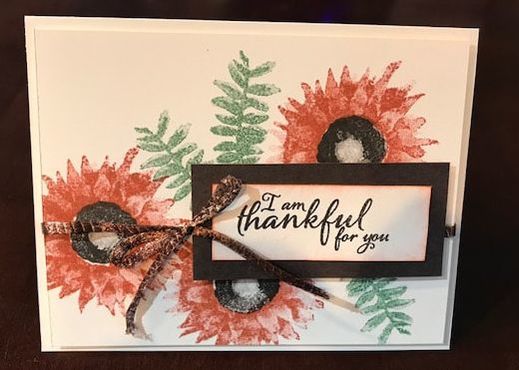
Stampin' Up's Painted Harvest Suite has been one of my favorite line of products in the Holiday Catalog!!! The images on the Painted Autumn DSP is just amazing! The designs just pop off the paper! My projects feature products from this suite! I used Very Vanilla and Early Espresso cardstock along with Early Espresso, Cajun Craze and Garden Green Ink pads. I knew I wanted to put together a little pick me up kit. I included a hand sanitizer, a couple packs of herbal tea, candy and a lip balm. I thought great I will use the new pizza boxes only to realize it was too small!! So I made my own box. 
I will admit, I typically can not come up with the measurements to make a box to save my life! But this time I was focused and figured it out! I am sure there are many boxes like mine...but I designed this size specifically for my contents.
So, what do you need? A piece of cardstock that measures 7x12. I used kraft paper because of the color and weight! With the 12" side horizontal, score at 1 1/4, 5 1/2, 6 3/4 and 11. Turn the paper so the 7" side is on top and score at 1 1/4 & 5 3/4. As you can see on the picture to the left, you will need to fold and burnish your score lines. You will notice there is one end that is a 1" fold and the other end isa 1 1/4". The 1" end will be your lid.
It will tuck in when the box is closed so it won't matter that it is 1/4 shorter. Remove the 2 outer edges from the 1" edge. Cut up on your score lines and add adhesive to the outside of your flaps. And assemble the bottom of your box. Tuck the lid closed. See pictures below.
I sponged the edges of the box in Cajun Craze just to add color. To keep the box closed, although it will stay closed without it, I made a simple belly band to go around.
I cut a piece of DSP 2x12 and added a piece of cardstock that was 3x4 under it. I stamped the flower in Cajun Craze, I stamped of before stampin each layer of the image. I fussy-cut the flower out. Then I stamped 3 leaves in Garden Green and added the veins in Early Espresso, punched them out with the Leaf Punch. Cut a 2" strip of Very Vanilla for the tag. Trim it to the length you want. I repeated the flower at the end of the tag and rounded the corners. I used a piece of 5/8 Burlap Ribbon and Copper Trim to sit behind the tag before adhering to the belly band.
The thankful sentiment is stamped on a piece of Very Vanilla that measure 1x2 1/2, layered on a piece of Early Espresso that measures 1 1/2x3. Adhere to the card with dimensionals.
And there you have it. My projects for the Thanksgiving Blog Hop by Stampin Friends. I hope you Loved it. 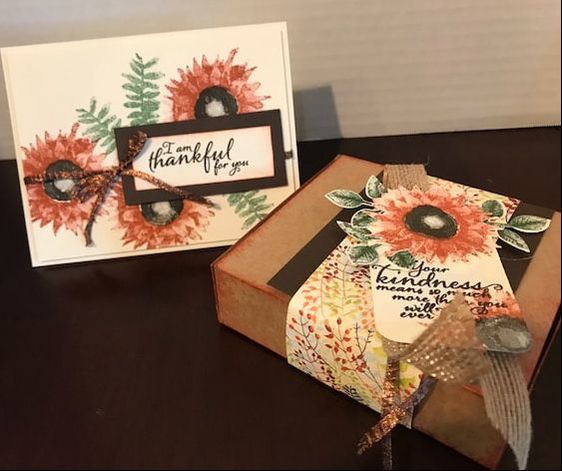
Be sure to leave a comment telling me what you LOVED about my projects and include #SFbloghop2017 and you will be entered for your chance to winner the Many Merry Star Simply Created Kit. WOW how amazing is that??
Thanks so much for joining us! I hope you had a great time! Happy Stampin Steph 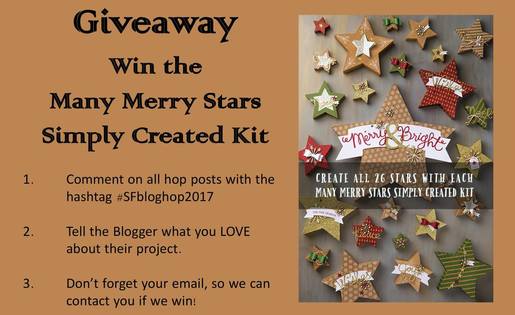
|


Categories
All
Archives
May 2024
|


 RSS Feed