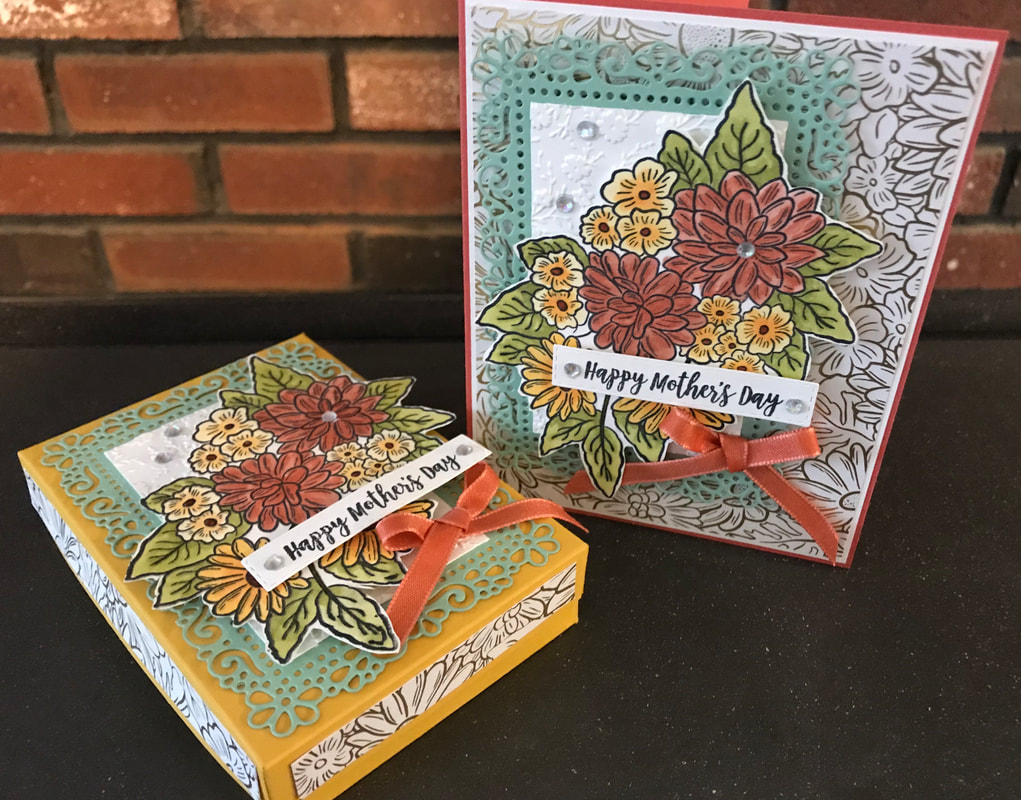
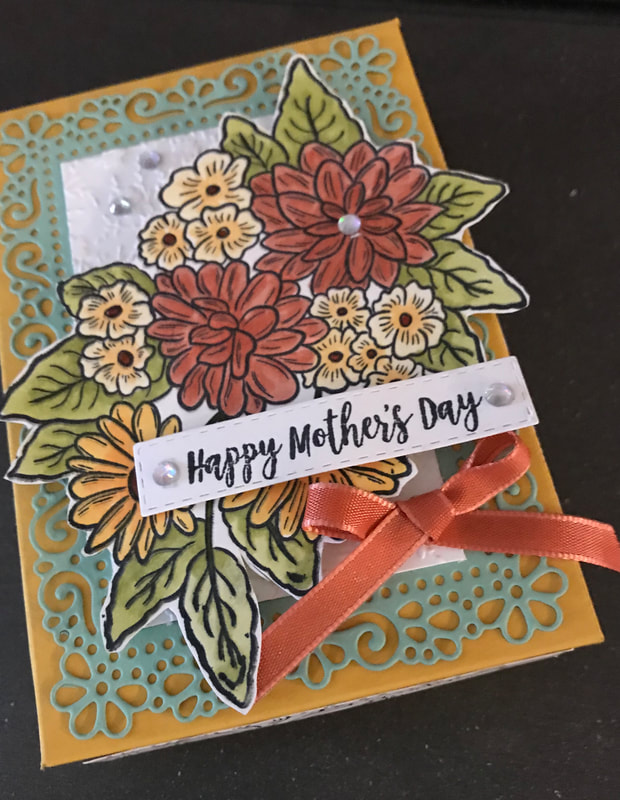
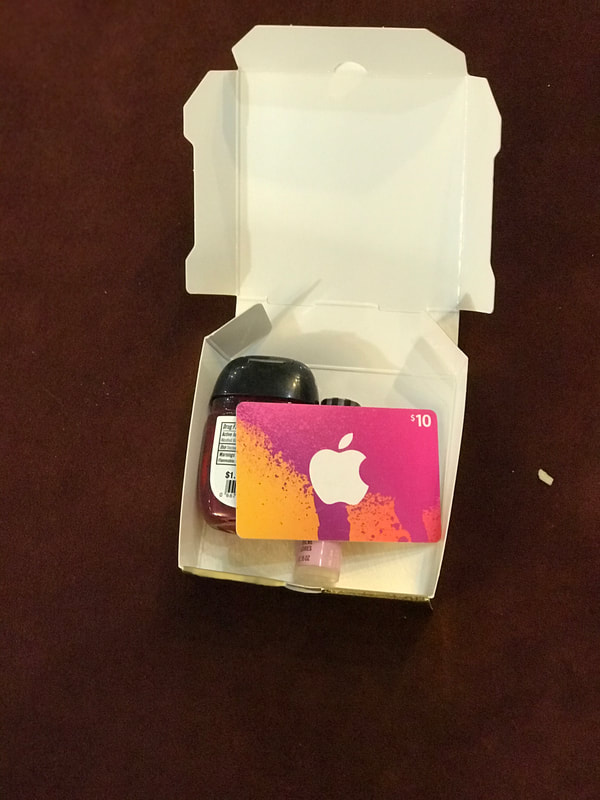
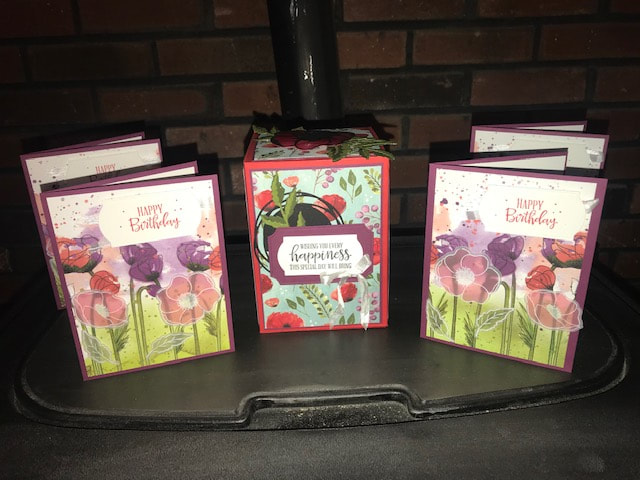
  Welcome to the April Stampin Friends Blog Hop!! We are featuring Flowers and Mom's in this month's hop. Be sure to hop along and visit everyone's blogs, if you get lost, be sure to scroll down to the end of each blog to find a list of hoppers. I hope you came from Melissa Thomas, didn't you just love her projects?? So great! After you view my blog, be sure to leave a comment!!! And then continue to Jo Blackman If you are not sure whose blogs you have visited, you can find a list of hoppers at the bottom of each blog! Mother's Day is May 10, 2020 here in the USA. So I decided to not only feature flowers, but to also make my projects for Mother's Day! At this point, not sure if my projects will be hand delivered or mailed. We will just have to wait and see! I've been loving the new Stampin Up Ornate Garden Suite. I chose this suite this month because it has so many flowers in this suite. And the big flower arrangement stamp was perfect! I made this easy adorable lidded box and matching card for you! SO let's dive right in!
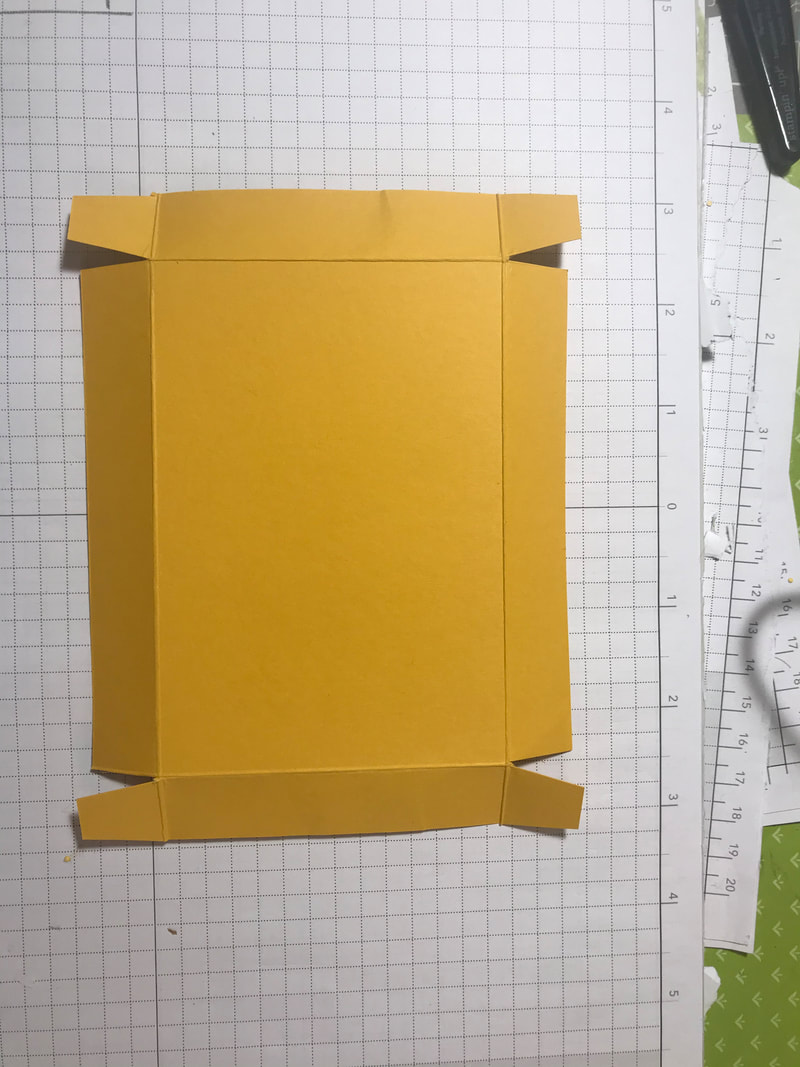
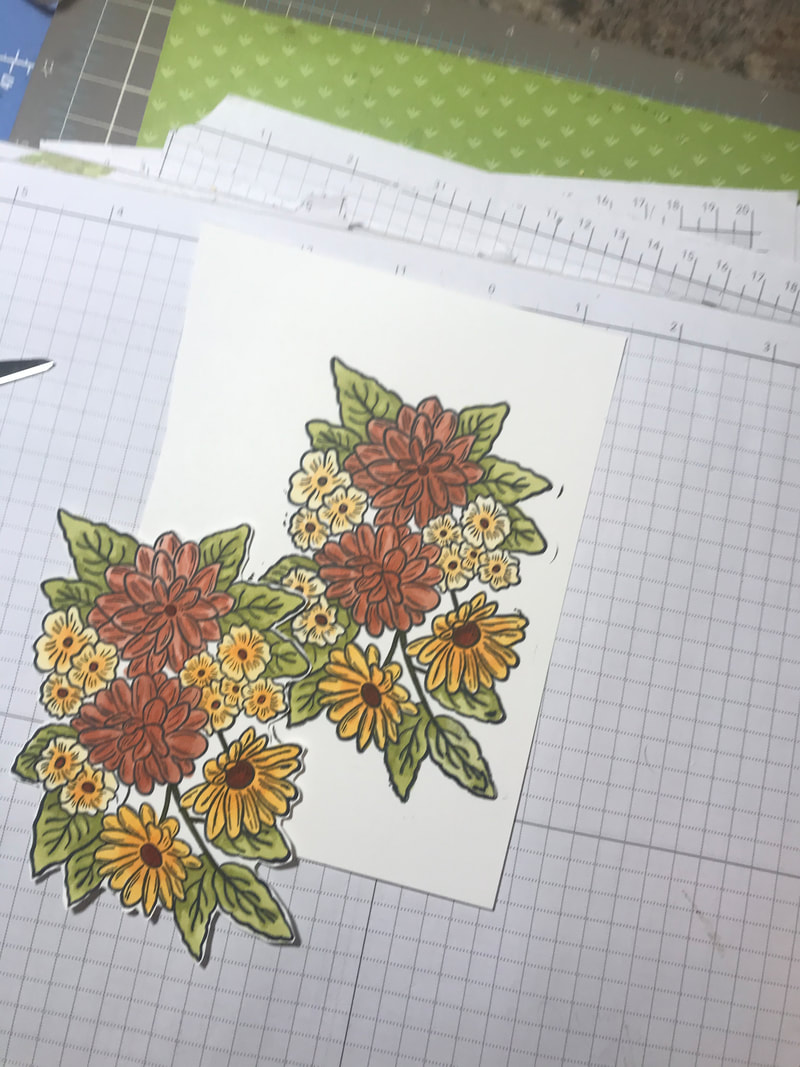
I cut the frame using the die from the Ornate Layers Dies. It is the second largest. Then I cut a piece of Whisper White to layer on top and embossed it using the Ornate Floral 3D Embossing Folder. I stamped the Flower image from the Ornate Style Stamp set in Black and colored with coordinating Stampin' Blends Markers; Calypso Coral, So Saffron, Daffodil Delight and Old Olive. Finished with some pearls and the Calypso Coral ribbon from the Ornate Garden Ribbon Combo Pack. Now I did all of this twice since I used the same design on the card. 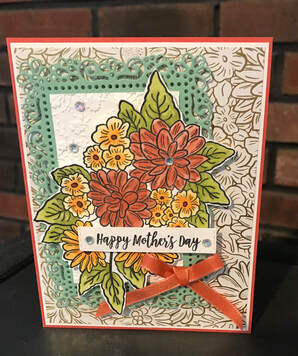 The box is a good size as you can see from the picture above, I included a travel tissue pack the and the lid goes on perfectly fine! You can tealights to this box too, so you can see just how much you can fit.
I made my card to match the box, so as I mentioned above, I stamped and cut the images twice so when I got the card, it was basically assembly. The card base is Calypso Coral. I added a layer of DSP first that measures 4 1/8'x 5 3/8". The DSP is from the Ornate Garden Specialty Designer Series Paper. I hope you enjoyed my projects today and I have inspired you to make one on your own! Please feel free to contact me with any questions!!! Be sure to check out the next blog during this month's blog hop, Jo Blackman! I'd love to hear what you think, so feel free to leave a comment!!! Take care Happy Stampin Steph
11 Comments
Welcome to the March Stampin Friends Blog Hop!! This month's hop is so much fun! We will be sharing projects that feature Congratulations, Graduations, Brides and Babies projects. Be sure to hop along and visit everyone's blogs, if you get lost, be sure to scroll down to the end of each blog to find a list of hoppers. I hope you came from Ann Marie Hile, didn't you just love her projects?? So great! After you view my blog, be sure to leave a comment!!! And then continue to Barbara Welch. If you are not sure whose blogs you have visited, you can find a list of hoppers at the bottom of each blog! 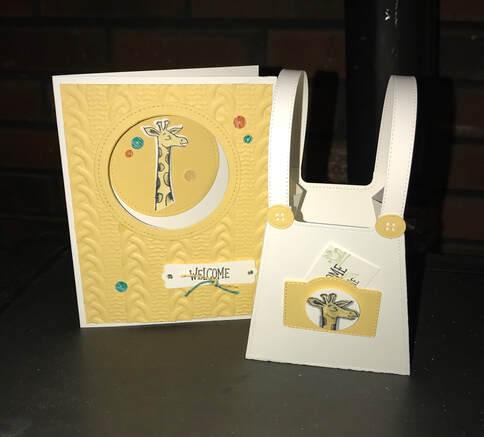
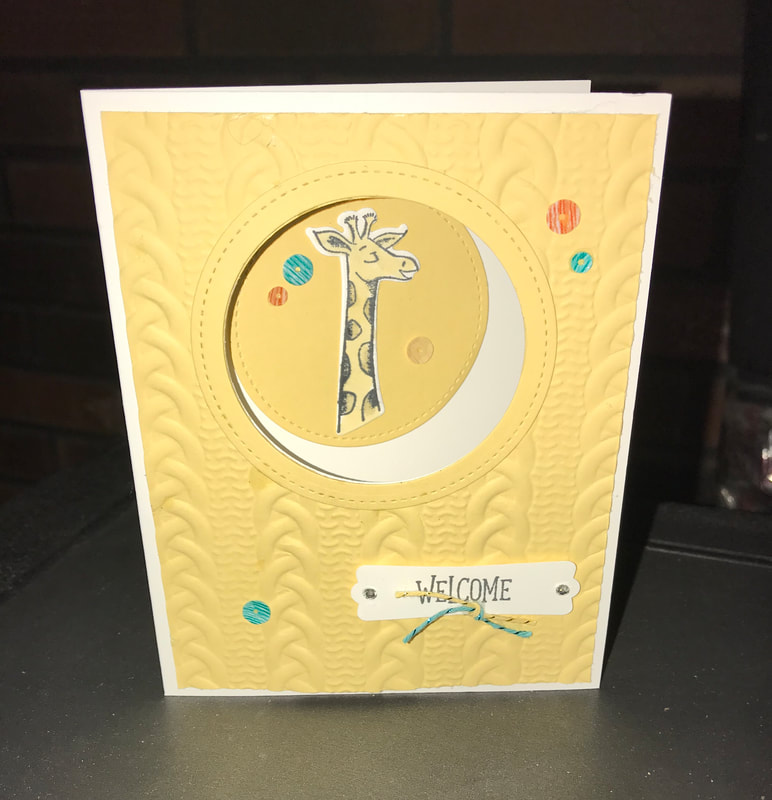
I used the stamp set by Stampin Up called Animal Outing. It's just so cute! I stamped, colored and cut out the giraffe. Created the window on the card and then embossed using a cable knit embossing folder. To make the opening on the card, I used a stitched circle die. and cut the layer first, then I centered the layer onto the cardbase, be sure the card is opened before cutting or yu will cut both sides, then cut out the circle. You can use the circle cut from the layer for the inside of the card. To created the circle border, I used a separate piece of paper, cut the small circle first and then aligned a larger circle over the cut part and that will create the ring the will fit perfectly on the card! Added some sequins and bakers twine and this card is done.
I hope you enjoyed my projects, I thank you for stopping by. Be sure to leave a comment and visit Barbara's blog!
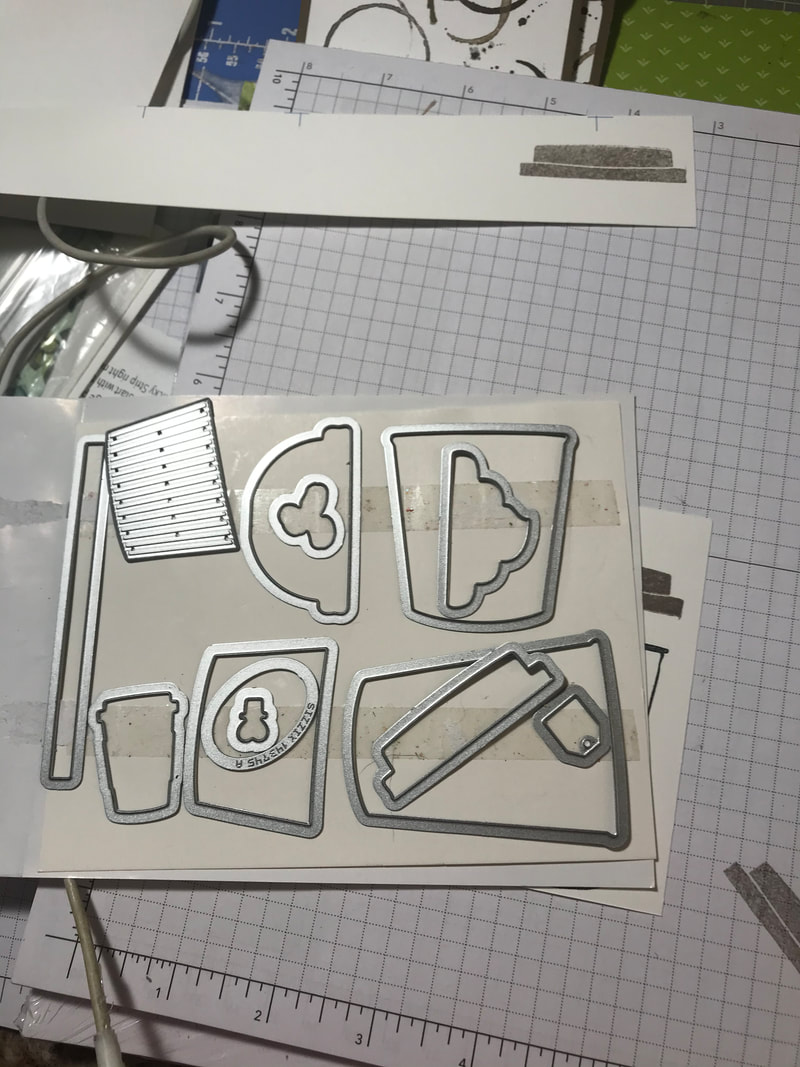
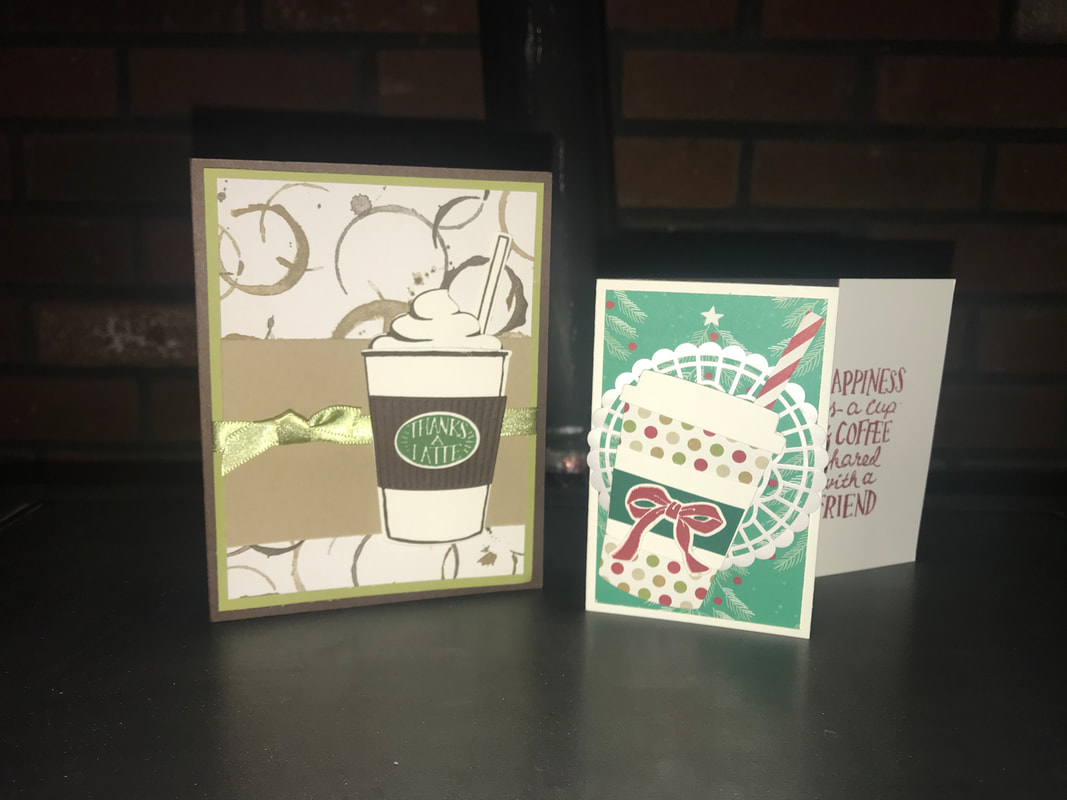
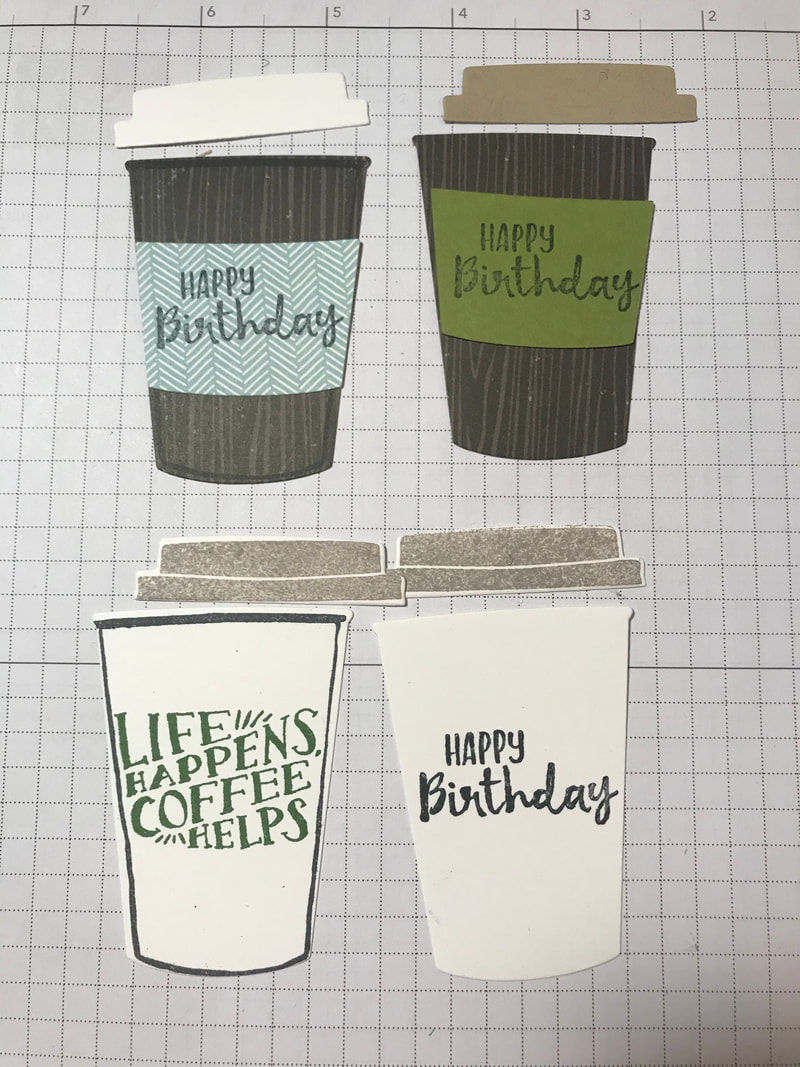
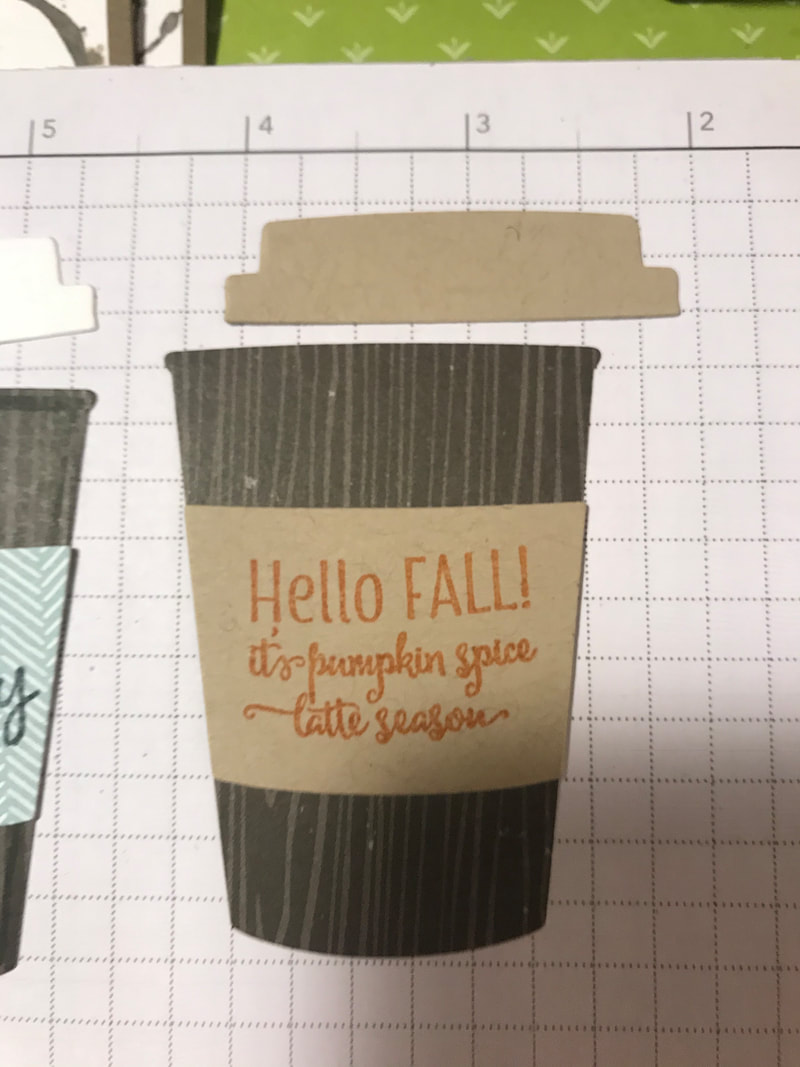
Happy Stampin Steph  Hello Crafters! Welcome to the February Stampin Friends Blog Hop!! I' so excited to share this month's hop with you! This hop is literally jammed with so many awesome projects by so many amazing hoppers. I just love this theme, I feel like I have my tried and true supplies and projects I just love to make over and over and it never gets old. Can you guess that our theme is Favorites. Be sure to hop along and visit everyone's blogs, if you get lost, be sure to scroll down to the end of each blog to find a list of hoppers. I hope you came from Jean Bolen Beaulieu, her projects were just awesome. After you view my blog, be sure to leave a comment!!! And then continue to Katja Ettig's blog. If you are not sure whose blogs you have visited, you can find a list of hoppers at the bottom of each blog! At first, I thought, how am I going to figure out my favorite crafting project or product? I was like there is way too many. But then I thought, what do I make the most, Gift Card holders!!! And the Coffee Cafe stamp set and matching dies is my go-to. I choose this set over and over and over for gift giving. It's the perfect set to use for coffee gift cards. I decided to combine Coffee Cafe with the new Best Dressed Suite. 2 of my favorite things, coffee and lipstick!!! 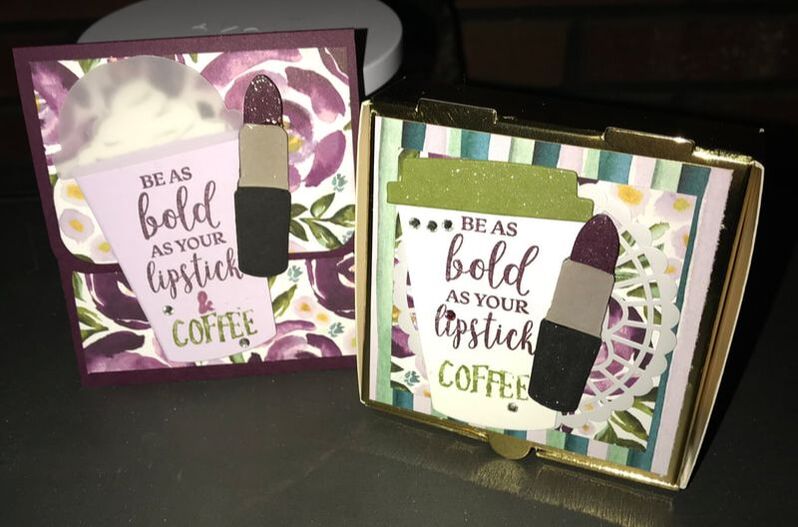
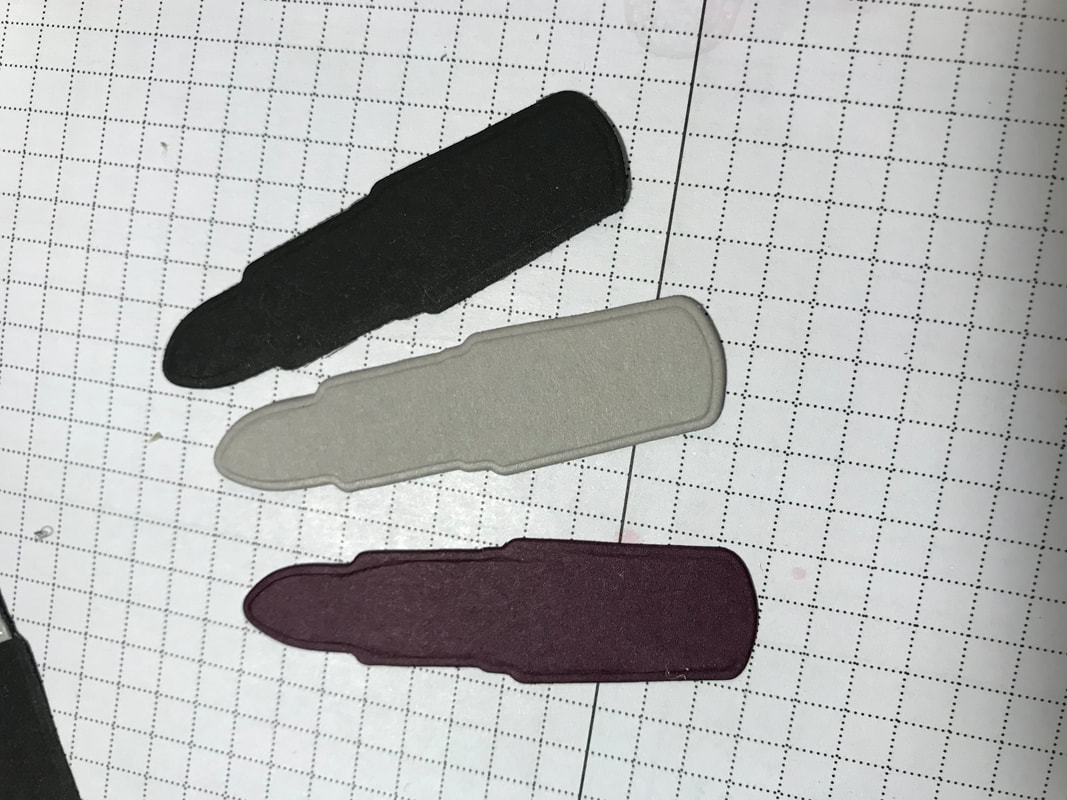
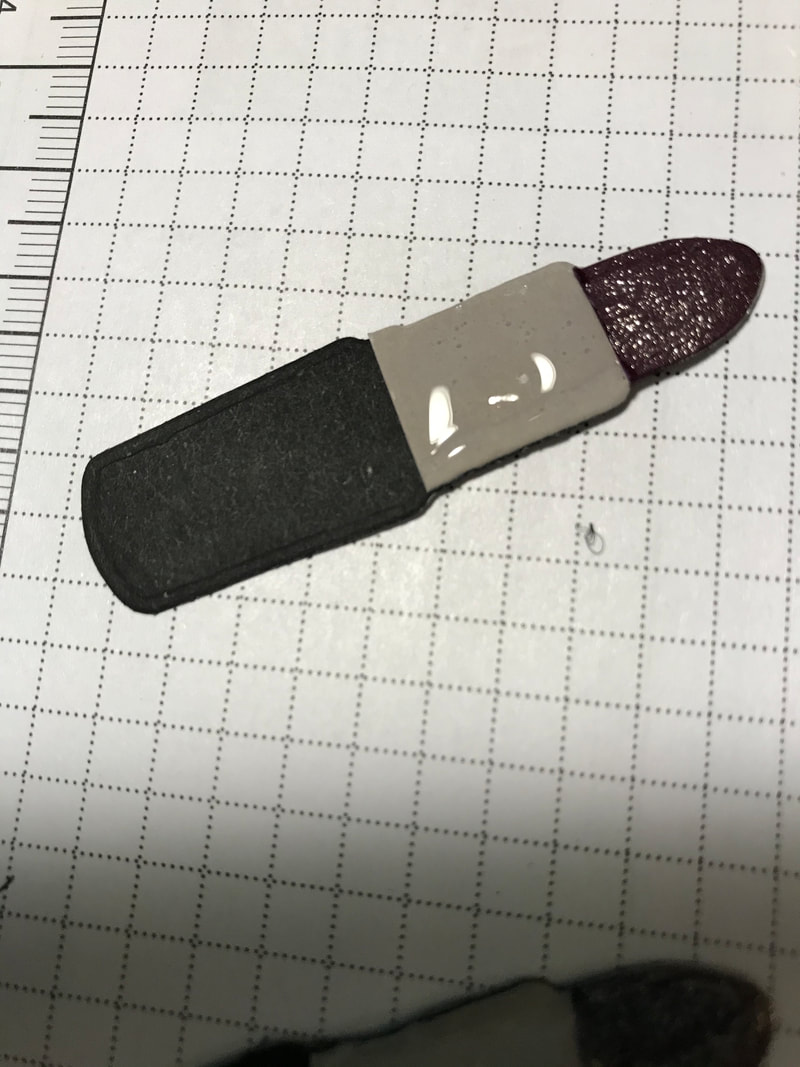
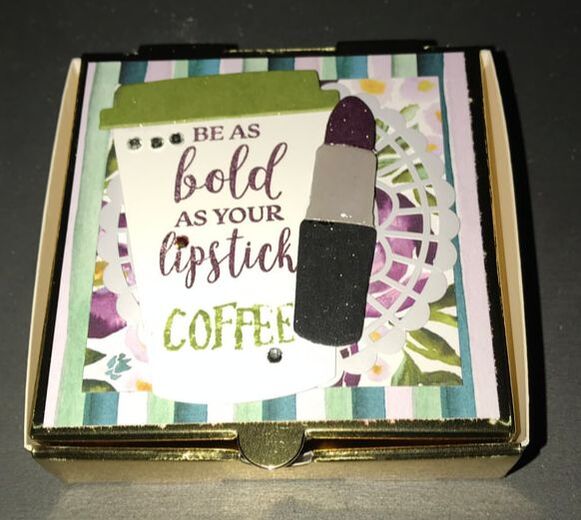
Be sure to keep the adhesive close to the edge so you can still add the gift card or folding money in the pocket. The DSP I used is from the Best Dressed Suite. I cut 1 piece at 3 1/4"x 2 1/4" and 1 piece at 3 1/4"x1 3/4". Adhere to the cardstock. You could create a belly band to keep the holder closed. But I used a little velcro dot and adhered it to the top flap. Use the lipstick die, from the All Dressed Up framelit set, to cut 3 lipstick tubes, I used Basic Black, Smoky Slate and Blackberry Bliss. Cut off the tip in Blackberry Bliss and cut the bottom off the Smoky Slate, and then layer them together. I added Wink of Stella and Glossy Accents to give a little more dimension. See photos below. I used Purple Posy for the cup base, I cut out the dome lid in vellum so it looks more like the clear lids, and then Whisper White for the whipped cream. I added a little whisps of Smoky Slate so it looks real. The greet was so fun, I stamped the Be as bold as your Lipstick from the Dressed to Impress stamp set in Blackberry Bliss, then I took the greeting 'Happiness is a cup of coffee shared with a friend' from Coffee Cafe and just used my marker, colored, just the word "COFFEE" in Old Olive and stamped it at the bottom, I wrote in the &. Now my greeting says Be as Bold as your Lipstick & Coffee! I Love it! So much fun to make and so easy. I know my girls will be grabbing these for any upcoming parties for friends.
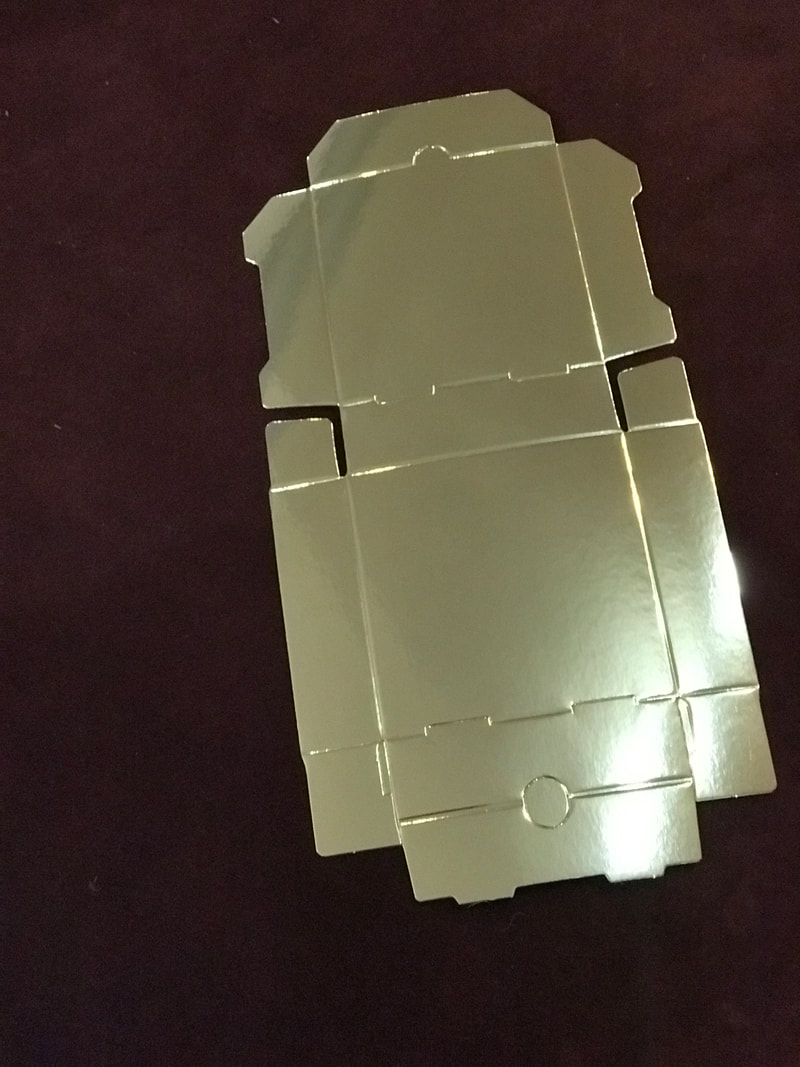
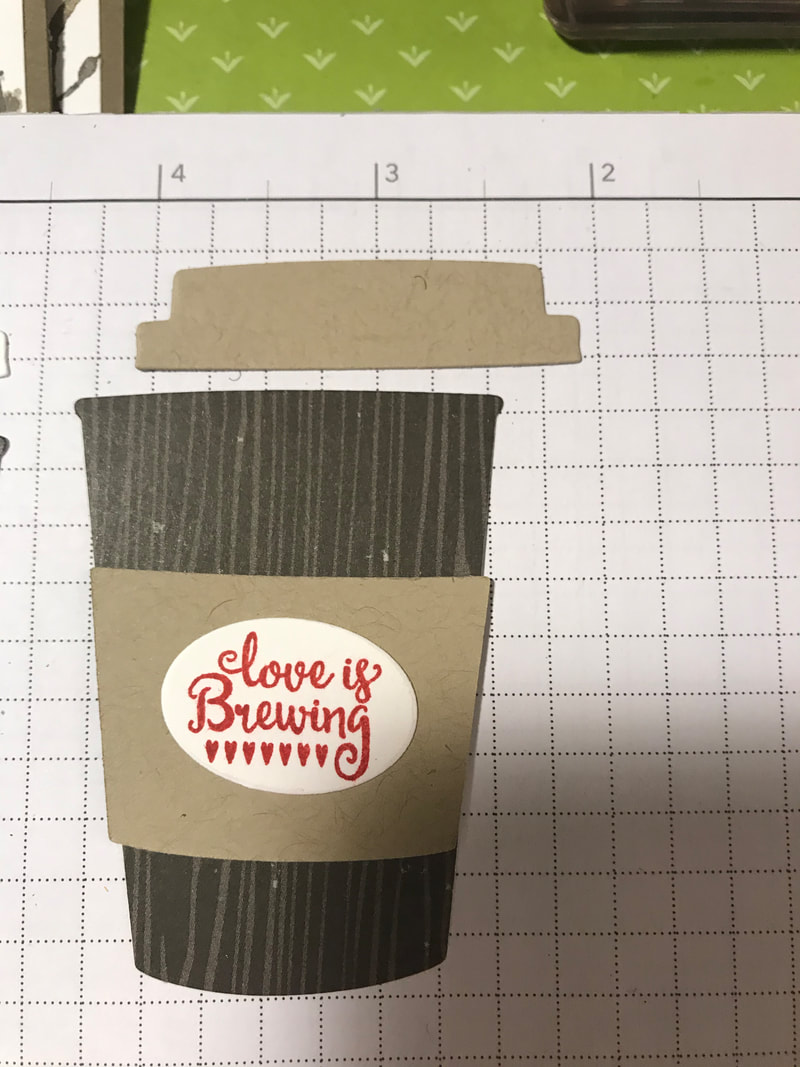
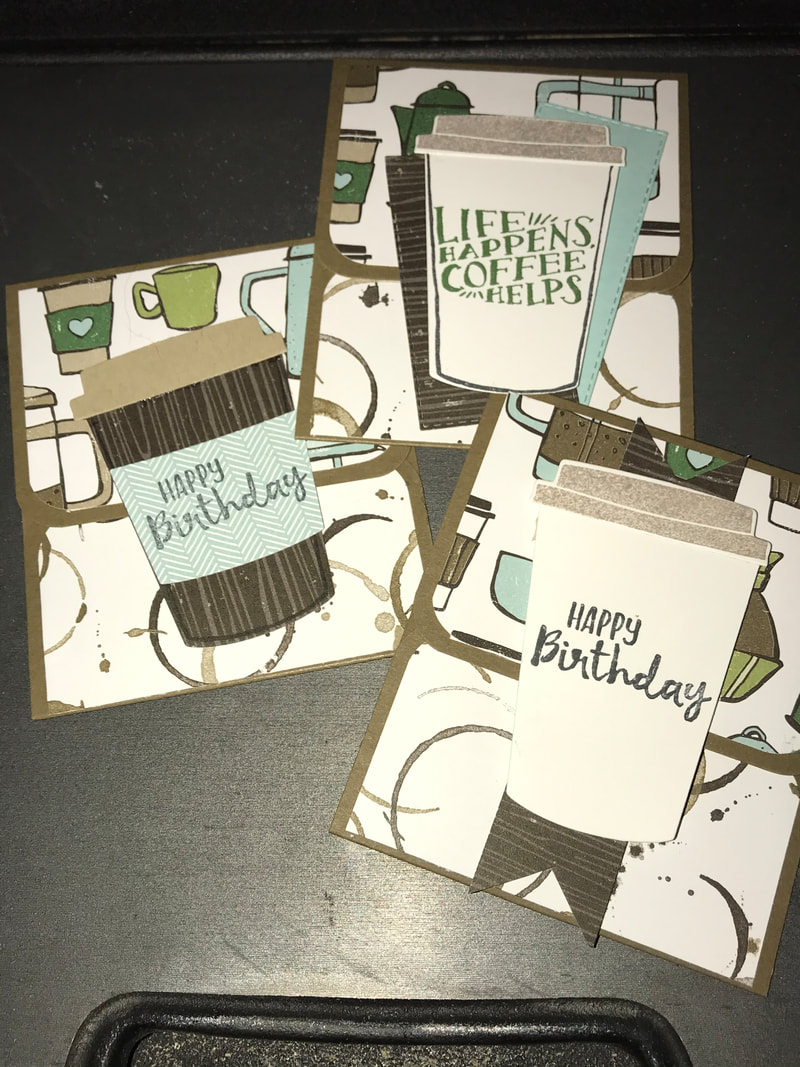
The DSP was cut at 3 1/4"x3 1/4" and 3"x3". I created the lipstick the same way as before. The coffee cup is in Whisper White, but I did the greeting the same and the is in Old Olive. I added a Doily I had on hand and there you have it, done...Super easy. Now, if you needed a white pizza box only had gold, you can fold the score lines opposite and have the white inside, become the outside. 2 in 1. As you can see from the picture below, you can fit a good amount of stuff inside and a gift card fits too!!! Below is just a few projects I used with Coffee Cafe, there's just so many. And if you have this set and need ideas, feel free to use these and there is tons more on Pinterest. I hope you enjoyed my "Favorites" be sure to leave a comment, I'd love to hear what you think.
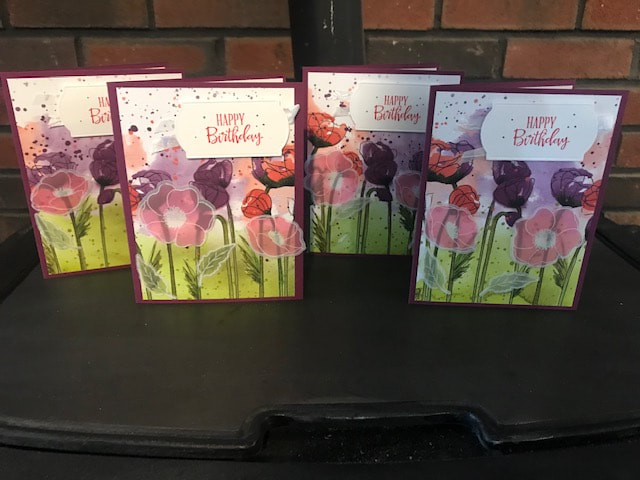
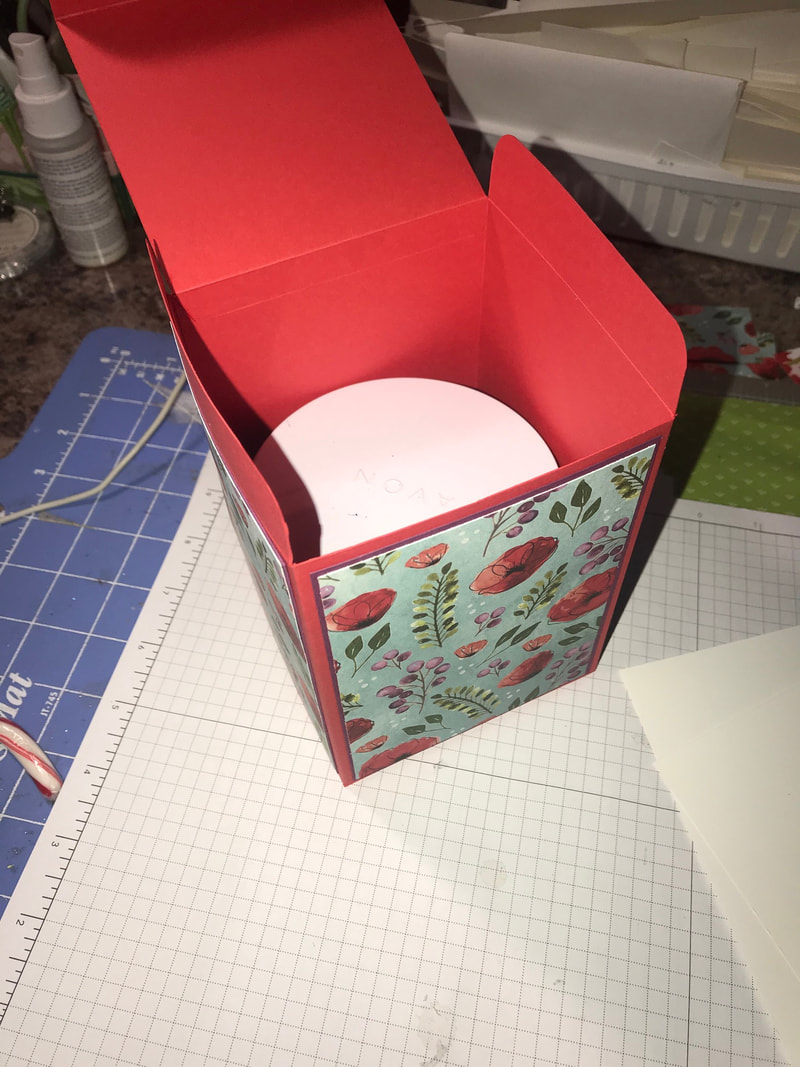
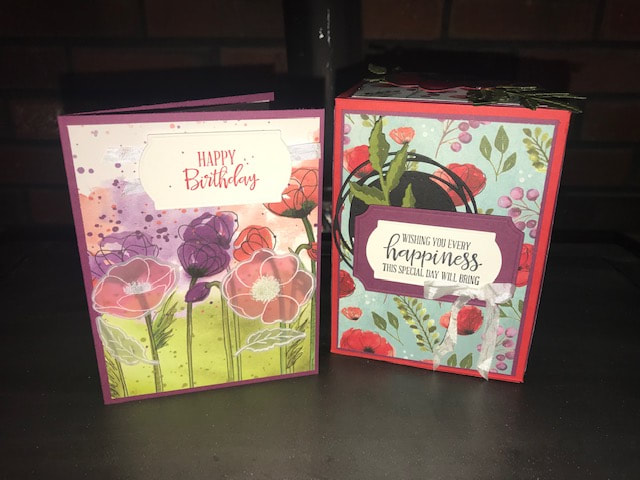
Continue along the hop to Katja Ettig's blog. She is amazing and you won't want to miss her projects! Welcome to a new year and a new 2020 Stampin Friends Blog Hop!! We have so many amazing new hoppers joining us. We are jammed packed with new projects to share with you as well. The Birthday Bash theme is perfect to kick of the new year and have you ready to go with all your birthday events in 2020! Be sure to hop along and visit everyone's blogs, if you get lost, be sure to scroll down to the end of each blog to find a list of hoppers. I hope you came from Jo Blackman's blog, wow weren't her projects Awesome?? After you view my blog, continue onto Katja Ettig's blog, you're going to blown away. So let's dive in! 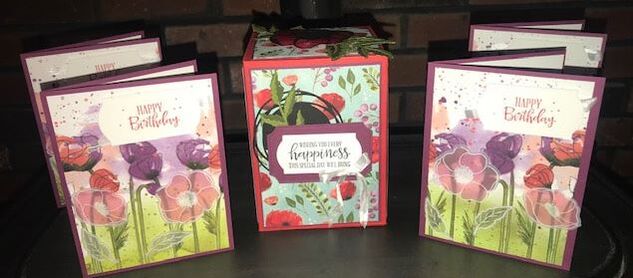 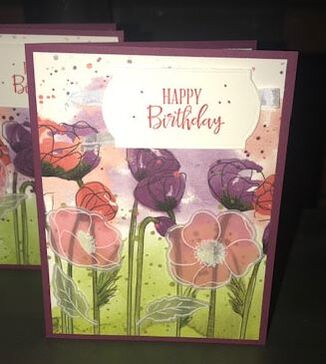 Today I have two fun projects for you using the new Stampin Up Peaceful Poppies Suite from the mini catalog. This Suite features not 1 but 2 stamp sets with coordinating dies. I think it is so pretty, I couldn't wait to use it! The card was made using Rich Razzleberry as the card base and features the Peaceful Poppies DSP. Isn't it pretty? The Happy Birthday greeting is from the new Peaceful Moments stamp set included in this bundle. The flowers and leaves are from the Painted Poppies stamp set. I stamped on vellum with Versamark, and embossed the images in white. The flowers and leaves were cut out using the coordinating dies, Poppy Moments. If you were browsing through the catalog, you may have noticed this card with a different greeting! I actually made a whole bunch of these cards as part of a swap for a Stampin UP group I am in. My next project is this huge box!!! I love to give candles to friends and families and normally I would just grab a giftbag and add a tag! But I thought what about a box. No problem right?? After a few failed attempts of trying to make a box on my own. I was ready to throw the towel in.
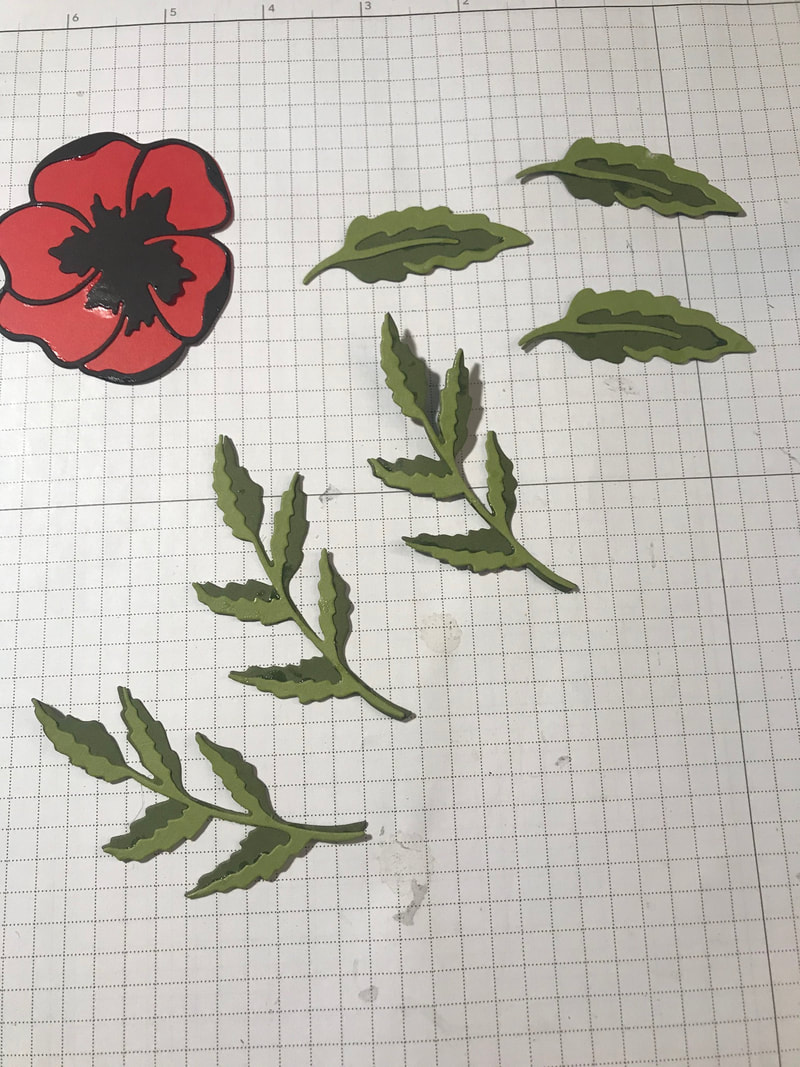
The flower and leaves were cut out with the Poppy Moments dies. I used Poppy Parade, Basic Black, Mossy Meadow and Old Olive. I layered them together and used the Fine Tip Glue Pen on the top of the flower to give it a shiny look. And I brushed the leaves with the Clear Wink of Stella. I hope you enjoyed my projects. Be sure to leave a comment, I will love to hear your thoughts!
Continue throught the Stampin Friends Birthday Bash Blog Hop by clicking here to go to Katja Ettig's blog!! Thanks for stopping by Happy Birthday, Happy Hopping and Happy Stampin Steph  Welcome to this month's Stampin Friends Blog Hop!! This months theme is Thankfulness! Be sure to hop along!! We have amazing projects prepared for you to help you during this season of Thanks! You can find the list of participants at the end of my blog post! I have prepared 2 projects for you today, 1 a home decor piece using a glass block and 2 a card using Stampin Up products! I have had this glass block on hand since last Christmas, and I've really wanted to decorate it! There are so many ideas on Pinterest! So I started there. And well this sort of just evolved. I am definitely out of my comfort zone so I had a tendency to overthink this whole thing! A few times I was like "I'm done. I'm not making it"..... 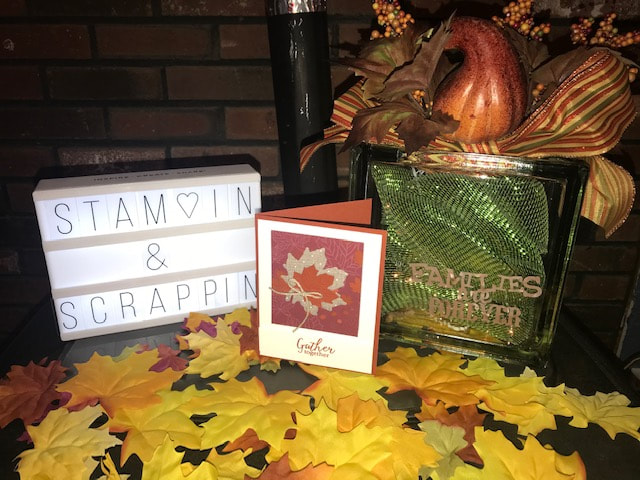  I am glad I stuck to it! I found the Families are Forever greeting from an old Cricut cartridge called Just Because Cards. I cut the greeting on Silver Vinyl and sponged over it with Cajun Craze ink. I used a heat tool to help set the ink! A more permanent ink like StayzOn probably would have dried better. But I really like the affect. It has a little bit of an aged look. On the inside, I added white rice lights, wrapped in a olive green mesh ribbon. I should have used a longer strand of lights to give a more glowing look. But this still gives a nice glow when the lights are down. For the top, I used small fall picks and ribbon. I added the ribbon first and then built around it. The middle decor piece is a small gourd. I'm sure a pumpkin would look nice too!
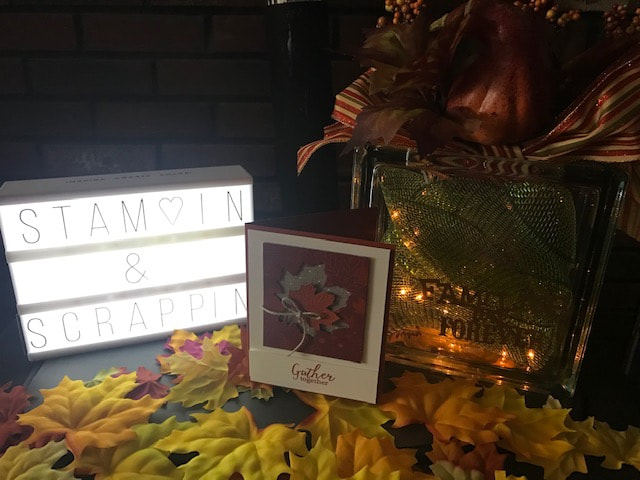 I hope you like my projects! Please leave a comment and tell me what you think! Be sure to continue with the hop to see all the wonderful projects. Below is a list of our participants! Thanks for joining us! Happy Stampin, Happy Fall Steph

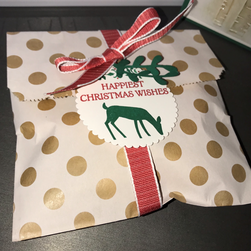 If you lose your way while hopping, you can scroll down and see the list of hoppers! Did you just come from Chery's blog? Wasn't her projects amazing!!! Be sure to continue to Anne Marie's after you finish! Today I am certainly taking advantage of the anything goes theme with a little Christmas in July!! It's never to early to start planning cards and gift packing! I have prepared for you a Christmas card and a little treat bag. I found these adorable bags at Walmart on clearance! They a good size!!! The rest of products used are all current through Stampin UP. I used the Dashing Deer Stamp set from Stampin Up on both the giftbag and card. I stamped the deer in Shaded Spruce, the greeting in Real Red and I colored the little holly strip with Real Red and Shaded Spruce markers and cut this out using the Layering Circles dies. I wrapped the bag in the Poppy Parade Textured Weave Ribbon and finished it with a bow! 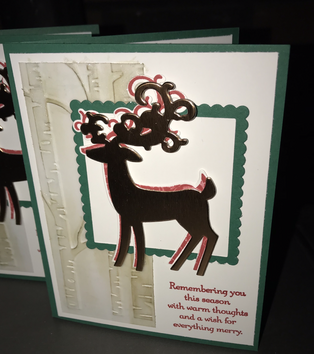 For the card I added the matching Detailed Deer dies and cut out a deer. The card base is Shaded Spruce layered with Whisper White. I used the Layering Squares dies to cut out the 2 squares. I also stamped a deer in Real Red and cut it out with the matching die. I used the Woodland Embossing Folder and embossed on a piece of vellum and then sponged over the images with Sahara Sand ink. I also added a little Wink of Stella over the trees to make them glitter, unfortunately you can't see it in the pictures!. I hope you enjoyed the projects I have prepared for you! I'd love to hear what you think, so please be sure to leave a comment below!
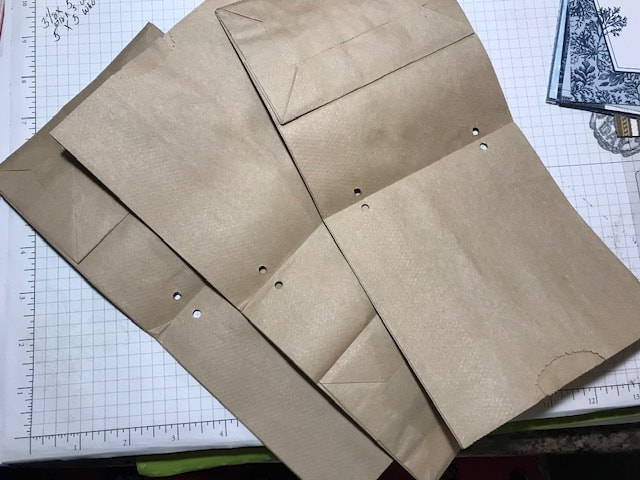
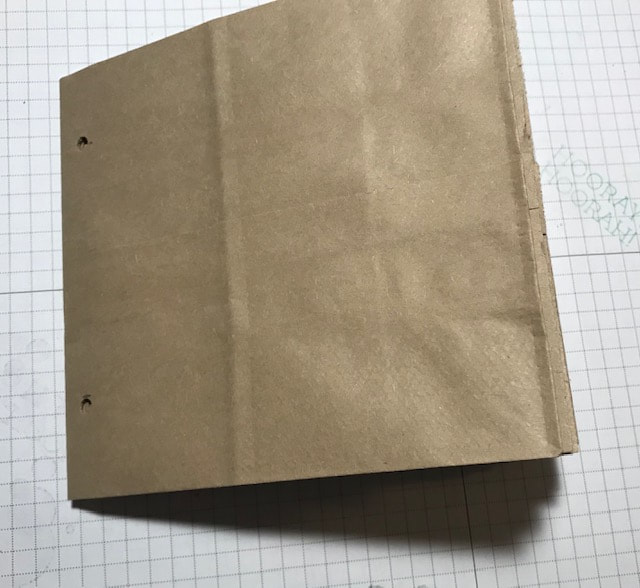
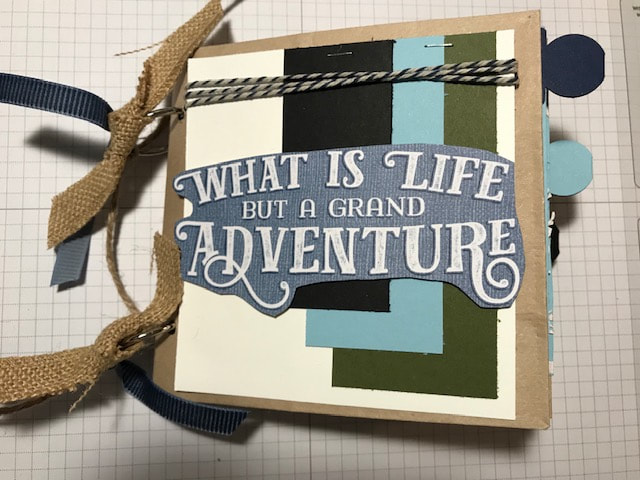
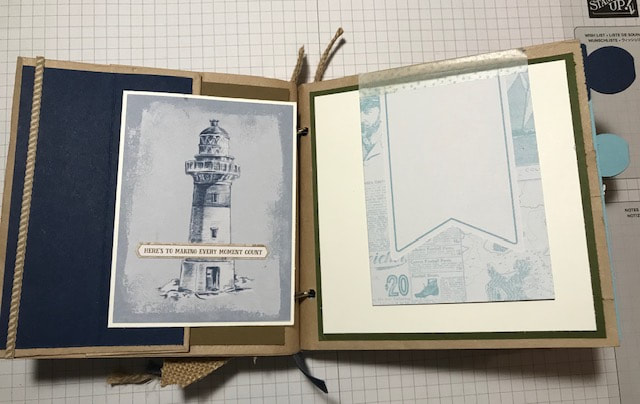
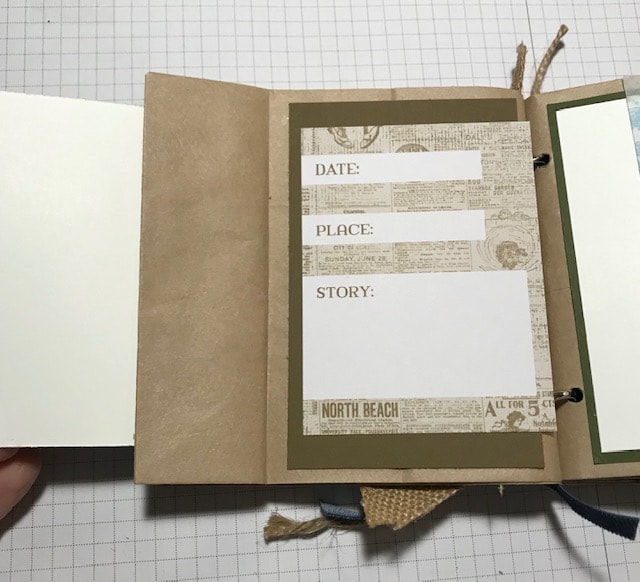
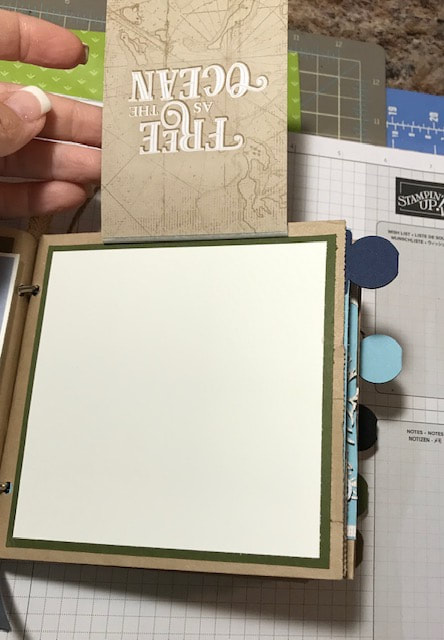
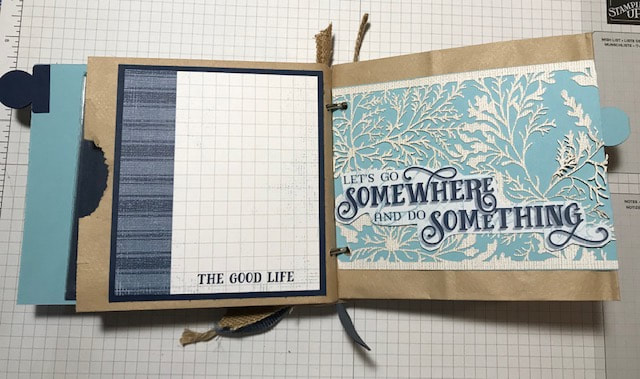
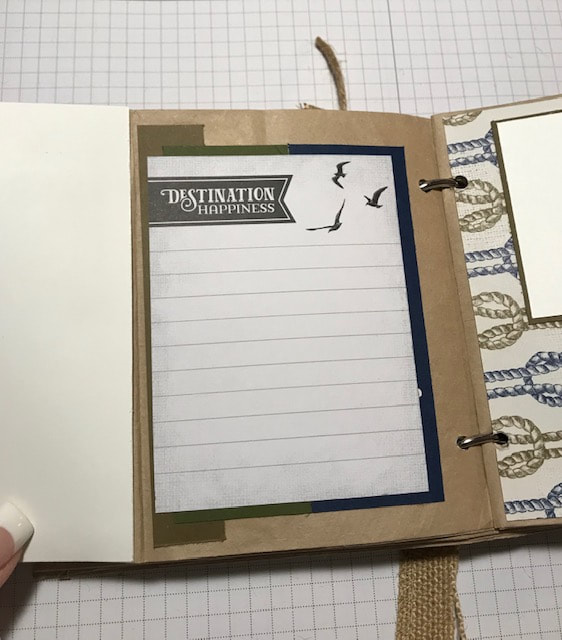
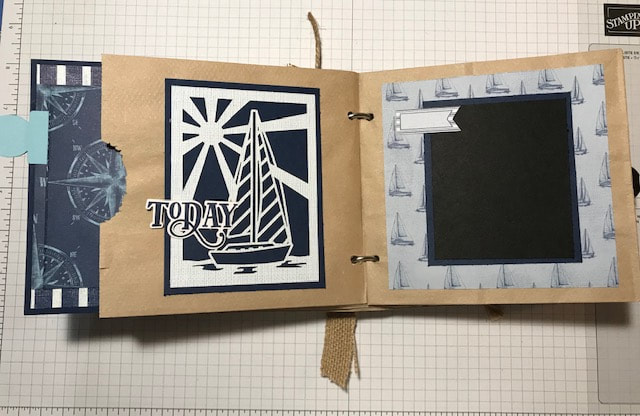
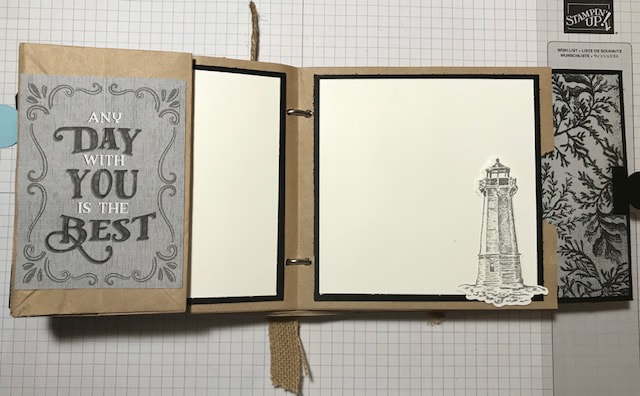
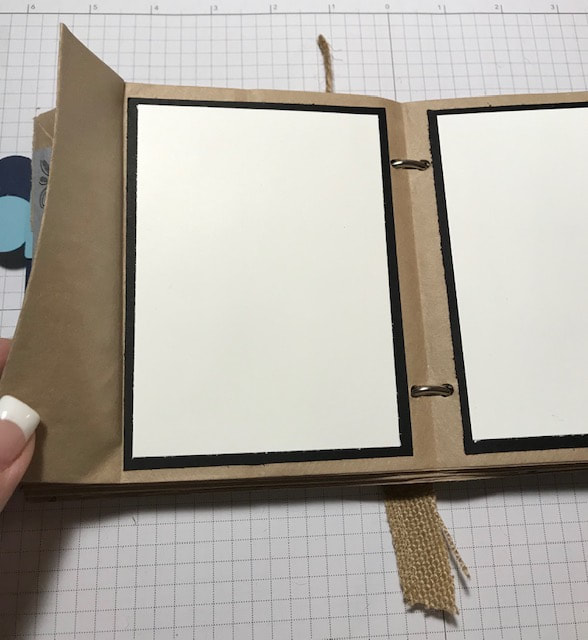
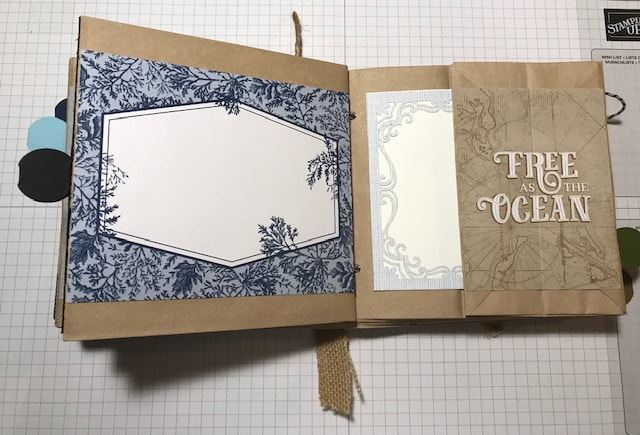
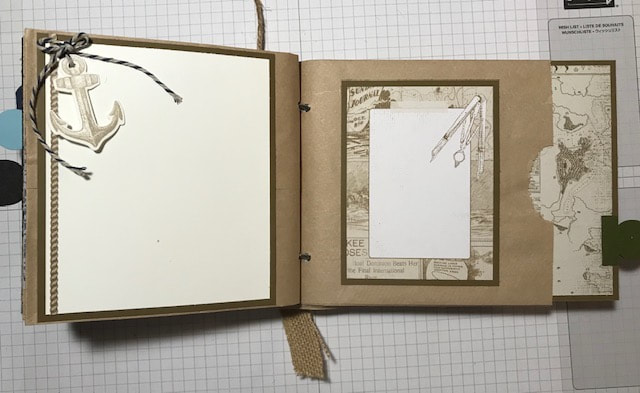
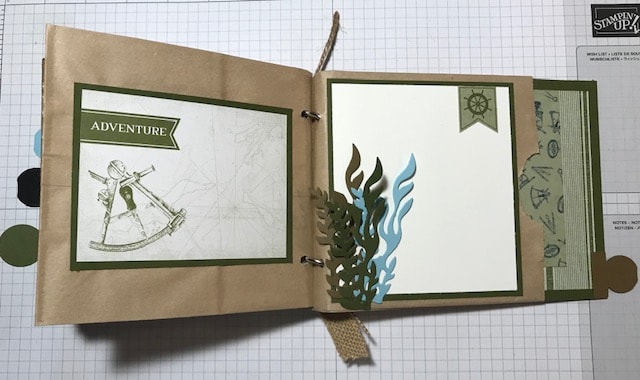
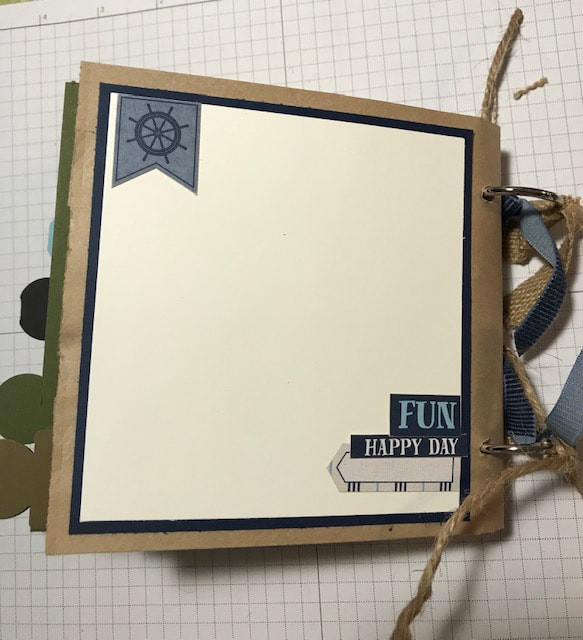
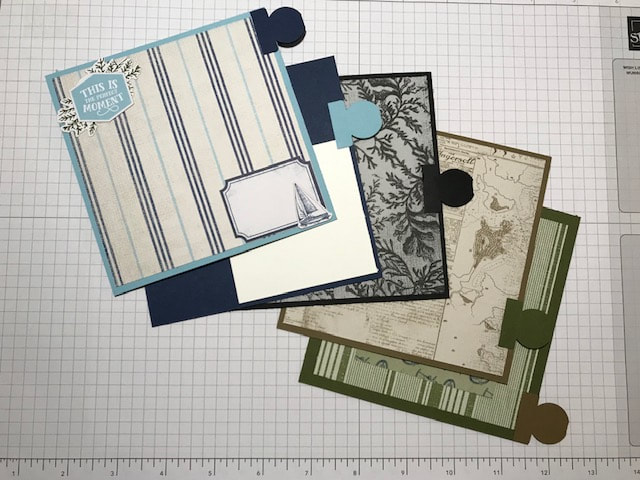
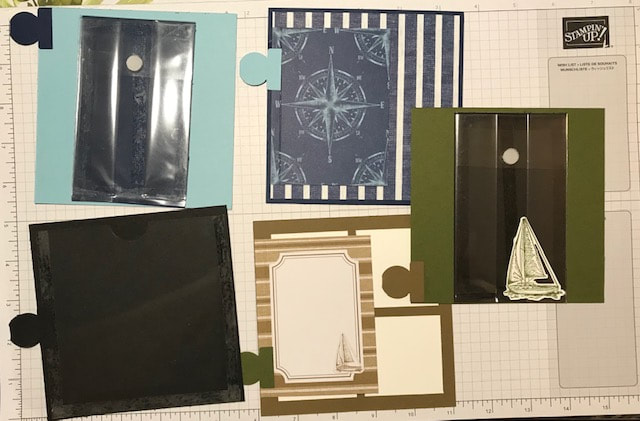
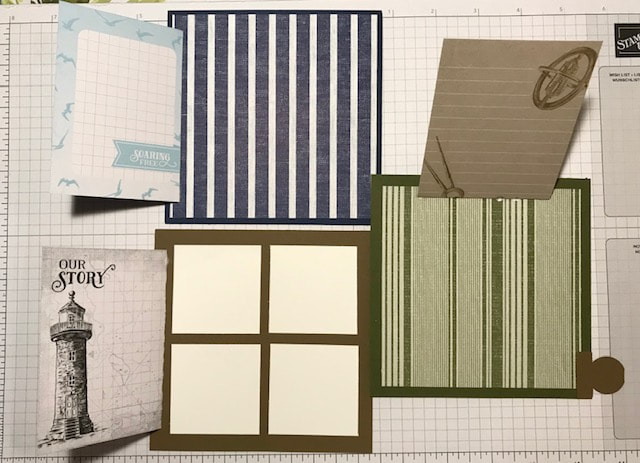
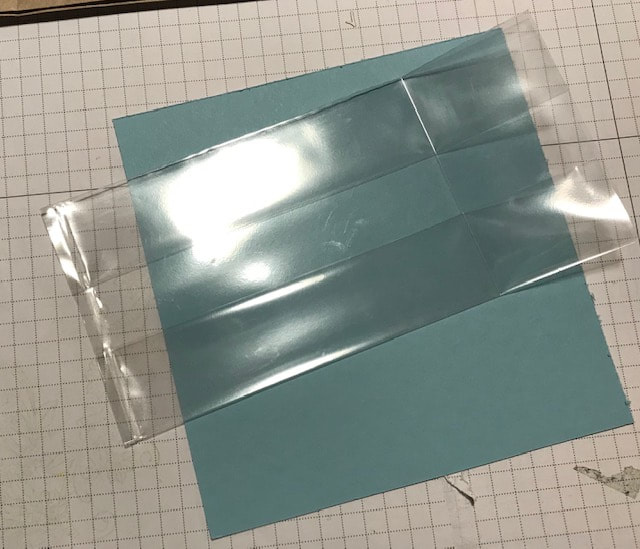
Thanks so much for stopping by! Happy Stampin Happy Christmas in July! Steph Welcome to our Stampin Friends June Summertime Blog Hop. I am so excited to share this month! School is out and sports are over! So I was able to design a little more this month, than I normally have time for! As you can tell, this month's hop showcases projects that have a summertime theme! Be sure to check out all our wonderful crafters and their amazing projects. Did you come from Maureen Rauchfuss's blog? Her projects were awesome! Be sure to continue to Barbara Welch's blog once you have finished viewing mine!!!  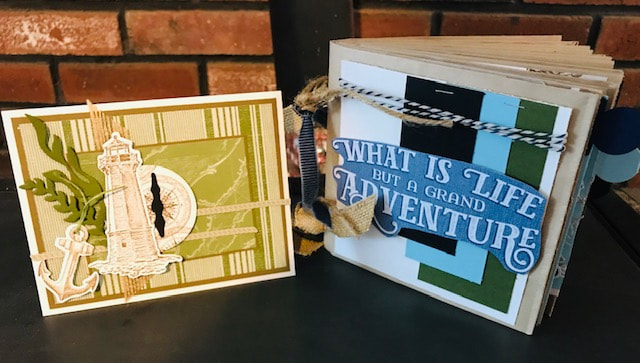 I am really happy with my project this month and I hope you enjoy! I made a travel album from brown paper lunch bags. Super easy! The projects feature products from the Come Sail Away Suite! Brand new in our Stampin Up Annual Catalog. I used coordinating cardstock colors; Balmy Blue, Basic Black, Mossy Meadow, Night of Navy, Soft Suede and Whisper White. The first thing you need to do is figure out how many bags thick you want to make your album. I used 5 brown bags. Then fold each bag in half and make sure you burnish the folds so the bags sit flat! Lay them one on top of the other alternating top and bottom of the bags. Once they are stacked and folded (make sure they all line up on edges or when you punch your holes the bags will be off), use a heavy duty hole punch or Cropidile. I measured from the top and bottom about 1" in and punched. Now for decorating I used the Come Sail Away Memories and More Cards, as well as the Come Sail Away Designer Series Paper. I basically looked through the cards to see what I wanted to use and then just went from there creating photo & journal layouts! Now, let's not forgot that with the bags folded in half, the top of the bags (the open ends) become a pocket. You can leave them empty, but what fun is that! I created 5 cards for the 5 pockets. Each card is a 5x5 piece of cardstock. I used the Circle Tag Punch to create the tabs on the ends so the cards can slide in and out of the pocket easily! Again, some of the cards have parts that flip up or out! You may have noticed on 3 of the cards there are pockets. I thought since this was to be a keepsake from traveling, you may want to have a place for some memorabilia. Creating the pockets was super easy. Lets start with the black card. To make the pocket, I took a piece of transparency (you can find these at office supplies stores) and cut it to 4 1/2x4 3/4. I cut a half circle at the "top" of one side. The reason I didn't cut it square is that you have a little more room to add things in and out. I added Tear N Tape to 3 sides and adhered to card. To make the pockets on the Balmy Blue and Mossy Meadow cards; 2- 3x6 Gussetted Cello Bags 2- small Velcro dots. Fold each bag, on the opened side, about 1"-1 1/4" down. Cut along the fold, be sure to leave 1 side still on (this is the closure to the pocket)SEE PICTURE 2 BELOW. Add the velcro dots. I then took a different color cardstock than the card base and cut it to the size of the pocket (you could skip this step and just adhere it right to the pocket. Some of the decorating throughout the album is from the Memories & More cards as well as a few stamped images from the Sailing Home Cling Stamp Set cut out with the Smooth Sailing Dies. The album is bound together by Binder Rings, you can find these at Walmart and other office supply store. The size you need will depend on how thick you made your album. I tied on some retired ribbon scraps to the binder rings to add a little more embellishment.
 Thank you so much for viewing my projects for the Stampin Friends June Summetime Blog Hop! I hope you liked what I made for you to share! PLEASE, leave a comment so I know you were here and I'd love to hear with you thought! Be sure to continue with the hop and visit on the list. If you missed a blog along the way you can see all the participant's blogs below! Thank you again for stopping by Happy Hoppin' and Happy Stampin' Steph Here is a list of all the bloggers for the Stampin Friends June Blog Hop
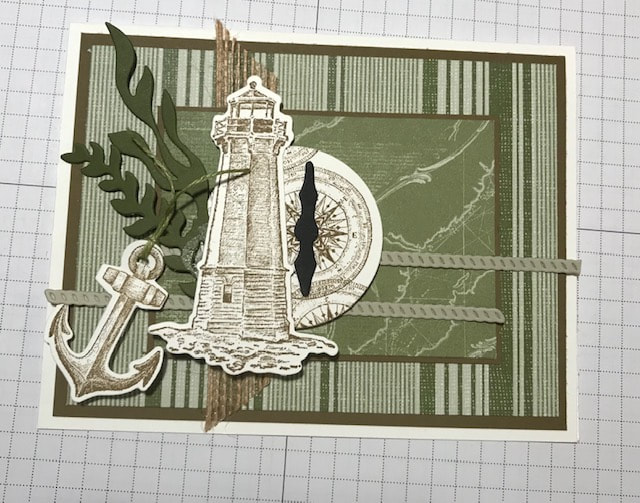
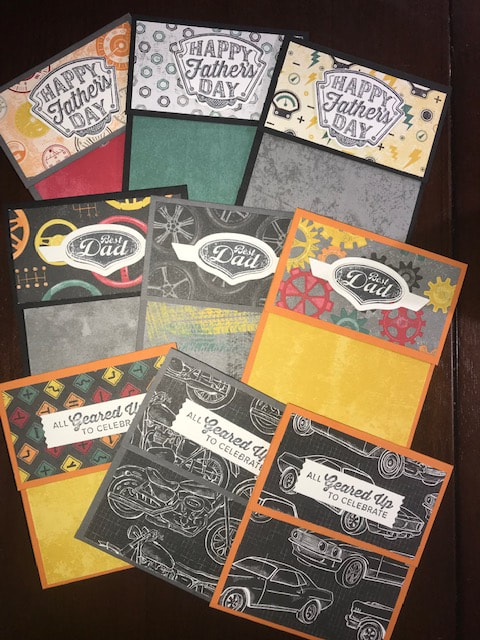
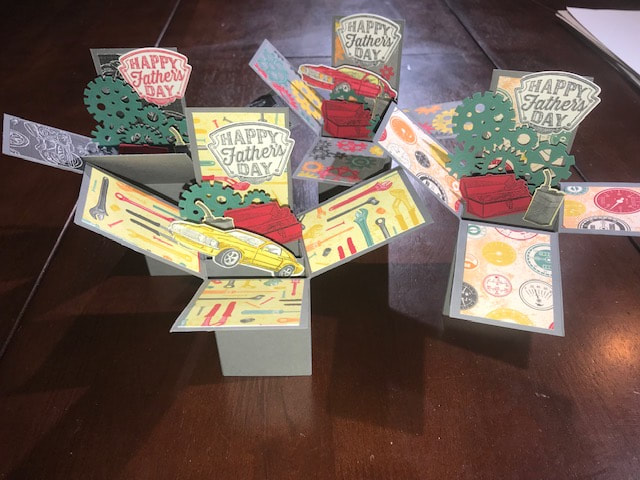
 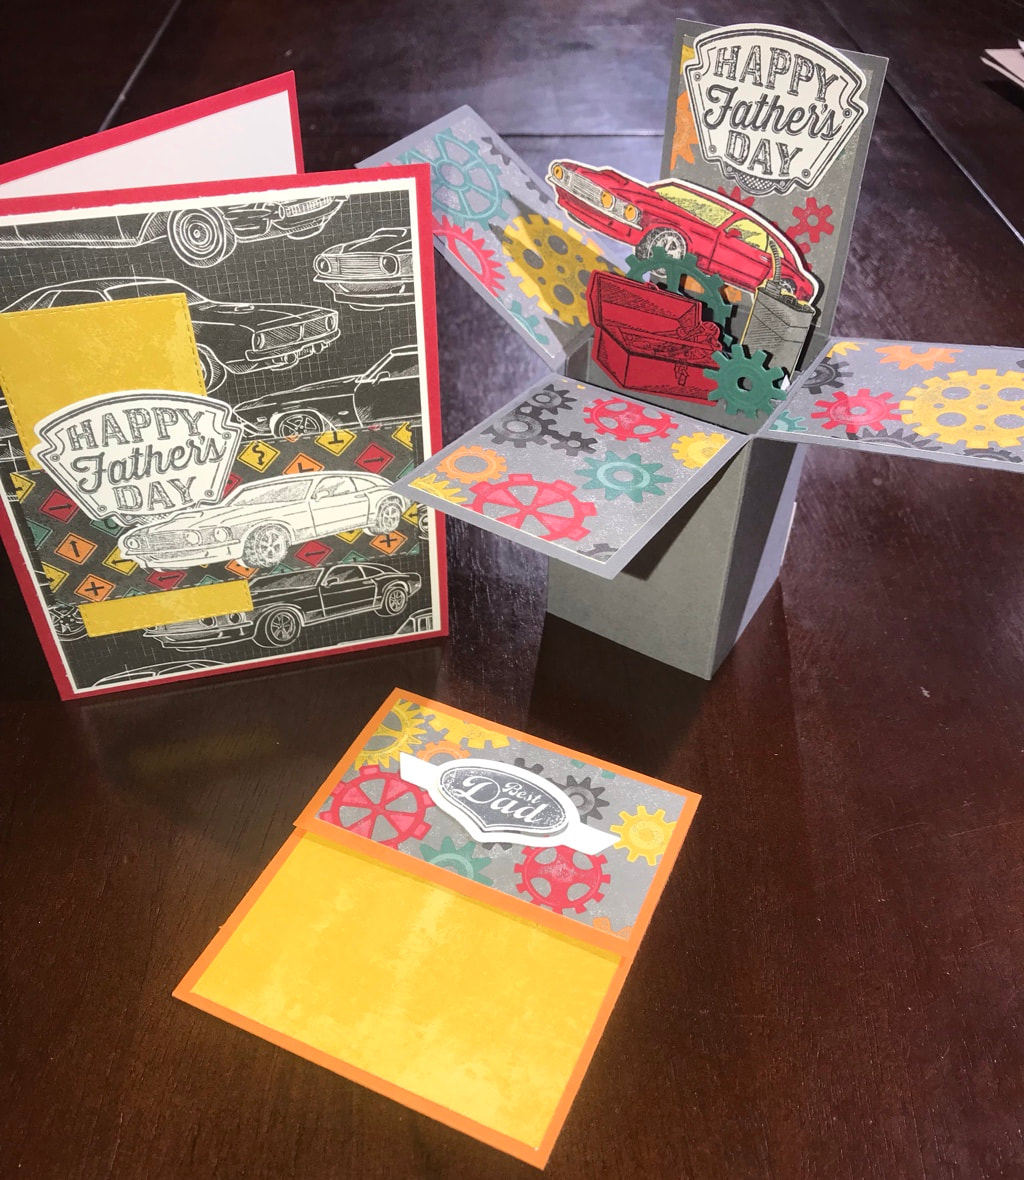 Welcome to our May Stampin Friends Blog Hop. This month hop showcases projects that feature Father’s Day. Be sure to check out all our wonderful crafters and their amazing projects. Did you come from Cheryl Taylor’s blog? Her projects were awesome! Be sure to continue to Barbara Welch's blog, you can click on her link at the end of my blog. I had fun preparing my projects for this month. I used all Stampin Up products. Primarily the Geared Up Garage Stamp Set, Geared Up Thinlits and DSP. The cardstock used is Basic Gray and Whisper White 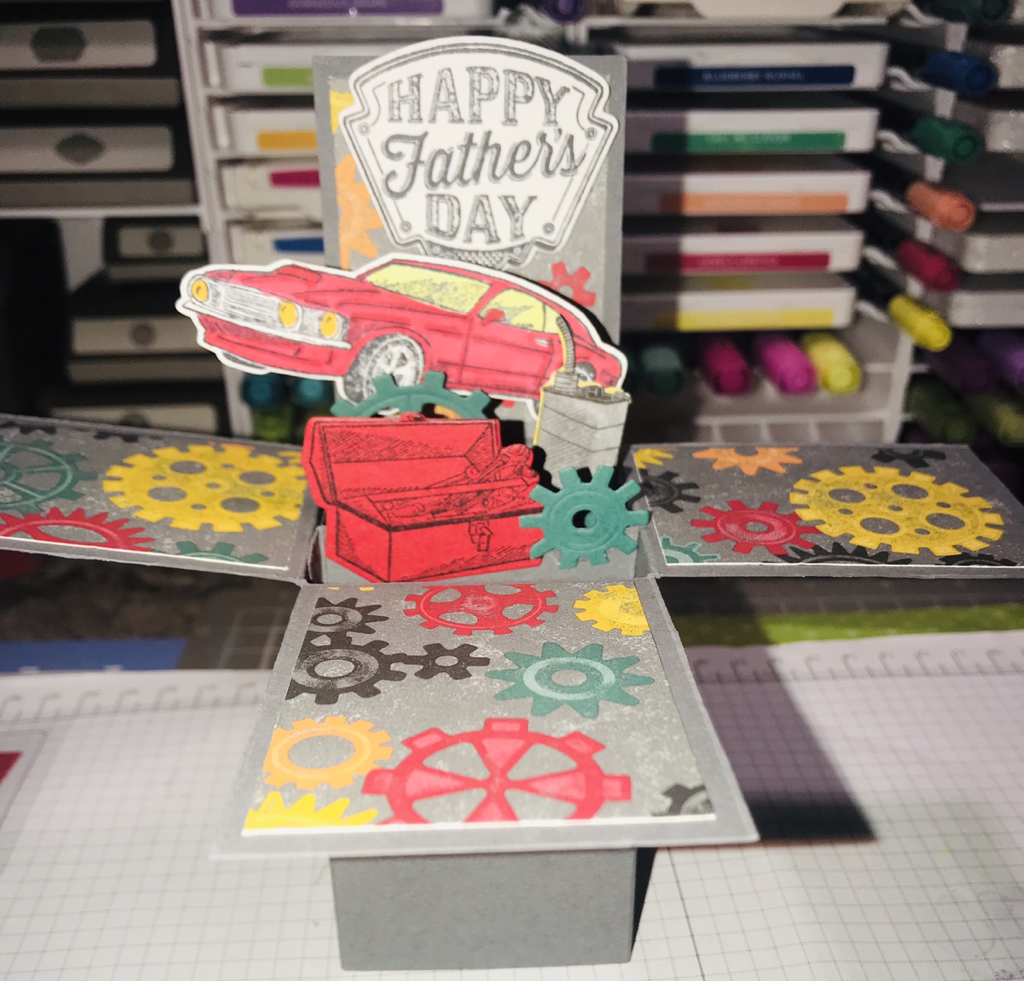 The first project I made in my set is a card in a box. I have always wanted to make one, and I finally sat down to give it a whirl! I did search Pinterest and found this video by The Serene Stamper. I found her tutorial very easy to follow! I am so pleased with how it came out and I know it will make an adorable display for the kids to give their dad. 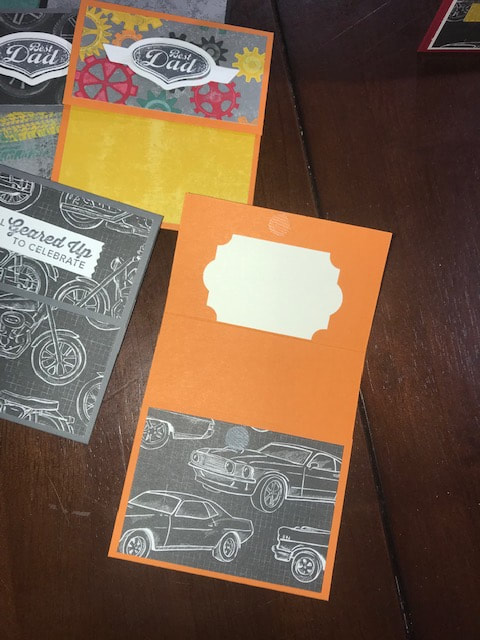 I then made this super easy gift card holder! It's the perfect compliment to the card in a box. Sometimes it's perfectly fine to give a gift card as a gift, when the person has all they need! So for this project, you need a piece of cardstock cut to 3 1/2" x 8 1/2". This is a great size too and you can make 3 gift card holders from 1 piece of Cardstock. On the 3 1/2" side, score at 2 1/2" on one end and 2" on other end. Round the corners if you want to give a more finished look. You will need 3 pieces of DSP, I just measure 1/4" less the front, bottom and back. I chose the shorter flap to be the top closer. Add tear n tape to the edges of the bottom flap to create a pocket. 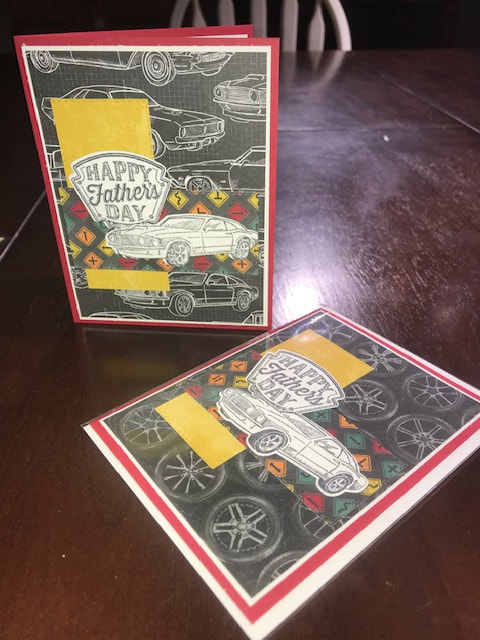 And for the last but not least is a card suitable for any dad!!! I used Real Red as the card base, and layered with Whisper White and DSP. I stamped the images in Black Momento Ink. I cut the out with the Thinlits. I decided to not color the images. I feel they popped more against the DSP. I hope you enjoyed the projects! Be sure to continue along the hop. Leave a comment and tell me what you think! 1 lucky person will receive the material to make all 3 projects!
Thanks so much Happy Stampin Steph  Welcome to our April Stampin Friends Blog Hop. This month hop showcases projects that feature Mother’s Day. Be sure to check out all our wonderful crafters and their amazing projects. Did you come from Cheryl Taylor’s blog? Wasn’t her projects wonderful. After viewing my projects you will want to visit Melissa Thomas' blog. Missed someone along the way?? At the end of my blog is a list of all participants, so be sure to select the next inline. You are at #7 Steph Jandrow. I am working on projects to sell at an upcoming Pop-Up shop for the spring. One of my focuses will be on Mother's Day! Sometimes it is tough when selling papercrafts, we have to be different and appealing for customers. I have always wanted to make tea box dispenser and the up coming shop will be perfect to display. You can search all over Pinterest and the internet to find all different instructions. This is super easy to make. 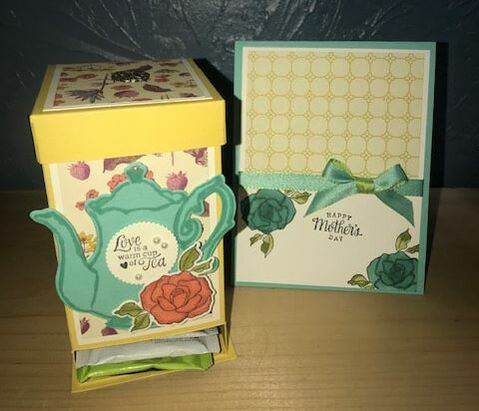 All products and supplies are Stampin Up! I used the Tea Room Specialty Designer Series Paper on page 188 of the current Annual Catalog. This paper is retiring and is now on the while supplies list. You will need a 12x12 piece of card stock cut to 6x12. I chose Daffodil Delight as the box base. I used the Tea Together Stamp set from the Occasions catalog and the matching framelits. ( this stamp set will be carrying over to the new 2019-2020 Annual catalog. How exciting!!! Using your Stampin Trimmer or Scoring Tool, and the 6" side of the paper at the top. Score at 1". Turn the paper so the 12" is now at the top and score at 3-1/16, 5-3/4, 8-13/16 and 11-1/2" So now we are going to trim, you have 5 sections that measure 3-1/16, 2-1/16, 3-1/16, 2-1/16 and 1/2". Chose the 2-1/16 *that falls in-between the 2-- 3-1/16, you need to score 3/4" above the 1" score line. Cut out the section once scored. Then, cut the 1" flap at the bottom of the 1/2" score line. Cut up to the 1" score line. For the lid you need a piece of cardstock that measures 4-1/4x4-5/8" Score at 3/4" on all 4 sides. Cut and assemble. This may sound a little confusing so I have added this link to Heidi Baks who goes into detail on YouTube on to make the dispenser. To make the panels, I just measure 1/4" smaller than the box and lid. And decorated with the Tea Together images. The dispenser holds a small box of tea! Adorable! 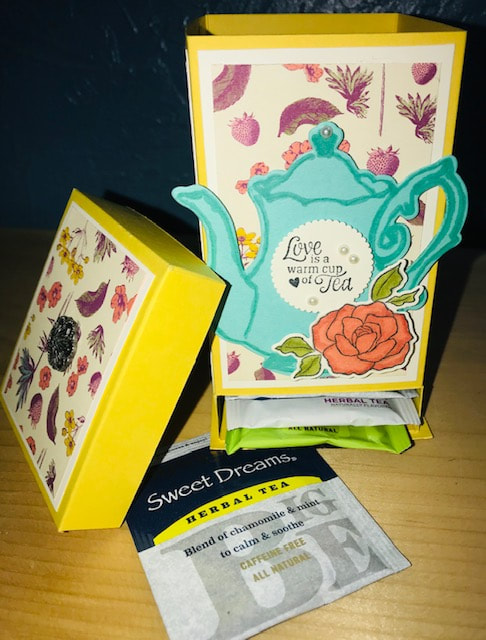 My card was nice and simple! My card base is Coastal Cabana. My first layer is Whisper White 4x5-1/4" and for the next layer, I used a piece of Designer Paper from the Tea Room pack that measures 3x3-3/4" I stamp flower and Mother's Day greeting, from the Tea Together set and colored the flowers in with Blends (I used Bermuda Bay and Old Olive), I also stamped the same images on Whisper White cardstock for the inside of the card. Before adhering to the card base, I added the Coastal Cabana/Granny Apple Green Reversible Ribbon and finished with a bow. At first I wasn't sure how the ribbon would look. But I was quite pleased! Very pretty in person!!! 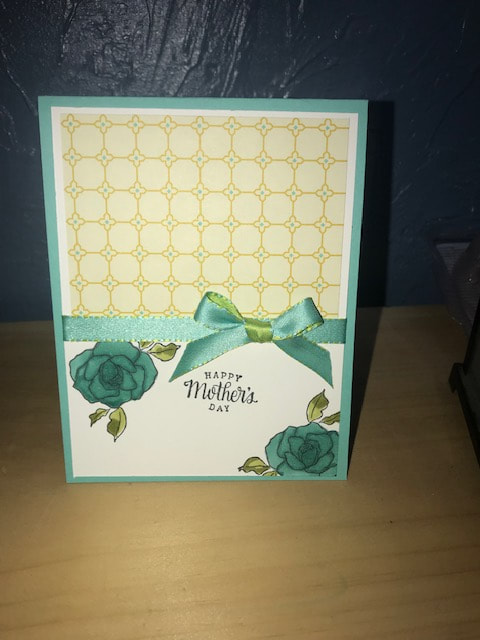 Thank you so much for joining this month's blog hop. I hope you like my projects and all the other projects you have seen! I hope you were inspired to create as well! Be sure to visit Melissa's blog next and continue on! Thanks for stopping by Happy Stampin Steph

Welcome to our Easter or Pastel Stampin Friends March 2019 Blog Hop!
Thank you for visiting my blog from Cheryl's site, thanks so much for continuing with the Blog Hop. Make sure to check out my blog and at the end click the Inlinkz button to continue with the hop. You will be able to view a list of all the hoppers! 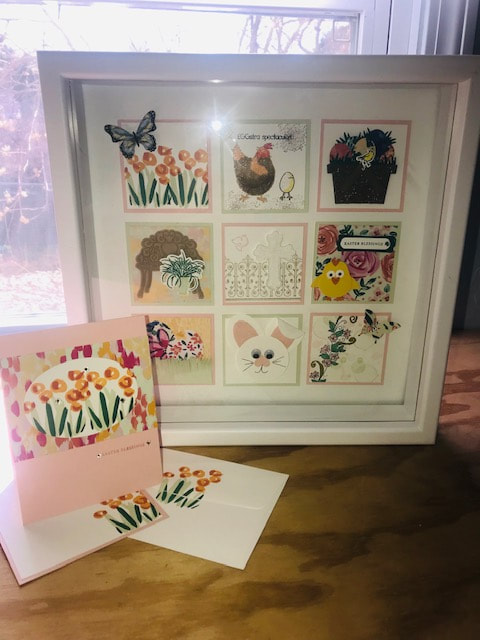
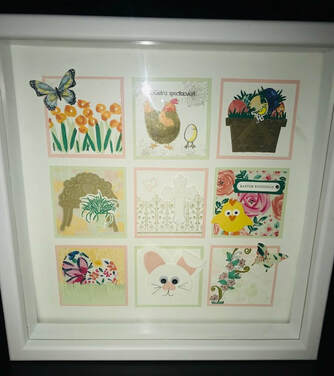
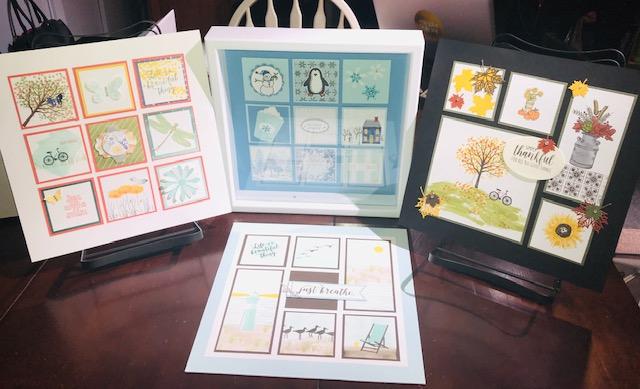
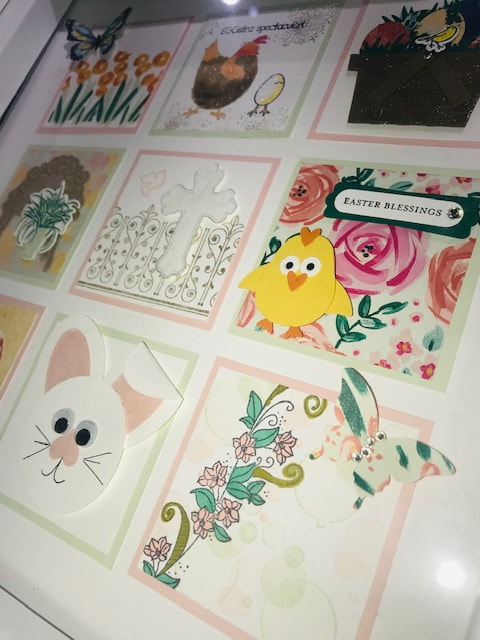
My original sampler displays the 4 seasons. I am currently working on 4 holidays. (Easter, 4th of July, Halloween, Christmas). The timing of the hop was perfect for me to finish and share my Easter Sampler. The products used are all Stampin Up and the shadow box frame can be found at Wal-mart under $10 also available in black.
Several stamp sets were used to make the sampler. Abstract Impressions, Beauty Abound, Sitting Pretty, Itty Bitty phrases, Picnic With You, Inspired Events and oops a couple that retired All God's Grace and Hey Chic. The DSP is Garden Impressions 6x6 paper stacks. The cardstock is Powder Pink and Soft Sea Foam. I used a 12x12 Whisper White cardstock and arranged squares evenly. The larger squares are 3x3 and then 2 3/4x 2 3/4. There are so many ideas for samplers on Pinterest. You can search to find designs that you like. My main focus was to make sure that Easter was the focus.. since I already have a spring sampler, I didn't want to make another. I am happy with the turnout! What do you think??
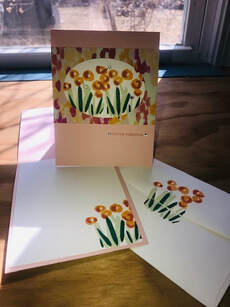
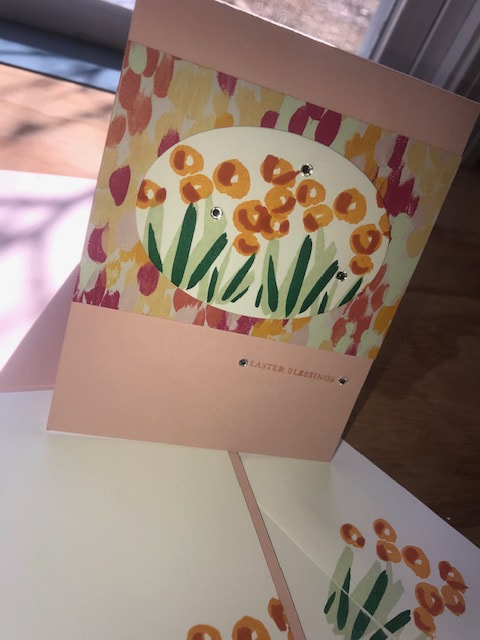
My next project for this hop is a card.
|

New 2023-2024 Stampin Up Annual Catalog


Kits Collection


Join today

Categories
All
Archives
January 2024
|


 RSS Feed